A Tale of Two Sheets (PC Sheet Investigation)
Pre-preamble: This is going to be a multi-post thread with several lengthy posts in a row as time progresses. Since we don't have a way to reserve and edit posts later, I'm going to ask that folks please refrain from commenting in *this* thread until it is complete. Instead, please post any discussion to the separate discussion thread, here: https://forum.prusa3d.com/forum/original-prusa-i3-mk3s-mk3-general-discussion-announcements-and-releases/a-tale-of-two-sheets-discussion-thread/ - I would like to keep the content here "clean" - I don't want people to have to trawl through multiple pages of comments and tangential discussions to find the post where the primary topic continues. -- Thanks!
Intro:
It was the best of printbeds, it was the worst of printbeds; it was the age of adhesion, it was the age of detached prints; it was the epoch of belief .... (yadda yadda... you get the idea, but read the rest of the opening paragraph since it's surprisingly relevant here).
I now hold in my hands two powder coated sheets. Brethren from Prague, reunited after being separated at birth. One is mine, purchased in May 2019. The other belongs to Bobstro, and is on loan for the purposes of this thread. Both are of the same batch, WA-15.
My sheet has always been fantastic - PLA, PETG, whatever. It sticks (well, excepting Sunlu PLA+ as of recently. But I don't count that because that stuff leaves an oily sheen on my smooth sheet, so it's clearly contaminated with something... the first roll-and-a-half stuck fine). I've done lithophanes on it that have remained attached for the full ~10h print (with brim, but that's needed even on smooth PEI). Bobstro, on the other hand, has not withheld his criticism and comments for issues he's had with his sheet.
What better than to do some proper science on these sheets, and see if we can figure out exactly why even two sheets from the same production run behave so differently. Hopefully, we will gain a better understanding of what's going on, and hopefully those that are less than satisfied with their coated sheets will have something they can take away from it to resolve their issues.
Chapter 1:
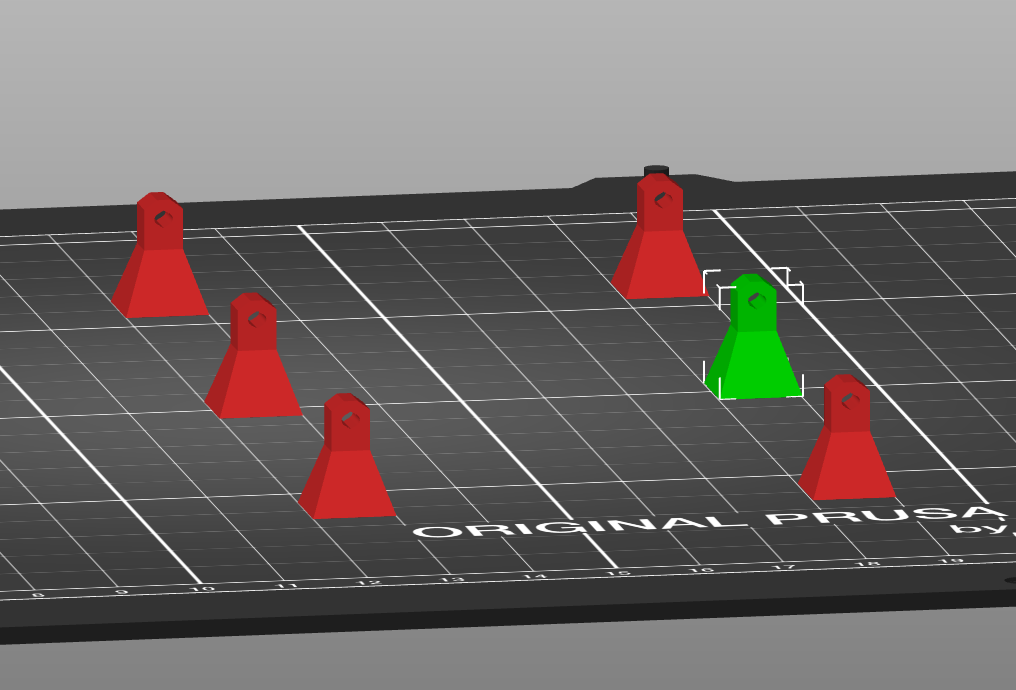
We need some way to measure the bed adhesion, and turn it into hard numbers. That will give some meaning and enable comparison as we continue with the experiment. I ended up making a small part to serve this purpose. It has a base that is 10x10mm, and a loop through which I can insert my spring force gauge, thereby allowing me to measure the amount of force required to remove a part from the bed.
Printing a 3x3 grid takes about 40 minutes.
Now, this is a bed *adhesion* test. We know the sheet will release the prints as it cools off, that is not the issue. The problem is that prints are not staying stuck to it while it is hot. Ergo, we will need to test removal force while the bed is still at temperature; I achieve this by not turning the bed off after the print for the duration of the removal test. Angle is also key here - for consistency I'm going to do my best to pull straight up instead of at an angle. The bed will not be removed from the printer during the test, as any flexing of the sheet could impact the measurements.
Coming up in Chapter 2: An introduction to the competitors!
(Ch. 2a) Ladies and Gentlemen! In the RED Corner...
Chapter 2A: Ladies and Gentlemen! In the RED Corner...
... we have Bobstro's sheet. Let's take a look at our contestant.
I present for your consideration, "Side A", our test side. Overall, looks to be in good health, but you can see some colour inconsistencies in the coating . It's hard to tell for sure whether this corresponds to a thickness difference. We'll take a closer look at the circled area in a bit.
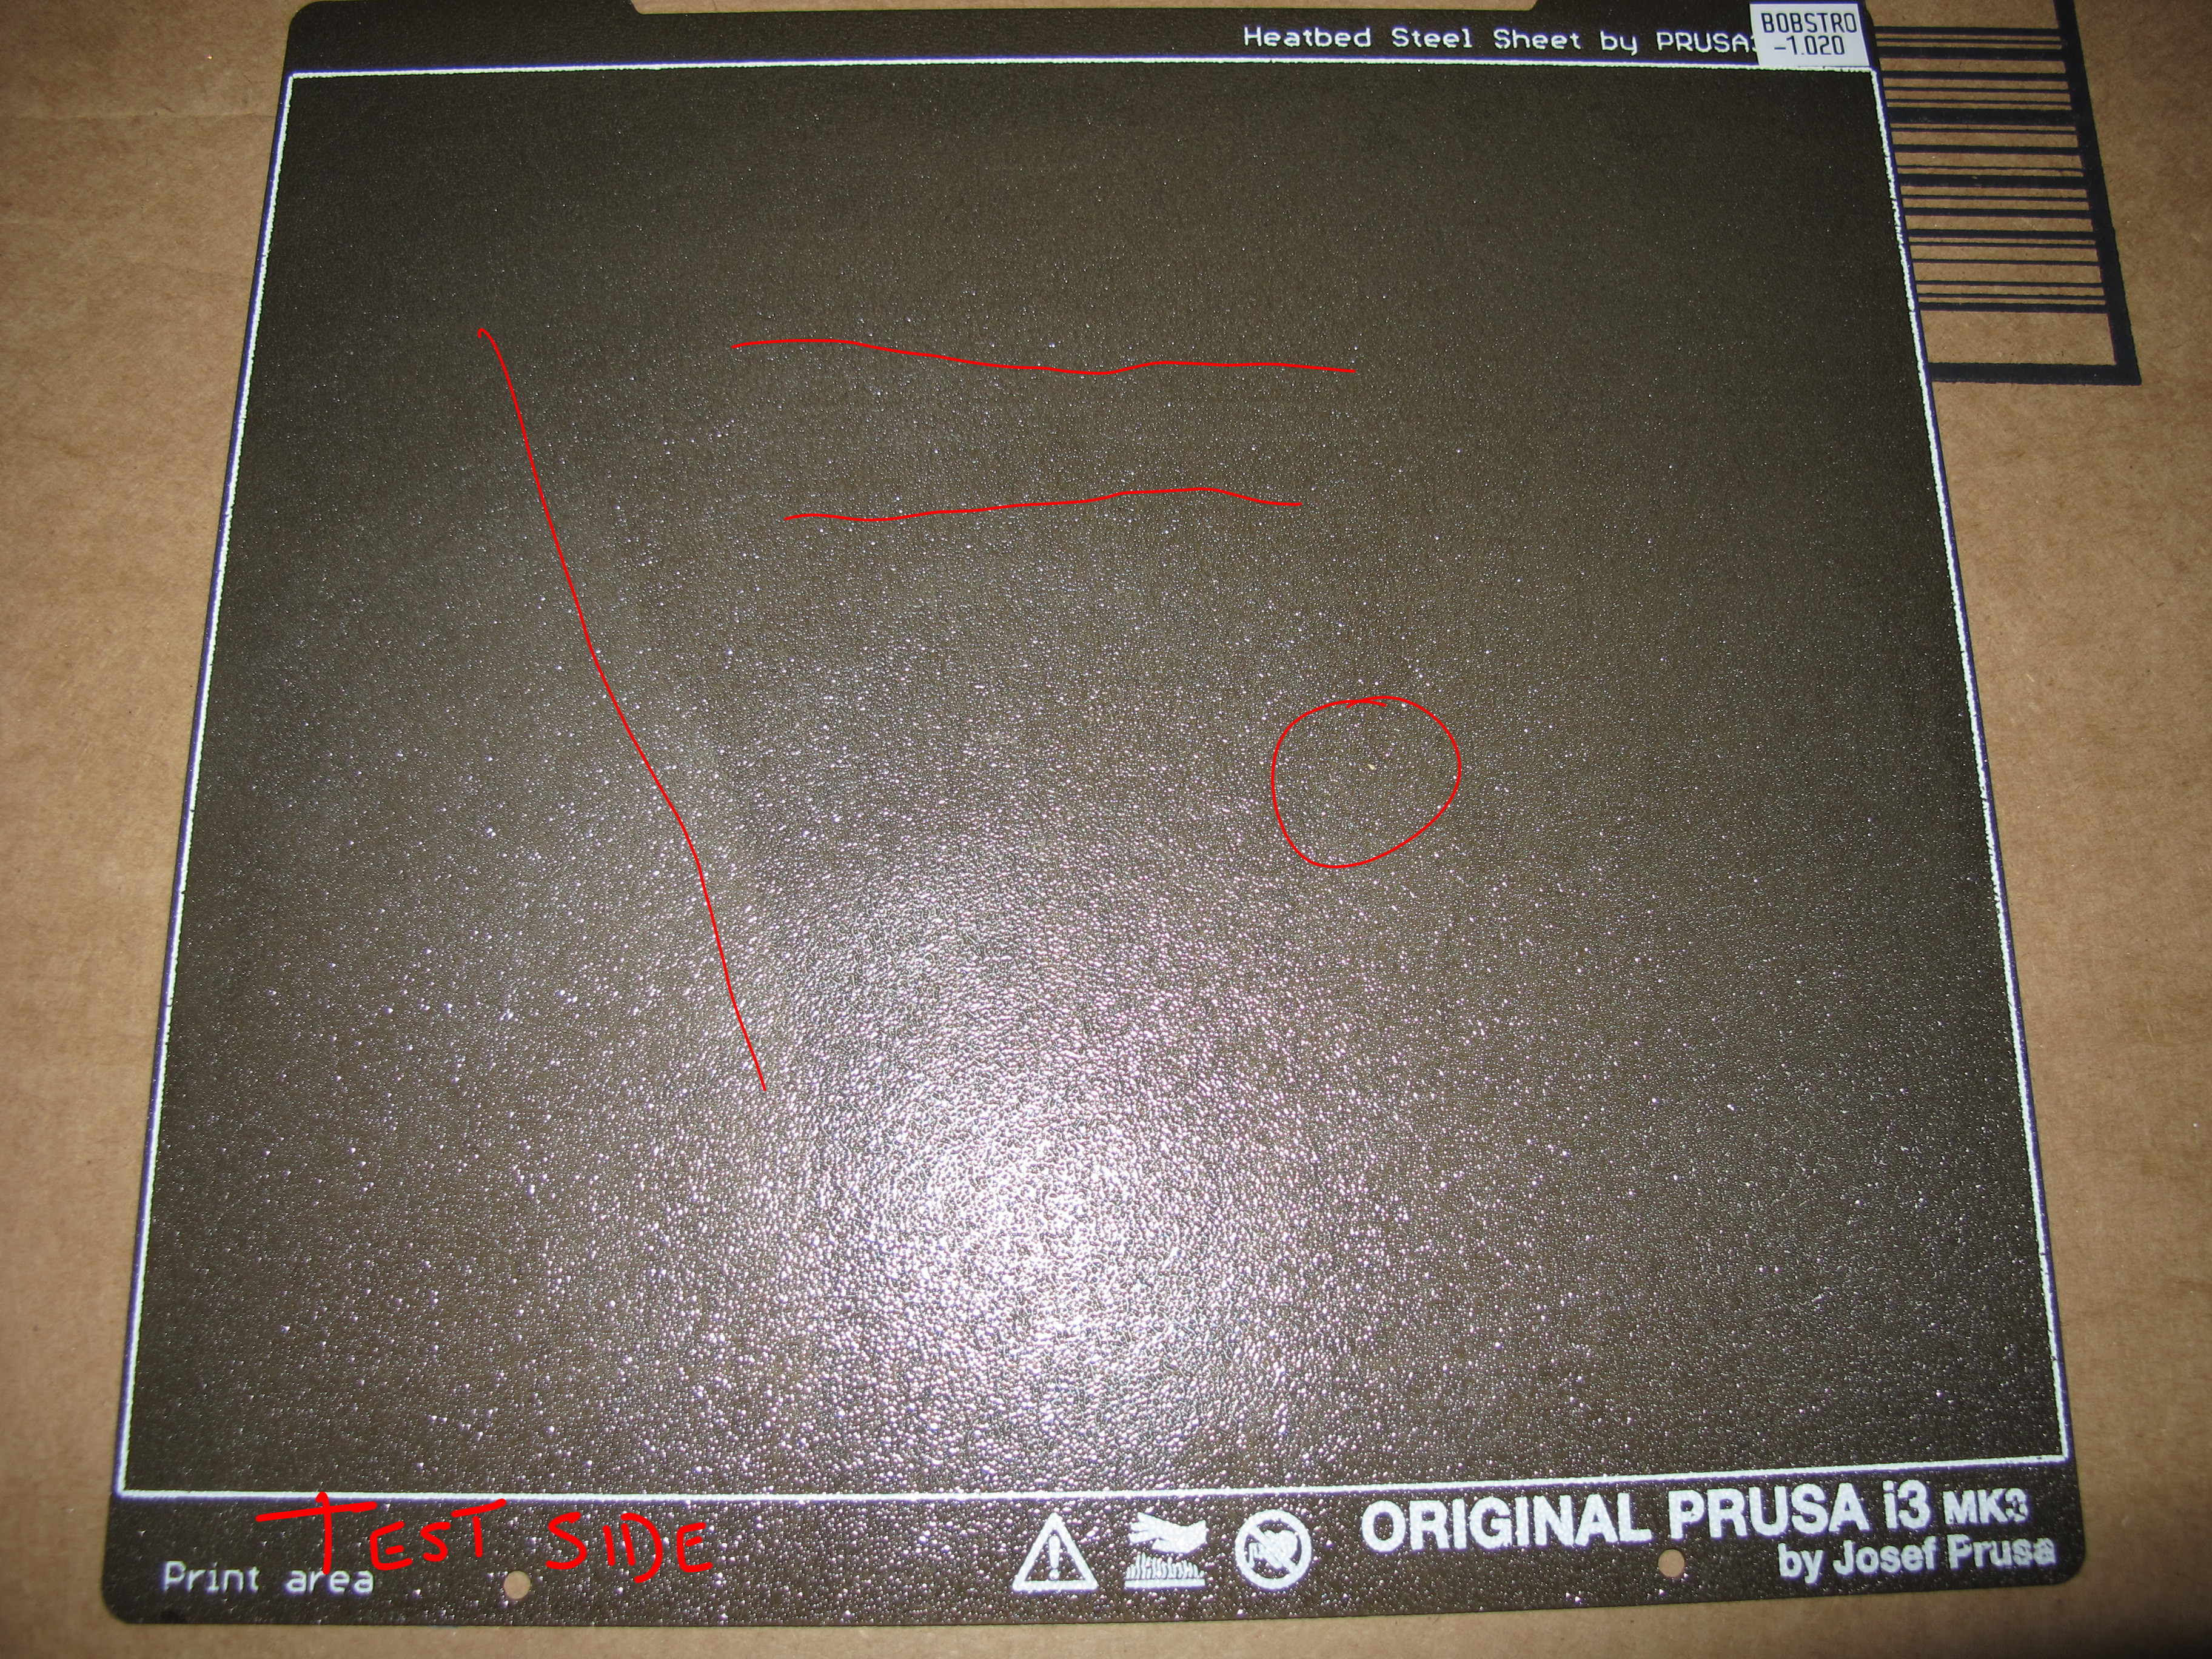
And here is the ... shall we say "well loved"...? side. You can see what looks like the outlines of a few previous prints. The lighting isn't great to capture it, but we'll get a better look later.

If you would, maestro...? Enhance!
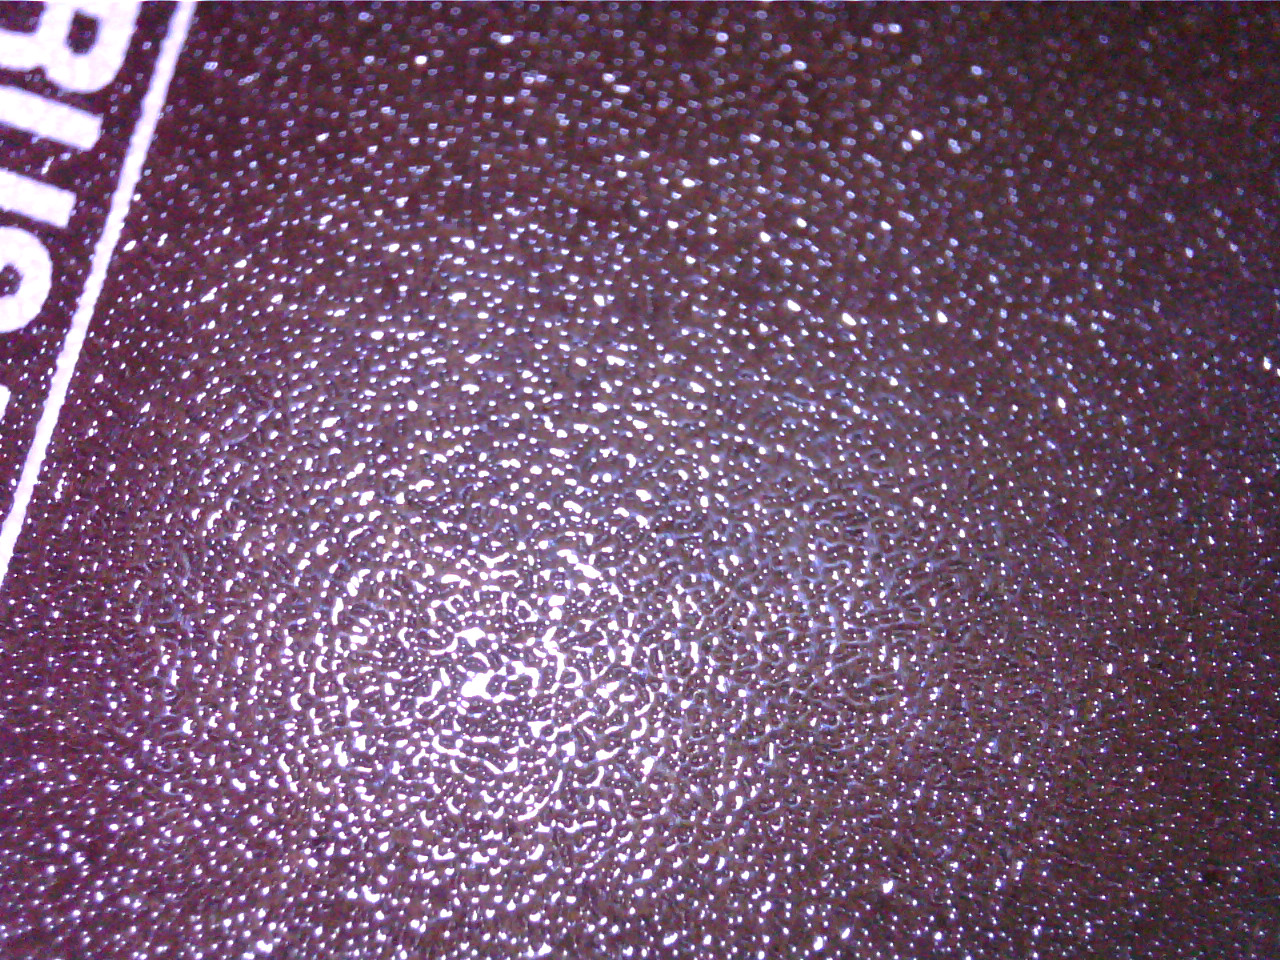
Looks pretty decent, still. Letters shown for better reference of texture size for this particular batch. Now, let's take a look at that circled area on the test side. (Hey, look! More print remnants!). At this level the surface is starting to look a little scuffed up. Seems fair, it's not a new sheet and they do wear over time.

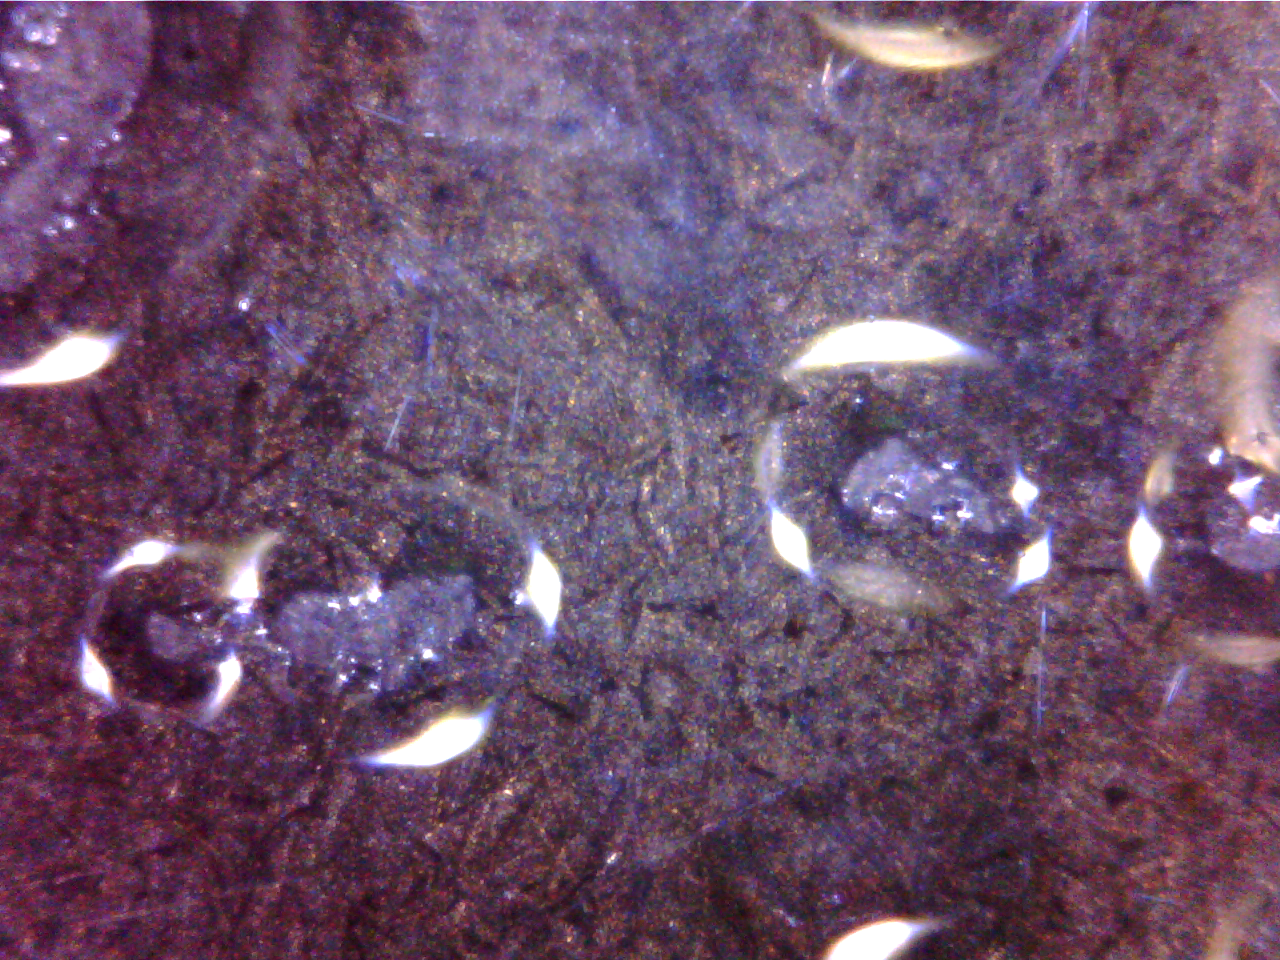
I think we can do better though... Let's bust out some CSI-level ENHANCE!
There are a few apparent things here - first, you can see what appear to be a fair amount of microscratches covering the coating. Second: The bottom of the textured pits... well, that's basically just the base steel sheet; there's no thin "priming" coat that covers the whole sheet.

Alright, one more for good measure. (Right, can we catch the perp from a reflection of his face in the head of a lug nut from that 480i CCTV still yet?) . Look closely at the light reflections surrounding those "scratches"... I'm pretty sure they're not scratches, but micro-fractures in the coating. I'd wager that this is why Prusa explicitly notes not to use acetone on the PC sheet. It's safer on the smooth sheet because thats not a brittle coating like this; it's got plasticeisers added to keep it flexible, so it'll survive a few scrub cycles until the acetone has leeched most of them away. At that point, it'll become brittle and start fracturing in a similar way. 
OK, that's about all I can get out of my USB 'scope. Let's flip the sheet over and take a look at those print outlines from the other side.

Notice that there are a lot more microfractures here... and chunks of coating missing entirely. That's just bare steel sheet at this point. Once the fracturing starts, it's basically a weak point that lifting and delamination can propagate from. I suspect the "strength" of the PC sheet is very much in the fact that normally, the PEI is one solid mass (albeit with some little holes scattered throughout) which lacks any real starting point for detachment. In the smooth sheet, the glue is the weak point. Seems like the real strength in powder coating would be a smooth sheet for that very reason - with the added benefit it'd be water tight, and you could actually give it a good scrubbing at the sink without fear.
Oh, and while we're on the topic... yes, there is a shot of some rust developing on the sheet.

BTW, iron expands as it rusts, so it's not going to help the situation - it's going to force the coating off the surrounding metal - so if you must wash, dry those sheets ASAP!
That concludes today's casual look at our first competitor!
Coming soon - Meet the heavyweight who's going to be battling for the title!
RE: A Tale of Two Sheets (PC Sheet Investigation)
Chapter 2B: In the BLUE corner....
My own sheet doesn't have any unusual features to show so I'll skip the macro shots unless you really would like to see them. It's seen medium use, as it's my go-to for most prints these days and I've had it for about three-quarters of a year now. That said, it's not entirely unscathed... there was a minor incident involving an unholy mixture of ABS contaminated with trace PETG that exacted its pound of flesh from me for being so foolish as to assume I'd purged all the PETG...you can see the outline of the print and the missing chunk of sheet.

Looking a little closer we can see a few scuffs and scratches here and there, but nothing on the level of the crazing observed on Bobstro's sheet. (I sometimes use a painter's multitool to bump parts off the sheet without touching it. I don't actively pry or jab at it, just use it to slide under and separate thin parts. For stuff that's larger it just comes off of its own accord when cool)
I've kept side B unused so far, mostly just an artefact of the sheet staying on the bed unless I need to flex it for part release. let's have a look at how that has fared:

Again, not a whole lot to see here, though there's a definite lack of any sort of scuffing/scratching.

I'm not quite sure what the deal is with that geometric-looking line/feather pattern that seems to exist under the surface. I see it on both sides of my sheet but not on Bobstro's (I took a second look at his sheet after seeing it on mine, but did not see it - might just be hard to get the light right, though it almost looks like crystallization of the coating. Interesting.
Coming up: Chapter 3 - Smooth sheet benchmark - putting some numbers to adhesion!
RE: A Tale of Two Sheets (PC Sheet Investigation)
Interlude: The Setup
We interrupt your regular post to bring you a brief message regarding the experimental setup. We'll return to the main feature shortly.
Here's the final test plate after printing. I've opted for a set of 9 in a 3x3 grid. The parts are no longer square to reduce variability from any corner lifting I'm also sticking to the center of the bed to reduce effects from the edges of the bed being a little cooler.

Measurements are taken pulling forward at 90 degrees to the bed, with the hook of the force gauge resting on the top of the part. (I previously tried pulling up but was getting less consistent numbers due to subtle variations in angle of pull; The more astute of you may notice there's no marker on the gauge; there's a small flag on the other side I'm using to record the maximum position and read it off after the part pops free.
Measurement error on the reading is probably give or take one graduation, which is 25g of force. I've dialled in the live z values so they look as consistent as possible between the sheets.

The STL is attached here:
And now, back to our regularly scheduled broadcast.
RE: A Tale of Two Sheets (PC Sheet Investigation)
Chapter 3: The Raw Numbers
Here's the moment you've been waiting for! After many prints and a bin full of these parts... I have numbers.
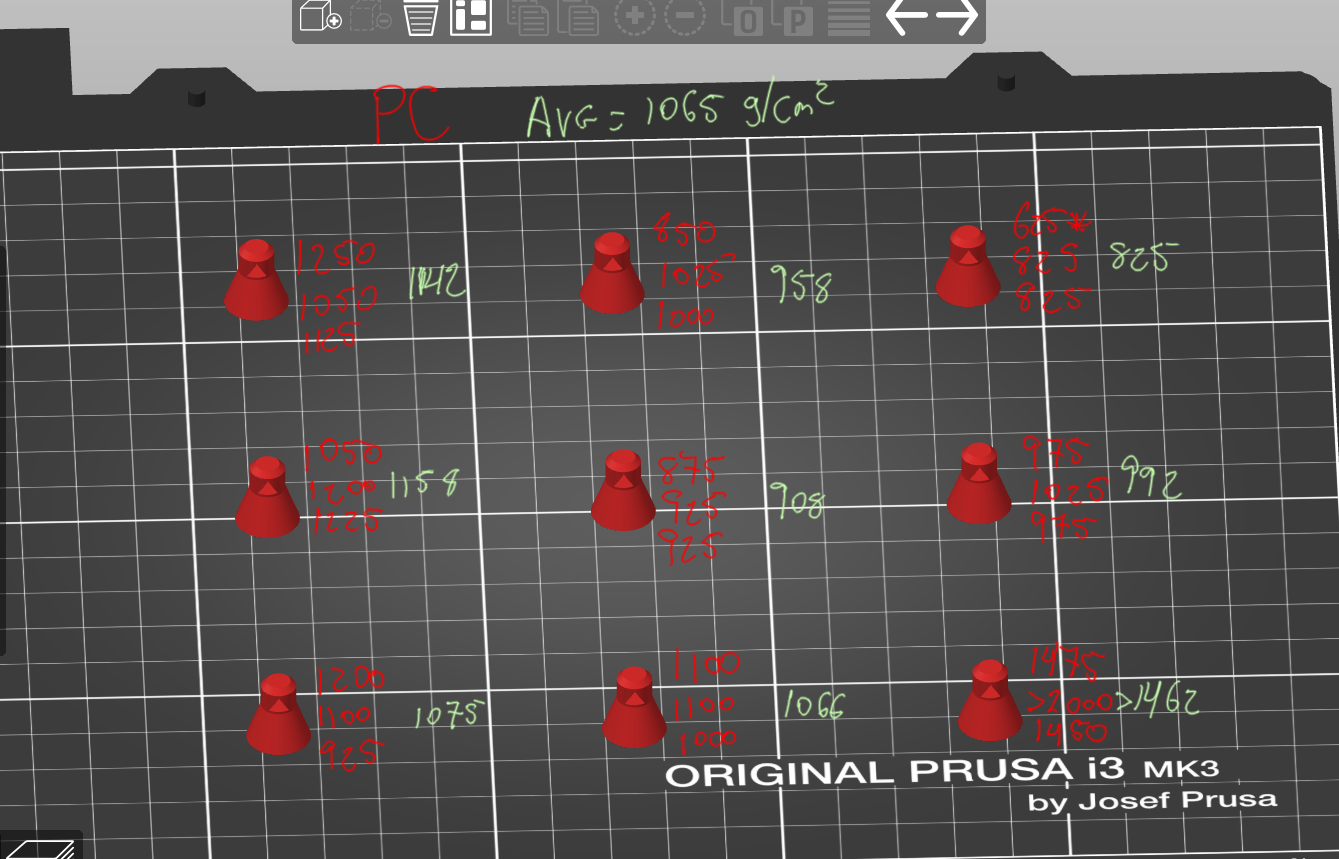
Each sheet was printed 3 times for measurement, and the values are recorded below for visual reference. Apologies for the handwriting; it was a lot faster to just draw this than meticulously edit text at each location in the image. Raw values are in red, averages for each point and the whole sheet (not sure how meaningful that is) in green.
Sheets were NOT cleaned between prints, and left on the bed to further reduce variability from run to run as much as possible.
First up: Smooth sheet, which averaged 733 grams of removal force per square cm of contact area.

My PC sheet, which averaged 1065 g/cm² (Note the starred number top right is likely invalid; I messed up during measurement so it's not included in the average.
Bobstro's sheet. Here there are two measurements I did not get because the flag caught on my sleeve and moved away from the correct value.

Early, surprising conclusions: I need to clean my smooth sheet (seriously). I did give all the sheets a good scrubbing at the sink before running this test, and live Z was not adjusted between runs on the same sheet to avoid an additional variable. But on average, it looks like adhesion ranking is as follows: PC -> Bobstro -> Smooth. My smooth sheet is somewhat well used and scuffed up, so it probably could do with the recommended once-in-a-while acteone treatment. At some point I'll also try side B for reference.
We can also see that the adhesion on Bobstro's sheet is also appreciably worse - My sheet regularly exceeds 1kg of removal force (with one point even exceeding my scale at 2 kg), but his manages about 800g.
Naturally this doesn't tell the whole picture - it's isolated points across the bed, so I do have some additional test plans coming up to look at the adhesion uniformity (think support structure first layer pattern)
Oh, and here are the raw numbers in a spreadsheet. Each block of 9 is one run, columns are sheets, each "block" row is one print. Averages are across the 3 points at the same location, as are the standard deviations. If someone's interested in doing detailed numerical/statistical analyses on these numbers,I'm happy to provide the original spreadsheet. STDEV likely isn't all that meaningful because there are so few sample points in each set, with fairly coarse resolution. But I suspect that even if I had a higher resolution scale with a digital readout and maximum feature, we'd still see this sort of variability either from variables that are not accounted for, or the manual nature of pulling the part off the sheet. I did my best to pull smoothly and forward, but a robotic jig might do a bit better, if I had the time to set that up...

I'll also note there are some interesting behaviours observed here - for example, the top right corner tends to the lower end of the range, whereas the front right seems to be towards the higher end. I did not think to do so at the time, but I suspect this may have a relation to MBL values. I have 7x7 MBL turned on, but I would not be surprised if locations with lower adhesion had the MBL calculation raising the Z a little higher as a result of a nearby bump, and areas with higher adhesion had a nearby low spot. When I next have some time I'll hook up a serial terminal and get some MBL values for the sheets to see if my theory holds water.
Coming up: full-surface adhesion tests!
RE: A Tale of Two Sheets (PC Sheet Investigation)
If nothing else, this emphasizes that there is variability among the PC sheets. I'm sure why there is such a discrepancy can be debated. I could argue that mine is only as good as it is because of the time and effort I put into it originally. Early on, it was a disaster.
Thanks for doing all this testing. It's nice to have something to point to for hard data.
RE: A Tale of Two Sheets (PC Sheet Investigation)
One more thing worth checking,, the difference between a hot sheet and a cold sheet.
With PETG and my sheet still at 90 Deg C when a print has finished, the grip is really good, allow the temperature to drop to 70 Deg C and the grip is noticeably less, allow it to cool to ambient and most of the time the part has completely come away.
So the most important temperature is printing temperature, so are you doing these pull tests with the sheet still at printed bed temperature?, and what variability does temperature have on adhesion?.
Sorry if you're already doing this.
Normal people believe that if it is not broke, do not fix it. Engineers believe that if it is not broke, it does not have enough features yet.
RE: A Tale of Two Sheets (PC Sheet Investigation)
Now, this is a bed *adhesion* test. We know the sheet will release the prints as it cools off, that is not the issue. The problem is that prints are not staying stuck to it while it is hot. Ergo, we will need to test removal force while the bed is still at temperature; I achieve this by not turning the bed off after the print for the duration of the removal test.
All tests were run at 60C.
I have one set of numbers of my own sheet at 50C instead of 60. This was with the prior vertical pull tests when the very first part didn't budge at over 2000g of force. I can't draw any definite conclusions from it but they look to be anywhere from 25-400 grams less. Temperature is one of the things I'm going to be testing in an effort to see what I can do to increase the adhesion on Bobstro's sheet.
RE: A Tale of Two Sheets (PC Sheet Investigation)
Chapter 3A: Temperature vs Adhesion
I decided to do a quick test on the impact of bed temperature vs part adhesion.
This test was run using Bobstro's sheet, with a small set of 4 parts in the center of the bed, to minimize the impact of any edge cooling.
They're very close to also minimize any surface and Z MBL differences.

The results were rather interesting. The sheet seems *incredibly* sensitive to minor temperature differences - adhesion that appears to outperform my own (60C) sheet measurements at 70C, and failure at only 55C (skirt failed to adhere to the bed, parts still completed.)
Numbers and a chart:

Again, sheet was not cleaned between runs, and sheet was not removed between runs either. Note the margin to failure is only around 5 degrees if running at the recommended 60C for PLA - so any drafts, surface cooling, etc are going to have severe impact if it takes the bed surface temperature even a small amount lower. Edges of the bed are going to be even worse. Heck, even your part cooling fan is working against you here for very small, thin parts.
Alas I don't have any means to get a surface measurement of the *actual* bed temperature. I only have contact thermometers, and not very great ones at that. Thermal camera or IR sensor would be needed.
RE: A Tale of Two Sheets (PC Sheet Investigation)
back when shane was still here and i had printed for 18 months on the smooth (before the textured was available) and lots of prints i could not get any more adherence with ipa, soap and water or even acetone. To the point where PLA prints would warp bad abs.
So i happened to chat with shane and he suggested to get a scotch bright scour pad and very lightly scour the surface. I did that, just lightly haze the surface and viola, prints would stick like it was brand new. Eventually I replaced the PEI sheets, however I would NEVER do that again. It was the actual worst and most expensive replacement surface I have had.
I have since purchased several other plates, 2 prusa (yellow and white lettering) and 3 Thekkiinngg, v2,v3, and v4 for quite a while I have been printing on either a v3 the king or white text prusa.
I started having adhesion problems with Thekkiinngg v3 and you cannot use acetone on it. IPA made zero difference, and the plate has a chunk out of it on one side due to a flaw in the plate, but i just print around it since it is close to an edge. So i thought, lets give it a try, got the scotchpad out and very lightly i scrubbed until it was slightly hazy instead of shiny. The adherence was amazing. even abs does not release easily and while it may warp on a larger print, it will warp the plate rather than pull away.
So take this with a grain of salt, do not try this at home, do not take my advice unless you are ready for consequences, your mileage may vary, these statements have not been evaluated by a trained dr.
but if you have a plate that is not responding to anything else you could try, and if it doesn't work, then you did it wrong. remember lightly don't pull the coating off, just lightly scuff it.
RE: A Tale of Two Sheets (PC Sheet Investigation)
Very interesting! What type of scale is that?
--------------------
Chuck H
3D Printer Review Blog
RE: A Tale of Two Sheets (PC Sheet Investigation)
It's just a simple mechanical weight gauge, measures how many grams of weight is pulling/pushing on the metal arm.
RE: A Tale of Two Sheets (PC Sheet Investigation)
@vintagepc
It looks a lot like a fishing scale.
--------------------
Chuck H
3D Printer Review Blog