What am I doing wrong?
I've created a model, imported the stl into slicer, and I can't get past the brim. It sticks, but there's a small nest of pla after several runs around the brim. I'm new to this, but I have had success with printing before this. I've got the gcode and stl files attached if that helps.
I printed the part without a brim, and after several failed starts, I got almost all of the first part of the print working until the four corners warped up and caught the nozzle. Therefore I am trying a brim.
I don't know what to do to fix this. I've got the printer set on pla. I've cleaned the surface. I'm using the glue stick, and it isn't helping.
gcode
Here's the gcode file
RE: Live-Z and/or bed cleaning most likely
This sounds like a bed adhesion issue, likely caused by your Live-Z being too high (not negative enough) and/or your print surface being dirty. Of your 1st layer print and print surface.
-
Part warping or lifting along edges.
-
Bumping or knocking noises as the part moves under the nozzle.
-
Uneven vertical surfaces and bulges caused by print lifting and compression of overlying layers.
-
Spaghetti resulting from parts moving during printing.
-
The dreaded "blob of doom" caused by the part lifting and sticking to the nozzle as it extrudes filament.
-
A dirty PEI print surface. Even if you don't think this is the cause, it's always a good idea to make sure your PEI surface is clean before trying any other fixes. If it's a smooth PEI sheet, take it to the kitchen sink and give it a good dunk with Dawn (original formula, no vinegar or hand softener variants) dishwashing soap or your local equivalent (e.g. Fairy in UK). Use a clean paper towel to clean it off, and another to dry it. Avoid using any sponge or cloth that has been in contact with grease. Above all else, avoid touching the PEI print surface. Once it's good and clean, you should be able to use 91%+ isopropyl alcohol between prints, 100% acetone when that fails , and another dunk when acetone fails. Worst-case, use a 3M 7445 ScotchBrite (1200-1500 grit) pad or equivalent on smooth PEI to give it a very light buff, but only infrequently. If you've got a textured powder-coated PEI print surface, the official instructions are to use 91%+ isopropyl alcohol on it only. Rumors persist that some have had good luck getting started with these sheets by giving them a wipe with 100% acetone and a dunk with Dawn. Either way, there's no real warranty on these sheets. YMMV.
-
Improper Live-Z adjustment. If you have not already done so, try usingexitadmiinfor calibrating your Live-Z setting. It is much easier to use and understand than the onboard routine and much easier to make mid-print adjustments accurately with. In general, start high (less negative) and work lower (more negative) in large increments (e.g. 0.1mm) until the filament starts to stick on its own. When you've got your Live-Z setting adjusted properly, you should be able to gently rub the extruded lines on the PEI surface without dislodging them. Then start lowering (more negative) the level until there are no gaps between layers. You should not be able to peel the lines apart after printing, but the top should be regular.
RE: Jeff Jordan's "Life Adjust" procedure link
Text got mangled...
Reply
First I want to thank you for your reply. I'm totally lost with this stuff. I have a machine shop, so I can't be too lame. Yet I have to admit, I just can't make sense of what to do next. I opened the Life Z page, downloaded the zip file (one of them), and see a list of things like measurement files. 1mm, etc. What do I do? Can you give me a file to print? Are the mm files supposed to correspond to filament diameter? Help. I just spent a day doing this.
RE: Go slow and be patient. 1st time's the hardest.
First I want to thank you for your reply. I'm totally lost with this stuff. I have a machine shop, so I can't be too lame. Yet I have to admit, I just can't make sense of what to do next. I opened the Life Z page, downloaded the zip file (one of them), and see a list of things like measurement files. 1mm, etc. What do I do? Can you give me a file to print? Are the mm files supposed to correspond to filament diameter? Help. I just spent a day doing this.
No worries. That thread has grown a bit and can be hard to follow. Here's an alternate approach to get you started:
- Start printing the Prusa logo print.
- As the 1st layer is printing (the rectangle), press the menu button and start adjusting Live-Z.
- If the filament is wiggling around or is only laying down loosely, lower (make more negative) Live-Z in increments of 0.04-0.06 steadily until it starts to stick.
- Once it starts to stick, continue lowering (making more negative) in 0.02mm increments.
Stop the print after the 1st layer is done and repeat as necessary. Any largeish flat print will work. The "Life Adjust" print is just convenient.
At some point, you should notice the extrusions becoming more consistent and the gaps between lines closing up. At that point, you're just about there. Make small adjustments up and down until you find the sweet spot where the top layer is even and extrusions stay planted on the PEI print surface when you poke them gently.
Hopefully, that's a bit more clear. If you can, take some pictures and post them here (drag into the text edit box) so we can make final tuning suggestions. It's a bit like cooking: Hard to describe exactly, but you get a feel for it.
Definite problem here
I'm using the first layer adjustment, which I assume is similar to what you suggested. It's easy to see that this isn't what I had when I built the printer. It was a nice layer. So I am turning the z axis down by -0.04mm. It didn't seem to affect a thing. Am I doing this right?
Also, rather than the link you sent, can't I just model a single filament, and print it? I'm assuming that's' what the Life z adjust is. Because it's a whole lot easier for me to do that than to try and find out where that calibration link is.
I really appreciate the help. I would be lost without it.
How's this?
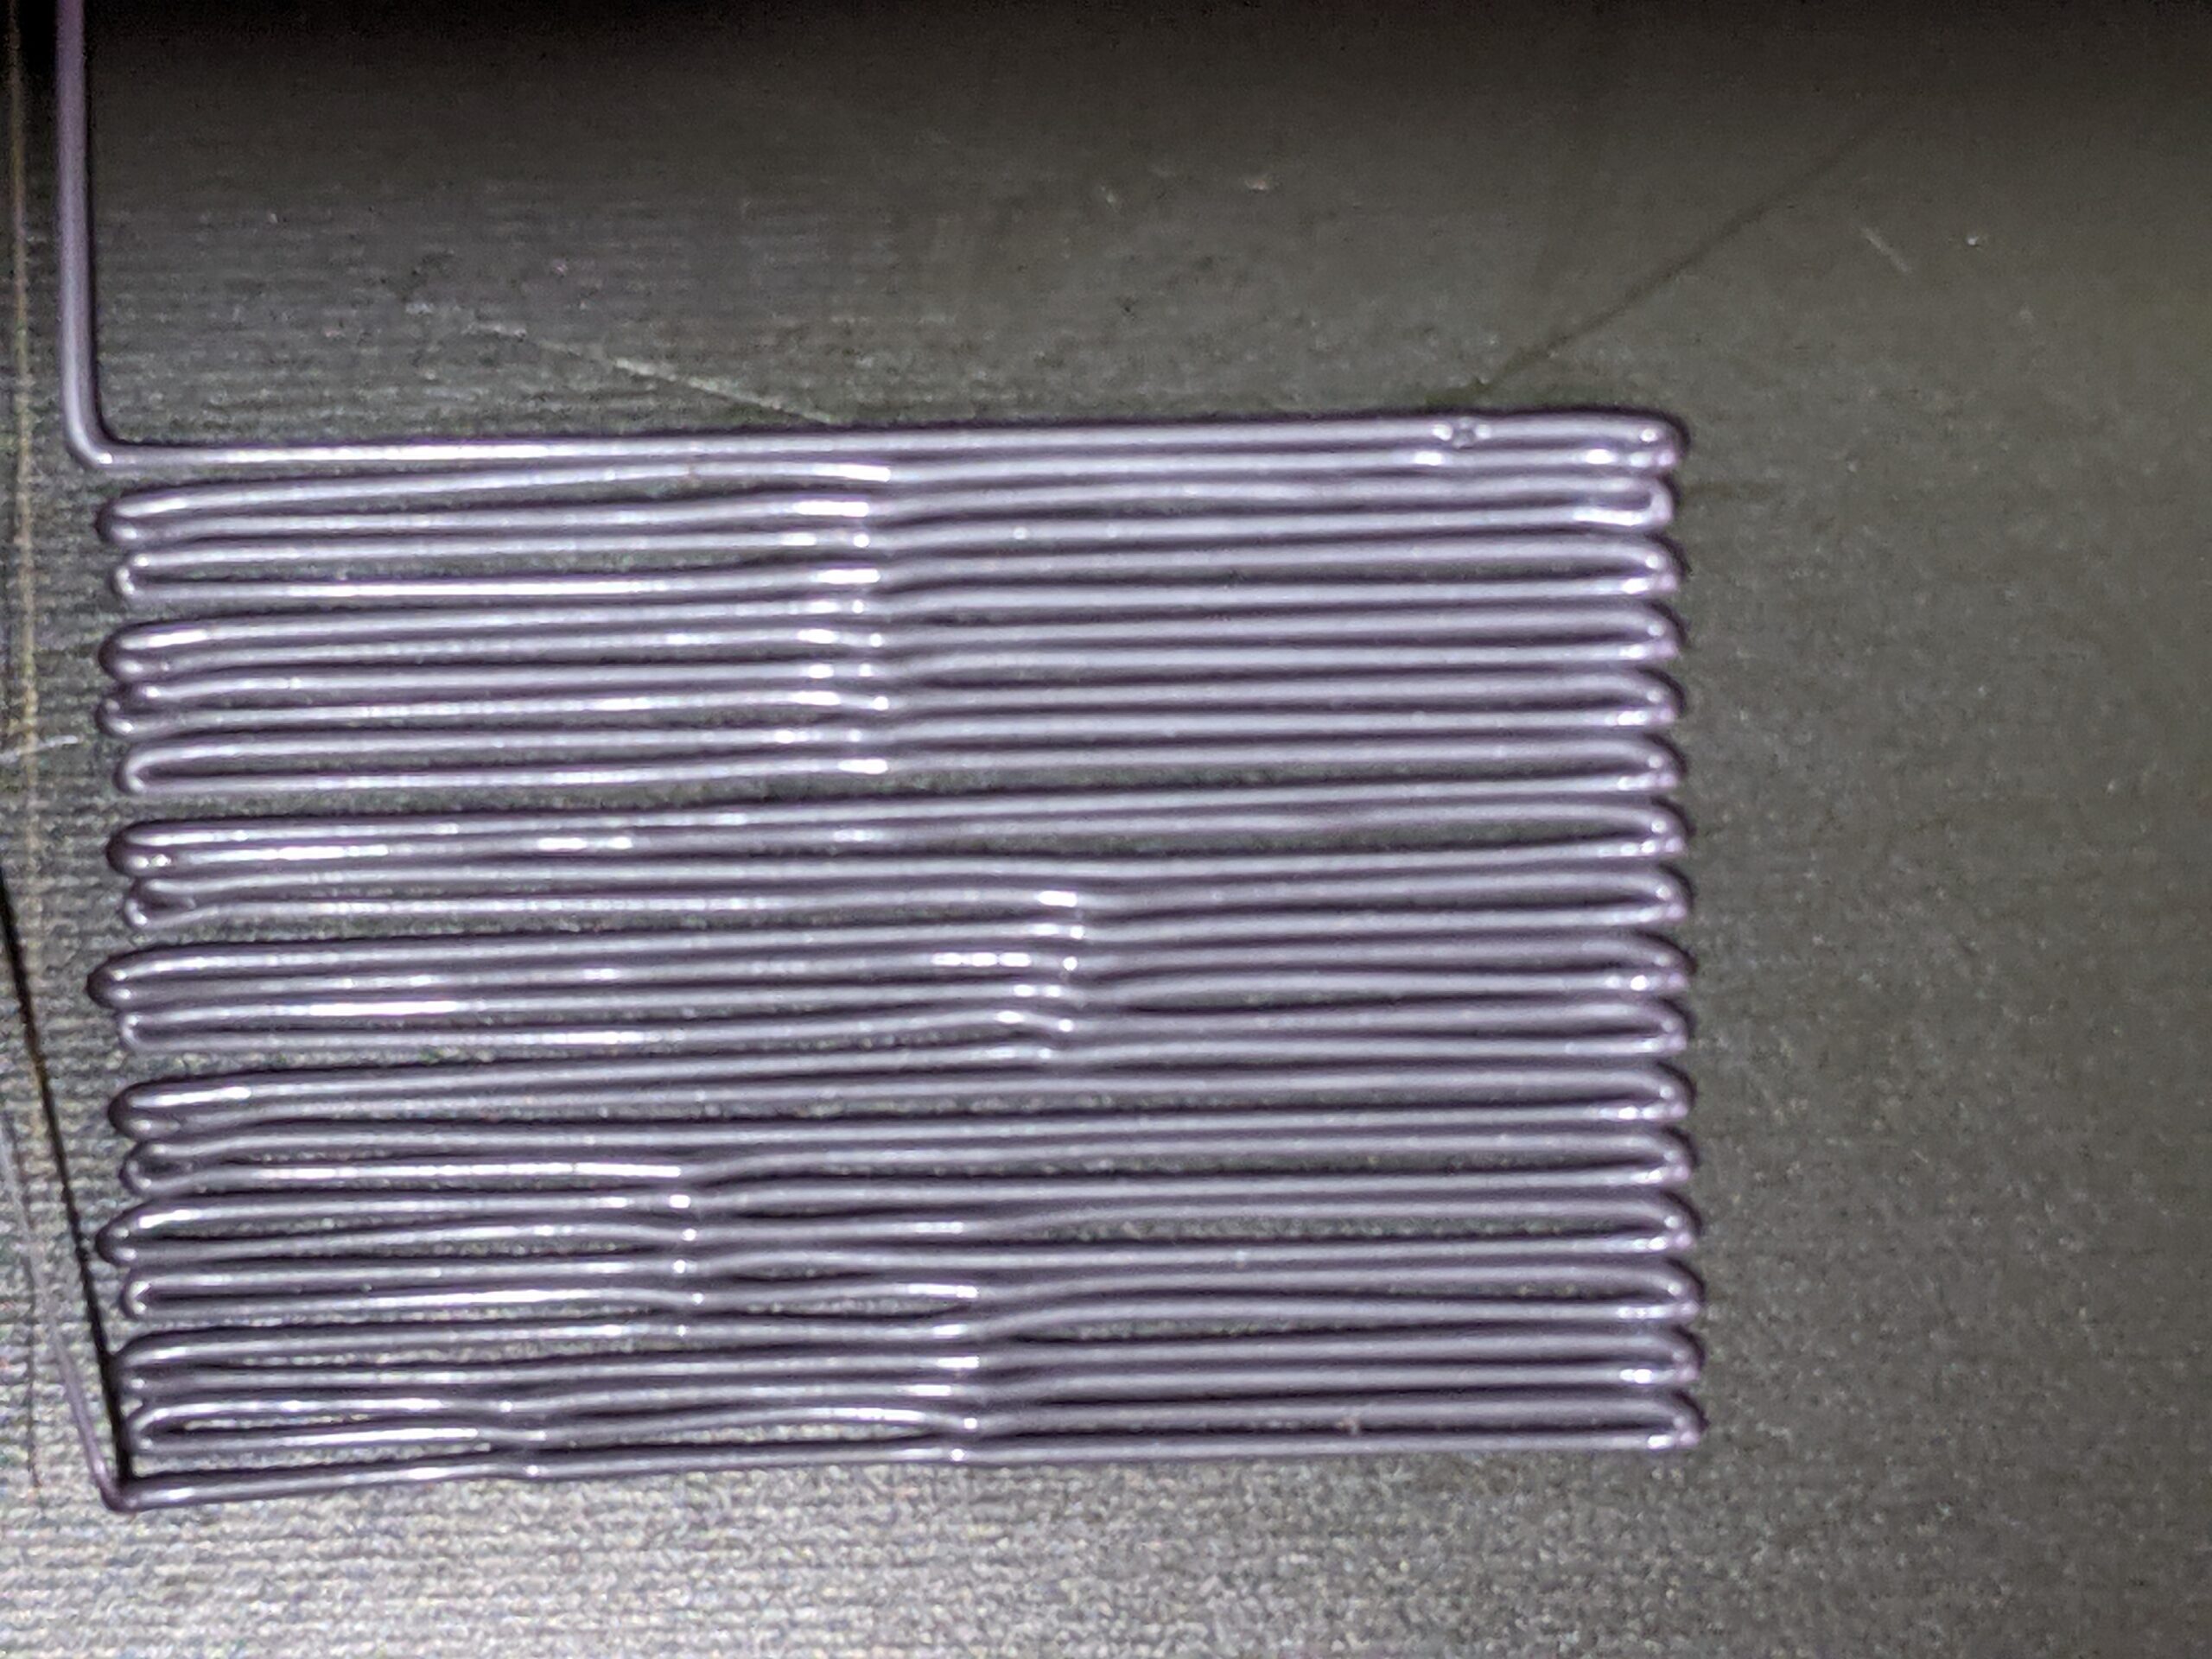
I've made progress. I had to drop a lot. Have I gone too far?

Looks good!
I've made progress. I had to drop a lot. Have I gone too far?
Not at all. That looks very good. Print a large-ish shape (the Prusa logo is perfect) and send a pic of the underside. Congrats!
I'm still having trouble
I started to print my part again, and here's what happened. The brim printed good, although not squashed like the above photo for some reason. Then when it prints the squares it died. The platen is spotless. In fact, the live z cal was hard to get off.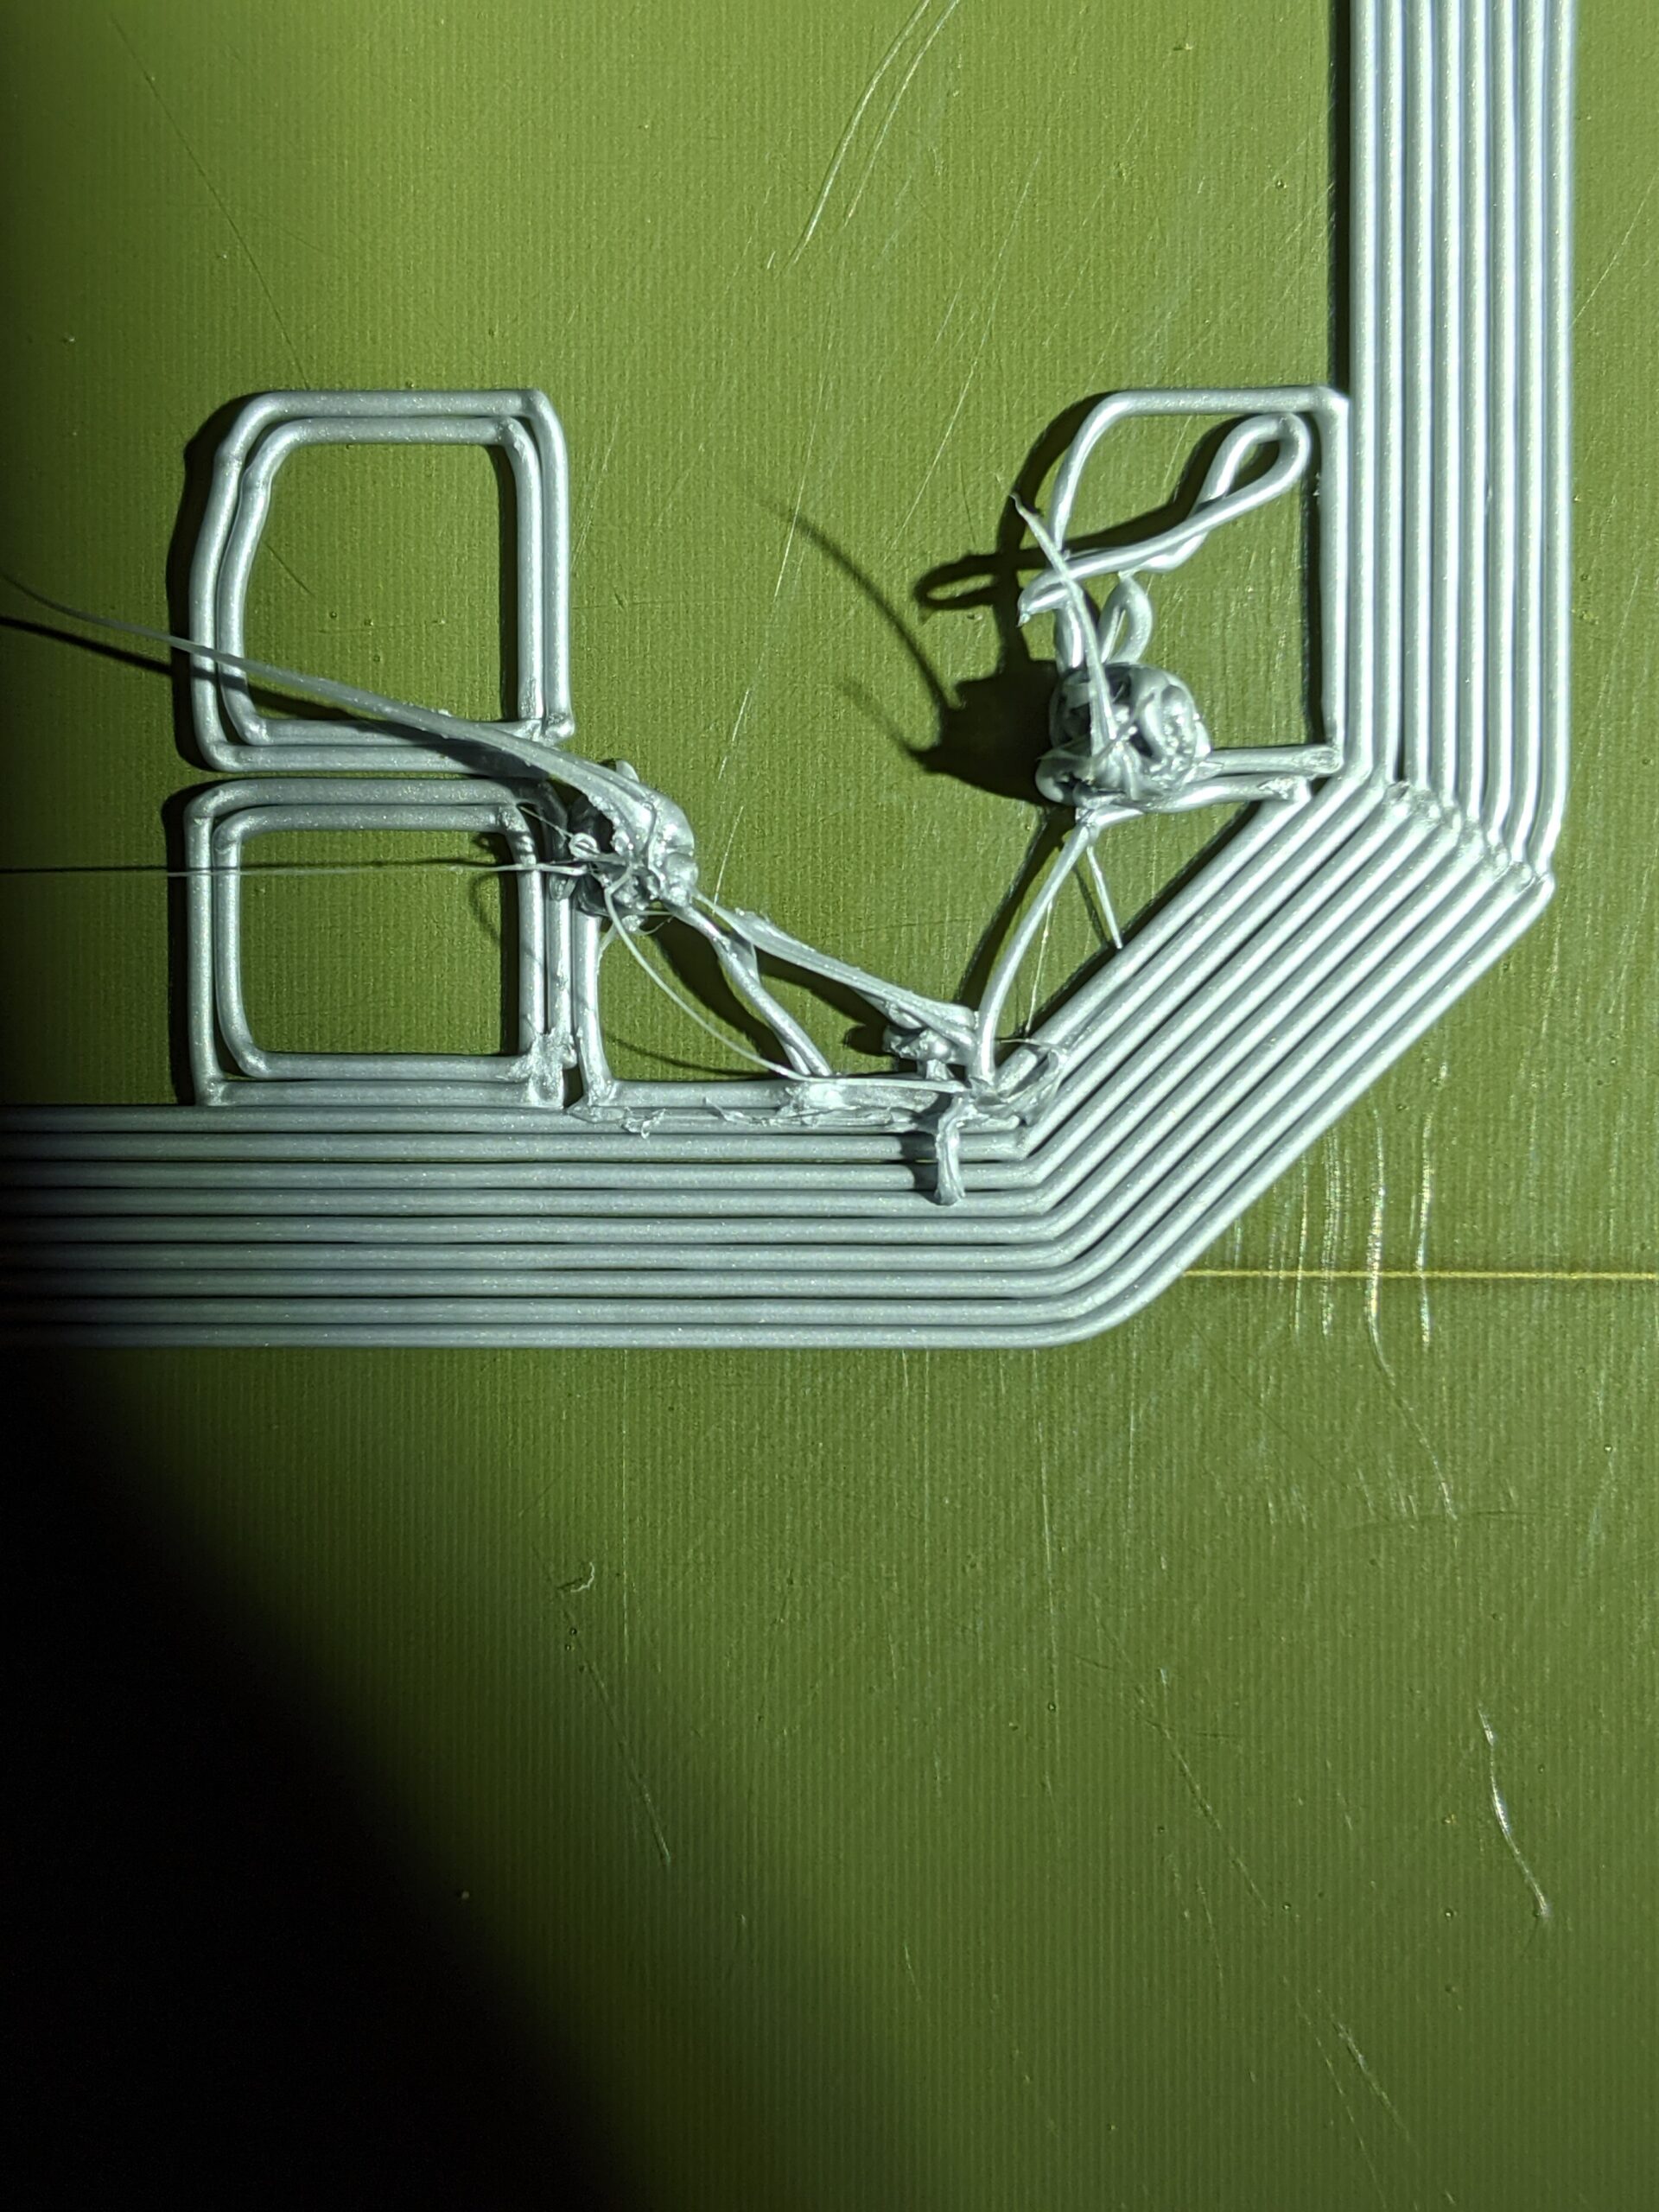

Live-Z lets you set the 1st layer height once and (more or less) forget about it
[...] Also, rather than the link you sent, can't I just model a single filament, and print it? I'm assuming that's' what the Life z adjust is. Because it's a whole lot easier for me to do that than to try and find out where that calibration link is.
Sorry, I'm not sure what you mean here. Here's an over-simplified explanation of what Live-Z is doing:
- When you home the printer, it moves the nozzle to the X=0, Y=0, Z=0 (ish) position based on "software endstops". It senses the end of motion from the motors.
- When you print the 1st layer, the nozzle needs to be low enough to get a bit of "squish" for good adhesion. If the extrusion is not squished, you get a rounded cross-section with minimal contact with the print surface and layers to be printed above.
- Live-Z adjusts corrects Z position up or down slightly.
Hopefully, this figure clarifies a bit:
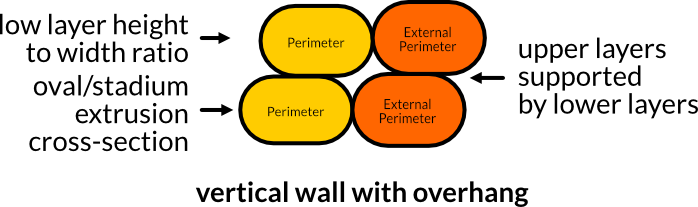
The idea is that when the printer receives your print gcode directing it to move to (for example) 0.2mm height to print the first layer, that position will have been adjusted so there's that Goldilock's "just right" amount of squish applied.
Once you get it right, you only need to readjust when you've made a hardware change (e.g., nozzle change) or manually moved the printer about.
Keep going, you're getting there
I started to print my part again, and here's what happened.
Keep going lower. There's an "ah" moment when it starts to squish properly. Notice how round your extrusions still are. They need a bit of squish. Just keep printing a large-ish 1st layer model that's big enough you can keep an eye on it. You're close.
So far so good!
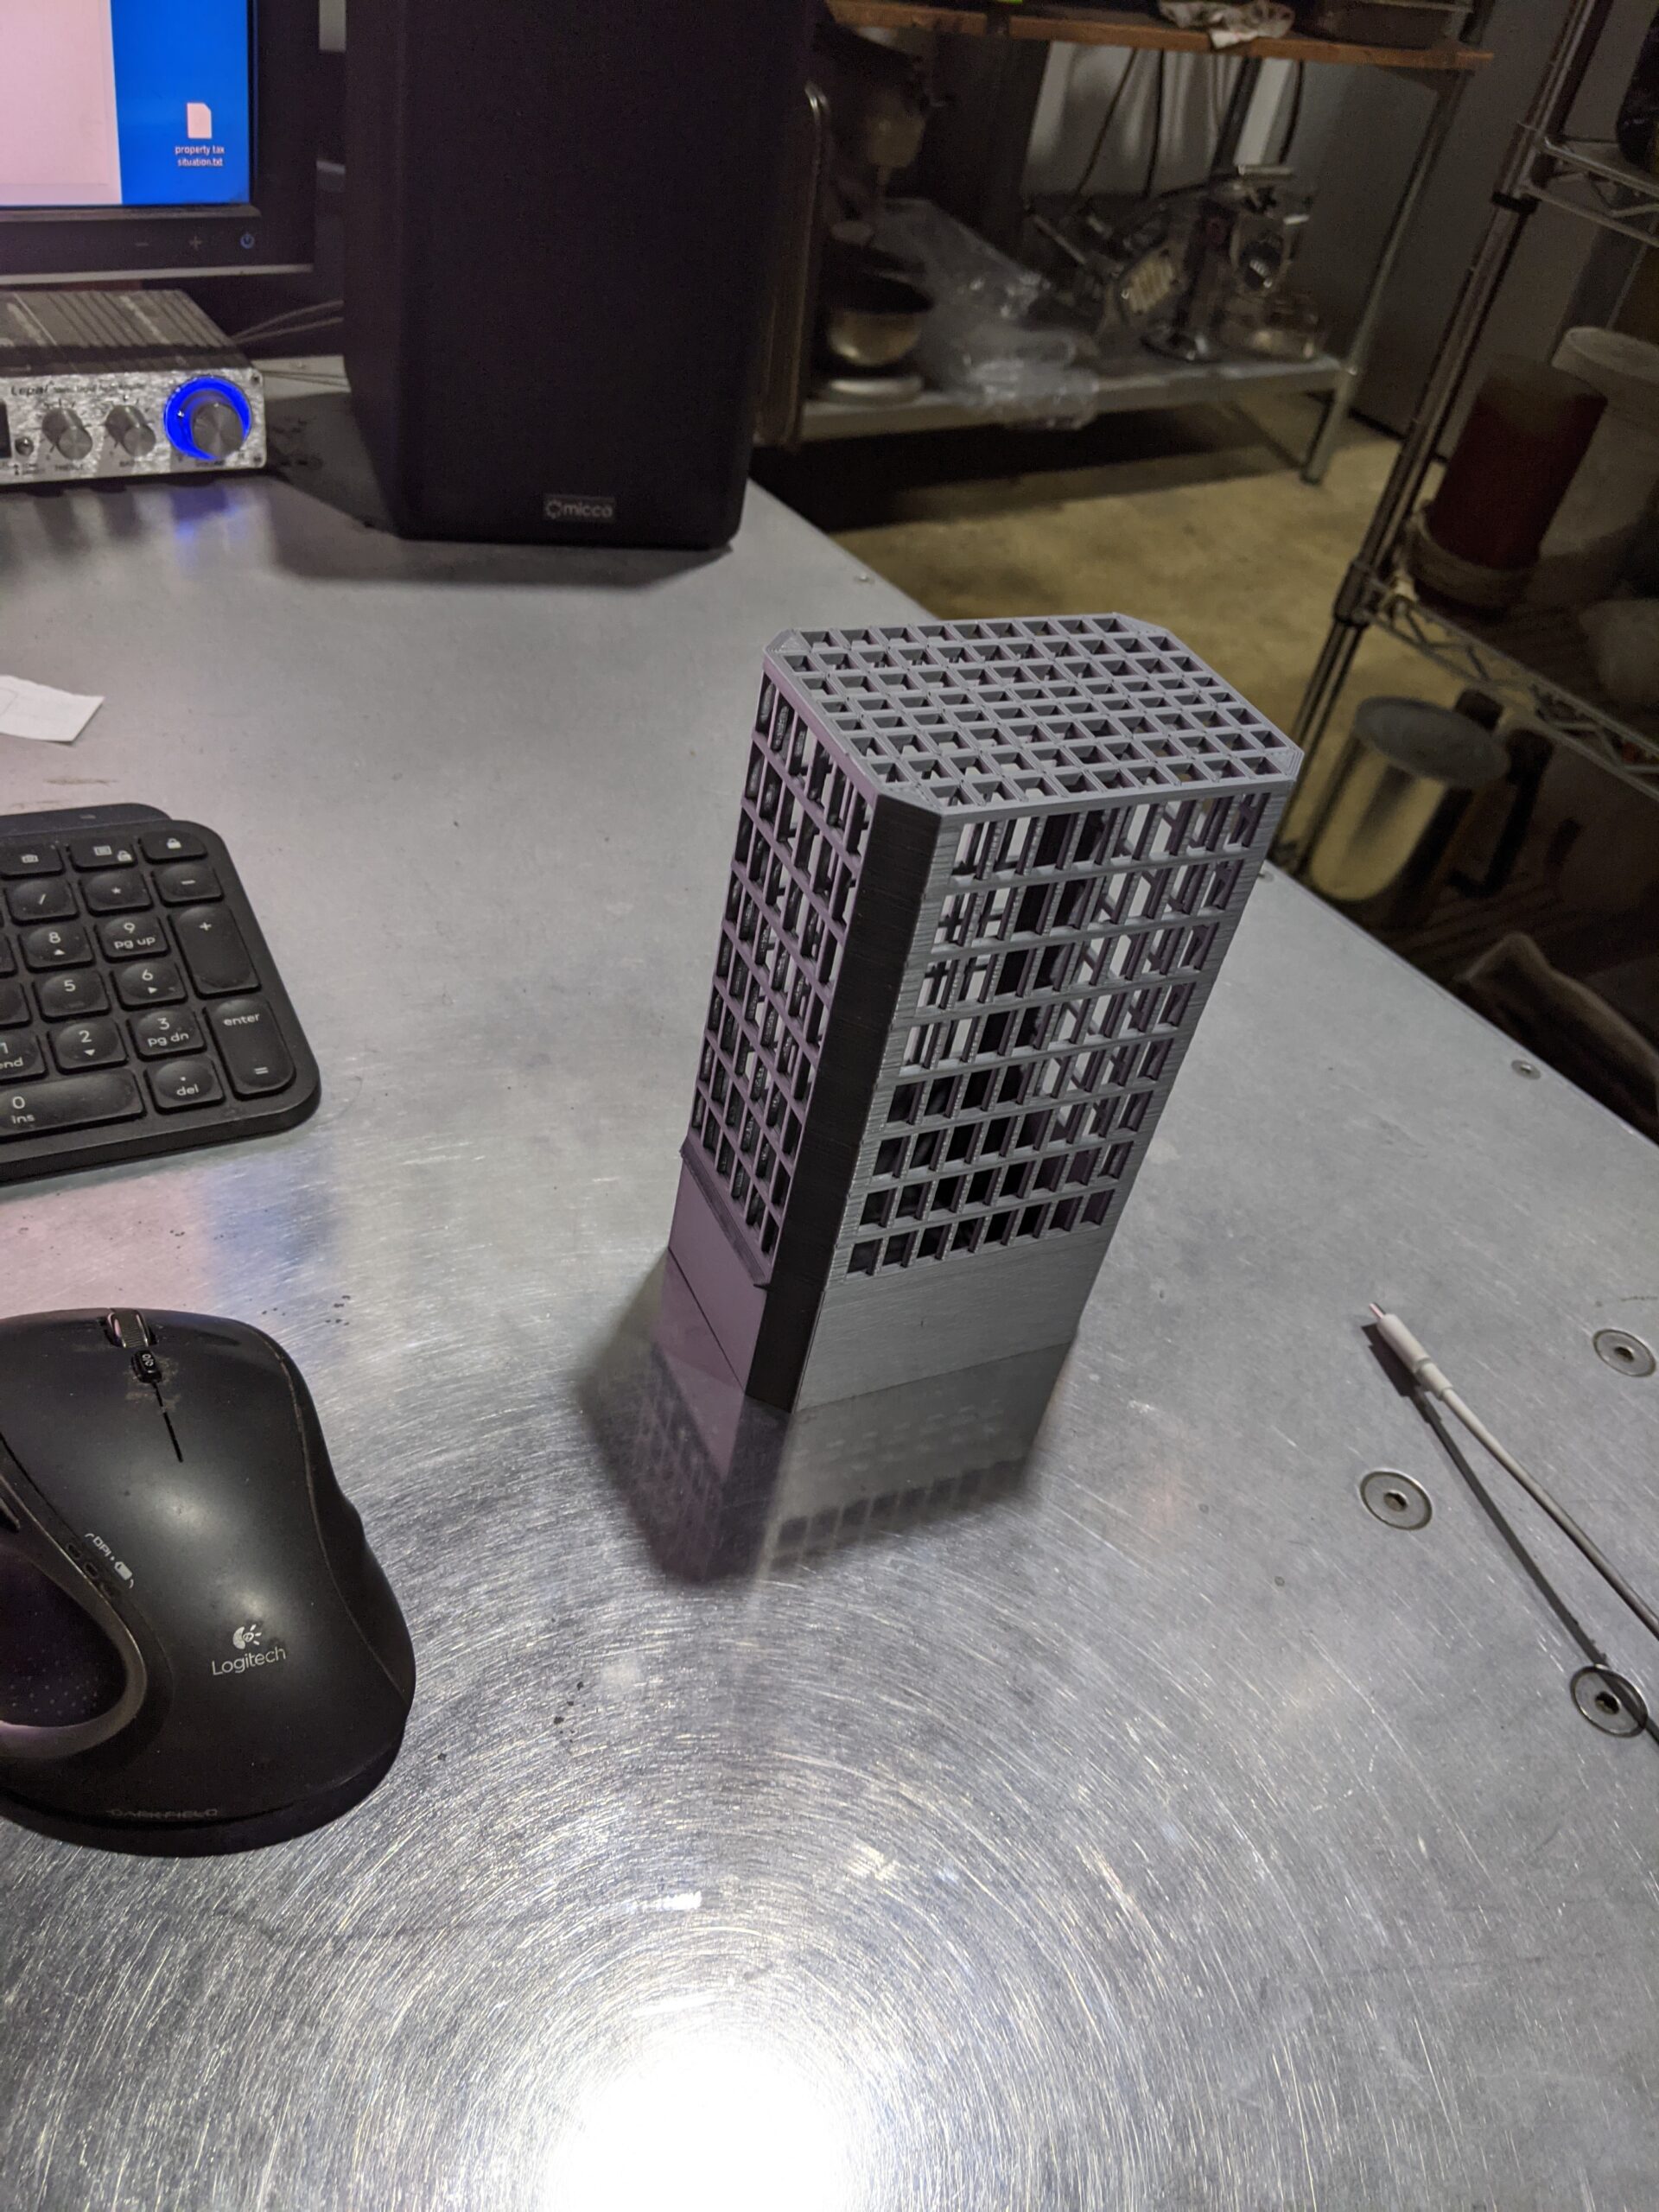
I made a 6mm brim with a single layer, and it's still adhering to the platen after the same place as before where it detached. Now I will probably be wondering how to print the part. Lots of holes. Thanks again.
sounds good. hopefully you got your z offset dialed in now, otherwise you will always have trouble
RE: Still having problems

I printed a brim with a second layer, but the part warps and breaks at the brim after an hour of printing. I had hoped the second layer would also print all the way to the part, but it doesn't. It only prints one filament on the perimeter. Can I get a second brim layer to print to the part? What else can be done to fix this issue aside from remodeling the part? Thanks you guys. You've been super helpful.
Perhaps it's the Z first layer again. I'll wait to hear back before doing that.
A brim is only 1 layer thick. If your part is detaching from the brim then you need to tweak your elephants foot compensation to a lower value. Unfortunately PS treats the brim position as fixed relative to the normal outer perimeters and uses the elephants foot to weaken the link between rather than having a separate offset for the brim position. With a default elephants foot of 0.2 it often results in weak or sometimes no contact between the brim and part making it of no use.
Elephant's foot? What is it, and how do I change it?
I have no idea. Is it in the slicer program?
Mouse ears can help with warp-prone parts
I printed a brim with a second layer, but the part warps and breaks at the brim after an hour of printing. I had hoped the second layer would also print all the way to the part, but it doesn't. It only prints one filament on the perimeter. Can I get a second brim layer to print to the part? What else can be done to fix this issue aside from remodeling the part?
I'm not a fan of elephant's foot compensation and find that Live-Z adjustment can usually eliminate the need for it. However, if you're having warping issues with normal brims, consider manually creating some "mouse ears" in the warp-prone areas of your print. These will be part of the print, so not so prone to separation like a normal PrusaSlicer brim. You'll need to trim them off after printing, of course, but a quick pass with a deburring tool is usually sufficient.

Right-click on the part, select Add part, create a cylinder and manually resize it (I like 30x30x0.2mm) and drop it onto the bed. Create as many as are needed for a particular print.
RE: What am I doing wrong?
Print Settings --> Advanced --> Elephant foot compensation
You have to be in Advanced or Expert mode (top right corner)
Edit:
@bobstro
That must be some sort of record 😀
Edit end
Prusa i3 MK3S+ FW 3.11.0 (kit dec -20), PrusaSlicer 2.6.1+win64, Fusion 360, Windows 10
Where do I find the mouse ears? Prusa slicer?
I haven't seen this in the slicer.
At least I got one good part so far. Why the second one won't print is beyond me. Oh, is the bed supposed to be cold after printing? It preheats, and then is cool while printing. I assume that;s normal.