Printing issues
I recently assembled and started using my MK3S+. I had a Creality Ender printer before which was ok but not anywhere close to this printer.
I have calibrated and done multiple printed squares to dial in my Z offset. I’m curious why my prints first layers keep looking like this (see picture). I’ve checked all over other posts and other resources on the net but never see the same type of lines in the layer.
Any ideas or suggestions would be most welcome? I clean my print bed after every print with IPA (not the beer 😂) and my bed temp is 68 because I have the printer in a basement and that tends to be a little cooler. Every print has printed fine but I’ve noticed my last print broke free from the bed about half way during the print. 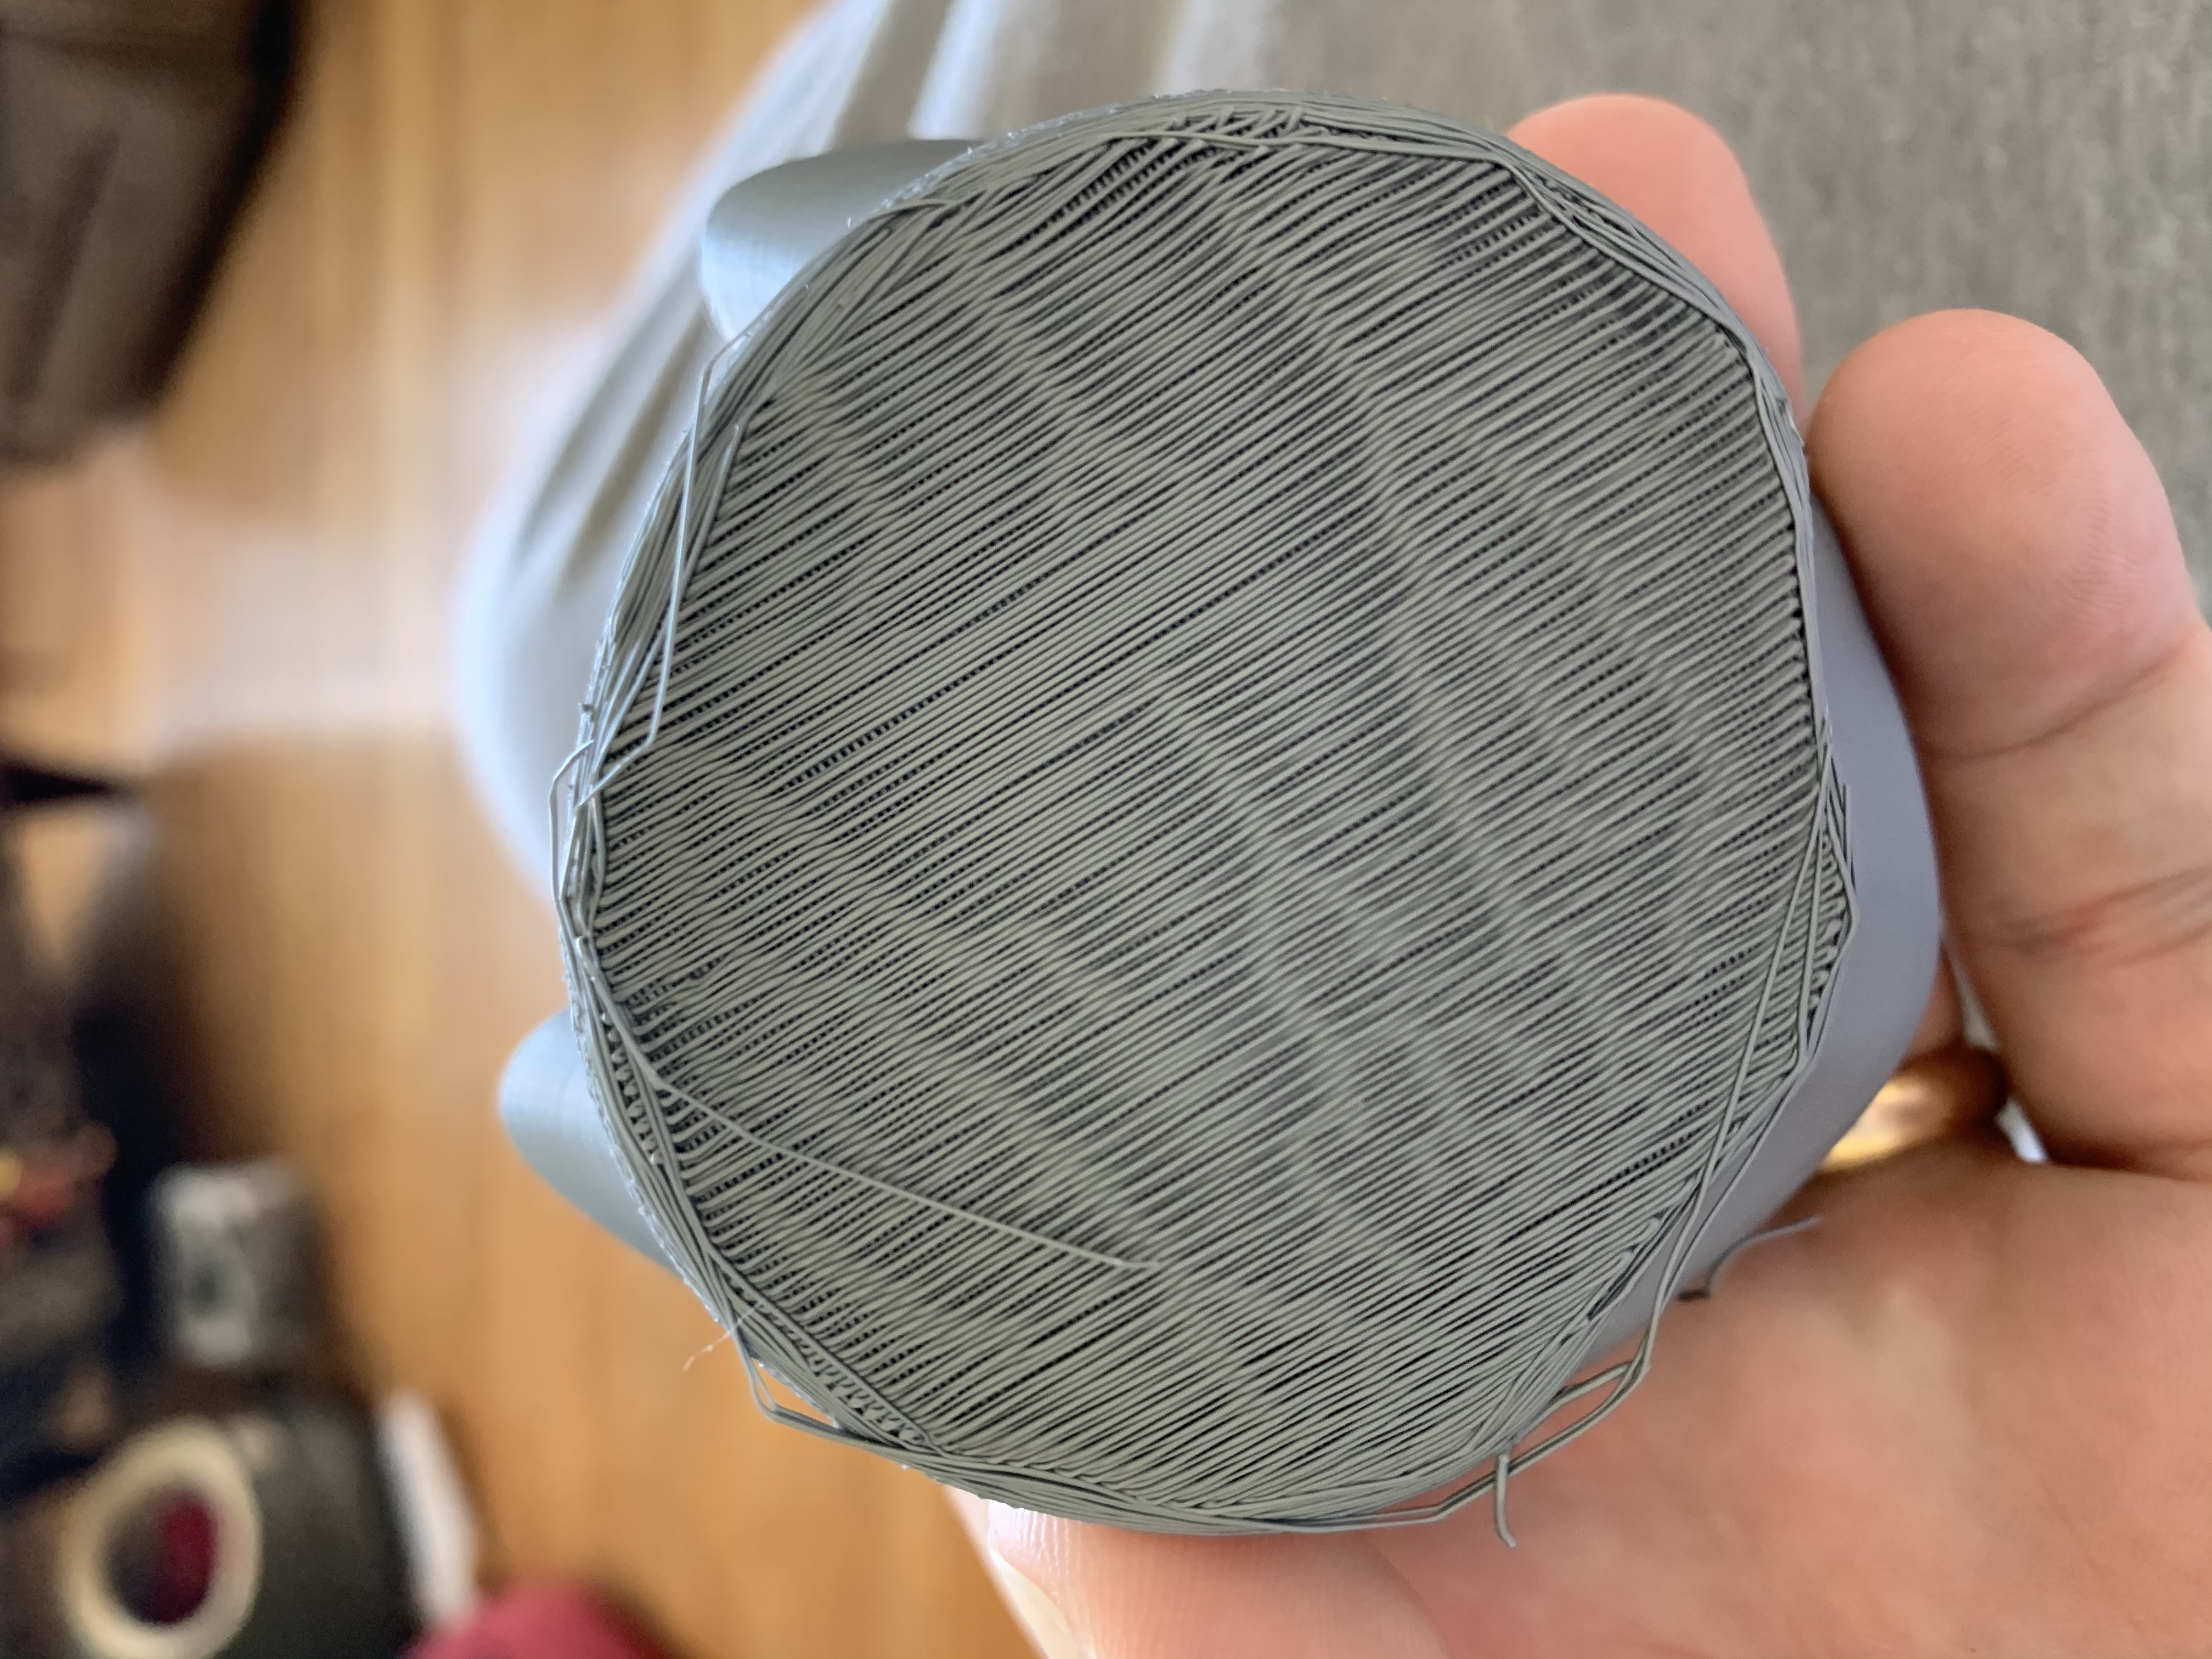
RE: Printing issues
Hi. Welcome to Live Z. Calibration is one step. Then getting a good first layer on every print requires some fine tuning that goes beyond calibration. Given what you show in your picture, you could use a Z adjustment in the negative direction. As our print begins after the filament wipe, click on the control button, and counterclockwise one click - it'll say something like "adjust live-Z". Click on that one, and your button now can be used to adjust the head position as your print proceeds. It is similar to what you did with calibration - and your goal is to get the extrusion to have a nice flat profile (but not too squashed!) - and the strands of your first layer and/or support are laying down nice and even, smoothly joined.
If the head is moving and some of the traces are curling up, or you can see the lines are not sticking to each other - adjust in the negative direction.
Each time you change sheets (from smooth to textured, or vice versa), or even changing filaments can need some live-z adjustment. For sheets you can lock in a Z setting using a sheet profile, so all you have to do for repeat-prints that involve swapping sheet type is to set up a profile for each sheet. The printer will maintain a default Z setting (based on your calibration or last live-Z adjustment) for each sheet profile.
RE: Printing issues
@dan-rogers
Thanks for the reply. I appreciate you taking the time to reply
Maybe I didn’t articulate myself well enough. I’m familiar with “Live Z” which is how the z off set is calculated and adjusted. I’ve done that multiple times with printed squares marking down the Live Z setting and checking it with high and low nozzle height.
I understand how the filament should look however I have never seen filament on a first layer look like veins in a human body.
RE: Printing issues
Your nozzle is still too high - when its about right the single threads in the first layer bond together. Look at https://forum.prusa3d.com/forum/original-prusa-i3-mk3s-mk3-assembly-and-first-prints-troubleshooting/life-adjust-z-my-way/ for a good way to adjust it (and also an explanation for how it should look like).
RE: Printing issues
I used that exact post and did exactly what is mentioned there. I even used a Sharpie and marked the squares which is a fantastic suggestion. I’ll try it again and move the nozzle down again and go through another round of printed squares. Honestly this is more work than I ever did with my Ender and that as all manual. No mesh bed leveling, no Z offset.
RE: Printing issues
@phisig
99.9% sure you're not getting enough squish on your print surface. The moire pattern we're seeing that looks like veins is because the adjacent lines of filament are just... kinda floating there.
Take a photo of the Z-height square that you made and share it.
RE: Printing issues
@dragon1291
I’m starting from scratch with a fresh calibration (probably over kill) and a new 75mm square. I’m also giving the bed a good cleaning with Dawn and IPA....and I’m going to pour myself an IPA beer
Hope I didn’t come off as a d nozzle. I’m not trying to be to anyone. It’s just not my first rodeo but I’m new to this printer. I finally found a pic of someone else’s square that showed that veiny look. Good to know I’m in good company LOL. Manually calibrating a printer you see some really messed up first layers but never saw that. Then again maybe all this time my first layers were always a mess with my other printer. Who knows??
I will get a pic of my new square as soon as possible. Again thank you for the assistance and the responses.
RE: Printing issues
I was impressed that the layers were so loose that random melting patterns set in...
RE: Printing issues
@dan-rogers
LOL exactly my thoughts. Now you can why I was confused. My experience with first layers was if they were a mess they were a mess. I guess it was more clear cut looking. Bad was bad and the print failed. The quality and tolerances are much better with this machine so maybe that plays a part.
maybe it’s like going 80 in a Ferrari vs 80 in an old Ford Escort. Yeah both are going 80 but which sounds better and which would you rather be in 😂
RE: Printing issues
So here is my new 75mm square. As you can see it started too low. I finally got it to looking good at -1.295. Now I’m going to run a new square and use that as my starting point to fine tune.
It is lower than my previous setting but not much. I had it at -1.270 but it looks better lower so that must be that.
RE: Printing issues
@phisig
No harm no foul. But remember you don't know what you don't know, and you can't learn if your cup is already full.
To break down why the Z height is too high.
1- Your perimeter is all jagged. Strong indication that it's not sticking to the print bed and being dragged along by the nozzle.
2- You can see the 2nd layer through the first. You should not have gaps that large that allow one to see through the layer like that.
Zoomed in onto your image we can also see inconsistent line widths. What filament are you using?
RE: Printing issues
Also for reference this is kinda what the bottom of a print should look like.
Not my photo just found it on the 3d Benchy website
RE: Printing issues
@dragon1291
Well ok. I could have done without the assistance about keeping an open mind but maybe I opened myself to that form of response.
I appreciate the assistance and suggestions.