Printer skips a few centimeters on start of every new layer, also oozes during travel
Hi,
I have this weird issue with my brand-new MK3S, using official Prusament PLA. At the start of every new layer, printer skips a distance of a few centimeters before it starts extruding, like there's no filament or something. This happens on every print on first layer, and on every layer on larger prints - smaller prints don't seem to be affected. I suspect this has something to do with traveling. I noticed that MK3S oozes filament quite badly during travel moves. I don't really understand why this happens - it was never an issue with the cheap Ender 3 that I had before, even though I used to print at the same temperatures and mostly same settings. I wonder if it's related - maybe filament oozes out during travel moves, and there's not enough pressure when printer expects it to be there, resulting in a gap?
I am using Octoprint on Raspi3B+, and Cura for a slicer, using official Prusa Cura profiles. This issue happened on direct SD card print as well, and I think on PrusaSlicer too. I think it's the slicer profile issue. I am attaching a GCODE file for the print in the picture. Can anyone suggest what is wrong?
EDIT: GCODE didn't attach, too large, here's a link to it: https://ufile.io/50vemynb
More info
Can't edit my post anymore, here's some more info:
I noticed that this happens after any long travel, not just during layer change. If there are towers, then I get blobs from the ooze that happens during travel, and gaps right afterward. I am pretty much convinced that the oozing is to blame.

Both PrusaSlicer and Cura have an option to enable retraction for layer change, but there is no setting for retraction during regular travel in the same layer. So I think that retraction settings don't matter here, but in any case they are 50mm/s speed and 0.8mm distance. Is there any way that I can enable retraction during travel in either slicer? Or is there another solution to this oozing? Why does it happen on MK3S, when it didn't happen even on much worse quality printers?
Have you checked the extruder gear tension?
A loose extruder gear grub screw may cause "delays" and errors in when filament is extrudeded or retracted. If you think about it, your two symptoms are related - oozing on travel may indicate that control over hydrostatic pressure inside of the melt chamber is experiencing a delay. The delay in pushing out filament at a layer start is a similar issue - and may be related to the loss of filament in the chamber during moves.
I'd recommend checking that the grub screw on the extruder gear (the one attached to the extruder motor shaft) to make sure it is tight. If that is ok, re-check the extruder gear tension screw (the one that has the spring that goes through the extruder body and tensions the filament door (the second gear tension depends on this). If the tension is too loose you may see delays in extrusion pressures.
Update
A loose extruder gear grub screw may cause "delays" and errors in when filament is extrudeded or retracted. If you think about it, your two symptoms are related - oozing on travel may indicate that control over hydrostatic pressure inside of the melt chamber is experiencing a delay. The delay in pushing out filament at a layer start is a similar issue - and may be related to the loss of filament in the chamber during moves.
I'd recommend checking that the grub screw on the extruder gear (the one attached to the extruder motor shaft) to make sure it is tight. If that is ok, re-check the extruder gear tension screw (the one that has the spring that goes through the extruder body and tensions the filament door (the second gear tension depends on this). If the tension is too loose you may see delays in extrusion pressures.
I checked the grub screw - it is tight. The filament door tension screw is flush with the nut. I tried increasing the tension further, but it seems to have no effect.
I have not been able to find a solution yet. Moreover, the print quality seems to be degrading every day. I am not sure how relevant this is. I filmed a print attempt I did just now. For whatever reason, I get oozing during travels even with low temperature (200°C), which creates blobs, skips after travel, and even tears off parts of my print from the bed.
The bed is clean. I washed it today with soapy water, and after it dried - with isopropyl. Never touched it with my fingers after.
The nozzle is clean. I did a cold pull today just to make sure. It is as clean as it is ever going to get.
I did XYZ calibration today, and adjusted Live Z afterwards as per normal recommendations. Everything is spot on there too. Belt tension is well within limits. Self test reports no issues. Bed meshing is 7x7 with magnet compensation.
GCODE was prepared with PrusaSlicer with default settings. Attaching GCODE file just in case.
Any idea what is happening?
Try one thing at a time
This is something odd going on with extrusion - it's sure looking like under extrusion. I'm not seeing any evidence of oozing - over-extruding. But moisture can be a cause for filament pushing out the nozzle when at rest. Also, make sure you are printing at the right temp. Prusament PLA runs hot - about 220 if I am not forgetting (I almost never use PLA - it's for printing dice and indoor decorations).
From the video I'm wondering about the first layer calibration. Maybe you can post a square a la https://forum.prusa3d.com/forum/original-prusa-i3-mk3s-mk3-assembly-and-first-prints-troubleshooting/life-adjust-z-my-way/, to make sure it's okay.
As far as the skipping is concerned, I'm drawing a blank. Can't imagine what would cause centimeters of skipping at every layer. I would suggest you get in touch with Prusa Support via their chat. Go to Prusa3d.com, login or create an account, then look for the chat button in the lower right corner.
Formerly known on this forum as @fuchsr -- https://foxrun3d.com/
First layer.
Use different filament you could have a bad roll.
After cleaning with dish soap, there is no need to clean with alcohol, then dish soap cleans more then alcohol, dish soap cleaning, use a lot of hot water, and do this a few times, so dirt get more loose on the bed and washed off.
This is what I do wen first layer does not work:
Print several cubes spread out over the bed, Then let bed heat up for a longer time(especially in winter), then start printing, but start at a to high level, print a bigger part and then lower the z a little, and print a bigger part, if you do this you see the good setting. Then print the good setting over the whole bed to see if bed is level.
Normally not needed:
1e layer speed slower,
1e layer hotter,
bed hotter,
use glue stick.
Missing lines or pieces of lines.
Skipping of lines I had some time ago. Search for weeks. I this is your problem I do not know.
But then I found a difference, if I choose a detail or speed template, there was a different, but not all missing lines where gone, but it was getting better.
The difference was, look at you start g code in prusa slicer, M907 E430 or M907 E538, last part of the start g code.
I change this to M907 E600, and all missig lines are gone.
The E600 is the standard setting for the motor, I think, possible prusa sets this lower to get less heat in the motor.
Possible bad effect is the more heat in the extruder, and with pla printing.
I have a extra cooler on the extruder motor, so for me no problem, I had this before this problem, I am printing in a enclosure.
This is how my startup g code looks like:(the past part of it).
; Don't change E values below. Excessive value can damage the printer.{if print_settings_id=~/.*(DETAIL @MK3|QUALITY @MK3).*/}M907 E600 ; set extruder motor current{endif}{if print_settings_id=~/.*(SPEED @MK3|DRAFT @MK3).*/}M907 E600 ; set extruder motor current{endif}
RE: Update
Here is a pic of the first layer calibration print:

As you can see, the lines themselves are fine (my Live Z is at -1.175), but notice the long string at the end that the nozzle created when moving away at the end.
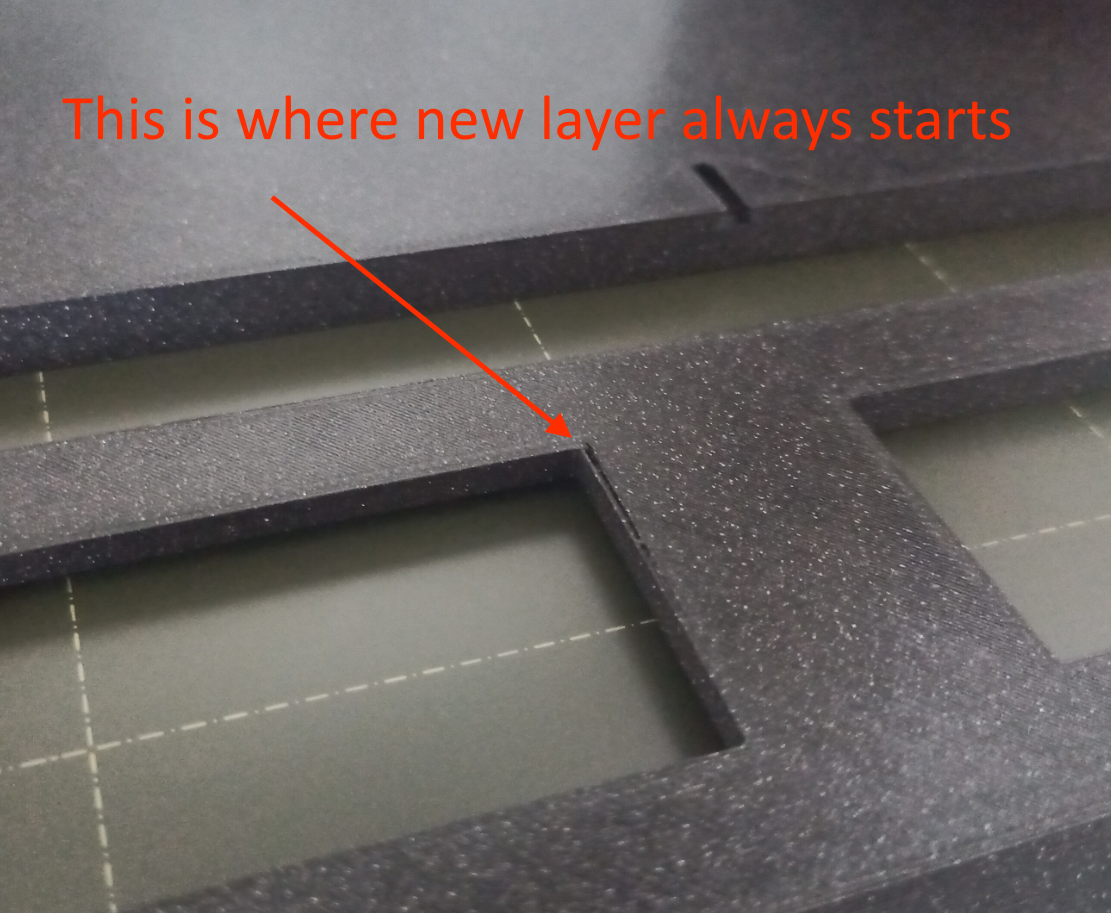
I also printed a 50x50 single layer rectangle for calibration:
As you can see, the internal lines are pretty much perfect, but the outline has a gap of a few millimeters where the print started (upper left corner). This is exactly what's happening after every significant travel move, in every layer. The longer the travel, the worse this gap gets.
I have contacted Prusa support. Spent half a day chatting with them and making dozens of tests. They were trying really hard, but couldn't figure out the problem either. As per their recommendation, I have tested various temperatures from 200°C to 225°C. There was no difference to the gap issue, although raising temps did help with bed adhesion.
When I raised the temperatures to 225, I got horrible oozing during mesh bed leveling, which made a mess on the bed, also stuck to the nozzle, later transferring to the print. Here is a video to give you an idea:
Prusa support told me that this is a known issue with MK3S, and it has been fixed in MINI+, but not in MK3S yet. To circumvent this issue, I modified my GCODE to heat the nozzle to 170°C, do MBL, then move to the wipe line start point, and finish heating there:
M862.3 P "[printer_model]" ; printer model check
M862.1 P[nozzle_diameter] ; nozzle diameter check
M115 U3.10.0 ; tell printer latest fw version
G90 ; use absolute coordinates
M83 ; extruder relative mode
M104 S170.0 ; set extruder temp ; pre-heat extruder
M140 S[first_layer_bed_temperature] ; set bed temp
M190 S[first_layer_bed_temperature] ; wait for bed temp
M109 S170.0 ; wait for extruder temp
G28 W ; home all without mesh bed level
G80 ; mesh bed leveling
G1 Y-3.0 F1000.0 ; go outside print area
G92 E0.0
M104 S[first_layer_temperature] ; set extruder temp
M109 S[first_layer_temperature] ; wait for extruder temp
G1 X60.0 E9.0 F1000.0 ; intro line
G1 X100.0 E12.5 F1000.0 ; intro line
G92 E0.0
M221 S{if layer_height<0.075}100{else}95{endif}

; Don't change E values below. Excessive value can damage the printer.
{if print_settings_id=~/.*(DETAIL @MK3|QUALITY @MK3).*/}M907 E430 ; set extruder motor current{endif}
{if print_settings_id=~/.*(SPEED @MK3|DRAFT @MK3).*/}M907 E538 ; set extruder motor current{endif}
This helped to eliminate the mess on the bed during MBL, but the ooze is still uncontrollable while printing. Take a look at this typical print quality that I get, even after all these changes:

Later today, I tried another print. This is what I got:

Again, lots of gaps, lots of strings that get trapped underneath other lines, and overall very messy result.
As for the filament, I have 3 rolls of Prusament PLA (different colors), and several generic PLA's also bought from Prusa. The red filament you're seeing is 4 days old since it was removed from the vacuum bag. Same with the others. I have another, 2-month old filament that came with the printer, and I get same results with it. So I have no reason to suspect bad filament, because all behave exactly the same.
@Peter M, I am a bit afraid of raising the currents on my extruder. This stuff definitely voids the warranty. I have already messed up one extruder and it's driver chip on my old Ender 3 this way...
Would it be too much to ask if one of you could print a few layers of the .3mf that I'm attaching to this post? It's the piece from the 3rd picture. Don't change any settings, and print just a few layers to see if your result is any different, it will take just a few minutes. If the results are different, then I definitely have a hardware issue.
EDIT: the .3mf doesn't attach for some reason. Here is a link to download it: https://ufile.io/9e7ajyly
You have to zip into an archive any files attached (except for jpg files).
You can print with the 2 standard templates, speed and detail if you see no difference, this would not help. I saw with my problem difference, I had longer pieces of line missing.
The E600 , I search for this on the internet, and found that E600 is the standard for this extruder, so I think it is not problem, I am printing like this for a few weeks.
Did you a calibration on how many filament your extruder uses wen you print 100mm or more, search internet on how to calibrate this, normally for prusa it should be good. The idea is to measure the filament and mark the filament, and then move the extruder 100mm, to see if this is correct.
@justinas
"Whatever the hell this is" <-- Quote from your earlier post
That is loose strands from overhang in thread
You probably heard this from Prusa support.... Have you checked that the grub screw is tightened at the correct place and in the correct order, flat part of the axle first?
Other than that, I have no clue....
Prusa i3 MK3S+ FW 3.11.0 (kit dec -20), PrusaSlicer 2.6.1+win64, Fusion 360, Windows 10
Weird
@justinas
"Whatever the hell this is" <-- Quote from your earlier post
That is loose strands from overhang in threadYou probably heard this from Prusa support.... Have you checked that the grub screw is tightened at the correct place and in the correct order, flat part of the axle first?
Other than that, I have no clue....
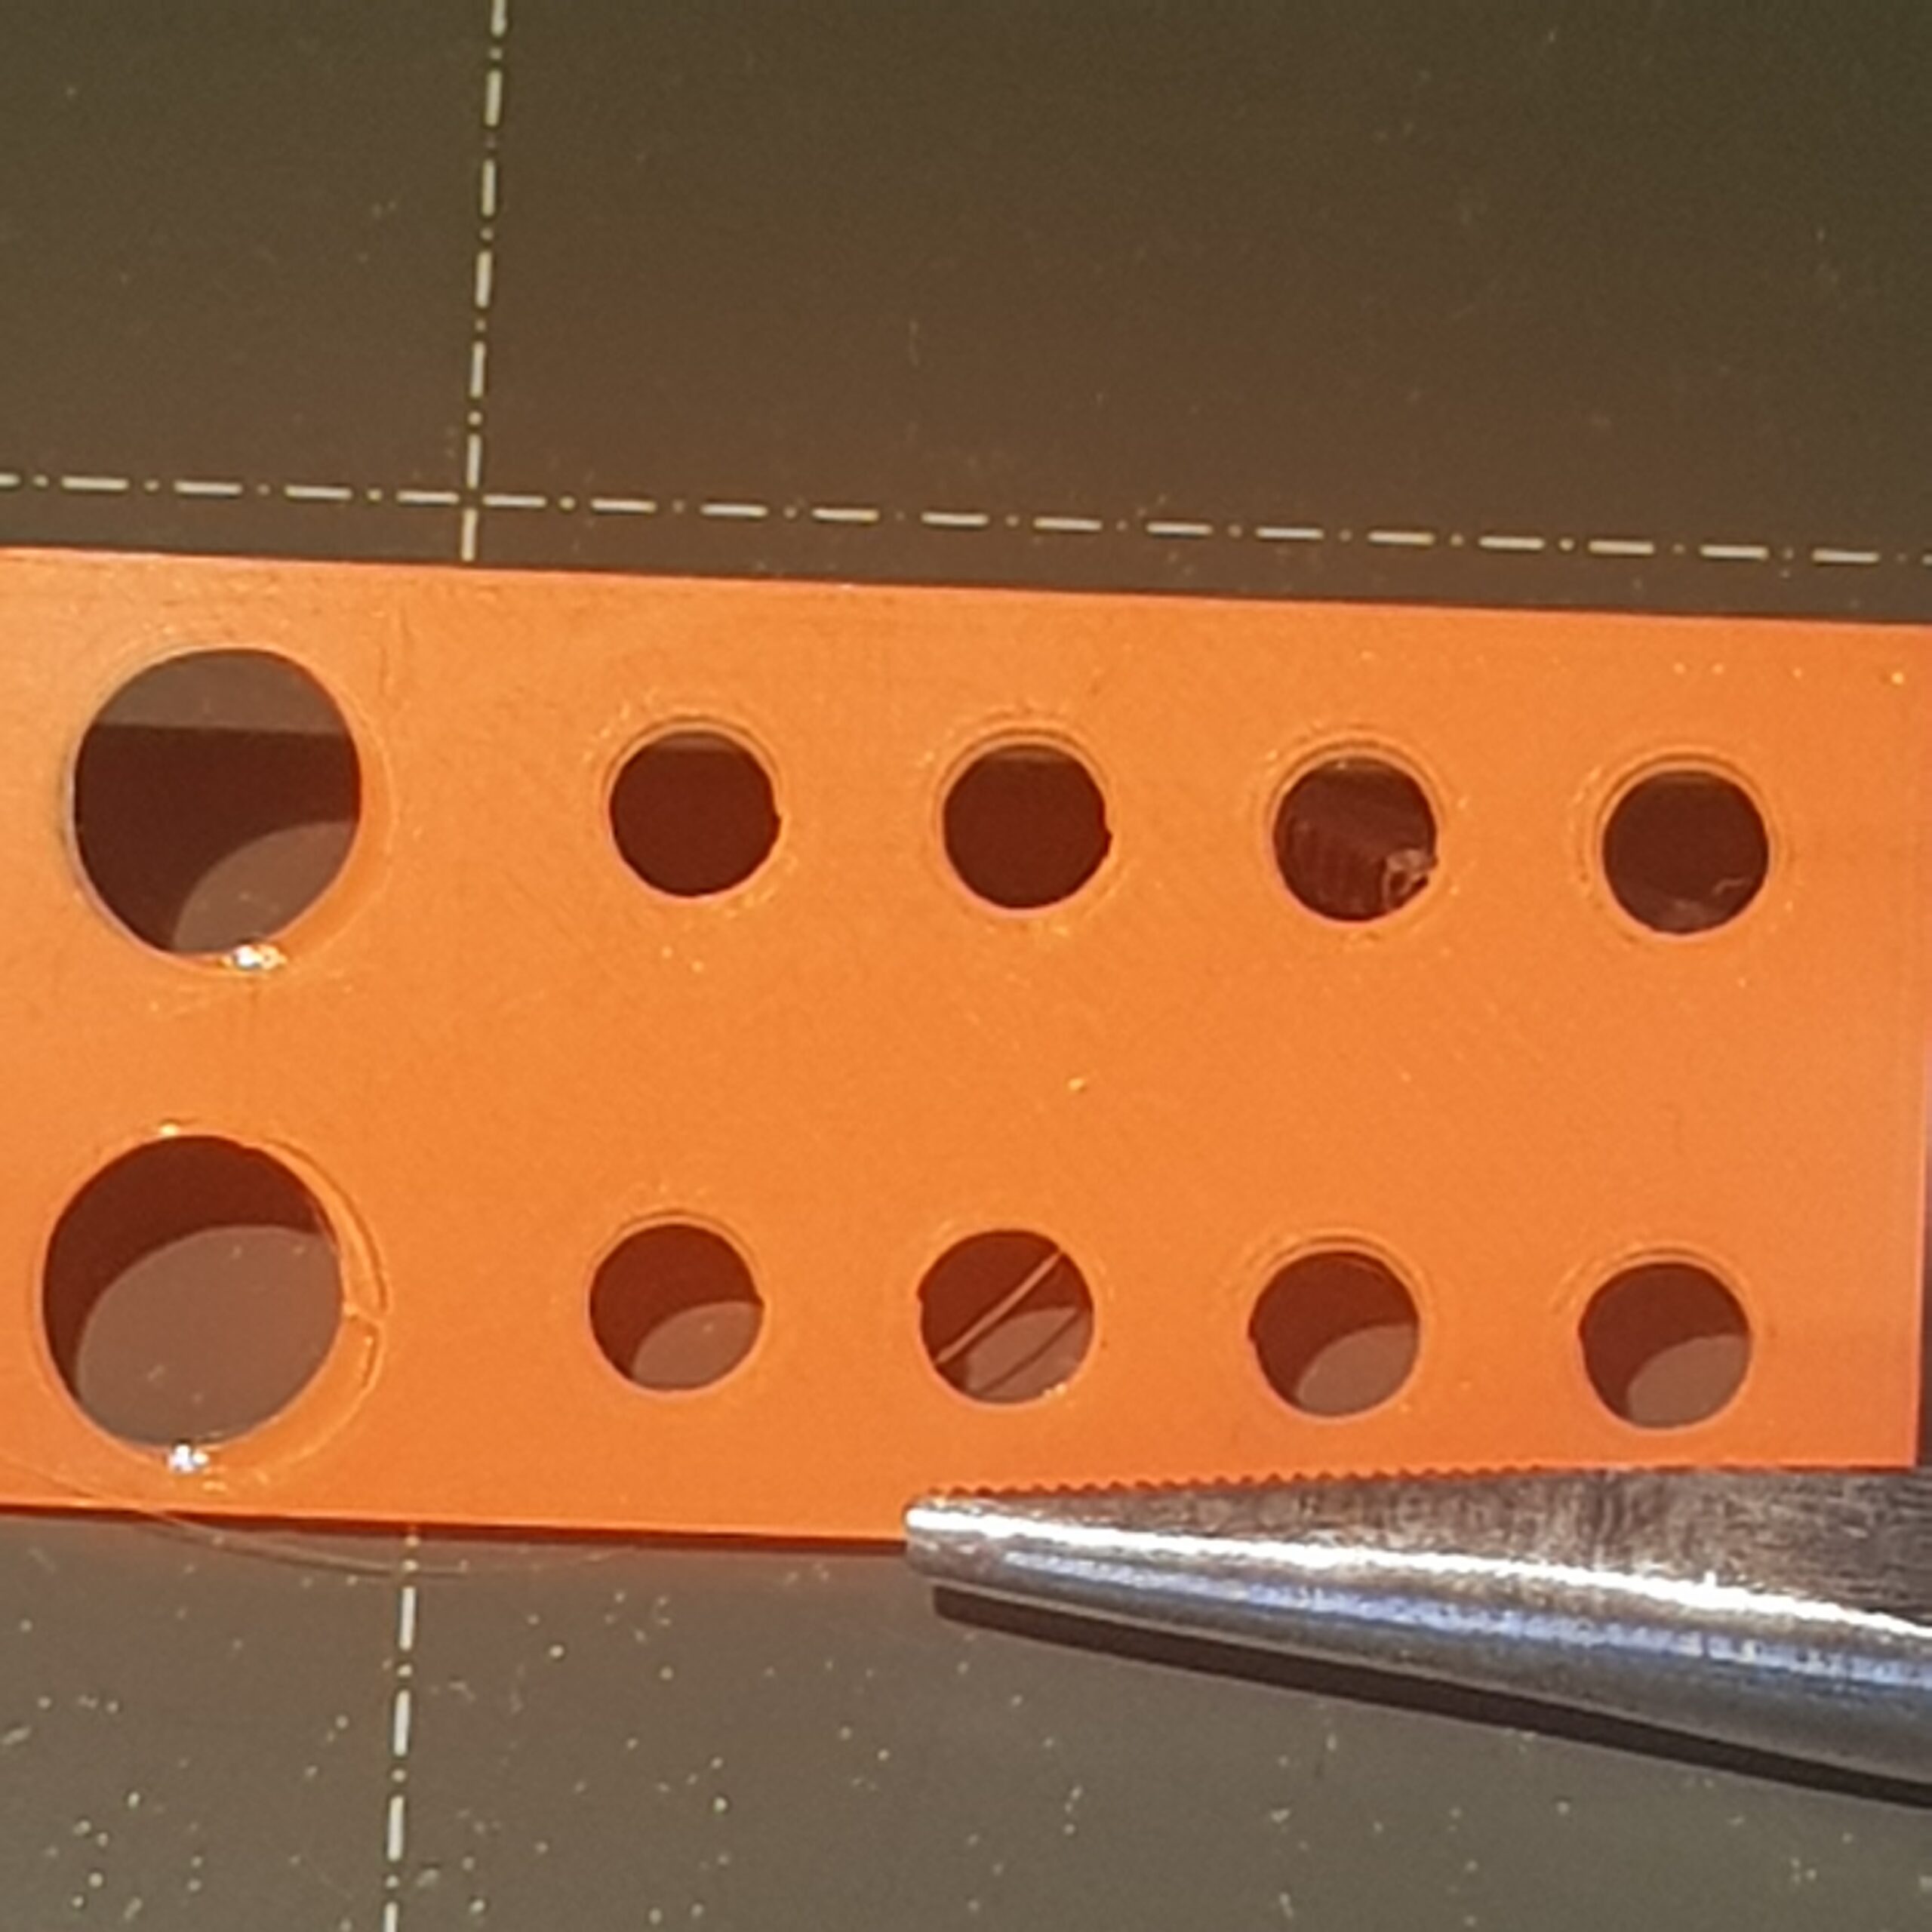
Thank you for taking the time to print this piece. Your quality seems to be far, far better than mine. I do see a loose strand in the first row middle hole, but I am not sure what that is. But overall, the thread printed find for you, there are no gaps or anything, except the outlines of the holes seem to have these "eyebrows" that I don't understand.
But why do we get such a different result from the same .3mf?
As for the grub screw, yeah, I've been asked to check it like 5 times now 😀 It is on the flat part, and it is really tight. Here's a pic.

I increased the E current to 600, and now it's even worse. My printer now skips the intro line altogether, and then maybe 5 cm from the print itself before the PLA finally starts flowing, although the start GCODE is the same as before. Sometimes now the extruder makes a loud BUMP when I load filament, as if skipping teeth or something. I did a cold pull today again, just to make sure I don't have any clogs - the shape of the pulled out filament indicates a perfectly clean nozzle. I have no idea what is going on.
@justinas
It is not a loose strand, it is marks on the PEI sheet 😀
I think the "eyebrows" comes from a little oversquished first layer
Yes, guessed you have heard it, just had to ask 👍
I would not change any factory settings, it SHOULD work as is on a brand new printer, I am sure there is something else than that.
If you raise Z, loosen the idler door completely and push down the filament by hand, does it go down smooth and filament flows in a nice round shape straight down from the nozzle?
That would be My first test. If it kind of dribbles there might be something with the hotend, clogged nozzle, PTFE tube, I don't know.
If it goes down nicely in straight line, well, don't know...
As said, I really have no idea what so ever.
(I read through this just before I "Add Reply" and realize I was just rambling 😀)
Prusa i3 MK3S+ FW 3.11.0 (kit dec -20), PrusaSlicer 2.6.1+win64, Fusion 360, Windows 10
Reply
@justinas
It is not a loose strand, it is marks on the PEI sheet 😀
I think the "eyebrows" comes from a little oversquished first layerYes, guessed you have heard it, just had to ask 👍
I would not change any factory settings, it SHOULD work as is on a brand new printer, I am sure there is something else than that.
If you raise Z, loosen the idler door completely and push down the filament by hand, does it go down smooth and filament flows in a nice round shape straight down from the nozzle?
That would be My first test. If it kind of dribbles there might be something with the hotend, clogged nozzle, PTFE tube, I don't know.
If it goes down nicely in straight line, well, don't know...As said, I really have no idea what so ever.
(I read through this just before I "Add Reply" and realize I was just rambling 😀)
One of the guys from Prusa tech support was kind enough to print the same object on his MK3S, using my .3mf file (identical settings). The quality he got blows mine out of the water:
I am now thoroughly convinced that this is a hardware issue on my end. But I have no idea what to look for. I did what you asked, and - the filament comes out smooth and round, no dribbling or anything.
For my latest test, I reduced the tension on the filament door to less than what is officially recommended - seems to be helping a little, as counter intuitive as it sounds.
RE: Another test
For testing, I came up with another print - two 20x20mm rectangles (2 layers) on the different sides of the bed, to exaggerate the travel influence on the skipped lines:

A close up of the left one. Notice the gap in the inner outline on the bottom right corner. This is where the print resumed after the travel.

The right rectangle. Same thing on the upper right corner, but smaller gap for some reason.

Now, both pieces removed and flipped, side by side. As you can see, the first layer also got gaps in the outline.

So I guess loosening the filament door didn't solve this.
EDIT: I also seem to need to set my linear advance, the corners are terrible 😀 But for now I'm at stock settings, to remove all unnecessary variables.
RE: Printer skips a few centimeters on start of every new layer, also oozes during travel
@justinas
Nice print from support
Here is one idea,
Loosen the idler door as much as possible, yes, I know the screw is short, load filament, start the attached print.
It is simply long straight strips in Y
Then tighten the idler door just enough for the filament to start extrude.
The reason for long straight strips in Y is to minimize X-travel for easier idler door tightening.
There is 1 change from factory settings in 3mf, infill is set to 90° for even less X-moves.
According to PS you have 11minutes to spend on idler door adjustment 😀
Edit: Posted this after your test with two squares further apart 😌
Prusa i3 MK3S+ FW 3.11.0 (kit dec -20), PrusaSlicer 2.6.1+win64, Fusion 360, Windows 10
Test ended quickly
@justinas
Nice print from support
Here is one idea,
Loosen the idler door as much as possible, yes, I know the screw is short, load filament, start the attached print.
It is simply long straight strips in Y
Then tighten the idler door just enough for the filament to start extrude.The reason for long straight strips in Y is to minimize X-travel for easier idler door tightening.
There is 1 change from factory settings in 3mf, infill is set to 90° for even less X-moves.
According to PS you have 11minutes to spend on idler door adjustment 😀
Edit: Posted this after your test with two squares further apart 😌
Attachment removed
Thanks for that print! I set my filament door tension screw so that this screw is just barely grabbing the nut - and I didn't need to tighten it any more, because filament is already extruding. Lines look fine. What now? 😀
@justinas
Mine is same, just barely grabbing the nut 👍
Try printing the cover again. And with all, Printer, Print and Filament at default setting.
Prusa i3 MK3S+ FW 3.11.0 (kit dec -20), PrusaSlicer 2.6.1+win64, Fusion 360, Windows 10
Good adhesion, but still gaps
@justinas
Mine is same, just barely grabbing the nut 👍
Try printing the cover again. And with all, Printer, Print and Filament at default setting.
Did that. Decent bed adhesion returned. But I still get gaps. Here is another print I did just now - as you can see, the bottom layer is missing filament for a few mm in one of the corners. Same with that Cover piece.
