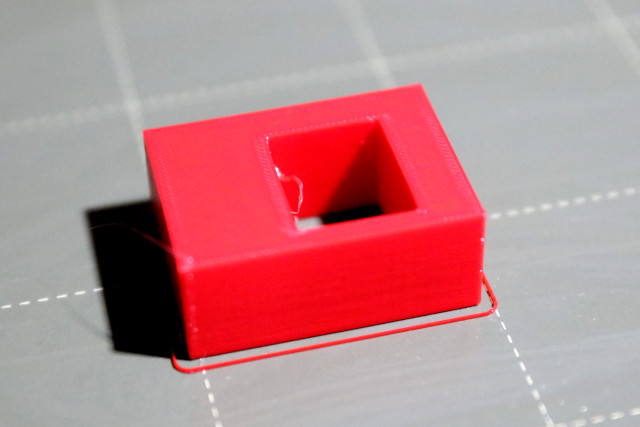
Printed surface rough and messy
Hi all,
I have recently switched out my hotend. After the switch the first 5 prints were fine, but now every prints fails because the printer is no longer printing surfaces correctly. No settings were changed and the printer went trough the full calibration process after the switch. Any ideas what is causing the issue?
Many thanks for any tips!

Have you tried drying your filament? Stringing like that is often a symptom of damp.
Cheerio,
Changed filament
Thanks for the suggestion @Diem. I opened a new filament, reprinted the shape, but it is still having the same issue. Any other ideas what it could be?

Changed filament
Btw, the print looks perfect (first layer, walls and infill) until it gets to the top surface.
What kind (type, brand) of filament is this?
Please save your project (File>Save as) which will save a .3mf file. Take the 3mf file and ZIP it up and attach it here. It must be zipped or the forum wont accept the file. A project/3mf file from PS will give us all a snapshot of your settings as well as the model and any modifiers etc you may be using. Its the best way to debug issues. Without it anything is just guesswork (although probably good educated/experienced guesswork). That will at least give a common starting point and can rule out possible model/slicer settings.
However if you have printed this model/gcode before and its now only happening after a hardware change then logic would suggest that your hardware has not been installed correctly.
If you changed your nozzle did you follow the e3 guide or do you have a leak (check the top of the heater block for upwards seeping plastic as well as the bottom ?
If you changed your heater or thermistor have you run a PID calibration ?
Changed filament
@jsw: I am using Prusa PETG
@Neophyl: Makes perfect sense, thanks for the explanation. I have attached the file below. I am using the MK3s+ and slice with the PrusaSlicer on .1mm Detail. All setting in the slicer are standard. I replaced the hotend including the nozzle with a new one from Prusa, so the setup should be ok and I do not notice any leakage. I just ran the PID calibration and it worked with no issues. Should I try to print the file again?
I took a look at your posted file, and printed a portion of it as a test print.
The entire object would take about six hours on my machine, so I sliced off a portion where the issue was clearly showing and used that for the test print.
I used a J. Random spool of PETg which I had handy and do not use very often.
On my machine, it printed as expected. Nice smooth top surface and clean sides. The only booboos were two small strings, not uncommon with PETg prints. (One on the inside of the cutout, the other near the top left front corner of the test print.)
I'm very confident that if I had printed the entire object, it would have come out as expected. I do PETg prints on this machine regularly and, with rare exception, have great luck with them.
My setup is very close to default. The printer is a MK3S/MMU2s with the MMU turned off at the time. The only change to the extruder is a tungsten-carbide .4mm nozzle in lieu of the stock brass nozzle. The build plate is a stock Prusa smooth sheet, actually the remaining good side of the one that came with the machine ca. January 2020. It's in a 3d Upfitters enclosure running at about 31-32-ish C at the time of the print. I admit, it has not been recalibrated in some time, ditto with Z cal. (Ain't broke, don't fix it!) 😉 It's regularly lubed on the rods and the dust and crud are regularly blown out with canned air.
The slicer is PS 2.3.0 on Ubuntu, using very-close-to-default settings for a generic PETg. 15% infill, .2mm layers, nothing changed, setting-wise, on the three additional tabs.
Now, having said that, one thing that I very much prefer with these little tests is to use the straight .stl file and not the project file. (I realize that I'm probably the odd-one-out on this.) 😉 I envision the goal of these tests is to help someone get a good print, as opposed to duplicating the exact environment that produced a bad print.
The first thing I noticed with your .3mf file was that the object was far off of the build plate, to the front and to the right. I sanity checked this with Cura, which also placed the object somewhere in the first-base-line stands. 😉
I extracted the object into a stand-alone .stl, re-launched my PS and checked that it was at the defaults I like. I then cut up the object to produce a suitable test object and re-imported that, sliced it, and sneaker-netted it over to the printer.

Changed filament
Thanks so much for the analysis @jsw. So I printed the file last night again and now the surface seems aside from a burned spot pretty smooth. So I am assuming the issue is somewhere with the printer as the sliced file is still the same. 
There's definitely something wrong.
The top layer is obviously incomplete, and it looks to me like the print aborted (head crash?) at the time that blob occurred.
If I had this issue, the first thing I would check is the nozzle area for leaks, as something caused that blob to drop onto the print.
Changed filament
You are completely right @JSW. Turns out there was a leak. I had another test print run during the day today and when I got home the printer head looked like this:
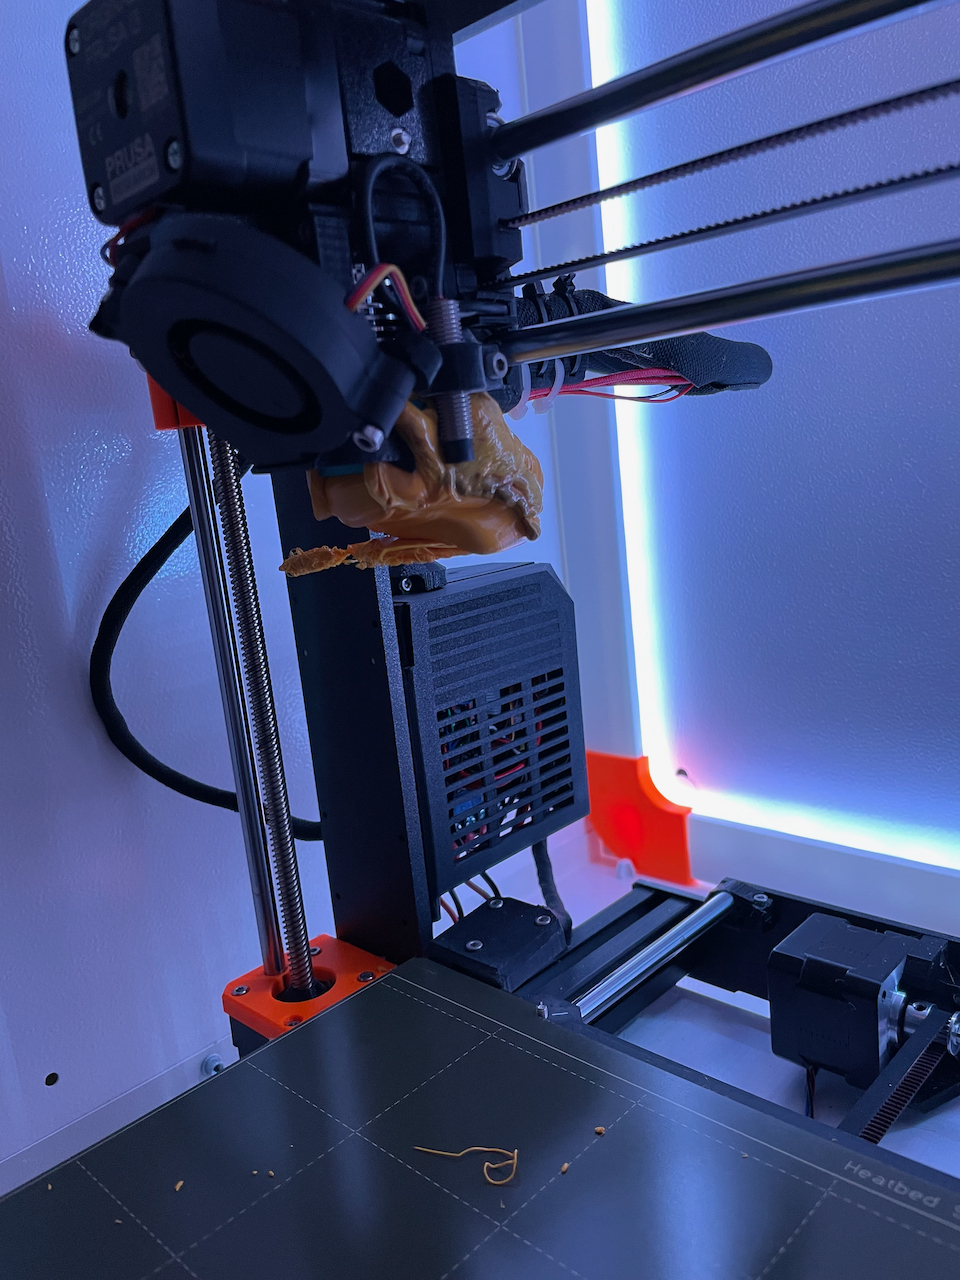
You have what's sometimes known as the Blob Of Doom.
The bad news is that it sometimes damages and malforms some of the plastic parts on the printer.
The good news is that it often times looks much worse than it is.
The first thing to do is carefully inspect the damage and see how bad it is. Bad Things (tm) would include such things as the involvement of wiring, obvious deformities, etc.
Some of these can be removed by heating the nozzle to above the filament print temperature (as in maybe 275 or so for a PETg blob) and letting the heat work into the blob for some time. Some of them can then be carefully pulled off.
Some people use a heat gun to soften the blob. These can, of course, soften and deform the plastic parts of the printer as well.
I've known of some who use things like a dremel tool or a hot wire cutter to 'de-bulk' the blob, making it easier to remove the parts close to the extruder.
In any case, if you can post some photos from various angles showing how the blob is attached to the extruder, the folks on here can help you decide upon a plan of attack.
Whatever you do, be sure that you do all you can do avoid damaging things such as thermistor and heater wires.
The plastic parts can be ordered if necessary, or reprinted by someone in your geographic area (I do not see where you are located, if you are in the States, I and/or some of the others have occasionally printed printer parts for those repairing a printer) or if you have a local 'makerspace' with printers, you can print the parts there or in some cases have the staff print them for you.
Changed filament
Thanks for trying to help, but I will actually ship it to Prusa and have them fix it. It just seems like a big hussle to do it myself as the cables are impacted as well!
That might be pricey!
Thanks for trying to help, but I will actually ship it to Prusa and have them fix it. It just seems like a big hussle to do it myself as the cables are impacted as well!
I can sympathize, but considering the physical risk and costs associated with shipping, I'd definitely recommend trying to clean that blob off yourself before giving up. Very often, simply heating up to the point that the filament will soften and gently pulling it away is sufficient to get it to the point that only minor additional cleanup is required.
When you get it all working again, be sure to do a PID tune if you've changed out hotend components, particularly thermistors.
RE: Printed surface rough and messy
Thanks for trying to help, but I will actually ship it to Prusa and have them fix it. It just seems like a big hussle to do it myself as the cables are impacted as well!
If you are not in Europe, I would think that the issue of (danger of) intercontinental shipping two ways would risk more damage to the machine than it would fix.
I would echo the suggestion of trying to gently remove the blob and replacing any damaged plastic pieces.
(I sure wish that Prusa had authorized sales/service folks here in the States.)