Poor adhesion and globs in prints.
I have suddenly started having two issues with my prints - all of them.
1.) Bed adhesion has become very poor.
2.) Printing will proceed normally (except for #1 above) until a buildup of plastic around the nozzle gets big enough to be dumped onto the print in the form of a glob. See photo.
I did a first layer calibration, and it looked fine. Squishing sufficient to get beads to run together, but not so much that I got ridges between them.
Suggestions?
RE: Poor adhesion and globs in prints.
Your issues are likely related. Poor adhesion will allow filament to come loose from the bed and snag your nozzle. Here's an info dump on the topic...
-
A dirty PEI print surface. Even if you don't think this is the cause, it's always a good idea to make sure your PEI surface is clean before trying any other fixes. If it's a smooth PEI sheet, take it to the kitchen sink and give it a good dunk with Dawn (original formula, no vinegar or hand softener variants) dishwashing soap or your local equivalent (e.g. Fairy in UK). Use a clean paper towel to clean it off, and another to dry it. Avoid using any sponge or cloth that has been in contact with grease. Above all else, avoid touching the PEI print surface. Once it's good and clean, you should be able to use 91%+ isopropyl alcohol between prints, 100% acetone when that fails , and another dunk when acetone fails. Worst-case, use a 3M 7445 ScotchBrite (1200-1500 grit) pad or equivalent on smooth PEI to give it a very light buff, but only infrequently. If you've got a textured powder-coated PEI print surface, the official instructions are to use 91%+ isopropyl alcohol on it only. Rumors persist that some tribes deep in the jungle have had good luck getting started with these sheets by giving them a wipe with 100% acetone and a dunk with Dawn. Either way, there's no real warranty on these sheets. YMMV.
-
If you have not already done so, try using Jeff Jordan's "Life Adjust" procedure for calibrating your Live-Z setting. It is much easier to use and understand than the onboard routine and much easier to make mid-print adjustments accurately with. In general, start high (less negative) and work lower (more negative) in large increments (e.g. 0.1mm) until the filament starts to stick on its own. When you've got your Live-Z setting adjusted properly, you should be able to gently rub the extruded lines on the PEI surface without dislodging them. Then start lowering (more negative) the level until there are no gaps between layers. You should not be able to peel the lines apart after printing, but the top should be regular.
and miscellaneous other tech projects
He is intelligent, but not experienced. His pattern indicates two dimensional thinking. -- Spock in Star Trek: The Wrath of Khan
RE: Poor adhesion and globs in prints.
Another thought - the occurrence coincides with my having installed Octolapse. While I didn't adjust any print parameters, it does retract the print head, which might cause something... ?
While I await collective wisdom, I'll try disabling it.
RE: Poor adhesion and globs in prints.
Note to self. When washing the plate, be sure to use a dish soap like Dawn, not a hand soap whose label claims that it "moisturizes."
🙄 It moisturizes by leaving oil.
Thank you, Bob.
RE: Poor adhesion and globs in prints.
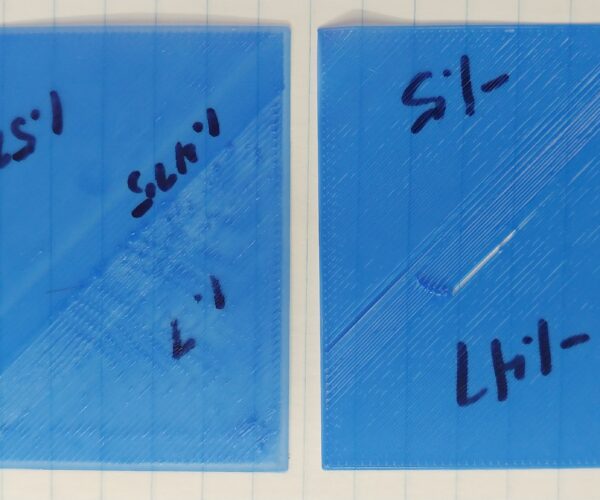
Final report on this issue. I learned on your calibration pattern, how live Z works. Here's the results. -1.475 is where I'd had it before. AMAZING how much difference 0.05 makes.
-1.525 it is.

