New MK3S+ First Prints and severe PETG warping issues
Greetings!
I am new, first time 3D printer owner. I built my MK3S+ a few days ago and am loving it! I am beginning to learn with PETG as I will use that most often for my purposes. My first 3 prints of Buddy! <3

The Black and white PETG are OVERTURE Brand from Amazon and the other is Magenta Semi-Transparent from eSUN.
The magenta prints wonderfully and has a lovely surface finish. It was very easy to dial in good temps and settings for this filament. I wish I could say the same for OVERTURE. The black wasn't too difficult but the white color filament is giving me many problems with adhesion to the bed. I have been trying many combination of nozzle/bed temperature, as well as needing to adjust the live-Z for each filament, but the white does not seem to want to adhere to the bed no matter what i have tried or researched so far.
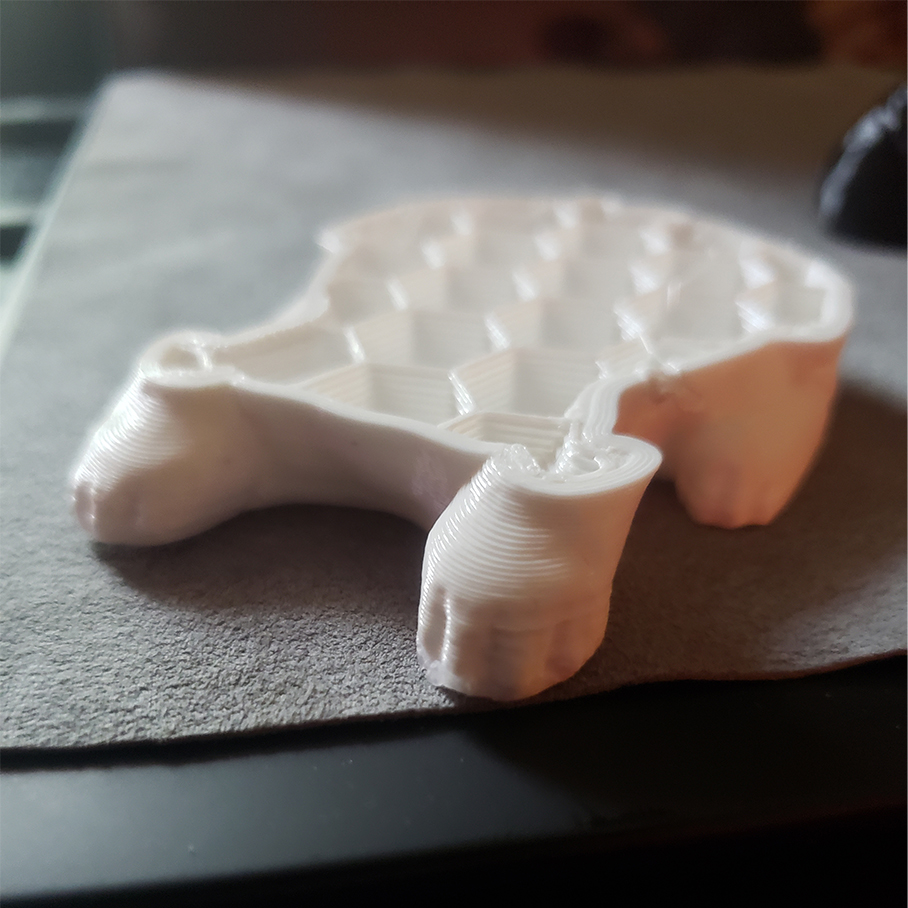
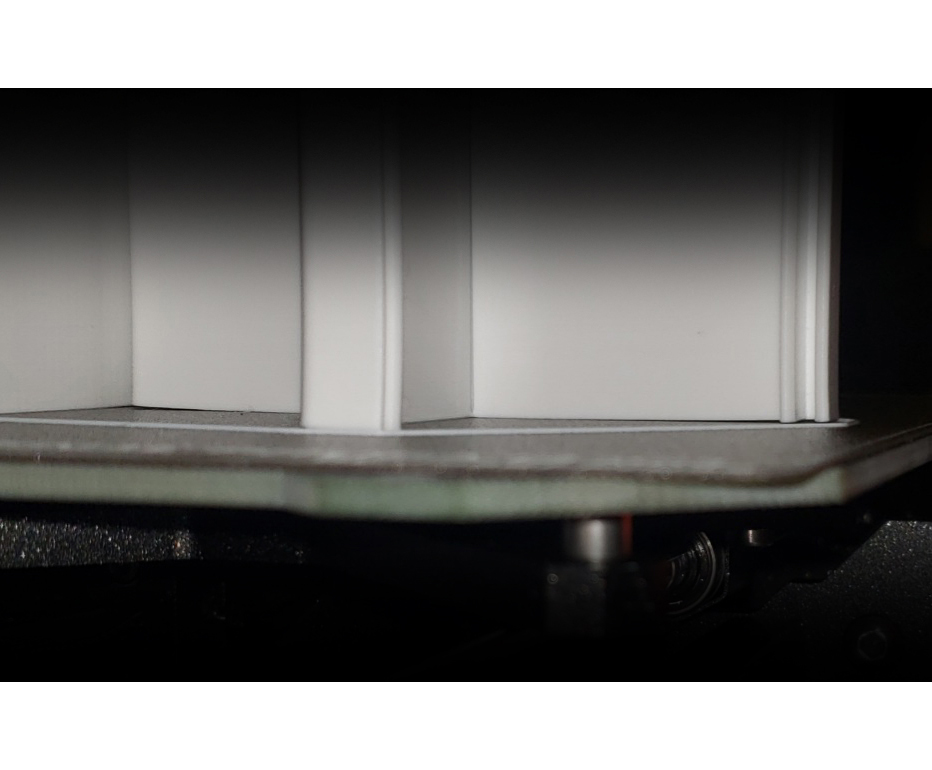
I do not have the textured powder-coated PEI sheet yet, I got the smooth with my kit. So I ordered a textured one and receive it next week. Currently I have tried the recommended methods of washing my smooth sheet with dawn and hot water, also tried wiping lightly with windex as well as 99% IPA. I did all of these on separate trials for the white filament. I even tried the included glue stick, preheating the bed, etc. Nothing seems to work with the White PETG. Even my first White buddy printed popped right off the bed after the front feet warped about 45 minutes into the print. I am printing the first few parts for the Lack Enclosure and as you can see the corner pieces for the acrylic windows are warping right of the bed.
I understand every filament brand is different, every color is different, etc etc. I am still doing a lot of experimentation and hope that this texture bed sheet I get next week will help. But any tips and recommendations would be a great help. I am still doing a lot of research and doing all the recommendations I find from people having warping/adhesion issues with PETG, but still nothing has worked yet for the white filament from OVERTURE. The black and magenta printed with no warping or adhesion issues I could notice.
Cheers and thanks for any help 🙂
RE: New MK3S+ First Prints and severe PETG warping issues
I think I may have some theory for the warping that I am seeing that seemed more obvious now than at first. Perhaps answering my own issues.
-
The warping is most present towards the outer edges of the print area where the parts are more susceptible to cooler ambient temperatures which may influence adhesion. I have no enclosure because I am trying to print the parts for it 🤪
- I need to try that textured powder-coated sheet, hopefully alleviating some overall adhesion issues with the PETG
- The thinner parts I am printing should be re-oriented facing towards the center of the bed to better balance the surrounding temperature for those thinner sensitive parts. Also place the parts closer and tighter together in general
- If issues still persist after this, Print less parts at a time(?)
Hopefully that makes some sort of logical or common sense now that I can see what printing a lot of parts looks like vs. the single Buddy's that weren't so painful to print.
Cheers.
RE: New MK3S+ First Prints and severe PETG warping issues
You can make a temporary enclosure by placing a large cardboard box over the printer while it makes the parts for the permanent version.
Cheerio
RE: New MK3S+ First Prints and severe PETG warping issues
I'm a bit confused as the photos look like you are using the textured sheet?
You could check your live Z and perhaps lower it a bit for the white filament, some require different heights and more squished would give better adhesion. If you haven't been using this method its very good:
https://forum.prusa3d.com/forum/original-prusa-i3-mk3s-mk3-assembly-and-first-prints-troubleshooting/life-adjust-z-my-way/
Raising bed temperature slightly might also help.
If you still struggle then a brim would certainly help but I think thats a bit of a last resort as it ought to stick better.
Regarding the enclosure, PETG shouldn't be hugely affected unless room is very cold or theres a big draft.
Hopefully others will be along to offer advices.
RE: New MK3S+ First Prints and severe PETG warping issues
I'm a bit confused as the photos look like you are using the textured sheet?
You could check your live Z and perhaps lower it a bit for the white filament, some require different heights and more squished would give better adhesion. If you haven't been using this method its very good:
https://forum.prusa3d.com/forum/original-prusa-i3-mk3s-mk3-assembly-and-first-prints-troubleshooting/life-adjust-z-my-way/Raising bed temperature slightly might also help.
If you still struggle then a brim would certainly help but I think thats a bit of a last resort as it ought to stick better.
Regarding the enclosure, PETG shouldn't be hugely affected unless room is very cold or theres a big draft.
Hopefully others will be along to offer advices.
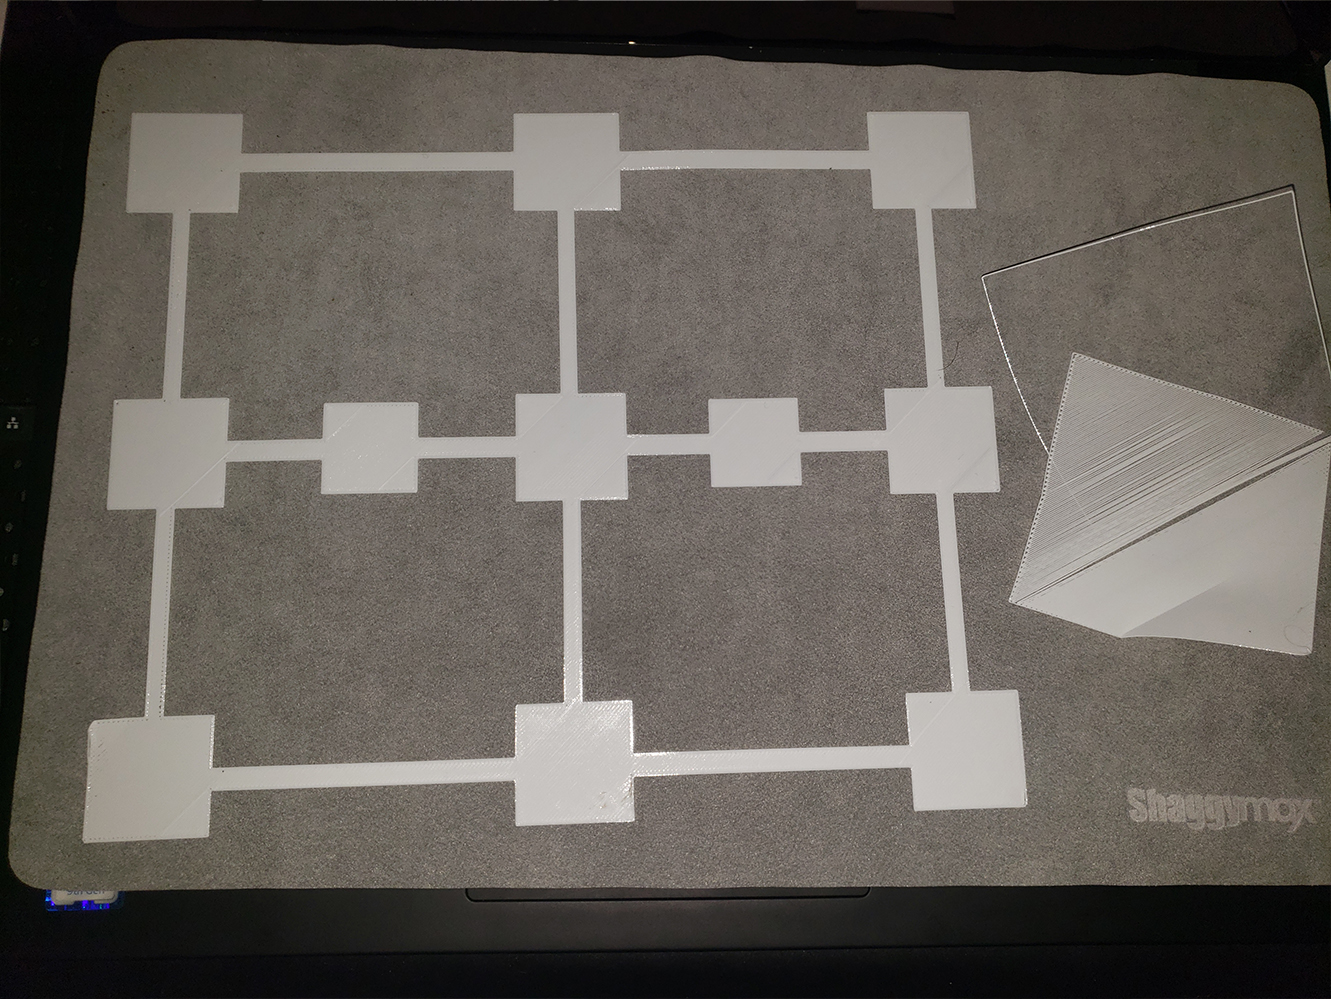
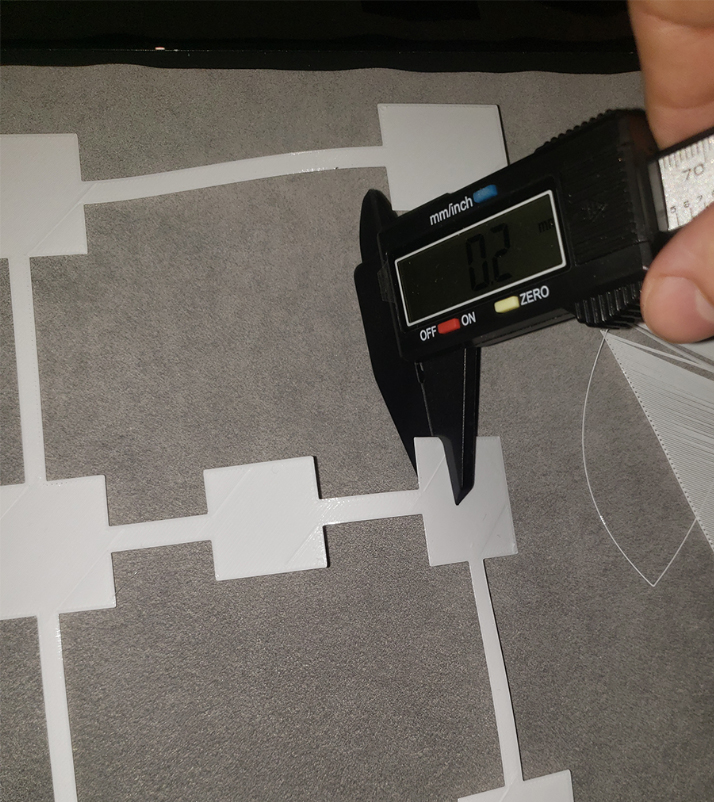
Indeed I have done the 75x75mm square for live-Z, forgot to take pictures on the bed but I saved them. As you can see the 75x75mm square to the right of the first pic where my Z started off at 0.000 (too high) and I dialed down to -1.476 for the white specifically (different values for the black and magenta). And as a safe measure I did the bed level correction grid as well, but I did not end up applying any value to the bed level correction because the entire thing looked decent enough for me (total beginner) and every square measure 0.2mm as it should.

Good catch on my print sheet, thanks! Wow I feel silly now, after you pointed that out I double checked the bubble wrapping it came in. I completely misread the label and had thought they gave me a smooth one 🤡 . So, anyways I guess I'll be getting another textured sheet to try. Surprised that with decent bed leveling, Z-adjustment, clean textured sheet, and about every first layer nozzle/bed temp combination between 230/80 - 265/90 respectfully for PETG.
As for the temporary enclosure idea, I am definitely exploring my options there.
Thank you for the replies. Cheers
EDIT: Just to be clear, the first layer calibrations with the white appear to stick fine, they definitely have some adhesion when I try to peel them off. It's not until about 45ish minutes into the print that it began warping off the bed with both the Buddy model and the Ikea lack enclosure parts.
RE: New MK3S+ First Prints and severe PETG warping issues
White is always the trickiest colour in any line, it has a higher percentage of pigment than other colours, translucent/natural with none is usually the easiest to print.
and every square measure 0.2mm as it should.
It may measure more if you are too high but it should never measure less even if you are too low - that's how much filament you are extruding even if it has to ooze out sideways.
With PETG on a textured sheet it may be better to squish the filament into the texture a little more. Adjust your live Z until you begin to see rippling, it is too low, now back off *just* enough to loose the surface disturbances. Setting the tightest acceptable layer should improve adhesion. DO NOT DO THIS WITH A SMOOTH SHEET.
Cheerio,
RE: New MK3S+ First Prints and severe PETG warping issues
I have a positive update on the second round of my enclosure parts. Very minimal warping now!
What did I do differently? Nothing really, it's the same g-code, same temps, I did another z-adjustment but it was also -1.46~ roughly the same as before, PINDA probe for my MK3S+ is 1.5mm exactly or the width of a quarter coin here in the US. I read on another post that the MK3S+ should be a bit higher than the instruction say (the zip-tie method is too low) 😐 is this true or should I lower my probe?
The ambient temp around the printer is 39-41 C as I have been checking from the sensor info on the LCD screen. The room is also definitely dry, very low humidity, very warm because no air conditioning. There's no apparent drafts, no nearby open windows or fans. The new picture shows nearly zero warping, but upon very close inspection there appears to be about 0.05mm-0.1mm warping on some of the other pieces. As long as it does not warp further, this is totally acceptable for me now. Fingers crossed the remaining 4.5 hours finish with no more warp.
Could it simply be that the spool of white I received is kind of bad? I wish I could have bought a few prusament spools but I am in the US and was trying to avoid customs fees, so I went with amazon of course.
Cheers
RE: New MK3S+ First Prints and severe PETG warping issues
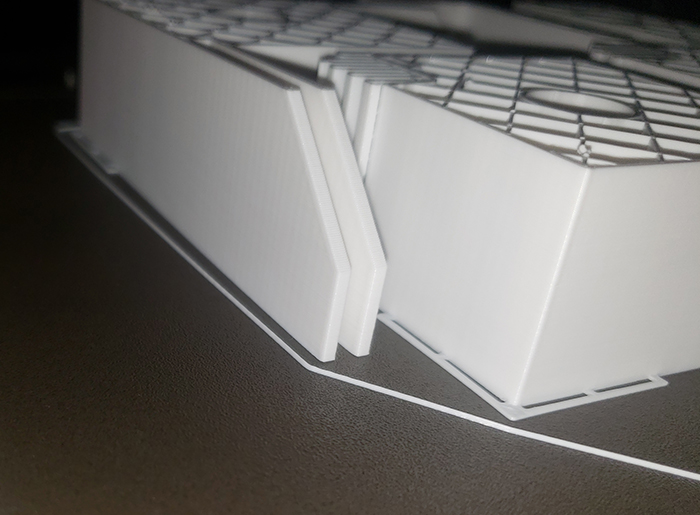
The 75mm square should be a solid piece of plastic which you can bend without breaking, it looks like yours has separated into strings so it means you need to go a bit lower. Once you've mastered the live Z it looks like your bed is pretty level and you'll get some really nice prints.
RE: New MK3S+ First Prints and severe PETG warping issues
White is always the trickiest colour in any line, it has a higher percentage of pigment than other colours, translucent/natural with none is usually the easiest to print.
and every square measure 0.2mm as it should.
It may measure more if you are too high but it should never measure less even if you are too low - that's how much filament you are extruding even if it has to ooze out sideways.
With PETG on a textured sheet it may be better to squish the filament into the texture a little more. Adjust your live Z until you begin to see rippling, it is too low, now back off *just* enough to loose the surface disturbances. Setting the tightest acceptable layer should improve adhesion. DO NOT DO THIS WITH A SMOOTH SHEET.
Cheerio,
That makes sense, I will try and lower it slightly with another 75x75 square before my next round of prints. Good idea, thank you!
Cheers
RE: New MK3S+ First Prints and severe PETG warping issues
@lize
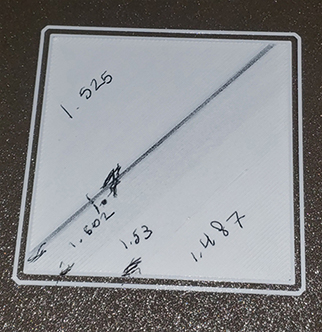
Yes I know I did the live Z on the square beginning at 0, so the first half was stringy and way to high as expected, I got it dialed in the second half where it was nice and solid layer all around with the Z height at -1.467 ish or around there. I'm going to lower it slightly as suggested by @diem to see if it sinks into the texture more on the next round.
RE: New MK3S+ First Prints and severe PETG warping issues
Thinking about it I originally got the smooth sheet and the textured one later, it took a couple of washes with soap and hot water before things sticked reliably and I thought it might have been a bit greasy after manufacture. It wouldn't hurt to give it another clean too. Good luck.
RE: New MK3S+ First Prints and severe PETG warping issues
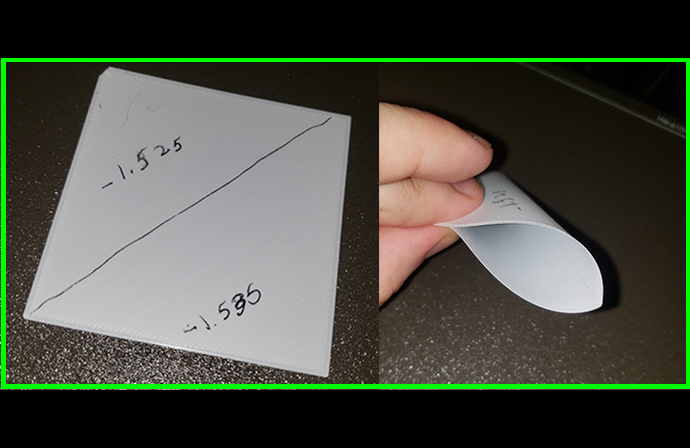
My second round of printing the enclosure parts finished successfully with minimal warping. So I proceeded with your suggestions of washing my sheet again thoroughly and rinsing with hot water, and doing a few more live-Z adjustments. As you can see I found the extreme low (-1.7~) and backed off to about -1.525. I then did a couple more squares and found -1.535 to -1.525 to be my sweet spot.
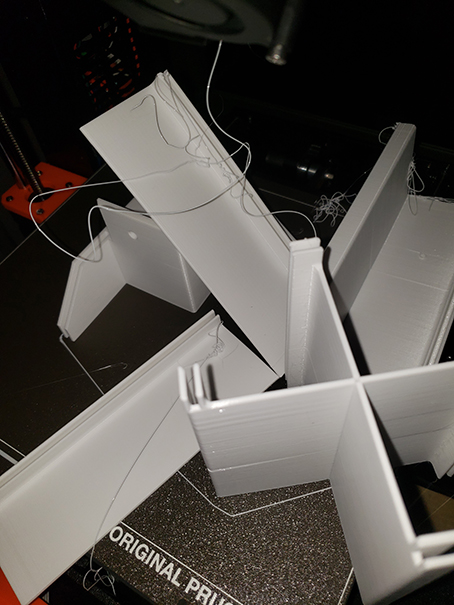
So I then printed the second part of enclosure parts (PSU parts) and that printed successfully, no apparent issue. Not until I began printing the third set of parts and a replacement rear corner piece (forgot to print two rear left pieces since I will mount PSU outside enclosure) did I encounter this warping again.. 😞

I really don't know what gives. To clarify I only did the soap/hot water wash and rinse once, as I've read you don't need to do that after every print. I just washed it before I printed the PSU pieces, which then printed perfectly. After the PSU parts finished, I wiped the bed with 99% IPA before proceeding with the next parts. And you can see above those thinner parts again are not sticking and pop off usually anytime after an hour in to the print.
- Do I just keep trying different Z-adjustments?
- Lower my pinda probe in small amounts?
- the first layer is 230C/90C (nozzle/bed) and the rest prints 245/90. Not really sure if this is my problem though
- Even though my room stays toasty warm about 38C or warmer, perhaps there is a ghost running circles around my printer creating a draft
- Anything else I am missing?
- I am feeling inclined now to wash my bed again and see if the parts print successfully. Perhaps the White PETG from Overture doesn't like IPA?
As I am still learning, is there any other things I may be unaware of that can cause this kind of problem? Aside from the solutions I have been trying, I'm not sure where to begin troubleshooting.
I guess as my last resort I will wash the bed again with soap and hot water, and this time add a hefty brim to those thinner parts. Though that scares me slightly because I feel that is unnecessary for these pieces if others have printed them without problem, and I will risk cracking those thin parts when trying to remove the brim.
Cheers.
RE: New MK3S+ First Prints and severe PETG warping issues
I think I'd go for washing the sheet again and having another go, the sheets seem to season and improve with age and it can never be too clean.
I don't use alcohol (because I couldn't get any during lockdown) and only wash the sheet and leave it to dry on a radiator. I tended to do this every print when the sheet was newer and now do it only after a few prints or if I accidentally touch it.
When you try your next print watch the first layer and perhaps lower another step. Don't move the Pinda or you'll be back to square one with the live Z, you'd only need to do this is it was too high and wasn't enough adjustment in the live Z. Not sure we checked before whether you are using 7x7 bed levelling rather than 3x3.
There shouldn't be a problem removing a brim if you do add one.
I've no experience with the Overture filament and so far have made few adjustments to the included PrusaSlicer filament profiles, you could perhaps try increasing your bed temperature by 5 degrees on the first layer. Also check the fan speeds against another PETG profile, too much cooling early on can lead to warping. Or zip your 3MF file and post it here and hopefully an expert can help.
RE: New MK3S+ First Prints and severe PETG warping issues
PS. I've just noticed your room is 38C, how do you sit in that heat?!!
RE: New MK3S+ First Prints and severe PETG warping issues
PS. I've just noticed your room is 38C, how do you sit in that heat?!!
Perhaps the printer is catching a draft from my nearby ice cold beers 🍺 and the ghost.
My bed leveling is on 7x7. I actually just opened two instances of prusaslicer to compare my file with the original in case I messed anything up. As far as I can see the only part that has a different setting is the black PSU parts (it had more solid top/bottom layers), but I had not changed anything in the settings/profiles from the standard prusa PETG profile aside from slightly different temperatures based on my previous prints with the black color overture, and noticing by trial and error that the temps I am using appeared to give a good first layer. Those 75x75mm squares certainly were a bit of a pain to get off, so I had assumed it would be good. I will have to try again and again with the default temps/profile, and then my temps, and then raising it again even more to see if that helps any.
There's about 5 hours left on my current print before I can do that test again and luckily some of the parts will be useable, so I will let it finish and start reprinting the replacements with a brim after new cleaning and temp trials.
Cheers
RE: New MK3S+ First Prints and severe PETG warping issues
With your multiple parts does it do layers of each one at the same time or print all of one before moving onto the next? Think behaviour depends on whether you have single or multiple STLs loaded into Slicer. Just wondering if there is a bit too much temperature change while its doing the multiple parts and whether doing some singularly might be another thing to check.
RE: New MK3S+ First Prints and severe PETG warping issues
@lize
That's an excellent point, In prusaslicer it shows the general behavior of focusing on one object before moving to the next object within the same layer (does that make sense). I had thought about this when I initially posted that it would be a good idea perhaps to split these files into less objects so there is more focus per object and less temperature change between objects as you say. Makes sense. Might just be that I'm also shooting myself in the foot trying to print these files that are 15+ hours, until I can get my printer properly enclosed and in a better location in my room.
RE: New MK3S+ First Prints and severe PETG warping issues
I printed some small letters in ASA the other day, I'd done a sample print and it looked OK so then did several on one sheet. They weren't bad but the layers didn't come out as nice as the first print so I went back to printing singularly.
I've seen people add things/multiples to the bed to introduce a bit of natural cooling across the parts but it could also work against your bed adhesion if first layers are cooling too much. The big difference in bed temperature to nozzle is one of the reasons ABS often warps.
On saying this I don't really see why you shouldn't be able to print them all at once but doing one or two at a time will give you chance to wear in the sheet and do any fine tuning for the white filament.
RE: New MK3S+ First Prints and severe PETG warping issues
I am sure you can imagine my frustration when this happens nearly 30 minutes before a 19 hour print finishes...... 🤬
Alright, so bottom line is the white is just not adhering an acceptable amount at this point. If raising the temperature, lowering Z even more, and cleaning the sheet again doesn't solve the issue, then I will be staying away from white color and overture brand for the long run . I can continue to wash the sheet with soap and water after every print and that is just what I am going to have to do. I've wasted almost half of my white spool at this point. I will not be able to print the full files anymore and will be forced to break them apart into smaller print times and less object per file in order to keep testing with what I have left.
RE: New MK3S+ First Prints and severe PETG warping issues
So I have made some relative progress, though I'm not sure if it is going in the right direction. Since my last frustrated post, I decided it was time to really put some of these unknown variables to rest. These variables include but are not limited to: fine tuning of temperatures and maintaining consistent temperature control throughout the duration of the print, washing the build plate with dawn and a thorough hot water rinse before every print, some sort of temporary enclosure is 100% needed in my case (may not be for everyone), of course a good live-Z adjustment is needed but I found that to be straightforward.
Ladies and Gentlemen, I present to you the Prusa Lack Enclosure V 1.8675309
(sorry, couldn't help myself 🤣 )
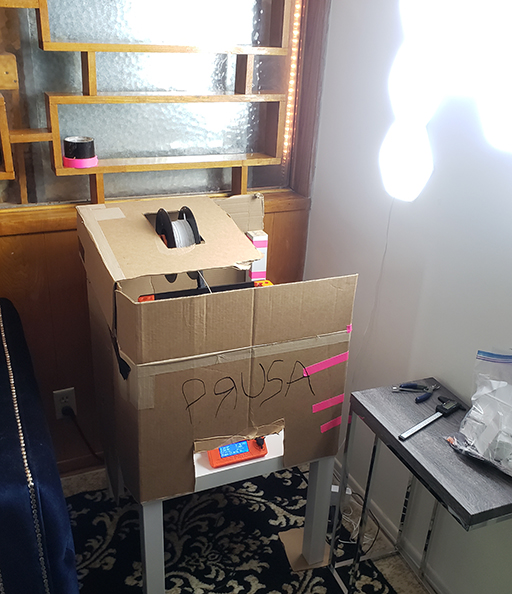
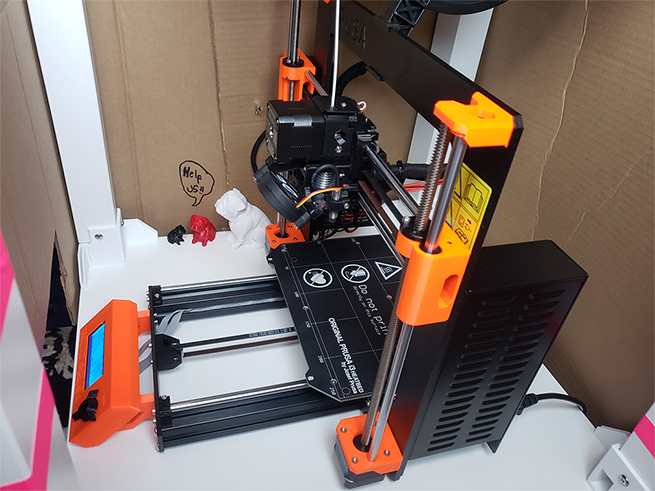
Jokes aside, I have now been able to get consistent successful prints with higher temperatures that stay consistent within this "open-air" cardboard box. I have replicated failed prints and found that I simply cannot print White PETG from overture at anything less than 265C Nozzle temp and 100C bed temp while keeping the ambient temp in the box at around 44-45C. First Layer temp must be 250C/90C for nozzle/bed. I can assure you, my room is not 44-45C 😉 I move the 3D printer into the corner of my living room area with the box. My living room stay much cooler at around 23C. I also notice the ambient temperature reading on the Prusa must be way higher than the actual ambient temperature in the box. I do find it hard to believe it is actually 44-45C in there, but anyways that doesn't bother me.
I did duplicate a print and try lower printing temp of 250C/90C with the first layer temp being 245C/85C. It fails, every time.
This white filament really likes it hot. 265C/100C is the winner. I even us the PP preheat settings before printing with it and let the noz/bed heat up for about 5 minutes before engaging the print. I have not yet had a print fail with these conditions so far. Finger crossed now I can complete the rest of these prints without much issue. Also, for some pieces I found it necessary to us a 4-5mm brim but careful judgement must be used and this is really only a last resort option for pieces that do not want to adhere whatsoever. I used a brim when re-printing the rear corner pieces and the tall standing pieces for the MMU cutout (.3mf files 1 and 2). Even with these hellish temperatures, I just couldn't trust those pieces to pop off an hour into the print and waste more filament.
I still have a lot of printing to go for the enclosure parts and if the rest of this spool goes well then I will give it another chance and order another white overture spool. Wish me luck
Cheers