LCD printing garbage after bed leveling
I just finished building my MK3S+ kit and started self test. It passed everything up to the bed leveling stage. When it finished the 9 points the LCD printed a screen of garbage (see image). I have left it in that state. What do I do now?

RE: LCD printing garbage after bed leveling
Check the ribbon cables at the back of the LCD display and at the Einsy board. Maybe one of these isn't seated correctly or maybe pulled during that movement of the print bed. Check that the cable can't be hit by moving parts.
RE: LCD printing garbage after bed leveling
I just finished building my MK3S+ kit and started self test. It passed everything up to the bed leveling stage. When it finished the 9 points the LCD printed a screen of garbage (see image). I have left it in that state. What do I do now?
Hello and welcome to the Prusaforum!
One possible problem is electrostatic charge. It would be helpful to ground yourself first and only then continue working on the printer.
Do you have the latest firmware for the MK3S installed (3.9.2)? A factory reset and reflashing of the firmware often helps with many problems.
Statt zu klagen, dass wir nicht alles haben, was wir wollen, sollten wir lieber dankbar sein, dass wir nicht alles bekommen, was wir verdienen.
RE: LCD printing garbage after bed leveling
@karl-herbert
Thanks for the replies. LCD flat cable connectors are seated at both ends. It is snowing sideways outside and very dry in the office so, yes, we have static. I have been grounding myself to one of the four screws into the rails on either side of the LCD. I checked continuity to a screw on the PSU and they are connected. I have rerun the XYZ cal and tried first print calibration. It starts out ok but at the end just produces a ball of PLA stuck to the nozzle. I have adjusted the PINDA up one click and tried again while adjusting the Z value down so far with same results. Adhesion is a problem so I cleaned the plate with IPA (the alcohol not the beer) a couple of times with no improvement. I am cleaning the nozzle each time with a green scrubber pad. I will continue to try to tune up the first layer.
RE: LCD printing garbage after bed leveling
@philg
are the hieroglyphs gone?
Next problem could be a misaligned filament sensor: https://help.prusa3d.com/en/article/ir-filament-sensor-troubleshooting-mk2-5s-mk3s_112226
The best way to clean the print bed is with dishsoap and warm water. Finally, dry with a lint-free cloth and do not touch the print surface with your fingers.
Statt zu klagen, dass wir nicht alles haben, was wir wollen, sollten wir lieber dankbar sein, dass wir nicht alles bekommen, was wir verdienen.
RE: LCD printing garbage after bed leveling
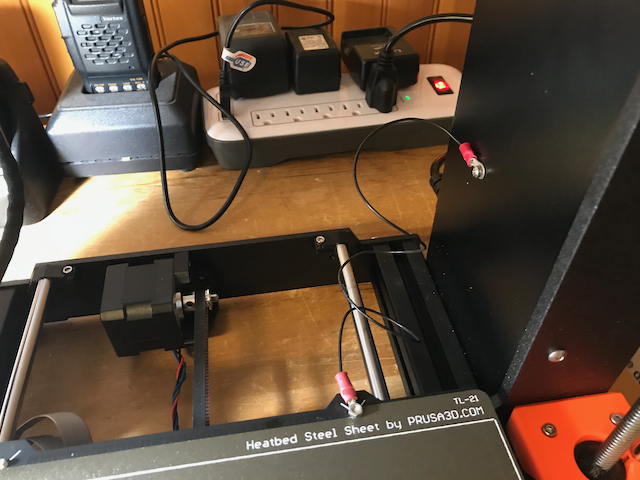
I realized that the spring steel plate is insulated from ground both by the heater plate under it and the powder coat enclosing it. When I put the steel plate on to do the first layer calibration the processor would run the cal program fine while the LCD sometimes went blank and then display garbage at the end of the procedure without me being close to or touching the device. Of course, that means I couldn't tune the nozzle height. I suspect that big (possibly charged) capacitor formed by the steel plate may be discharging to the nozzle at some point causing the LCD to go bonkers. I added a ground wire loop from the plate to the PSU and it seems to be failing a lot less often. I had to remove a little of the powder coat near the right hand alignment screw stud to make the ground connection to the steel plate (see picture).
During assembly I did not like forcing the LCD flat cables into the rail slots for fear of cutting the insulation or breaking a conductor so I used electrical tape to fasten them flat on top of each other along the bottom of the rail. Now I am thinking that having those two cables running parallel to each other potentially causes crosstalk between them and they should be separated by a piece of aluminum or copper tape which would be grounded to the rail. I will try that too. Maybe there also should be a #22 ground wire connected from the LCD board to the frame to keep it electrically close to ground.
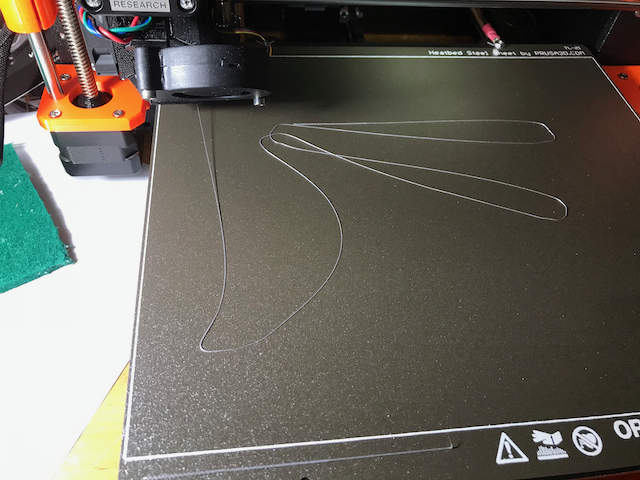
So I was able to run the first layer calibration but no matter what I adjusted, the trace would not stick to the plate and especially when the nozzle is rapidly oscillating at the end of the large zig-zag, the PLA just balls up on the nozzle and then drags the rest of the zig-zag with it when it moves up the Z axis(see picture). I will try soap and water rather than IPA tomorrow. I don't think there is a problem with the filament sensor, at least I have not had any indication of failure from the self test.
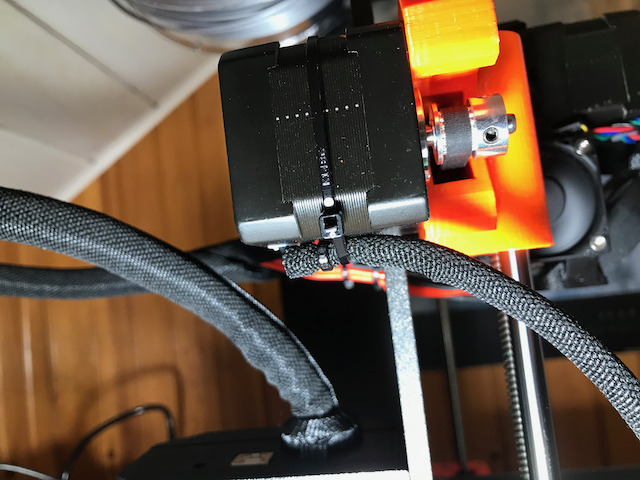
On another subject, during the assembly, I felt that the X-axis motor cable would be subject to breaking right between where it exits the sheath and enters the motor so I wrapped a couple of zip ties around the motor to prevent the wire from bending when moving up and down the Z-azis (see picture).
RE: LCD printing garbage after bed leveling
I've tried cleaning the bed with soap and water, I've tried a different manufacturer's PLA, I measured the bed temp with a thermocouple and it was 8 degC below the regulated temp so I increased the bed temp by 8 deg (room temp is 20C) and, so far, nothing has helped adhesion. I would like to try the suggested g-code instead of the built-in first layer cal but not sure how to do that. Not sure where I go from here.
RE: LCD printing garbage after bed leveling
Hi Phil,
are you still using 3x3 mesh bed levelling,? if so, can you please turn on 7x7 mesh bed levelling, using the LCD menu. this will test 49 points on the build plate.
I suggest that you try another first layer calibration program...
https://shop.prusa3d.com/en/
there is a zip file at the bottom of the first post on the first page.
this contains three test patch gcodes, one each for PLA, PETG and ABS
open the zip file so that you can access the files,
load the appropriate file onto the SD card, and run the file on the printer.
follow the instructions adjusting live Z as the print continues.
as nothing is currently sticking, I suspect your live Z is too high off the build plate, so I suspect you will need to make live Z a larger negative number
good luck, Joan
I try to make safe suggestions,You should understand the context and ensure you are happy that they are safe before attempting to apply my suggestions, what you do, is YOUR responsibility.Location Halifax UK
RE: LCD printing garbage after bed leveling
joantabb, thank you. I had downloaded those files before but was unsure how to use them. I ran the PLA file without changing the mesh bed leveling and adjusted my Z-offset -1.4 mm which was quite a bit lower than what I tried before and the print had gaps. I eventually got to -1.55 mm and it printed nicely (what do you think?). I measured the thickness and it was about 9 mils (230 um). The temperatures it used (225/55) are quite different from the ones that are normally set for PLA from the LCD (215/60). I want to adjust the nominal bed and nozzle temperatures so that the changes are saved in memory, how do I do that? Since my office ambient is about 20C I think it's a good idea to increase the bed temp and maybe the nozzle too, at least until spring.
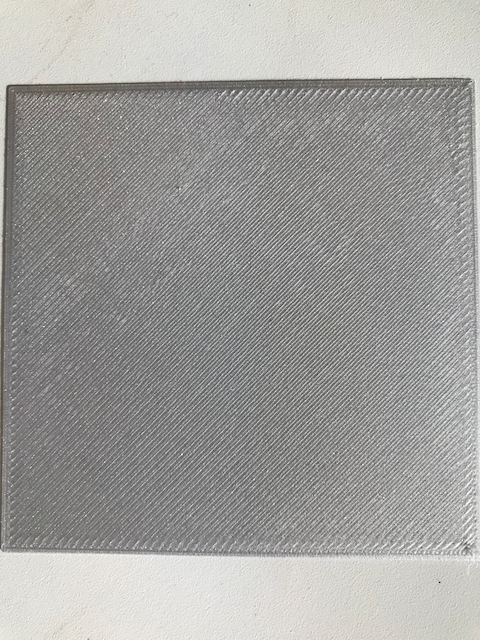
RE: LCD printing garbage after bed leveling
Hi Phil,
That looks good, perhaps a tiny bit low. at the edges it looks like the nozzle is causing tiny furroughs, as the initial extrusion is at the ends of the lines are a tiny bit heavier than the middles... see how it looks when you print a file that you slice yourself... the file that you used for Life adjust Z My way
regards Joan
I try to make safe suggestions,You should understand the context and ensure you are happy that they are safe before attempting to apply my suggestions, what you do, is YOUR responsibility.Location Halifax UK
RE: LCD printing garbage after bed leveling
Hello Joan
I ran the first layer test again while tuning the nozzle distance. I started at -1.550 mm which is the picture I attached to my previous post and went down in steps to -1.450mm. At -1.450mm the layer easily tore because of bad adhesion between lines. I took microscope images of one corner of each sample. I think, based on my uneducated eye, that -1.500 worked best. I will try a file that I have sliced sometime soon.