First layer issues with intricate patterns
Hello, I've been using the i3 mk3s+ as my 1st 3d printer for about 2 months now, and have printed quite a few items although most were quite basic and easy to print. Recently I've been looking for more complex models and came across this nice looking clamp:
https://www.thingiverse.com/thing:2833822
The key issue I am having so far is getting the 1st layer down properly: I've gotten everything down to a point where "easy" patterns like long unbroken lines, gentle curves, and so forth, adhere rather well and lead to successful prints. However, with "pecky" details like the text on the clamp surface, adhesion doesn't take very well and I'm dealing with mounds of molten filament rather quickly.
Aside from that, I'm also noticing that in the beginning stages of the print, the extruder tends to "hack up" globs of partially melted filament here and there, frequently (~30%) ruining the first layer and forcing a restart. Annoyingly, this happens right AFTER the initial purge AND the first layer skirt. So it always affects the actual print. Is this due to waterlogged filament? The reason I don't believe that to be the case is when the print goes past the first layer, I generally do not get the glob issue.
Details:
- stock i3 MK3S+
- 0.6mm e3d brass nozzle (printed many "easy items" successfully with this)
- smooth prusa sheet
- using prusaslicer
- XYZ calibration reports "perpendicular" (strangely, I got the "slightly tweaked" result the first few times I ran calibration, but recently I got the perfects)
- colorfabb PLA/PHA filament, recently opened (used this for a few successful "easy prints")
- bed temp I tried from 60-70deg
- nozzle temp I tried from 205-220deg, so far 210 seems to work the best, but still getting the occasional glob
RE: First layer issues with intricate patterns
First layer problems are z-height problems 90% of the time - even if you printed "easy" patterns successfully you might not be at the perfect z-height. Do some z-height calibration prints (e.g. this one: https://forum.prusa3d.com/forum/original-prusa-i3-mk3s-mk3-assembly-and-first-prints-troubleshooting/life-adjust-z-my-way/#_ga=2.164769084.226967347.1617611670-1776735925.1604498294 or https://www.prusaprinters.org/de/prints/13254-prusa-i3-mk3-z-height-tests-and-live-adjust-models or https://www.prusaprinters.org/de/prints/10876-first-layer-test-100x100-mm-square preferably with standard slicer settings) and post pictures of the results. If we can rule out "wrong z-height" you can move on with troubleshooting different parameters and tweaks.
If at first you don't succeed, skydiving is not for you.
Find out why this is pinned in the general section!
RE: First layer issues with intricate patterns
I printed that. It's a pain in the ass to get the infill right so the clamp is more than a pretty gee-gaw as useful as an ocarina with dice inside. Funny how somebody added a brand name to it - the one thing is does best is twist 😉
RE: First layer issues with intricate patterns
First layer problems are z-height problems 90% of the time - even if you printed "easy" patterns successfully you might not be at the perfect z-height. Do some z-height calibration prints (e.g. this one: https://forum.prusa3d.com/forum/original-prusa-i3-mk3s-mk3-assembly-and-first-prints-troubleshooting/life-adjust-z-my-way/#_ga=2.164769084.226967347.1617611670-1776735925.1604498294 or https://www.prusaprinters.org/de/prints/13254-prusa-i3-mk3-z-height-tests-and-live-adjust-models or https://www.prusaprinters.org/de/prints/10876-first-layer-test-100x100-mm-square preferably with standard slicer settings) and post pictures of the results. If we can rule out "wrong z-height" you can move on with troubleshooting different parameters and tweaks.
You are correct - the Z-height that I had thought was set correctly based on the stock 1st layer calibration program (the zig-zag) was only partway to optimum. I had to go another 100 micrometers down to get the correct height. Probably unrelated to the issue, but I also had to fix a loose Y-axis belt at this time.
One thing that still bothers me is the finish of the 1st layer - the test square at the correct height had a nearly prefect smooth finish, but when I go to print an actual part, the finish looks rough. It's still considerably better than before, as I don't get the "globs" which now I believe is the result of the nozzle scraping established layers back off. Lastly, I got a brass brush and made sure the nozzle is clean before starting a print.
I'll post pictures of the layers later today. Thanks for your advice. 🙂
RE: First layer issues with intricate patterns
I printed that. It's a pain in the ass to get the infill right so the clamp is more than a pretty gee-gaw as useful as an ocarina with dice inside. Funny how somebody added a brand name to it - the one thing is does best is twist 😉
I had no illusions of this tool having anywhere near the utility of the original metal version! Perhaps a PC or Nylon version could be usable. Mainly I liked the way it looked and was curious if my printer was able to produce parts that would fit together properly.
RE: First layer issues with intricate patterns
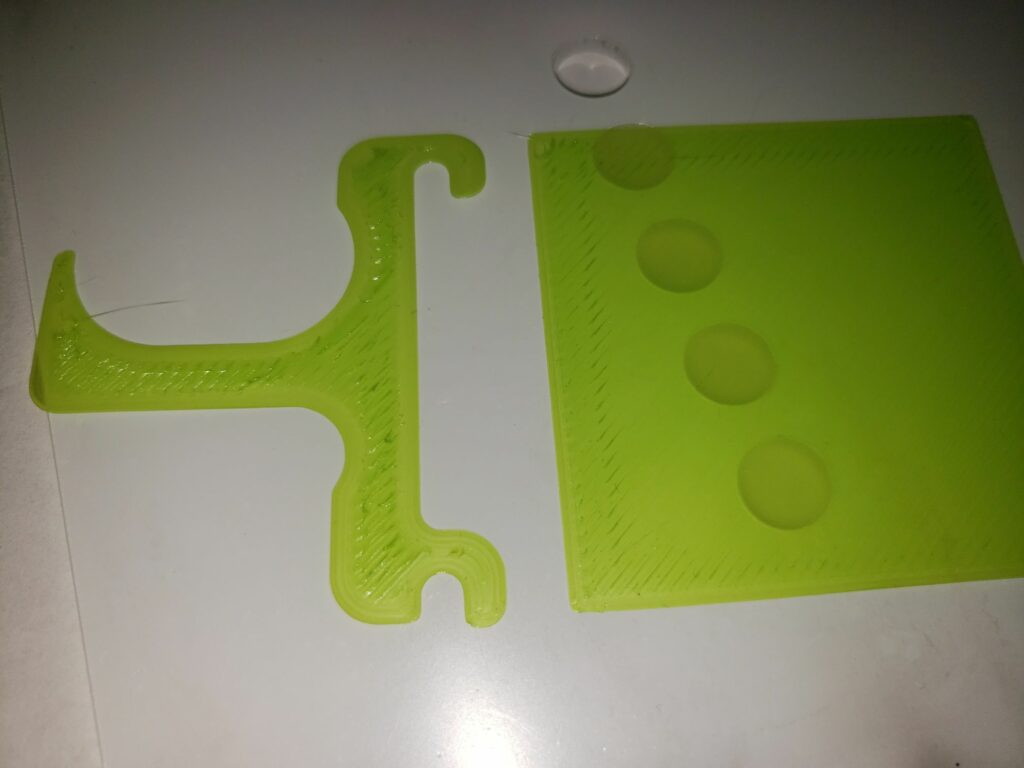
Here are the two single layer prints (0.20mm) made with the same Live-Z value. The square is the calibration print I used to dial the Z-height with, and the surface is very even. The left is the 1st layer of an "easy print" which was done right after the calibration. The perimeters look good, but the center fill exhibits a lot of ridges. Nevertheless, this was still a considerable improvement to what I was getting prior to the improved calibration.
RE: First layer issues with intricate patterns
Wavy like water means you are too low
