First Layer Frustrations
I've been experiencing first layer problems since I received my kit MK3 in February. I have XYZ calibrated so many times, but to little success. It seems as though there is a sweet spot on the bed at which the printer can print something without much of an issue in the first layer. But if I do anything large, like this raspberry pi case, it all goes awry.
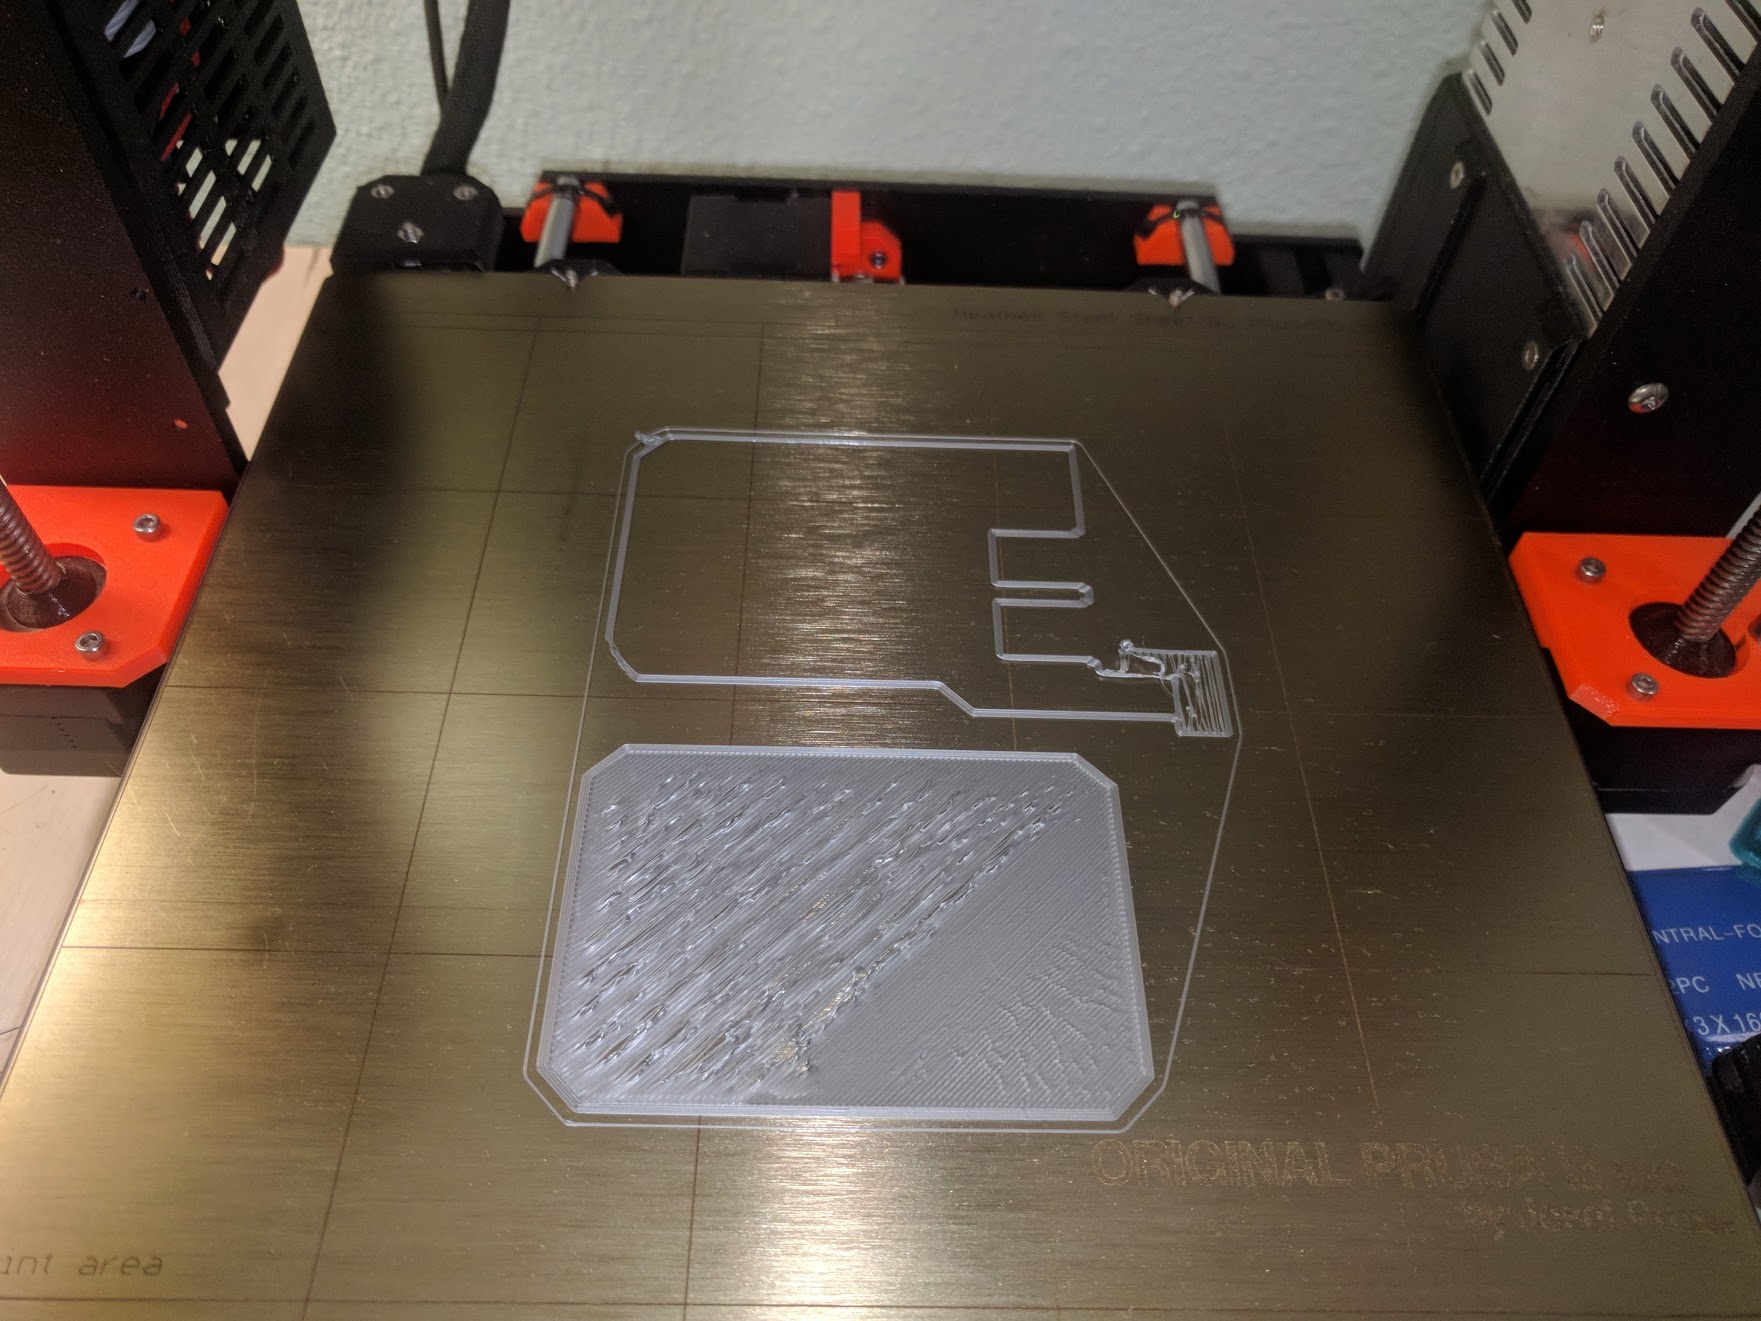
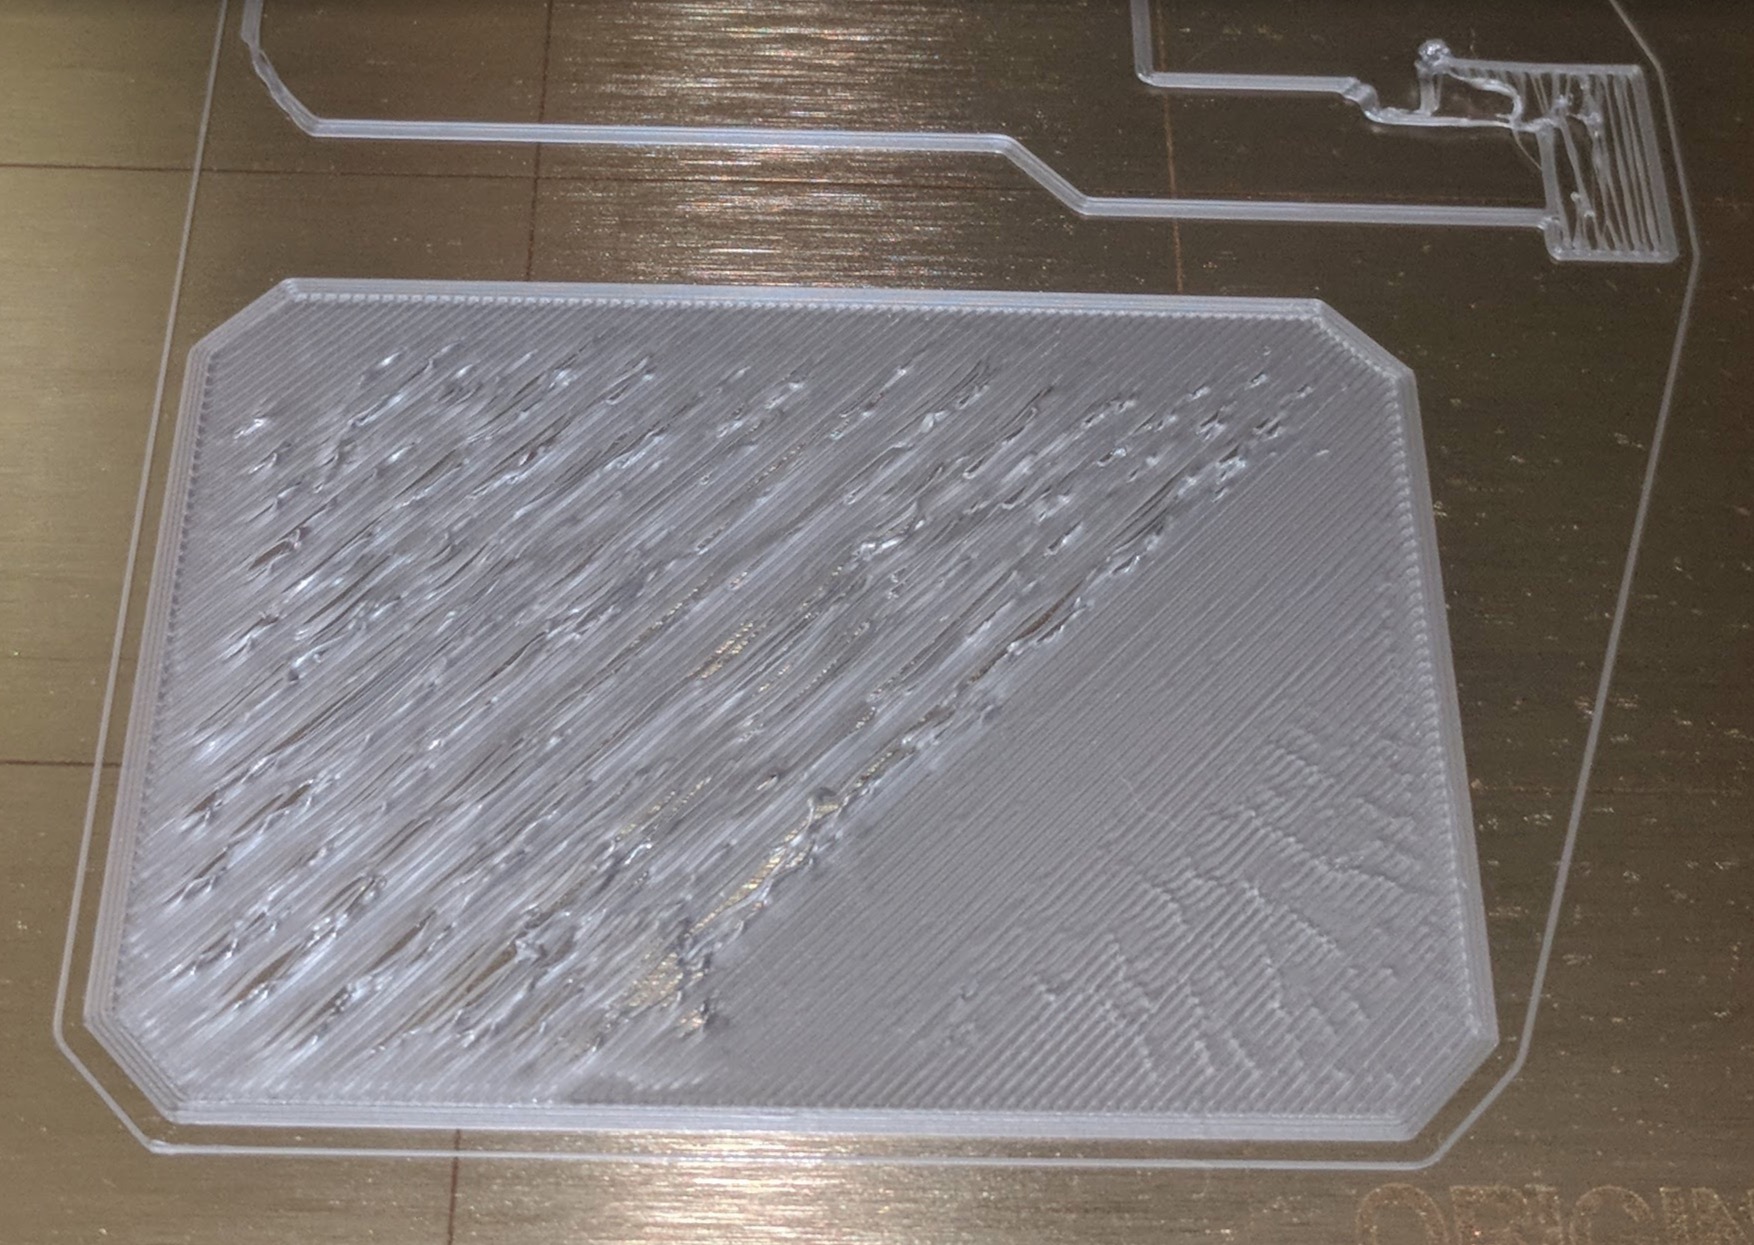
As you can see one the bottom print, the first layer is sort of bad at first, then dials in to smooth, and then wildly starts shredding itself, all on the same Live Z value.
Each time there is a firmware update, I hope that it will solve the problem. After each successive update and calibration, I'm stuck with the same issue. I can only speculate about the root of the issue: inaccurate automatic bed leveling, wild fluctuations in bed temperature, improper PINDA temperature, etc.
I don't want to go the route of others and go with custom firmware. So I hope posting here will continue to improve this great 3D printer down the road.
Re: First Layer Frustrations
Looks familiar! I assume you already tried adjusting your live z-height? That usually works for me. Alternately, try doing a conceetric infill and/or changing your infill-to-perimeter overlap to 0% instead. Any better?
Good photo! I'm curious what others have to say about this.
Also, cleaning your bed for better adhesion might help.
There may not be a single magic bullet, but instead a combination of things to solve it.
The first layer is always the trickiest. Sometimes a second or third layer pass, if you can make it that far, will smooth over it though and in some sense bury the problem.
Re: First Layer Frustrations
I have adjusted live z-height, but as you can see, it seems to produce inconsistent results depending on where on the bed it is printing. As you can see at the top, adhesion is lost entirely and it looks like silly string.
Re: First Layer Frustrations
Just spitballing this until someone smarter than me can reply, but the poor adhesion may be fundamental, at least in the big square in the front. Probably the nozzle sorta rips into it when laying down consecutive extrusions, creating a cascading failure of ripped up material. But you're also right, it looks like the bed levelling may not be fine grained enough to handle whatever warpage is going on. I presume your slicer's gcode is bed leveling *after* the bed is heated up?
I wonder if maybe your PINDA is getting inaccurate height readings when it measures your bed. What is the live z-height compensation you have going on? I've read somewhere on the forum that the optimal amount is around -0.8mm, or something like that. If it's more than -1.2mm in magnitude, IIRC, the accuracy may go down (?).
Anyhow, great post and excellent photo.
Hopefully Joan.t chimes in. She's full of great suggestions. 😀
According to PJR, "The bed should be heated with the extruder high to prevent heat affecting the probe." ❗
Re: First Layer Frustrations
Hi Nathan,
there is a bed level correction option in the calibration menu,
this allows you to change front, rear left and right, relative to the overall liveZ setting...
this may help...
I use a 200mm square patch, 0.2mm thick, with concentric infill,
I let it run about 5 outlines, and watch what happens,
then adjust left, right, front, back as necessary. and re run the 200mm patch
if it's close, I check liveZ, and repeat until it's as good as possible...
some folk do hyperfine bed levelling(search on forum), this requires non standard firmware... I don't do that!
I have never let a full 200mm patch complete... which saves time. and materials
regards Joan
I try to make safe suggestions,You should understand the context and ensure you are happy that they are safe before attempting to apply my suggestions, what you do, is YOUR responsibility.Location Halifax UK
Re: First Layer Frustrations
My Live Z Height for my printer is around -.75. I am not sure if adhesion is the issue, I keep the bed proper clean with acetone. But I absolutely auto bed level after pre-heating before each print. Thanks for the advice!
Joan, when you test with the 200mm patch, are you test printing it on different areas of the bed?
It pretty nearly fills the bed. I suppose you could get aggressive and completely fill the bed, except for the priming line.
I don't seem to have the problem, but if you do, I just noticed this, which should help: general-discussion-announcements-and-re ... 18890.html
Very timely!
Good luck!
Re: First Layer Frustrations
You may want to first get your bed as flat as possible first. What helps a lot are the TPU Micro springs and the Octoprint PrushMeshMap Plugin here are the links https://shop.prusa3d.com/forum/user-mods-octoprint-enclosures-nozzles--f65/-help-needed-octoprint-prushmeshmap-plugin-t15333.html#p85988
I had to put 2 springs in the right hand corner 1 in the middle and 1 on the left hand side middle for both beds. Just put the screws in snug then run the bed level plugin and then what ever is yellow slowly tighten a little at a time (very little adjustment goes a long way just take your time you do not want to squish the springs completely or you will have to replace it and start over.After that if you need it you can adjust the mesh bed leveling in software
Now getting the first layer down correctly the PINDA is temperature sensitive so you want to install the latest firmware put in the gcode that waits for the correct temp in this thread and follow the instructions to manually calibrate your live -z layer between (0.800-0.950) at 35c, 40c, 45c, 50c 55c and 60c here https://shop.prusa3d.com/forum/-f0/1st-layer-problems-in-depth-look-at-software-pinda-t14815.html#unread
The Latest Firmware can be found here https://github.com/prusa3d/Prusa-Firmware/releases
Open Firmware Issues https://github.com/prusa3d/Prusa-Firmware/issues
Re: First Layer Frustrations
I did some bed level correctioning last night as Joan suggested. I am getting somewhat better results, but the filament is still curling over. That said, I got the first layer to remain in place and it printed the Raspberry Pi case! Thanks for the additional replies, I'll give this plug-in a try. It really looks helpful.
Re: First Layer Frustrations
assuming Pinda is at the correct height relative to the nozzle, the next step imo is to run G80 to auto bed level and G81 to get the results.
If there is a gross error on one corner, next consider the information here:
Re: First Layer Frustrations
Which of the following statements are correct?
Pinda probe temperature calibration in firmware is broken therefore gives unreliable measurements over different temperature ranges.
In some cases pinda probe gives noisy signals when mounted at the height specified in the manual and must be lowered.
When Probe is mounted at a height the gives consistant readings between prints, some manual adjustment of bed level correction from lcd control is required to do the job mesh bed leveling is supposed to do.
When you get it all sorted first layers are consistent and printer works very well.
Re: First Layer Frustrations
Which of the following statements are correct?
.....
When you get it all sorted first layers are consistent and printer works very well.
.....
that's the closest but I wonder if there are problems caused by variations in manufacturing and even part changes. I got my printer pretty early and never had any real trouble with the Z axis adjustment. My Live Z offset is -0.69. I have only printed PLA and PC-MAX (which requires much higher temperatures).
Re: First Layer Frustrations
For clarity's sake, I have the most recent firmware update (3.2.1) installed, and I have run XYZ and bed leveling calibrations. If I am rightly following the manual, as you say, my PINDA is at the desired height relative to the nozzle: roughly 2mm above the nozzle height. Bed Level adjustments are working, I have the left at -30 um and the back at -25um, but I still can't print much of anything big. What do you mean by "run G80 to auto bed level and G81 to get the results". Can you link me to how I do these things?
Re: First Layer Frustrations
If your printer is not connected to a computer, do that and then run Pronterface. I am not 100% sure but this might be included when you install the Prusa version of Slic3r or when you donwload drivers.
here is an [EXAMPLE ONLY] of how to connect and send G codes to the printer - note this is for a different machine.
1) run [Calibration][Calibrate Z] (printer will move all the way to the top to drive the Z axis into end stops - watch for obstructions! and then will do first layer cal
2) run [Calibration][Auto home]
2.5) preheat the printer or not your choice
3) send command G80 from Pronterface - this will trigger the 9 point measure first layer calibration
4) when that is finished send G81 from Pronterface and it will immediately return a table of values
the Pronterface terminal will look something like this:
>>> g80

SENDING:G80

echo:busy: processing

echo:busy: processing

echo:busy: processing

echo:busy: processing

echo:busy: processing

echo:busy: processing

echo:busy: processing

echo:busy: processing

echo:busy: processing

echo:busy: processing

echo:busy: processing

echo:busy: processing

echo:busy: processing

>>> g81

SENDING:G81

Num X,Y: 7,7

Z search height: 5

Measured points:

  0.00833  0.04731  0.07037  0.07750  0.06870  0.04398  0.00333

  0.09861  0.15048  0.18150  0.19167  0.18098  0.14943  0.09704

  0.15333  0.21314  0.24962  0.26278  0.25261  0.21913  0.16231

  0.17250  0.23528  0.27472  0.29083  0.28361  0.25306  0.19917

  0.15611  0.21690  0.25681  0.27583  0.27397  0.25122  0.20759

  0.10417  0.15801  0.19588  0.21778  0.22369  0.21363  0.18759

  0.01667  0.05861  0.09194  0.11667  0.13278  0.14028  0.13917
you can copy/paste the table of values into this page
http://lokspace.eu/3d-printer-auto-bed-leveling-mesh-visualizer/
HOWEVER don't rely on that web page for correct orientation of the axis, just for a viewable look.
don't be alarmed if the display shows something very crazy - it is a very exaggerated scale !
you can experiment with small pieces of paper under a corner or in the middle of the bed to prove to yourself which values correspond to which cell in that table.
finally, remember to wipe clean the printer bed with isopropyl alcohol before each print and use something that will not leave lint if possible. I have 70% concentration at the moment but I prefer to use 90%
Re: First Layer Frustrations
Thanks for the thorough walkthrough, I'll try it when I get home from work!
Re: First Layer Frustrations
If your printer is not connected to a computer, do that and then run Pronterface. I am not 100% sure but this might be included when you install the Prusa version of Slic3r or when you donwload drivers.
here is an [EXAMPLE ONLY] of how to connect and send G codes to the printer - note this is for a different machine.
1) run [Calibration][Calibrate Z] (printer will move all the way to the top to drive the Z axis into end stops - watch for obstructions! and then will do first layer cal
2) run [Calibration][Auto home]
2.5) preheat the printer or not your choice
3) send command G80 from Pronterface - this will trigger the 9 point measure first layer calibration
4) when that is finished send G81 from Pronterface and it will immediately return a table of values
the Pronterface terminal will look something like this:
>>> g80

SENDING:G80

echo:busy: processing

echo:busy: processing

echo:busy: processing

echo:busy: processing

echo:busy: processing

echo:busy: processing

echo:busy: processing

echo:busy: processing

echo:busy: processing

echo:busy: processing

echo:busy: processing

echo:busy: processing

echo:busy: processing

>>> g81

SENDING:G81

Num X,Y: 7,7

Z search height: 5

Measured points:

  0.00833  0.04731  0.07037  0.07750  0.06870  0.04398  0.00333

  0.09861  0.15048  0.18150  0.19167  0.18098  0.14943  0.09704

  0.15333  0.21314  0.24962  0.26278  0.25261  0.21913  0.16231

  0.17250  0.23528  0.27472  0.29083  0.28361  0.25306  0.19917

  0.15611  0.21690  0.25681  0.27583  0.27397  0.25122  0.20759

  0.10417  0.15801  0.19588  0.21778  0.22369  0.21363  0.18759

  0.01667  0.05861  0.09194  0.11667  0.13278  0.14028  0.13917
you can copy/paste the table of values into this page
http://lokspace.eu/3d-printer-auto-bed-leveling-mesh-visualizer/
HOWEVER don't rely on that web page for correct orientation of the axis, just for a viewable look.
don't be alarmed if the display shows something very crazy - it is a very exaggerated scale !
you can experiment with small pieces of paper under a corner or in the middle of the bed to prove to yourself which values correspond to which cell in that table.
finally, remember to wipe clean the printer bed with isopropyl alcohol before each print and use something that will not leave lint if possible. I have 70% concentration at the moment but I prefer to use 90%
So when it is pasted into that website, what is considered good? Red or blue or ??
Re: First Layer Frustrations
....
So when it is pasted into that website, what is considered good? Red or blue or ??
....
I think it is relative, blue is low and Red is high. It is possible that the chart will autoscale and always show something of each color regardless of magnitude but I am not sure.
What I look for is symmetry (a single low corner or single high corner is bad).
On my bed the middle seems consistently high so I have purchased a shorter standoff to put in the middle and I will try that in the next few days. Bear in mind, however, that I have not had any problems with my printer - I am just experimenting with improvements that may bear fruit in the long run.
Even though my printer's bed is up to 0.4mm high in the middle compared to the outer it will still print a single layer 200x200 very well because the z axis follows the measurements.
Re: First Layer Frustrations
I've been experiencing first layer problems since I received my kit MK3 in February. I have XYZ calibrated so many times, but to little success. It seems as though there is a sweet spot on the bed at which the printer can print something without much of an issue in the first layer. But if I do anything large, like this raspberry pi case, it all goes awry.
IMG_20180531_204158.jpg
As you can see one the bottom print, the first layer is sort of bad at first, then dials in to smooth, and then wildly starts shredding itself, all on the same Live Z value.
Screen Shot 2018-06-01 at 9.42.58 AM.jpg
Each time there is a firmware update, I hope that it will solve the problem. After each successive update and calibration, I'm stuck with the same issue. I can only speculate about the root of the issue: inaccurate automatic bed leveling, wild fluctuations in bed temperature, improper PINDA temperature, etc.
I don't want to go the route of others and go with custom firmware. So I hope posting here will continue to improve this great 3D printer down the road.
From my small point of view this looks a bit like underextrusion and I reallu do not understand why there are artefacts at the lower right side of the print. Would be quite helpfull to know which slicer you use and with wich temperatures you run your MK3. I also assume that this is the silver PLA from prusa?
Greetings
Jonasebby
Re: First Layer Frustrations
My Live Z Height for my printer is around -.75. I am not sure if adhesion is the issue, I keep the bed proper clean with acetone. But I absolutely auto bed level after pre-heating before each print. Thanks for the advice!
Joan, when you test with the 200mm patch, are you test printing it on different areas of the bed?
It pretty nearly fills the bed. I suppose you could get aggressive and completely fill the bed, except for the priming line.
I don't seem to have the problem, but if you do, I just noticed this, which should help: general-discussion-announcements-and-re ... 18890.html
Very timely!
Good luck!
Well I am quite new at 3D printing and really no offense but this first layer looks really squished. The pressure regulation stripe looks very thin.
But i could totally be wrong.
Kind regards.
Jonasebby
Re: First Layer Frustrations
I too have been having similar issues.
Small items no problem, but once you try to print something almost the full width of the bed, No chance!.
I used pronterface and ran the G81 command which shows the mesh bed levelling and was out by 0.6mm which when your printing 0.2mm is a lot of variance, so I found some 3x1.5mm 'O' Rings and fitted them between the spacers and the carriage, this gives enough squish to be able to adjust the heat bed and steel plate using the Calibration Mesh Bed Leveling from the Prusa menu, once completed, send G81 from Pronterface and copy and paste the values into http://lokspace.eu/3d-printer-auto-bed-leveling-mesh-visualizer/
If trying the same, be aware that 1 full turn of the bed screws = 0.5mm, so what I did was when fitting, screw the m3 screws in until just begining to squish the 'O' ring, then do one full turn then run the calibration and visualise the results before adjusting further.
Just be aware that the front and rear is reversed, left and right are fine.
If you have a blue low point and you try to unscrew a little (quarter turn max to get it close to begin with) and the screw becomes slack, you will need to turn all the other screws in 1/4 turn then re run the calibration, copy and paste into the visualizer and try again.
Initially do this on a cold bed until you get the calibration within 0.1mm across all the points, but make sure your middle screw is not bottomed out.
Then heat the bed up to your normal material temperature (60 ish for PLA, 85 ish for PETG or whatever you print at most).
Now run the calibration again, then G81 again and you will see the middle has bowed up. You should be able to tighten the middle screw to compensate for this.
If you can get everything within 0.15mm whilst heated up, then carry out a LIVE-Z calibration run.
I found that with the new textured PEI sheet, the thickness of the calibration squares is more like 0.25 rather than 0.2 for nice smooth prints.
Oh and one more thing, get yourself an e-3d silicone sock pro, you will be so glad you did. Nothing to do with bed levelling, but now you don't get stuck filament on the nozzle dragging through your first layers print.
Normal people believe that if it is not broke, do not fix it. Engineers believe that if it is not broke, it does not have enough features yet.