Re: First Layer Frustrations
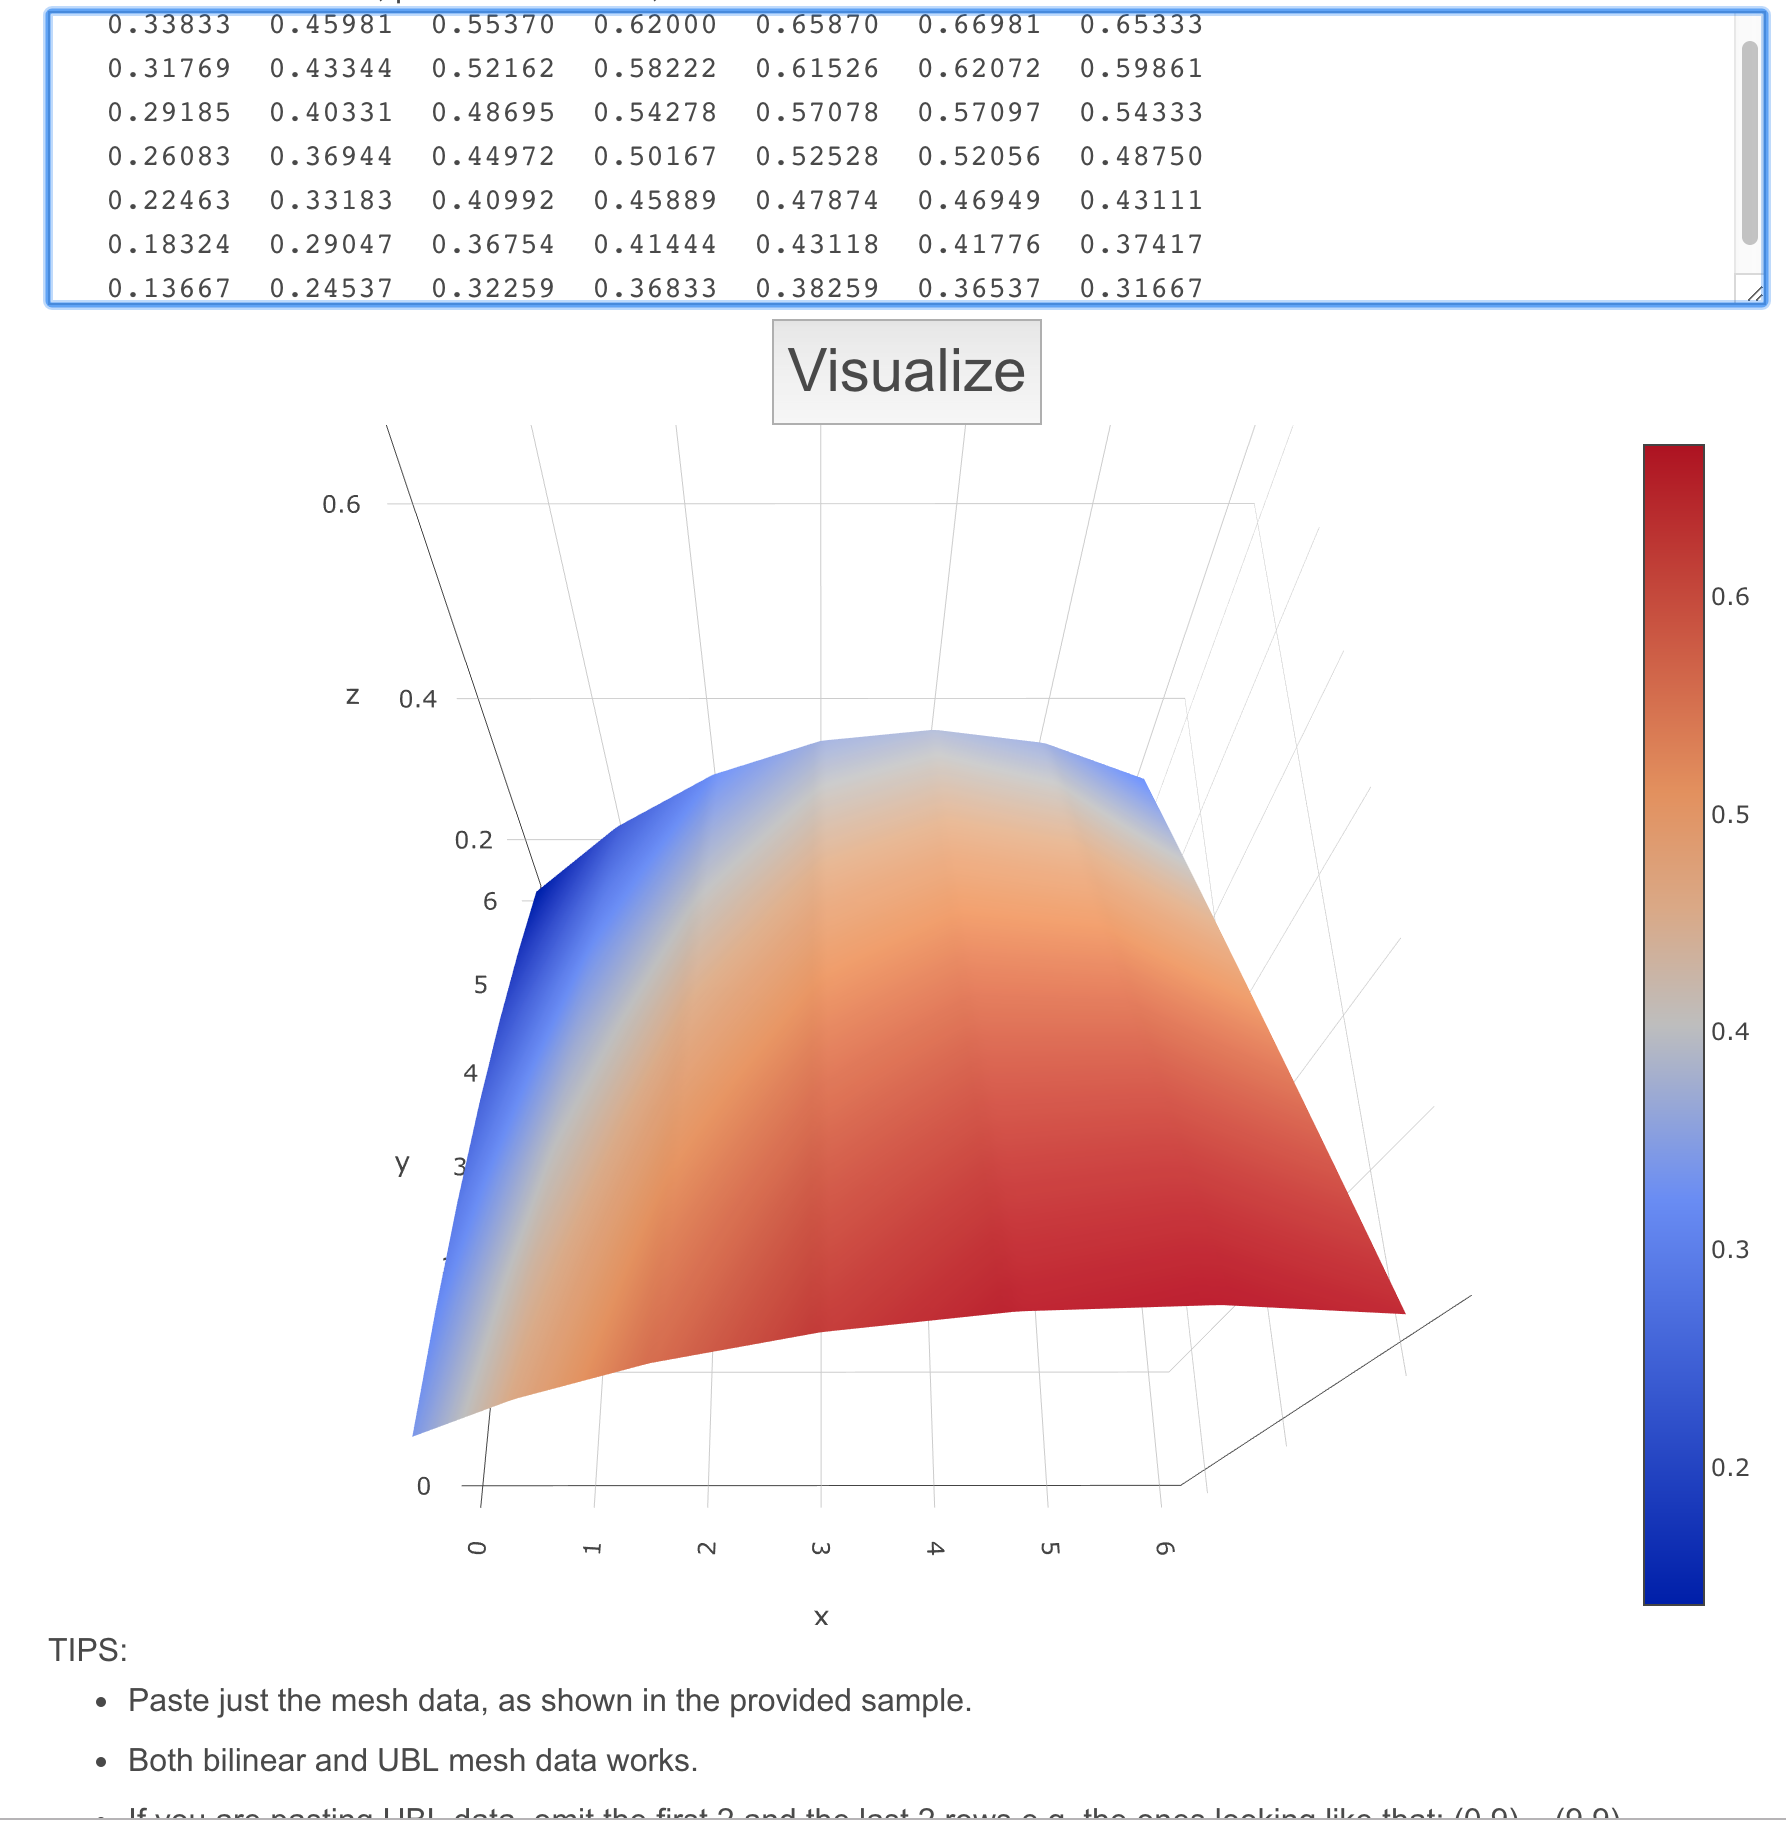
And here is my G81 output at temperature for PETG:
0.10250 0.10481 0.10648 0.10750 0.10787 0.10759 0.10667
0.10102 0.10330 0.10506 0.10630 0.10701 0.10719 0.10685
0.09991 0.10219 0.10404 0.10546 0.10645 0.10701 0.10713
0.09917 0.10148 0.10343 0.10500 0.10620 0.10704 0.10750
0.09880 0.10117 0.10321 0.10491 0.10627 0.10728 0.10796
0.09880 0.10127 0.10340 0.10519 0.10664 0.10775 0.10852
0.09917 0.10176 0.10398 0.10583 0.10731 0.10843 0.10917
0.08mm variance across the bed.
You actually get more than that just by taking the steel sheet off and on again so no point in trying to get it better. 😀
Normal people believe that if it is not broke, do not fix it. Engineers believe that if it is not broke, it does not have enough features yet.
Re: First Layer Frustrations
This is driving me mad, I have got the bed as level as I can, I have done this numerous times now, I have done PINDA temperature calibration, XYZ calibration etc etc, tried straight edges yet I still cant print a consistent first layer.
The middle is slightly under and has separations on part of the square, I can get this correct by adjusting live=z, but even with this, the front middle and right are squished down and show signs of dragging! even if I adjust the Bed level correct to +50, I still get the same.
Something is very wrong here.
Can the automatic bed levelling be disabled and just run the print using live-z setting, I can get a flat bed using a dial guage if need-be, but this automatic bed compensation is just driving me mad. I can run consecutive G80 G81 commands and get different readings varying by 0.008 every time and I haven't even touched the printer!
Here is an example, G80 G81 : Min Max 0.104 0.112 variance 0.008
0.10518 0.10390 0.10335 0.10354 0.10447 0.10613 0.10853
0.10417 0.10380 0.10386 0.10437 0.10531 0.10670 0.10853
0.10362 0.10414 0.10475 0.10547 0.10629 0.10722 0.10826
0.10354 0.10492 0.10602 0.10685 0.10741 0.10769 0.10770
0.10391 0.10614 0.10767 0.10851 0.10866 0.10811 0.10686
0.10474 0.10780 0.10971 0.11046 0.11004 0.10847 0.10575
0.10603 0.10991 0.11212 0.11268 0.11156 0.10879 0.10435
Then without touching anything another G80 G81Min Max 0.1 0.116 variance 0.016
0.10880 0.10897 0.10862 0.10775 0.10636 0.10446 0.10204
0.10660 0.10487 0.10393 0.10376 0.10439 0.10580 0.10800
0.10568 0.10231 0.10075 0.10102 0.10310 0.10701 0.11273
0.10604 0.10127 0.09909 0.09950 0.10250 0.10808 0.11626
0.10767 0.10177 0.09895 0.09922 0.10258 0.10903 0.11857
0.11058 0.10379 0.10032 0.10018 0.10335 0.10984 0.11966
0.11477 0.10735 0.10321 0.10237 0.10480 0.11053 0.11954
Anyway, fairly level you would think, but to begin to get something resembling a good first layer print, I have to use Bed level adjust which results in a G80 G81 looking like this: Min Max 0.12 0.2 variance 0.08
0.14417 0.14898 0.14981 0.14667 0.13954 0.12843 0.11333
0.15926 0.16104 0.16002 0.15620 0.14959 0.14017 0.12796
0.17148 0.17169 0.16984 0.16593 0.15996 0.15193 0.14185
0.18083 0.18093 0.17926 0.17583 0.17065 0.16370 0.15500
0.18731 0.18876 0.18829 0.18593 0.18166 0.17548 0.16741
0.19093 0.19517 0.19693 0.19620 0.19298 0.18727 0.17907
0.19167 0.20019 0.20519 0.20667 0.20463 0.19907 0.19000
And even this is not enough adjustment to dial in a good consistent first layer.
What am I doing wrong as this is just driving me mad, if I try to compensate for the inaccuracies by adjusting the bed phisically, the software compensates for this and still ends up with the same problem. I can definitely state the bed level compensation software works, but it's no good if the measuring is wrong in the first place.
bed compensation on points 2 and 3 (Middle front and right front) need to be at least +80 higher than they are now, is there a way of dialling in individual settings for compensation or turn the damn thing off altogether?
Thanks
Normal people believe that if it is not broke, do not fix it. Engineers believe that if it is not broke, it does not have enough features yet.
Re: First Layer Frustrations
I am having similar issues only worse. Ever since I installed the MMU 2.0 Multimaterial upgrade. Calibration is off and I don't seem able to dial it in. Can someone PLEASE walk me through this. Everything was perfect before the Multimaterial upgrade. I've done everything in the manual several times now and I only get stuff that looks like the attached image.
Re: First Layer Frustrations
Carried out factory reset, re levelled the bed, carried out another factory reset, re-calibrated everything again, yet still first layer is squished front middle and front right.
I'll give it this, it is consistent!, but consistently wrong.
I'm at a loss what to do next.
Because I never mentioned it before, trying to use PETG ay 230 Deg with bed at 85. All bed levelling done with bed at 85 and using Pronterface.
I have tried different test patterns and sliced using latest version of Slic3rPE but whatever I do, the printer always squishes the same, even if I adjust the levelling lower.
I have just ordered a precision dial gauge and am going to check the bed flatness to see if this is the issue.
Normal people believe that if it is not broke, do not fix it. Engineers believe that if it is not broke, it does not have enough features yet.
Re: First Layer Frustrations
Dial gauge arrived but was broken so have had to replace it, meanwhile I have also ordered some springs for levelling the bed and am going to strip down the Y carriage and rebuild it with new printed parts to hold the linear bearings and Y rods with no cable ties or poor U clamps, also new X motor bracket with built in X end stop so the bearing is not used as a stop, and new Belt tensioner.
Everything will be built and checked for alignment again before carrying out a factory reset again and full calibration again, after that it's contacting Prusa and maybe look at the alternative firmware which has individual mesh bed calibration settings for each of the 9 points.
I'm at a loss what else to do, all I can print are small parts and I am positioning them to the left and rear of the bed.
Normal people believe that if it is not broke, do not fix it. Engineers believe that if it is not broke, it does not have enough features yet.
Re: First Layer Frustrations
Replaced bearing U bolts with printed parts, replaced cable tie Y rods ends with printed parts which cover rods, and replaced Y xis motor bracket with a better one with integrated Y axis stop so bearings don't get hit.
Rebuilt using original spacers and measured using dial gauge and pinda level (G80 G81).
Dial Gauge:
0.052 0.109 0.136
-0.037 0.071 0.179
0.00 0.062 0.129
Pinda level (Corrected orientation and zero offset to match zero from dial gauge)
-0.015 -0.08 -0.004
0.08 0.21 0.178
0.00 0.11 0.179
Not right at all, what pinda measures and what is actual don't match.
Normal people believe that if it is not broke, do not fix it. Engineers believe that if it is not broke, it does not have enough features yet.
Re: First Layer Frustrations
I am about to start on a physical level project using a dial indicator so what is presented to the PINDA system is as close as I can get it
This is my pinda starting point printing the dial-indicator mount right now
Re: First Layer Frustrations
Following, i have the same problem, it is like a low spot on the middle of my bed.
Re: First Layer Frustrations
Hi 🙂
I had the same problem as you until yesterday. Then I came across the solutions here.
- I recalibrated my printer... the same stupid result.
- I turned my PEI sheet... the same result.
- I cleaned the sheet with Isopropanol (99,9%)... the same bad result.
Then I cleaned my Sheed with acetone for the first time - here I was always afraid that it might be damaged...
And see there - tada - That was the solution.
In my picture the top was the result before and on the bottom after the cleaning.
It is not perfect yet but much better than before.
Borth are printed with the same calibration - the difference is only the acetone.
Currently I'm printing another one where I clean the surface with isopropanol after the acetone - I hope then the streaks will go away.
So i hope this helps also the other guys here 🙂
Re: First Layer Frustrations
Hello Tobias,
since I have a first Layer problem with my printer as well, I'd like to ask you a couple of things:
1) I assume you have been using the printer quite a while before the problem occured? (So it's not a recently assembled unit and you "cleared" the bed with acetone?)
2) What firmware are you on?
Cheers,
Steffen
Re: First Layer Frustrations
1) I assume you have been using the printer quite a while before the problem occured? (So it's not a recently assembled unit and you "cleared" the bed with acetone?)
2) What firmware are you on?
Hi,
1) Yeah, I got the printer in the early summer, and I've been printing since then. Not much (maybe 100 prints) and in retrospect it got worse and worse. The printer was already assembled.
2) I worked with the newest firmware 3.5.0
I hope this helps you =)
p.s.: I got a better result when i clean the bed first with acetone and then with Isopropanol to remove some acetone residues
Re: First Layer Frustrations
Well, Ive tried the DTI gauge on all 3 sides of the extruder motor so have the whole bed covered, the last measurments on the right side of the extruder as close to the PINDA as I can, just over 1cm, but it does not seem to matter, wherever I take measurements from and get the bed level to within 0.01mm (Usually less but allowing for variance when the PEI spring sheet is removed and replaced), yet even with all the adjustment to get it this level the god damn printer still thinks the front middle is lower than it is so adjusts the Z axis to compensate!.
I wish I had bought a basic machine now without all this fancy automatic adjustment, I can level a printer bed just fine myself.
there is something seriously wrong with the firmware.
Here is the G80 G81 result from a flat bed, using a DTI guage in 3 different locations to make sure the bed is in fact level, I have carried out factory resets, firmware upgrades, strip down and rebuild of the printer numerous times, replacing parts for better parts, lost track how many times I have calibrated the printer, online chats to support, fitted springs to the bed etc etc etc and still the printer insists the front middle is lower than the rest of the bed so drives the head into towards the bed!.
0.16417 0.15676 0.15176 0.14917 0.14898 0.15120 0.15583
0.14602 0.14308 0.14172 0.14194 0.14376 0.14715 0.15213
0.13380 0.13193 0.13178 0.13333 0.13659 0.14156 0.14824
0.12750 0.12333 0.12194 0.12333 0.12750 0.13444 0.14417
0.12713 0.11727 0.11221 0.11194 0.11647 0.12579 0.13991
0.13269 0.11376 0.10258 0.09917 0.10351 0.11561 0.13546
0.14417 0.11278 0.09306 0.08500 0.08861 0.10389 0.13083
This is as good as I can get it, no adjustment will get it any better, any adjustment to the front middle keeps the offset, if I wind it up, it also adjusts up by 0.05, if I wind it down, it follows, I cannot get rid of this offset!, I can rebuild the printer, level everything again and still get the same offset.
Is there any firmare available which allows this printer to run without this stupid automatic calibration.
Normal people believe that if it is not broke, do not fix it. Engineers believe that if it is not broke, it does not have enough features yet.
Re: First Layer Frustrations
Just carried out two bed levelling runs one with firmware 3.1.3 and one with 3.5.0 without removing the steel sheet and waiting for the pinda to get to temperature and there is a difference with the front edge, so firmware definitely suspect as to inconsistent bed results.
3.1.3:
0.21667 0.19787 0.18315 0.17250 0.16593 0.16343 0.16500
0.13167 0.14619 0.15746 0.16546 0.17021 0.17169 0.16991
0.07639 0.11129 0.13848 0.15796 0.16974 0.17382 0.17019
0.05083 0.09315 0.12620 0.15000 0.16454 0.16981 0.16583
0.05500 0.09178 0.12064 0.14157 0.15459 0.15968 0.15685
0.08889 0.10718 0.12178 0.13269 0.13990 0.14342 0.14324
0.15250 0.13935 0.12963 0.12333 0.12046 0.12102 0.12500
3.5.0:
0.21167 0.19509 0.18204 0.17250 0.16648 0.16398 0.16500
0.13093 0.14735 0.16003 0.16898 0.17420 0.17568 0.17343
0.07787 0.11302 0.14052 0.16037 0.17256 0.17710 0.17398
0.05250 0.09213 0.12352 0.14667 0.16157 0.16824 0.16667
0.05481 0.08466 0.10901 0.12787 0.14123 0.14910 0.15148
0.08481 0.09062 0.09701 0.10398 0.11154 0.11969 0.12843
0.14250 0.11000 0.08750 0.07500 0.07250 0.08000 0.09750
Look at how the bottom row drops compared to the first set of results.
They are both false, since my bed has been checked with a DTI gauge and is less than 0.01 variance, yet this is saying I have over 0.1 variance, no wonder I can't get a consistent 1st layer over the whole bed.
Great data, thank you for your work. Would you consider posting this on github. This is the preferred place for firmware errors and you have great data. Better than what’s posted there now. Either way thanks.
Re: First Layer Frustrations
Been trying a few more things and found some interesting or worrying observations.
It would appear you get more success dialing in a bed using Calibrate Z from the LCD after every adjustment then do a G81 from Pronterface, the numbers start to look a lot better. The horrible dip at the front has gone and I have a lot more flat bed as per the dial gauge readings, but now it shows it dips to the right (It does not though), but not every calibration run, sometimes the readings come out as a U one run, then without any changes the next calibration run will be a straight plane down to the right, easiest way to describe it is end on one run the plane looks like U then the next \ so it looks like there is variance in the Z axis side to side between calibrate Z runs from the LCD.
This is what I mean, no changes to bed or anything made between calibrations:
A \ shape
0.12750 0.09269 0.06630 0.04833 0.03880 0.03769 0.04500
0.11611 0.08537 0.06086 0.04259 0.03056 0.02475 0.02519
0.11000 0.08176 0.05836 0.03981 0.02611 0.01725 0.01324
0.10917 0.08185 0.05880 0.04000 0.02546 0.01519 0.00917
0.11361 0.08565 0.06216 0.04315 0.02861 0.01855 0.01296
0.12333 0.09315 0.06846 0.04926 0.03556 0.02735 0.02463
0.13833 0.10435 0.07769 0.05833 0.04630 0.04157 0.04417
A U shape taken after an LCD Calibration Z run
-0.03000 -0.04713 -0.05630 -0.05750 -0.05074 -0.03602 -0.01333
-0.04139 -0.05565 -0.06336 -0.06454 -0.05917 -0.04725 -0.02880
-0.04639 -0.05951 -0.06676 -0.06815 -0.06367 -0.05333 -0.03713
-0.04500 -0.05870 -0.06648 -0.06833 -0.06426 -0.05426 -0.03833
-0.03722 -0.05324 -0.06253 -0.06509 -0.06093 -0.05003 -0.03241
-0.02306 -0.04312 -0.05491 -0.05843 -0.05367 -0.04065 -0.01935
-0.00250 -0.02833 -0.04361 -0.04833 -0.04250 -0.02611 0.00083
Now exactly the same data showing a U shape after a G80 G81 run from Pronterface
0.12583 0.10917 0.10000 0.09833 0.10417 0.11750 0.13833
0.11222 0.09843 0.09096 0.08981 0.09500 0.10651 0.12435
0.10472 0.09225 0.08552 0.08454 0.08929 0.09978 0.11602
0.10333 0.09065 0.08370 0.08250 0.08704 0.09731 0.11333
0.10806 0.09361 0.08549 0.08370 0.08824 0.09910 0.11630
0.11889 0.10114 0.09090 0.08815 0.09290 0.10515 0.12491
0.13583 0.11324 0.09991 0.09583 0.10102 0.11546 0.13917
How can there be so much variance without changing anything?
Normal people believe that if it is not broke, do not fix it. Engineers believe that if it is not broke, it does not have enough features yet.
Re: First Layer Frustrations
Well, I've tried and tried and using just the calibrate Z from the LCD menu, I got a flat bed, I mean so flat that I could not detect any movement from the Z screw whilst using settings, move axis from the LCD menu to traverse over the bed left top right, front to back, I thought, Yes, I've cracked it, even a G81 output gave me brilliant results.
Then I carried out a G80 run, without changing anything!. What a disaster, I'm back to print bed too high on the right hand side and front, and the Z axis screws turn whilst carrying out the same traversing over the bed and a G81 output shows over 0.1mm variance.
There is something seriously wrong with the G80 mesh bed levelling calibration.
Here are three G81 outputs one after the other,
The first with a G80 to level the bed:
0.12750 0.14333 0.15000 0.14750 0.13583 0.11500 0.08500
0.14574 0.16212 0.16909 0.16667 0.15484 0.13360 0.10296
0.15657 0.17258 0.17928 0.17667 0.16474 0.14351 0.11296
0.16000 0.17472 0.18056 0.17750 0.16556 0.14472 0.11500
0.15602 0.16854 0.17292 0.16917 0.15727 0.13724 0.10907
0.14463 0.15403 0.15638 0.15167 0.13990 0.12107 0.09519
0.12583 0.13120 0.13093 0.12500 0.11343 0.09620 0.07333
Now exactly the same but from an LCD Calibrate Z followed by G81:
0.00333 0.02907 0.05019 0.06667 0.07852 0.08574 0.08833
0.01907 0.04677 0.06850 0.08426 0.09405 0.09788 0.09574
0.02769 0.05717 0.07973 0.09537 0.10408 0.10587 0.10074
0.02917 0.06028 0.08389 0.10000 0.10861 0.10972 0.10333
0.02352 0.05609 0.08097 0.09815 0.10763 0.10942 0.10352
0.01074 0.04461 0.07097 0.08981 0.10115 0.10498 0.10130
-0.00917 0.02583 0.05389 0.07500 0.08917 0.09639 0.09667
And now another LCD Calibrate Z followed by G81:
0.01583 0.01259 0.01148 0.01250 0.01565 0.02093 0.02833
0.01509 0.01497 0.01528 0.01602 0.01719 0.01880 0.02083
0.01370 0.01562 0.01694 0.01769 0.01784 0.01741 0.01639
0.01167 0.01454 0.01648 0.01750 0.01759 0.01676 0.01500
0.00898 0.01173 0.01389 0.01546 0.01645 0.01685 0.01667
0.00565 0.00719 0.00917 0.01157 0.01441 0.01769 0.02139
0.00167 0.00093 0.00231 0.00583 0.01148 0.01926 0.02917
Three totally different results, so how is this supposed to print a first layer correctly?
Normal people believe that if it is not broke, do not fix it. Engineers believe that if it is not broke, it does not have enough features yet.
Re: First Layer Frustrations
Omg.... no-one from Prusa answered ?
I have the same problems, 2 days of fight...
Now I frustrated and don't think that Prusa i3 MK3 is good printer anymore !
There are many problems, software covering hardware and all together are great puzzle.
I have no time to fight with, maybe it's time to find better printer ?
Maybe Creality CR 10-S pro ?
Regards
maciej
RE: First Layer Frustrations
I know this is quite an old thread, but it comes out as one of the first on Google, so I'll add my two cents. I had the same issue (obviously) and what turned out to be a lose hotend. Basically I could rotate it if I grabbed it with pilers and used a bit of force. Adjusting it and srewing tighter did the trick.