Re: Monoplexer and Multiplexer Redesigns (no metal parts required)
I've printed the multiplexer in clear/natural pla and now can view whats going on inside.
Now I'm printing the Gear_MM aparently with no problem.
But at the begining i realized i must to precise relocate the filament after loading.
Sometimes the load proccess don't end correctly and filament doesn't reach the start position (don't catch the filament in the microsteps phase) o reach the hotend (two consecutive loads i.e.)
This can be the source of a lot of problems we have.
EDIT:
After seven/eight layers one filamente is not extruded... clogged
maybe a little irregularity in the interior of the multiplexer can be the source of this clog.
who knows.
Saludos,
abcplexormulti.JPG
Antonio. First off, I like the look of the top end of the multiplexer, that looks pretty slick. Which style is on the inside? I assume it is mine because of the way it is layered but I'm not 100% sure so I need to ask.
Secondly, what layer height did you print with when you printed it? Smaller layer heights are preferable to reduce the layer stacking effects mentioned earlier.
Lastly, did you take spare filament to check feed path resistance after you printed the part? I definitely had some resistance in mine but it went away after sawing some filament up and down each of the feed paths.
Please let me know what you find!
Re: Monoplexer and Multiplexer Redesigns (no metal parts required)
Lastly, did you take spare filament to check feed path resistance after you printed the part? I definitely had some resistance in mine but it went away after sawing some filament up and down each of the feed paths.
Good point. Maybe a rough filament (like wood filament) would be even better to smoothen the ridges of the layers.
Re: Monoplexer and Multiplexer Redesigns (no metal parts required)
Inside is your design 100%, no changes.
outside changes are for better visibility of filament path.
printed at 0.20 layer height
I used spare filament (and a little allen key) to be sure the path is free of dust or blobs
saludos,
abc
This is the main difference that I see with how you printed yours vs how I printed mine. I've kind of eluded to the fact a few times in these long posts that there is a "layer stacking effect" that happens through the angled feed paths of the layers because of the nature of how it prints. I'd like to take a little time to explain why I suggested a .1 mm layer height for this print. Please reference the image below.
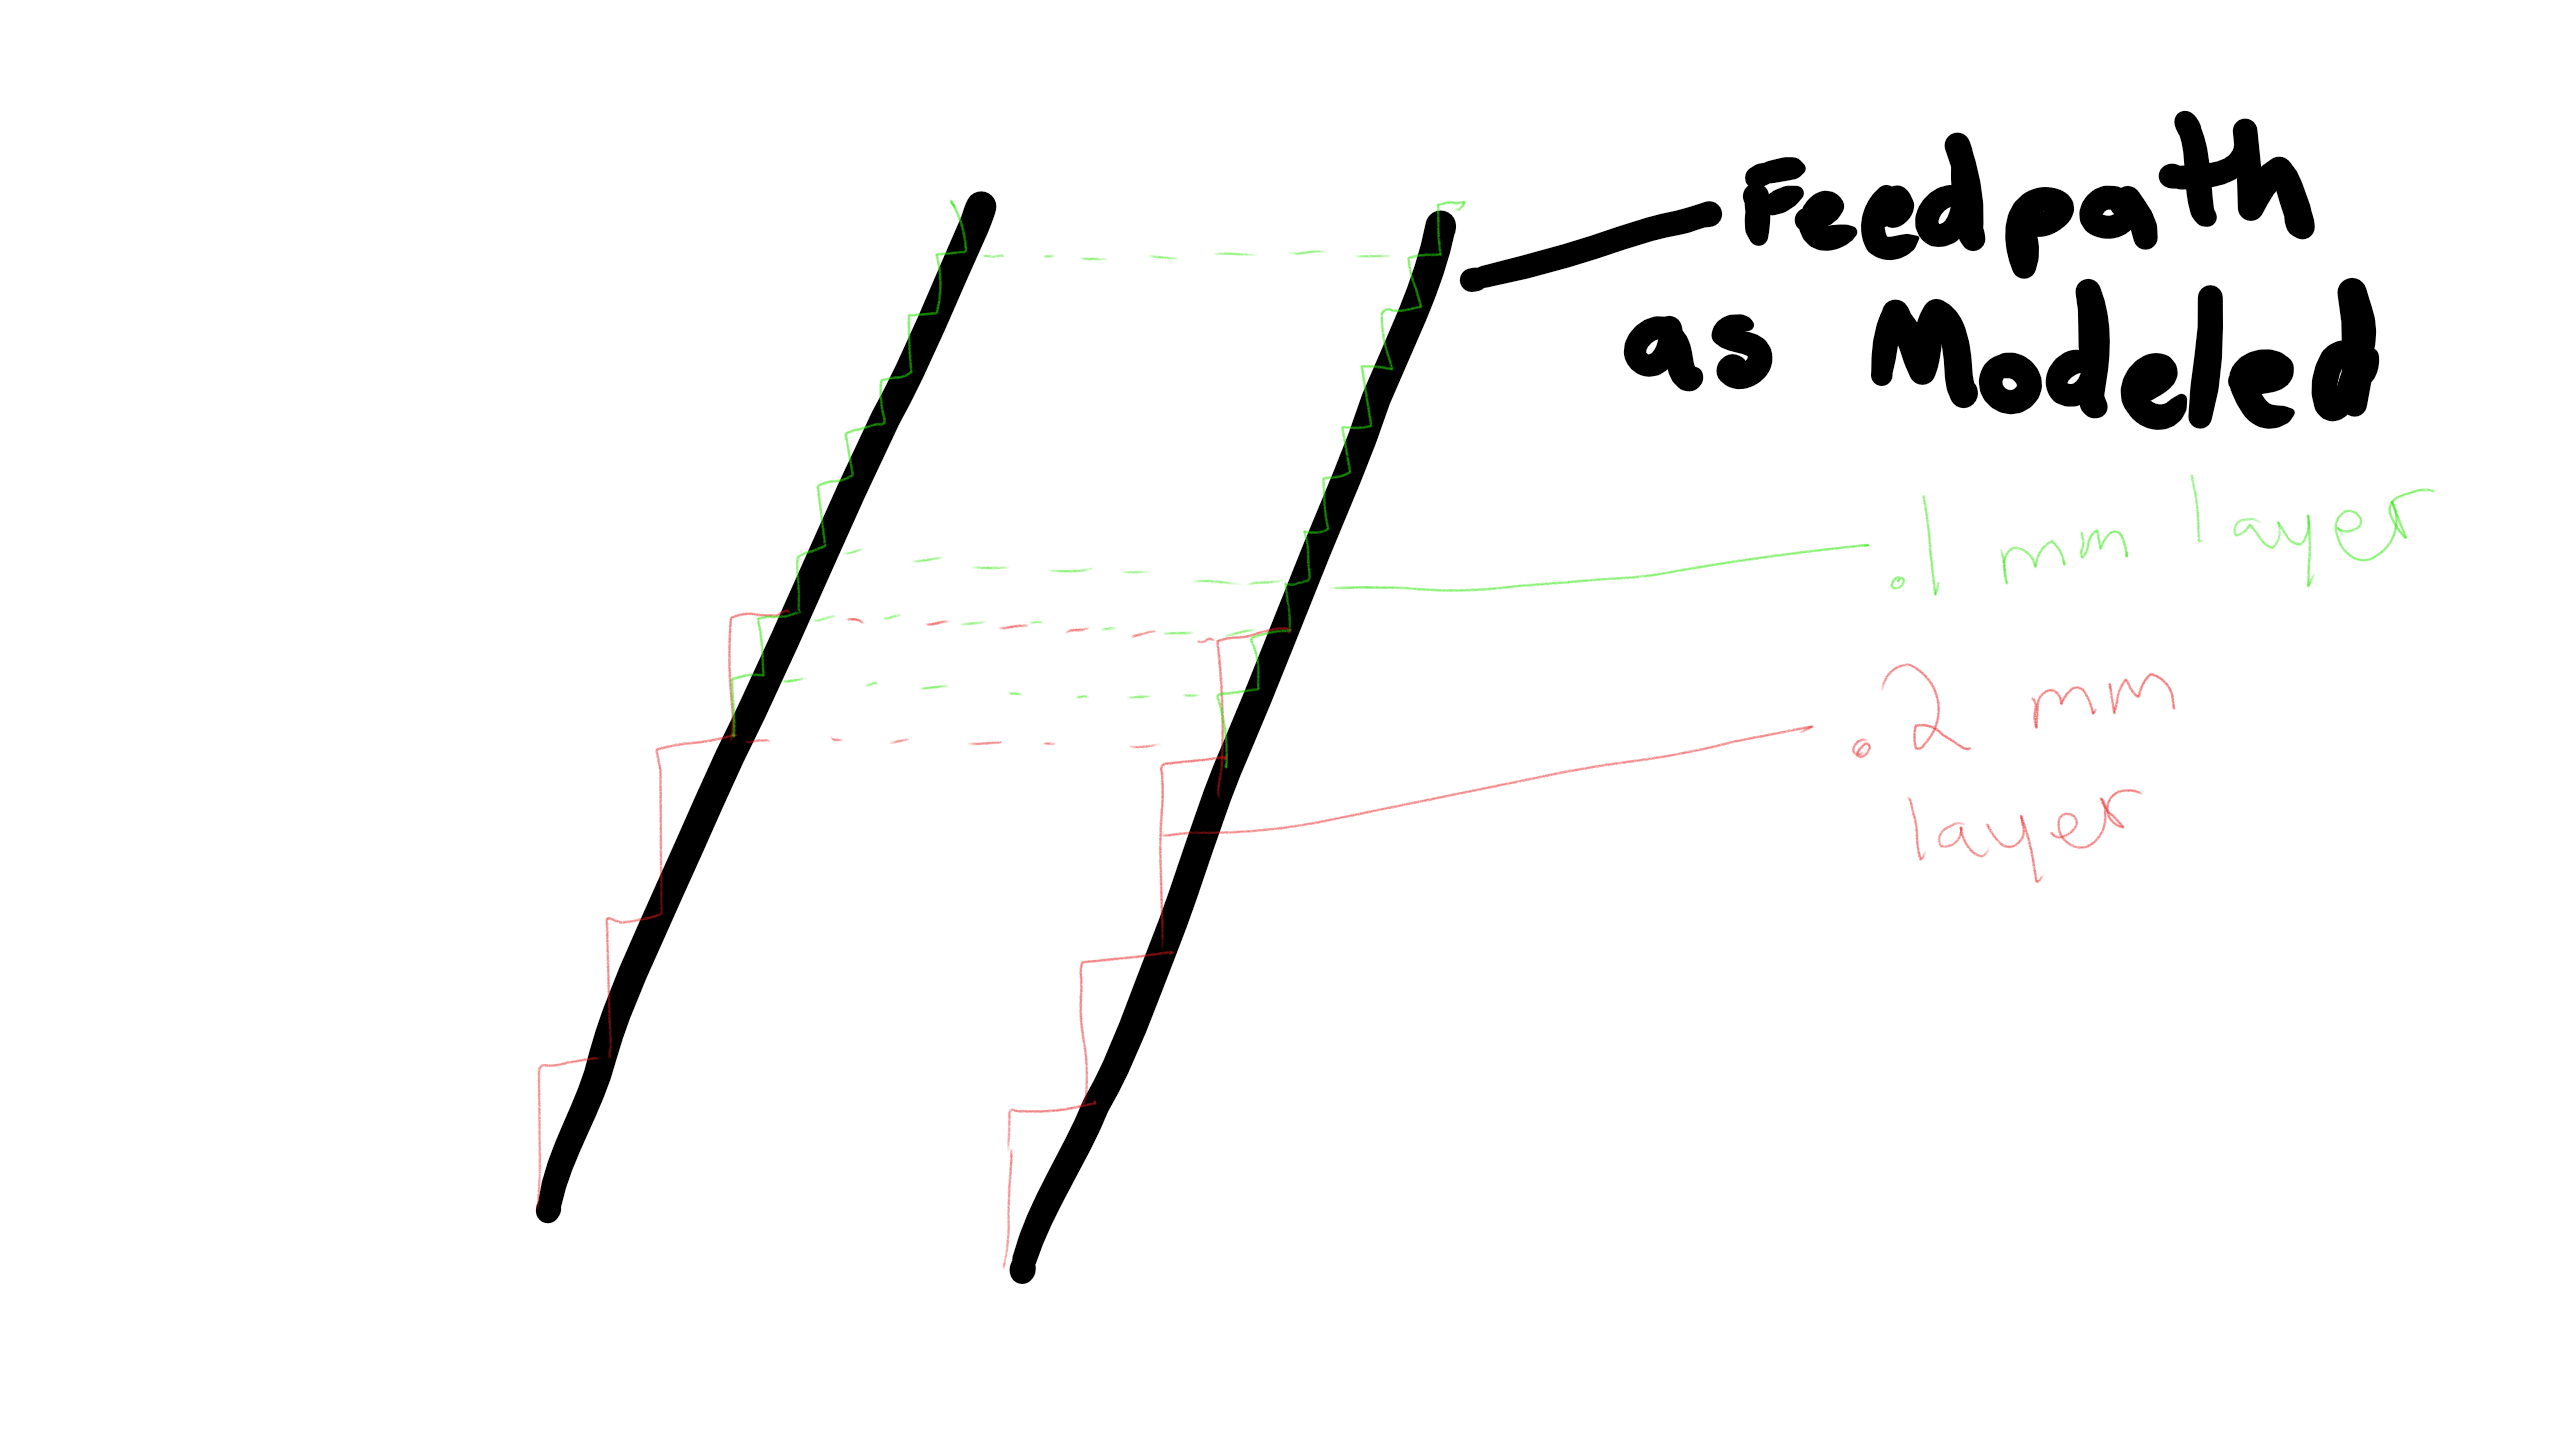
Sorry for the crappy drawing, but it illustrates my point pretty well.
On the red part of the drawing (.2mm layer heights) you can see that each ridge of stacked layers are larger and have more material in each point. This makes the feedpath (slightly) smaller and harder to smooth as there is more material to remove in each layer.
On the green part (.1 mm layer heights) the ridges are more numerous, but have less material to each layer making it easier to smooth. It also makes for slightly wider feed paths.
This is why I suggest a .1 mm layer height when printing (or less if you feel like it, it only makes the paths easier to smooth).
This is also why I suggest that there is a "break in" period that will have increased feed path resistance (until the ridges are smoothed). This is also why I suggest using spare filament to smooth feed paths manually before use on the printer.
You will note that in the monoplexer, there is no break in period, this is because the feed paths are not angled, and therefore stack neatly without the little "stairs" in them.
I know it's not ideal to print another piece, but it works a lot better.
UPDATE: My personal printed multiplexer: I have another print under my belt, this one took roughly 30 hours to print, but only used one color. When I tried to print the same design with my old multiplexer, it would make it about 20-30 layers in and jam. This happened 3 times before I switched gears and redesigned the piece and now I have a fully printed one on the first try! I will post pictures when I have printed the other half of this model and can show it in it's full glory (it is a late Christmas present to my Mom, I modeled it myself, so i'm pretty proud of it).
Re: Monoplexer and Multiplexer Redesigns (no metal parts required)
Sorry for the crappy drawing, but it illustrates my point pretty well.
I understood the implications of use 0.2 instead of 0.1... but thanks for the drawing 😀
anyway... i'm thinking in an "analog" solution... buy a block of PTFE (25x25x45mm aprox) and drill exactly like your design.
do you think can work?
saludos,
abc
Re: Monoplexer and Multiplexer Redesigns (no metal parts required)
Any time! Crappy drawings are what half my ideas are based on.
If it is done right then yes but mechanically getting the paths right would be hard. Especially since if you drill too far even by a little would ruin that path. Not to mention lining them up would be a nightmare.
I've never tried it but I hear there is some filament that is close to PTFE. I'll do some research tomorrow and see what I can find.
Re: Monoplexer and Multiplexer Redesigns (no metal parts required)
Any time! Crappy drawings are what half my ideas are based on.
anyway... i'm thinking in an "analog" solution... buy a block of PTFE (25x25x45mm aprox) and drill exactly like your design.
do you think can work?
Re: Monoplexer and Multiplexer Redesigns (no metal parts required)
Edited my post when I saw the rest of your post. Sorry lol. I did answer your question though xD just didn't think you'd read it and reply that fast.
Re: Monoplexer and Multiplexer Redesigns (no metal parts required)
For the monoplexer. Why not make a printed outer casing. And extend the cold end ptfe up to the bottom of tbe festo in one piece?
Regards. Joan
I try to make safe suggestions,You should understand the context and ensure you are happy that they are safe before attempting to apply my suggestions, what you do, is YOUR responsibility.Location Halifax UK
Re: Monoplexer and Multiplexer Redesigns (no metal parts required)
For the monoplexer. Why not make a printed outer casing. And extend the cold end ptfe up to the bottom of tbe festo in one piece?
Regards. Joan
Why not making a Multplexer with PFTE Tubes added on all 4 holes until they get to the bottom point?
Re: Monoplexer and Multiplexer Redesigns (no metal parts required)
I think thay Graftimg the ptfe together would be a nightmare
I try to make safe suggestions,You should understand the context and ensure you are happy that they are safe before attempting to apply my suggestions, what you do, is YOUR responsibility.Location Halifax UK
Re: Monoplexer and Multiplexer Redesigns (no metal parts required)
First, thanks to everyone for the wonderful discussion here ! My MMU works wonderfully, but I've printed the monoplexor as a backup though, and I'm going to print the new multiplexor too, as I like to experiment and tinker. I did find a couple of filaments that wouldn't with the MMU because of terrible od tolerances. So these will be my trial filaments for the new piece.. Thanks Again !
Re: Monoplexer and Multiplexer Redesigns (no metal parts required)
BTW, any reason not to print in ABS ? I have some Prusa easy orange, so it would look like it was OEM.
Re: Monoplexer and Multiplexer Redesigns (no metal parts required)
BTW, any reason not to print in ABS ? I have some Prusa easy orange, so it would look like it was OEM.
I think ABS would be fine, probably preferable.
Just remember that the break in may last longer due to the more durable material and the feed paths may take a little more initial coaxing with ABS filament.
First, thanks to everyone for the wonderful discussion here ! My MMU works wonderfully, but I've printed the monoplexor as a backup though, and I'm going to print the new multiplexor too, as I like to experiment and tinker. I did find a couple of filaments that wouldn't with the MMU because of terrible od tolerances. So these will be my trial filaments for the new piece.. Thanks Again !
No problem! Remember to post your results and use the recommended print settings.
I think thay Graftimg the ptfe together would be a nightmare
If not downright impossible. If you don't graft it you would run into the same problems as the steel tubing due to having to widen the feed path to accommodate the PTFE tubes.
For the monoplexer. Why not make a printed outer casing. And extend the cold end ptfe up to the bottom of tbe festo in one piece?
Regards. Joan
If you're asking what I think you're asking, the reason I wouldn't do it is just because of simplicity of design. The lower end works well feeding into the hot end PTFE tube, and removing that distance from the cold end just seems like a hassle. Removing the PTFE in the hot end and extending it up is more work for essentially the same result and the way it is, the monoplexer and multiplexer are easily interchangable, if you extended the tube, you'd have to replace it every time you want to use the multiplexer again.
Mine works with little to no resistance already anyway, so it fits my needs perfectly.
Re: Monoplexer and Multiplexer Redesigns (no metal parts required)
Thankfully, I'm not having the problems this design seeks to address, but regardless, WELL DONE!
Tom Cole
Re: Monoplexer and Multiplexer Redesigns (no metal parts required)
I can confirm it can be printed from ABS with good tolerances (but I did it on my other printer). Filament loaded just fine, running 2MM Treefrog now. I have a fresh print from my regular MUX, using the same filament to compare. This is poor tolerance filament that gave me underextruded layers and shitty infill on the original MUX, so it will be a nice test. The Bondtechs seem to run a bit quieter on material change with definitely less clicking on the wipe tower. Note that I have a working original MUX with very little tangible resistance even though I had to drop retract length. The first layers are looking good so far, first 10 or so color swaps worked well, nice wipe tower. I will post the results if the print successfully completes (fingers crossed).
As a sidenote, maybe you could redesign the top end a bit wider? Screwing in that last Festo is awkward.
Thanks for the design, I think it's worth a shot. Cannot really follow the argument about the metal tubes needed for more extreme printing conditions - if we cannot properly print using PR's own PLA there's no point starting with high temp or special filament.
I have another suggestion: What if the steel tubes were replaced with something soft, and with a bit smaller outer diameter? Something like copper or aluminum. Maybe it could rub off and deform a bit after a few prints, decreasing tolerance. Also the tubes could be a bit longer so they reach through the thread in the Festo and press end-on against the PTFE topside.
Re: Monoplexer and Multiplexer Redesigns (no metal parts required)
I'm finding the filament gets jammed on final retraction with my monoplexer (would that BE a plexer? You're not plexing anything... 😀 ), a change in g-code or drilling/redesigning for a short length of PTFE may be in order...
Re: Monoplexer and Multiplexer Redesigns (no metal parts required)
After a few days of testing, I finally could solve my problem of stringing! It took me a while to figure this out (I am a beginner in 3D printing), but everything looks good at the moment (printing only with one colour).
I have printed both the monoplexer and the multiplexer and tested both, but this did not improve the situation. I have also changed the PLA filament to different colours (black, grey and white) but did not get an improvement.
Then I started playing around with the temperature and this solved my problem! During the MM upgrade, the hot end was replaced by a new one and it seems to me that the new hot end needs another temperature configured for the same PLA filament. My printing temperature was at 215°C with a lot of stringing. By changing it to 205 and 195°C, no stringing did occur. I have now fixed my printing temperature to 200°C.
I have sticked to the monoplexer for the time being, but I will test the multiplexer and the Prusa multiplexer again with the lower temperatures.
Re: Monoplexer and Multiplexer Redesigns (no metal parts required)
Print finished and looks a tiny bit better than with the original MUX (see for example the underextruded bit on left hindleg / butt of the frog). The underextruded parts are still visible with the alternate MUX, but much reduced. Infill looked nice. Interestingly it jammed upon unload in at the outlet of the Bondtech and the tips are a tiny bit larger than before. Maybe the steel tubes in the original do not form the tip by cooling, but shave off a bit when it retracts into the tubes?
I'll try a bit more aggressive retraction settings now, but I have a feeling that the real reason is very slow heat creap. Basically every time you swap color it pulls hot filament up the heatbreak, if the cooling is at its limit that might slowly push it over the edge.
Has anyone tried a bigger fan with the MMU?
I'd definitely recommend printing this at least as a fallback/spare.
Re: Monoplexer and Multiplexer Redesigns (no metal parts required)
Well, i did some tests, but for me it improved a lot so far. But i have some issues with stringing, but that can be fixed in the settings. the layers are way better and almost not underextrusion. But im going to keep both parts, its going to get sanded and filled anyways 🙂 First picture is with the original MUX, the second one is with seth.g2's his file
But i think if i have the time i'm going to modify his file so that the Festo's doesnt had the be screwed in the plastic 😉