Severe Y axis layer offsets

Hello All;
Please see attached picture. I have a Original Prusa i3 MK2 kit assembled in April 2017. Not a total noob but still very fresh.
OK steps checked so far;
- belts checked OK no binding and a decent tension
- extruder power cable bundle does not hit the print
- stepper motor checked for proper securing, could be an issue but not sure how to check when printing.
- no curled prints hit the nozzle or PINDA probe, seems to be clear during other prints.
- bad wiring to steppers or overheating, No all seem OK on other prints as well
- bearing binding, possible here as well but how to check during printing.
- bearing zip ties checked, all tight
- no cats, no kids and I am sure no ghosts! (yes this list is from the FAQ and advice list from Joseph!)
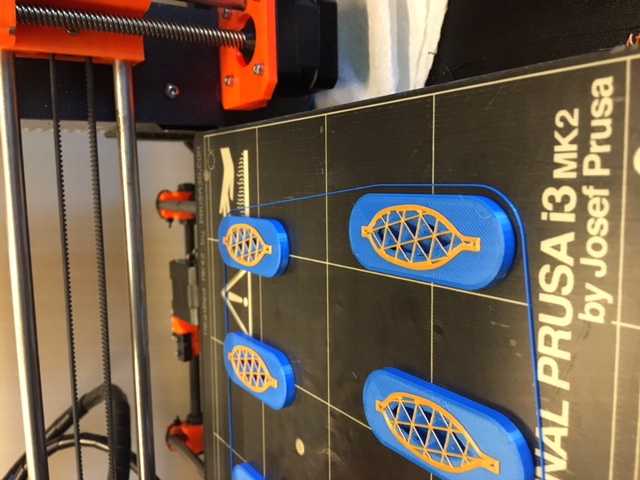
OK so a bit more explanation as I try to solve this strong offset. The print is a set of small toy ship models and what you see in the photo is the set of bases the ship model builds into. If I print one I have no issues, if I print one large one again no issues. I made up a gcode file for 12 pieces of the model and have run it successfully several times already so I think I can rule out slicer settings.
Recently I did some trouble shooting to kill a rattle and adjusted the belt and the grub screws for the pulley mounted to the shaft on the Y stepper motor. Could this pulley be slipping this much?
I would really appreciate you guys having a look at this as a small offset I can attribute to some of the other settings but this result is a bit beyond my experience..
All input will be greatly appreciated.
mr
If you want something different for tomorrow you have to DO something different today. 💡
Re: Severe Y axis layer offsets
- no cats, no kids and I am sure no ghosts! (yes this list is from the FAQ and advice list from Joseph!)
To be clear, that FAQ was from a user, not Joseph himself. But I am please that someone read it!
Recently I did some trouble shooting to kill a rattle and adjusted the belt and the grub screws for the pulley mounted to the shaft on the Y stepper motor. Could this pulley be slipping this much?
Tell us a bit more about this. And yes, it could. Because you slippage is only in Y, I think something on that path is the culprit. Look at the belts. Missing teeth? Belt tight? Is the pulley firmly attached to the stepper? I would use Settings -> Move Axis -> Y and move the axis back and forth and watch it closely. Since this seems to be a problem only on certain positions of Y (e.g. your single print seems fine) I would look at all positions and watch and listen closely to see if I could identify any reasons for slippage. I presume there are no "under carriage" cables or wires that might be catching on the Y carriage? Maybe something that bumped loose while doing the above debugging?
A few more things to ask/check. (But I doubt them since the issue is only in Y.)
1) Are you using Z-Hop (Z-Lift) on this print?
2) Do you see any signs that the base of the ships are curling up, and possible catching on the nozzle?
3) Are you in silent mode? (That reduces power to the steppers and can cause miss steps like this.)
BTW, THANK YOU for a very clear post on what the issue is, and what you have done to solve it.
Any advices given are offered in good faith. It is your responsibility to ensure that by following my advice you do not suffer or cause injury, damage or loss. If you solve your problem, please post the solution…
Re: Severe Y axis layer offsets
Thank you Aaron, the input is appreciated;
That summary you wrote on the overview and highlights of the forums is well done, thank you for it! (maybe re post it? 😀 )
OK first the silent mode was ON, so I have changed it to OFF now and have started a small print. With the leg vibration dampers in place the noise increase is very little.
The grub screws on the Y axis motor are tight to the shaft, any more force and I think I would bend the small hex wrench 😯
I did inspect the belts and rolled the platform back to the end stop and forward a few times, nothing to note that I can see. No wear spots no missing teeth no vibration on movement. I noted the alignment of the belt as both ends came to their respective ends. IE when at the back end stop the belt was square to the orange belt holder, not askew at all. The same held true for the front end with the belt close to the idler, no angels in the belt.
I have never looked into or used the Z hop so I would have to say no to that.
The bases in this print have not curled, I am using the Biome potato starch based bio filament and so far it has shown a very limited range where it wants to curl sharp corners. These are rounded so no issues.
As for wires on close check I did find the small wire from the back of the bed to the heating element was more droopy than I would prefer so i added an extra zip tie to secure it up better to the wiring harness. I did not appear to be in way of interference but for the sake of good housekeeping better to have it up.
I am running a small print now as I type this and it is good so far.
I will try a few more small ones then do a set of ships tomorrow evening and report the findings back here.
cheers
mr
If you want something different for tomorrow you have to DO something different today. 💡
Re: Severe Y axis layer offsets
I have never looked into or used the Z hop so I would have to say no to that.
The bases in this print have not curled, I am using the Biome potato starch based bio filament and so far it has shown a very limited range where it wants to curl sharp corners. These are rounded so no issues.
What slicer are you using? If Slic3r, what "Printer" are you using? One of them has ZHop at the end of the name.
Z Hop or Z Lift is a slicer preference that tells the printer to lift the Z a little bit when moving around. As you watch, it kinda hops from place to place with a little lift between the moves. This is designed to help prevent dragging the nozzle on a print that has curled up a little bit.
I am not familiar with Biome, but if it curls even a little bit, (especially in Silent Mode) it can catch an cause a slippage. Z Hop (Z Lift) might be of some help in this case.
On last (grasping at straws) thing. I presume your PINDA sensor is not real low (near the nozzle) where it too could catch on a curled print? It should be about 0.6mm ABOVE the nozzle tip.
Any advices given are offered in good faith. It is your responsibility to ensure that by following my advice you do not suffer or cause injury, damage or loss. If you solve your problem, please post the solution…
Re: Severe Y axis layer offsets
Hello!
Here are some possible causes of your problem:
1. Is one of the grub screws tightened against the flat spot on the motor axis?
2. Maybe the cable to the y-stepper motor is failing because of copper strands are broken or maybe there is intermittent contact causing failure every now and then?
/Henrik
Re: Severe Y axis layer offsets
Thank you Aaron and Henrik for the great input.
My small prints last night we successful, however the Y motor did not sound healthy.
My slicer is Simplify3d (S3D) and yes it does have a default setting for the original Prusa i3 MK2. I have used, tweaked, adjusted, messed op, re tweaked and sorted out a few times now. 😯
Yes I will look into the way S3D handles Z hop.
The rattle that was fixed turned out to be the two screws on the underside of the bed. The ones that hold the part for the ends of the Y belt and then attach to the underside of the bed, the screws had worked loose.
My PINDA probe is now at a good spot relative to the nozzle and the bed, the live Z height is -550 at the moment. It has been hit by over print blobs in the past and re calibrated to where it sits now, yes it does also now have the printed probe protector.
The grub screws are tight and Yes, one of them is tight to the flat section of the Y motor shaft.
Tonight I will trace the wires of the Y motor and I will download the new Prusa Control slicer and set up a new gcode for this project.
Will report back when I have some finished prints!
cheers
mr
If you want something different for tomorrow you have to DO something different today. 💡
Re: Severe Y axis layer offsets
Make sure that the Y pulley is at least a couple of millimetres away from the motor body.
If you have to move it, you will also have to move the motor in the opposite direction.
Peter
Please note: I do not have any affiliation with Prusa Research. Any advices given are offered in good faith. It is your responsibility to ensure that by following my advice you do not suffer or cause injury, damage…
Re: Severe Y axis layer offsets
Hello gents, a quick update;
Thank you Peter, yes the Y pulley is slightly off set from the motor housing.
It appears to be coming down to a corrupt gcode file. Not sure how that happens but seems to be the most likely at the moment.
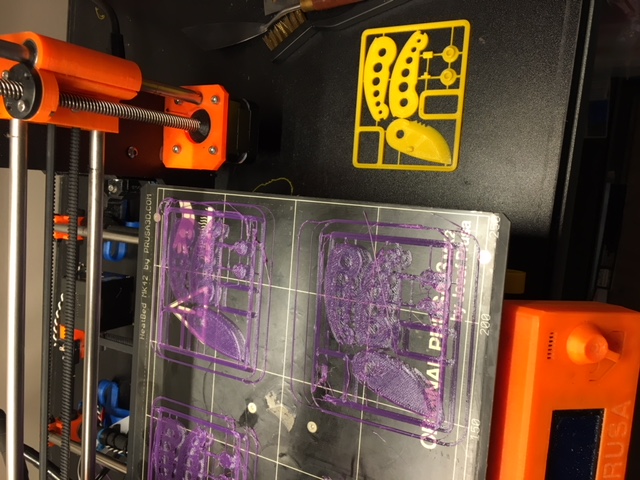
I did download and use the the new Prusa Control and ran the slicer for a new gcode file of the model and 3 duplicates. Just not as many and right now the attached picture shows the progress. So far very good!
One more test I will do in a few days is to duplicate the identical layout for the 12 pieces and run it in the Prusa Control.
cheers all..
mr
If you want something different for tomorrow you have to DO something different today. 💡
Re: Severe Y axis layer offsets
Great that you can print again!
I have a suggestion that is easy to perform - but may/may not catch the culprit. Here it is:
1. Switch the y-motor and x-motor in the rambo board.
2. Print something that fit into the new area.
Maybe the error show up or not depending on how the cables moves and if there are broken strands. This can give valuable information for the least of work put into finding it.
/Henrik
Re: Severe Y axis layer offsets
I was just experiencing the same problem with my MK2S, after painstakingly watching a couple of failed prints it looks like the nozzle crashes into the print. Adjusting retraction and Z-hop fixed the issue.
Re: Severe Y axis layer offsets
Hello All;
Again, thank you for the good input, as others that come later read through this input they may see in some of these propose solutions an answer they are in need of.
I did use the new Prusa Control to re-slice and prepare gcode for this set of small ship models.
here is a photo of the results;
(sorry I do not link rotated pictures 😳 )
cheers
mr
If you want something different for tomorrow you have to DO something different today. 💡
Re: Severe Y axis layer offsets
Hello All;
While it has been several months since I started this post to solve an Y-Axis off set, and I have run through several rolls of filament, the offset returned last night. 😕

I had just completed a print of the same file in yellow PETG and was doing a second run of the same file in the purple PETG. The completed yellow print is just to the right of the printer on the bench.
I have recently recieved the MK2s upgrade package and I am getting ready to install it. What I am requesting is the Assembly manual picture that has all the dimensions and placement of the lower part of the printer. I have seen it but cannot locate it skimming the manuals files. Was this a custom document?
Please if you know the location or better yet can link it here I will very much appreciate it. What I am suspecting is I do not have the whole Y carriage and its supports and motors fully and correctly squared up.
Again thank you in advance, any and all input is greatly appreciated. 🙂
mr
If you want something different for tomorrow you have to DO something different today. 💡
Re: Severe Y axis layer offsets
Hello again;
I located this file and it is similiar to the one I have seen.
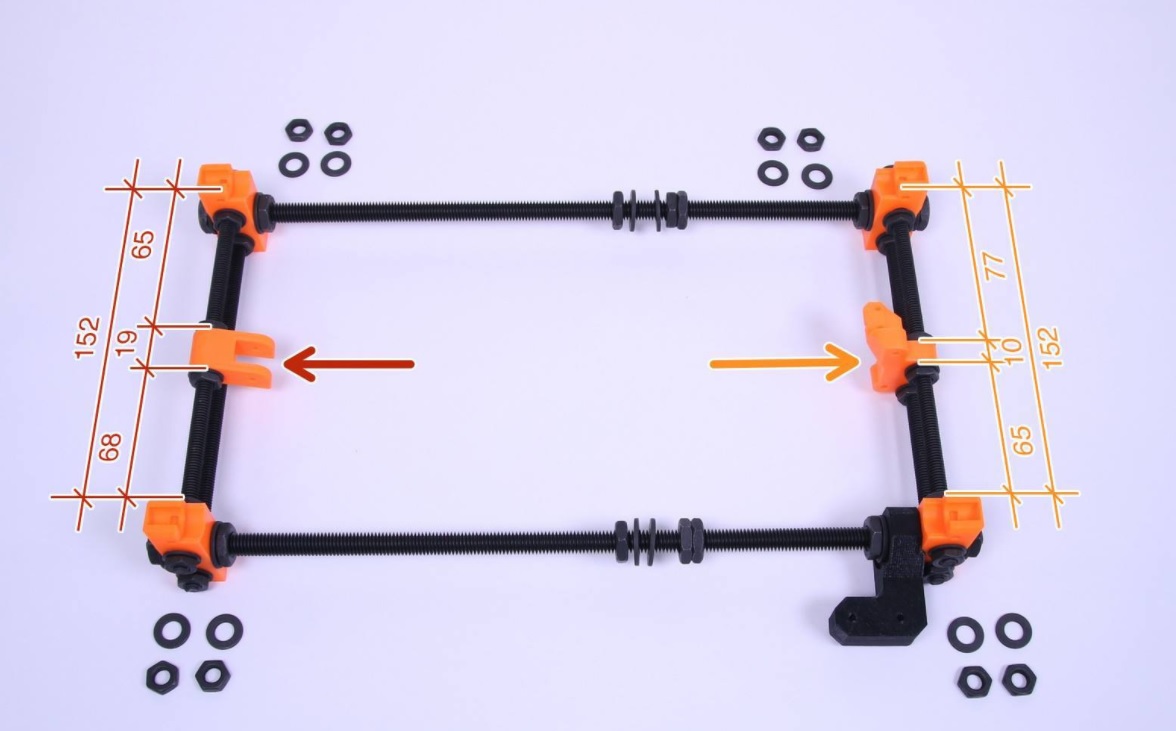
Am I mistaken or is there another one with all the dimensions? ❓
Looking forward to your inputs..
mr
If you want something different for tomorrow you have to DO something different today. 💡
Re: Severe Y axis layer offsets
Hello All;
While after several months of good prints I am looking at some bad offsets again. 🙁 . I will post some pictures below. This time however it is on the X Axis.
I thought I had it figured out when I cleared the SD Card from all g-codes and loaded it with fresh with just the one g-code to be used. These are sliced using Prusa Control which up to the point has worked well. One round of prints worked well.
Sorry, to be clear with some context, I have an order to print many of these stop signs so it is in the multiple prints of the same item that this offset is appearing. The same as before. Multiple prints of the catan boat started the bad offsets in the first round.
The item I suspected was the g-code was corrupted due to a large amount of files then the subsequent removal of those files. The latest round started right after the "cleanup" of the SD card.
My next plan is to go back to the stl file and re-slice multiples in Slic3r and give that a try. I really need some advice on this apparent software issue as this is building into a small business! 💡
Pictures - these are not in chronological order, just images captured during my trouble shooting.
OK the first is the offset in the next layer on the left while the right side has printed well, up to this layer.
The second is a small offset noticed after the print was completed. Completed one in for reference.
The third picture is actual the first chronologically in the real time order. Captured after the SD card "cleanup". And yes I know, I did damage the sheet cover of the print bed and I will be replacing it. 
Any and all suggestions with be gratefully received. 😀
MR
If you want something different for tomorrow you have to DO something different today. 💡
Re: Severe Y axis layer offsets
Interesting, on looking at my own pictures I noticed that pictures 1 and 3 the offset is in the X Axis, however picture 2 the offset is in the Y Axis.
MR
If you want something different for tomorrow you have to DO something different today. 💡
Re: Severe Y axis layer offsets
Update
Hello All
Here are the steps I have followed so far.
- I returned to the stl file and re-sliced it in both Prusa Control and Slic3r.
- Changed the SD card back to the one shipped with the orginal Prusa kit.
- Cleared and deleted all files from the SD card.
- Loaded the 2 new g-codes on the SD card and then printed them separately.
- Used Live Adjust Z to open the gap a bit. -700 down to -500 for more space and less potential drag. 🙄
- I then printed them both separate with results below in the photo. Just as a side note, in this simple print, the fine setting on both slicers, the Prusa Control rocked it! The one on the right is the Prusa Control print.
- I then selected the Prusa Control slicer and created a 5x multiple, this was also a successful print.
I am now on a 10x multiple also from Prusa Control slicer and will update accordingly.
Observations and comments please, where can we estimate this offset is developing from? 💡
😯
Respectfully;
MR
If you want something different for tomorrow you have to DO something different today. 💡