Removed my nozzle incorrectly... help
So, I completely missed the part about heating the nozzle to 280 before removing it. So I put some serious torque into trying to get that off. And int he process, dinged up the heater block pretty good with the wrench. And when I put it back on, I think I tightened it way too hard - I made it nearly flush with the block. I since loosened it a bit, but now when its hot, it can be too easily screwed/unscrewed (just by tapping it).
I recently noticed that my nozzle and heatblock have burn marks on it. Specifically, the burn mark right around the circle of the heatblock (where the nozzle connects) is concerning. Thoughts? Did I ruin it?


RE: Removed my nozzle incorrectly... help
There is nothing like consistency,
you disassembled it incorrectly. and then re assembled it incorrectly.
There is always a learning curve with a hobby! Lol... I guess you won't do this in a hurry...
there is still room for more errors... Did you get a mini compatible (E3Dv6, style) nozzle? there are similar looking nozzles that can give you problems... Mk8 nozzles for example, the mk8 Nozzle screw thread is about 1mm shorter than the Mini style nozzle...
the Nozzle needs to connect firmly with the heatbreak inside the heat block, in order to cause a seal that will stop filament leaking!
this means that the nozzle should not be tightened hard against the heatblock.
I don't have a mini myself, and don't have a mini related diagram,
However if you can focus on the heater block, nozzle and heatbreak in the picture below, 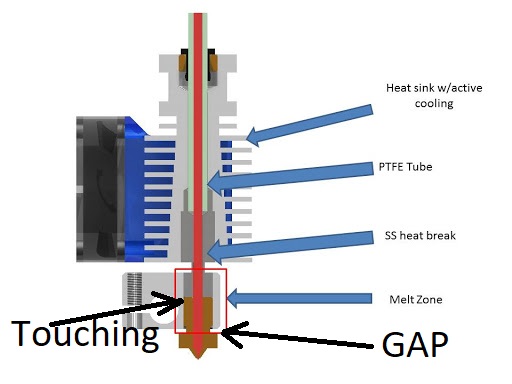
you will see that the nozzle and heatbreak should meet together inside the heater block and the nozzle does not tighten up against the heat block.
I hope this helps...
chances are you will have to re adjust live Z (First layer calibration) after you sort your issues out.
BE VERY CAREFUL with the grub screws holding the heatbreak into the heat sink, they are easy to break, some folk change them for normal cap head allen screws, so that they don't have problems with broken grub screws...
Also be careful with the hot end wiring, the thermistor wires are particularly easy to break
You may be better heating the hot end, and disassembling it, cleaning the components, then reassembling.
when re assembling, I screw the nozzle in to the headblock, all of the way, then unscrew it 1/2 a turn, then I screw the heatbreak in from the other side of the heatbreak, until it touches the nozzle. I re assemble the rest of the hot end, then heat the hot end, and finally tighten the nozzle against the heatbreak
this should leave the nut of the nozzle a small distance clear of the heat block, and should eradicate any leaks
regards Joan
I try to make safe suggestions,You should understand the context and ensure you are happy that they are safe before attempting to apply my suggestions, what you do, is YOUR responsibility.Location Halifax UK
RE: Removed my nozzle incorrectly... help
Prusa has well written guides on how to do almost anything with the Mini:
https://help.prusa3d.com/guide/how-to-replace-a-heaterblock-heatbreak-mini-mini_122769
You may have to replace the heater block, heat break, nozzle and PTFE tube. If you follow the guide, it works. If you value your time, I would just replace all the parts and have a clean hot end, rather than try to recover from your past errors with the parts that may be damaged. It probably only took a few hours to rebuild mine with new parts, and I work very slowly. It has worked flawlessly since. Prusa sells all the parts and if you buy two rolls of filament at the same time, shipping is not too bad.
Regards,
Mark
RE: Removed my nozzle incorrectly... help
I agree with Mark. Get a new hotend assembly, or at least all the parts and re-assemble it. And while you're at it, I'd order a second one to have as a spare. It's not that hard to remove the old hotend and put a new one in.
Formerly known on this forum as @fuchsr -- https://foxrun3d.com/
RE: Removed my nozzle incorrectly... help
I agree with Mark. Get a new hotend assembly, or at least all the parts and re-assemble it. And while you're at it, I'd order a second one to have as a spare. It's not that hard to remove the old hotend and put a new one in.
They included an updated procedure to install the PTFE tube in the latest online procedure. I am hoping that reduces the PTFE shrinkage issue. So, use the latest online procedure rather than anything downloaded in the past.
Regards,
Mark
RE: Removed my nozzle incorrectly... help
Update....
So I'm super proud of myself. I managed to take apart the entire hot end, without damaging any wires... and cleaned up the entire heat blocker (heat gun and brass brush). I then took the heat break, and screws out of the heat block so I could clean those up, because they were all gummy/stuck too. I re-assembled it, and its back to looking/functioning great.
After a few good test prints, I decided to resume my project with the next 15 hour print (high detail figurine pieces). Of course, I did not sit over my 3d print for those full 15 hours... well, my first-layer calibration must not have been spot on (though, it looked good. I think the raft layer I added was not mushed enough). So when I came back, I had a huge mess. And of course, my hotend was all gummy again.
At this point, I knew the process well, so proceeded to disassemble again...
The grub screws in the heat sink were stripped. I tried everything. Rubber band trick, heat, cold, super glue on the tip of of my torx bit - nada. I wound up replacing the entire hot end assembly.
Those grub screws are a crime. Having access to them in order the clean the hot-end is essential.
Taking a week break from printing lol. If yall have tip for replacing those grub screws with something... better. let me know!
RE: Removed my nozzle incorrectly... help
I remember just reading about a replacement option for those screws.. but don’t remember where I read it.. maybe post a new thread or search here..
Update....
So I'm super proud of myself. I managed to take apart the entire hot end, without damaging any wires... and cleaned up the entire heat blocker (heat gun and brass brush). I then took the heat break, and screws out of the heat block so I could clean those up, because they were all gummy/stuck too. I re-assembled it, and its back to looking/functioning great.
After a few good test prints, I decided to resume my project with the next 15 hour print (high detail figurine pieces). Of course, I did not sit over my 3d print for those full 15 hours... well, my first-layer calibration must not have been spot on (though, it looked good. I think the raft layer I added was not mushed enough). So when I came back, I had a huge mess. And of course, my hotend was all gummy again.
At this point, I knew the process well, so proceeded to disassemble again...
The grub screws in the heat sink were stripped. I tried everything. Rubber band trick, heat, cold, super glue on the tip of of my torx bit - nada. I wound up replacing the entire hot end assembly.
Those grub screws are a crime. Having access to them in order the clean the hot-end is essential.
Taking a week break from printing lol. If yall have tip for replacing those grub screws with something... better. let me know!
RE: Removed my nozzle incorrectly... help
Just found a thread, where this was mentioned:
https://forum.prusa3d.com/forum/hardware-firmware-and-software-help/mini-hotend-grub-screw/