Rough surface finish on Mini 3D prints, what's wrong
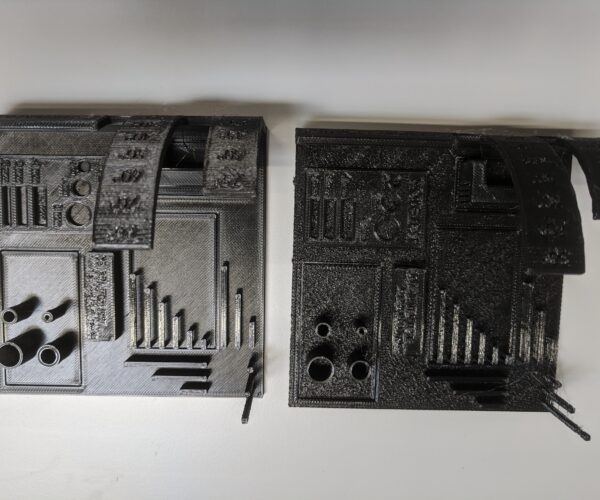
We have 2 Prusa Mini's at the office. One of them has a problem with a rough surface finish like it was sand blasted.
In these pics you can see the smooth surface on one print and a rough surface on the other. Any idea on what causing this and how it can be corrected? Thanks
Causes
Rough prints can be caused by wet or hydrated filament or too low extrusion. I am sure there are more.
--------------------
Chuck H
3D Printer Review Blog
Are both Mini's new? If not, how old? The one that makes bad prints: this happens lately, or since new? Only PLA filament was used on this printer, or did you use PETG before?
I assume on both printers the same filament is used for prints on photos... The only explanation I can think of is, hotend is not assembled properly. There's probably a clog inside heatbreak -take hotend apart, inspect and clean.
There's also possibility that gear inside extruder (on motor shaft) got lose -take extruder apart and check.
[Mini+] [MK3S+BEAR]
More info
The Mini that is having problems is fairly new (a couple of months). The one that's producing decent parts has some miles on it. The filement is a brand new roll of PLA from Prusa and we are using the default Prusa settings. I don't think it's a moisure problem because we're in So Cal where it's pretty dry, it's a brand new spool and the other printer is not having problems
It all started when the filiment in the extruder jammed. We manged to clear it but it quickly jammed again.
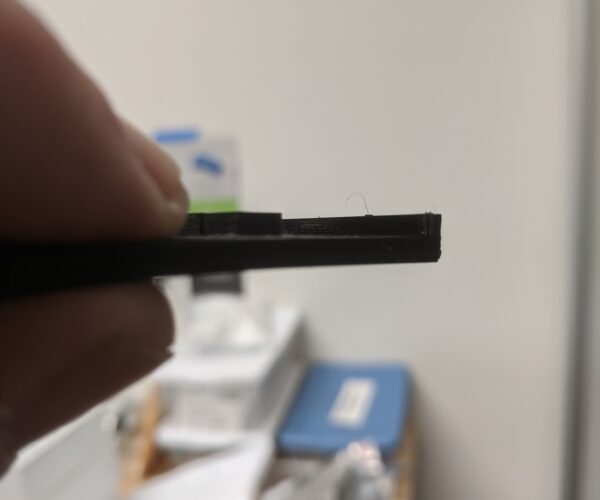
So we remomed the extruder and hot end and cleaned everything up and ran another print. Since then it's been producing parts like what's pictured abouve. The funny thing is if you stop the printer after it laid down a 1/16" or and removed it from the bed you can see specs of light through the layers. One of the engineers was playing around with the Z axis trying to reduce the layer height but I told him without acually measuring the clearance between the bed and the nozzle we really don't know how what the gap is between them (I'm going to put a feeler guage to it later today). His efforts to correct the problem reducing the layer height had no effect.
Not sure if replacing the nozzel is worth trying. We are using a .4mm brass nozzle that came with the unit.
We use the printer to confirm the design of medical diagnostic equipment so it's important we get this working properly.
Are you using the EXACT same .gcode file on both printers? To me, it looks like there is a difference in the top layer fill pattern, like one is Monotonic and the other Hilbert Curve. But the "see-through" first layer is just plain fugly.
Hear ye, Hear ye! Step right up folks and get your Government salvation here! Less than $.002 per word! Amazon.com/dp/B0B8XMMFP4
see through
That is definitely underextruded.
The Mini that is having problems is fairly new (a couple of months). The one that's producing decent parts has some miles on it. The filement is a brand new roll of PLA from Prusa and we are using the default Prusa settings. I don't think it's a moisure problem because we're in So Cal where it's pretty dry, it's a brand new spool and the other printer is not having problems
It all started when the filiment in the extruder jammed. We manged to clear it but it quickly jammed again.
So we remomed the extruder and hot end and cleaned everything up and ran another print. Since then it's been producing parts like what's pictured abouve. The funny thing is if you stop the printer after it laid down a 1/16" or and removed it from the bed you can see specs of light through the layers. One of the engineers was playing around with the Z axis trying to reduce the layer height but I told him without acually measuring the clearance between the bed and the nozzle we really don't know how what the gap is between them (I'm going to put a feeler guage to it later today). His efforts to correct the problem reducing the layer height had no effect.
Not sure if replacing the nozzel is worth trying. We are using a .4mm brass nozzle that came with the unit.
We use the printer to confirm the design of medical diagnostic equipment so it's important we get this working properly.
--------------------
Chuck H
3D Printer Review Blog
Things to do
...It all started when the filiment in the extruder jammed. We manged to clear it but it quickly jammed again.
-that's important info!
To answer why that happened, do the following:
1. Take extruder apart and check if gear on extruder motor is fastened properly (see here). It happened to some, that screw inside gear got lose over the time and so, gear cant push/pull filament as it should (resulting under-extrusion).
2. If step above doesn't solve the problem, take hotend apart (heatbreak, heatblock and nozzle). Yes, you did that, but this time make sure you do it properly. Take time, study instructions here and here -it's important that you pay attention on every detail!
If anything in above process in not fully clear to you, ask in forum.
Explanation: Your print example (on photo) shows under-extrusion. This can only happen because:
-extruder is not working properly (a lot of filament debris, filament tension screw too loose, gear on motor shaft loose),
-there's a jam inside hotend (hotend not assembled properly, which causes clog that prevent filament to flow out freely),
-printing temperature too low (default is 215C for PLA) -observe on display during print.
[Mini+] [MK3S+BEAR]


