How to avoid these marks on the top of my prints?
I've noticed a lot of my PLA prints have these round marks on the top layers. This is particularly noticeable with this model:
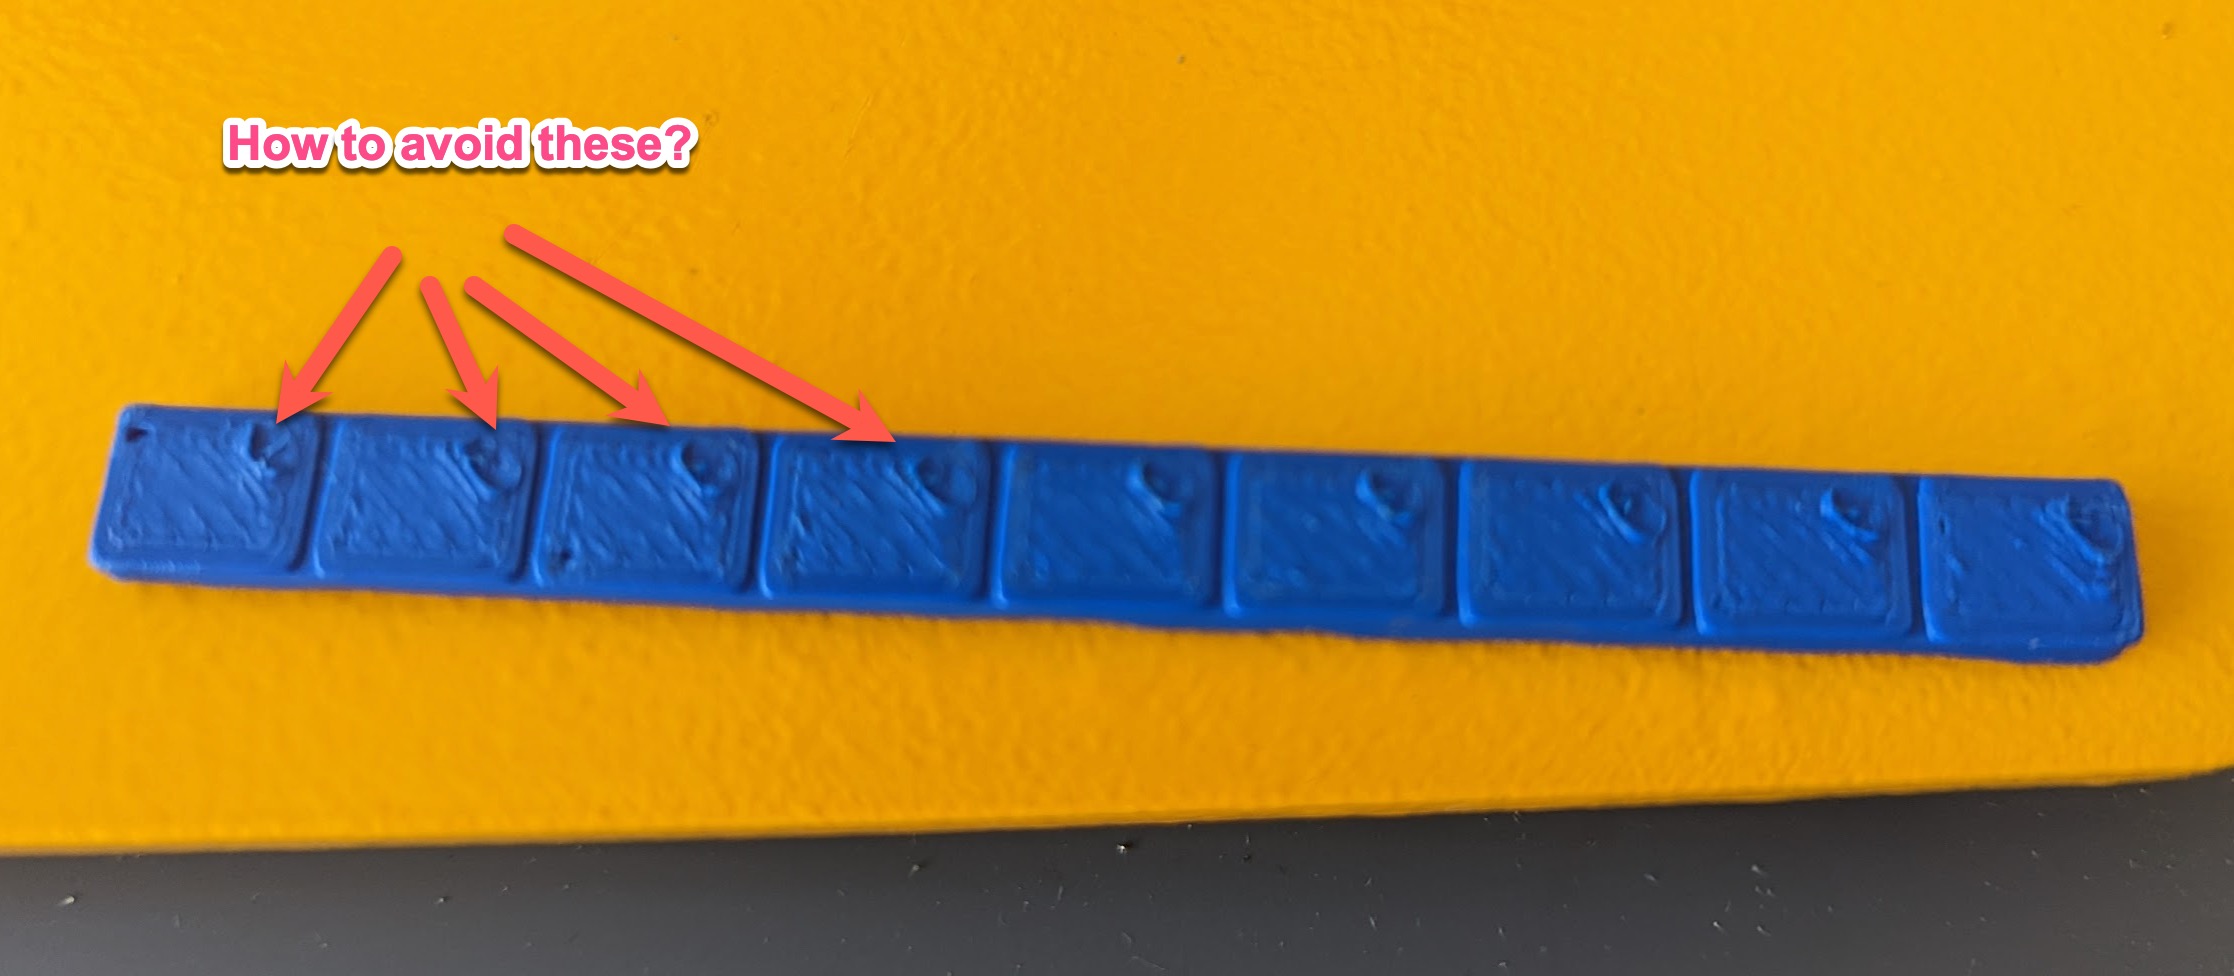
It looks like the nozzle stirs a bit into the model before lifting up, causing those round marks. Is there a way to avoid that?
I'm using the latest Prusa Slicer v2.5.0.
Thanks,
Julien
RE:
This looks like some pretty substantial over-extrusion! In other words, too much filament comes out, causing the extra to get dragged around by the nozzle. The top of your print is not supposed to look like that at all.
A simple fix is to reduce the extrusion multiplier in the Filament Settings > Filament section of the PrusaSlicer settings. Try lowering it by increments of 0.05 (and smaller when you get close to something good) with small test prints. To get optimal results, you could use a flow calibration (AKA extrusion multiplier calibration) technique such as this which should be more accurate than eyeballing it: https://teachingtechyt.github.io/calibration.html#flow
Also note that if you use 100% infill, your extrusion multiplier must be pretty well calibrated else any excess plastic will protrude on top (because there aren't any gaps for it to fall into) and get dragged around the top surface. It will worsen for each additional printed layer as more and more material accumulates.
RE: How to avoid these marks on the top of my prints?
Thanks for the tips. I will try to play with the extrusion multiplier setting. I will also try out the calibration method that you've linked.
For now, I've just ran another print using a brand new spool of Prusament PLA and the "Prusament PLA" filament system preset in Prusa Slicer. The issue still appears:
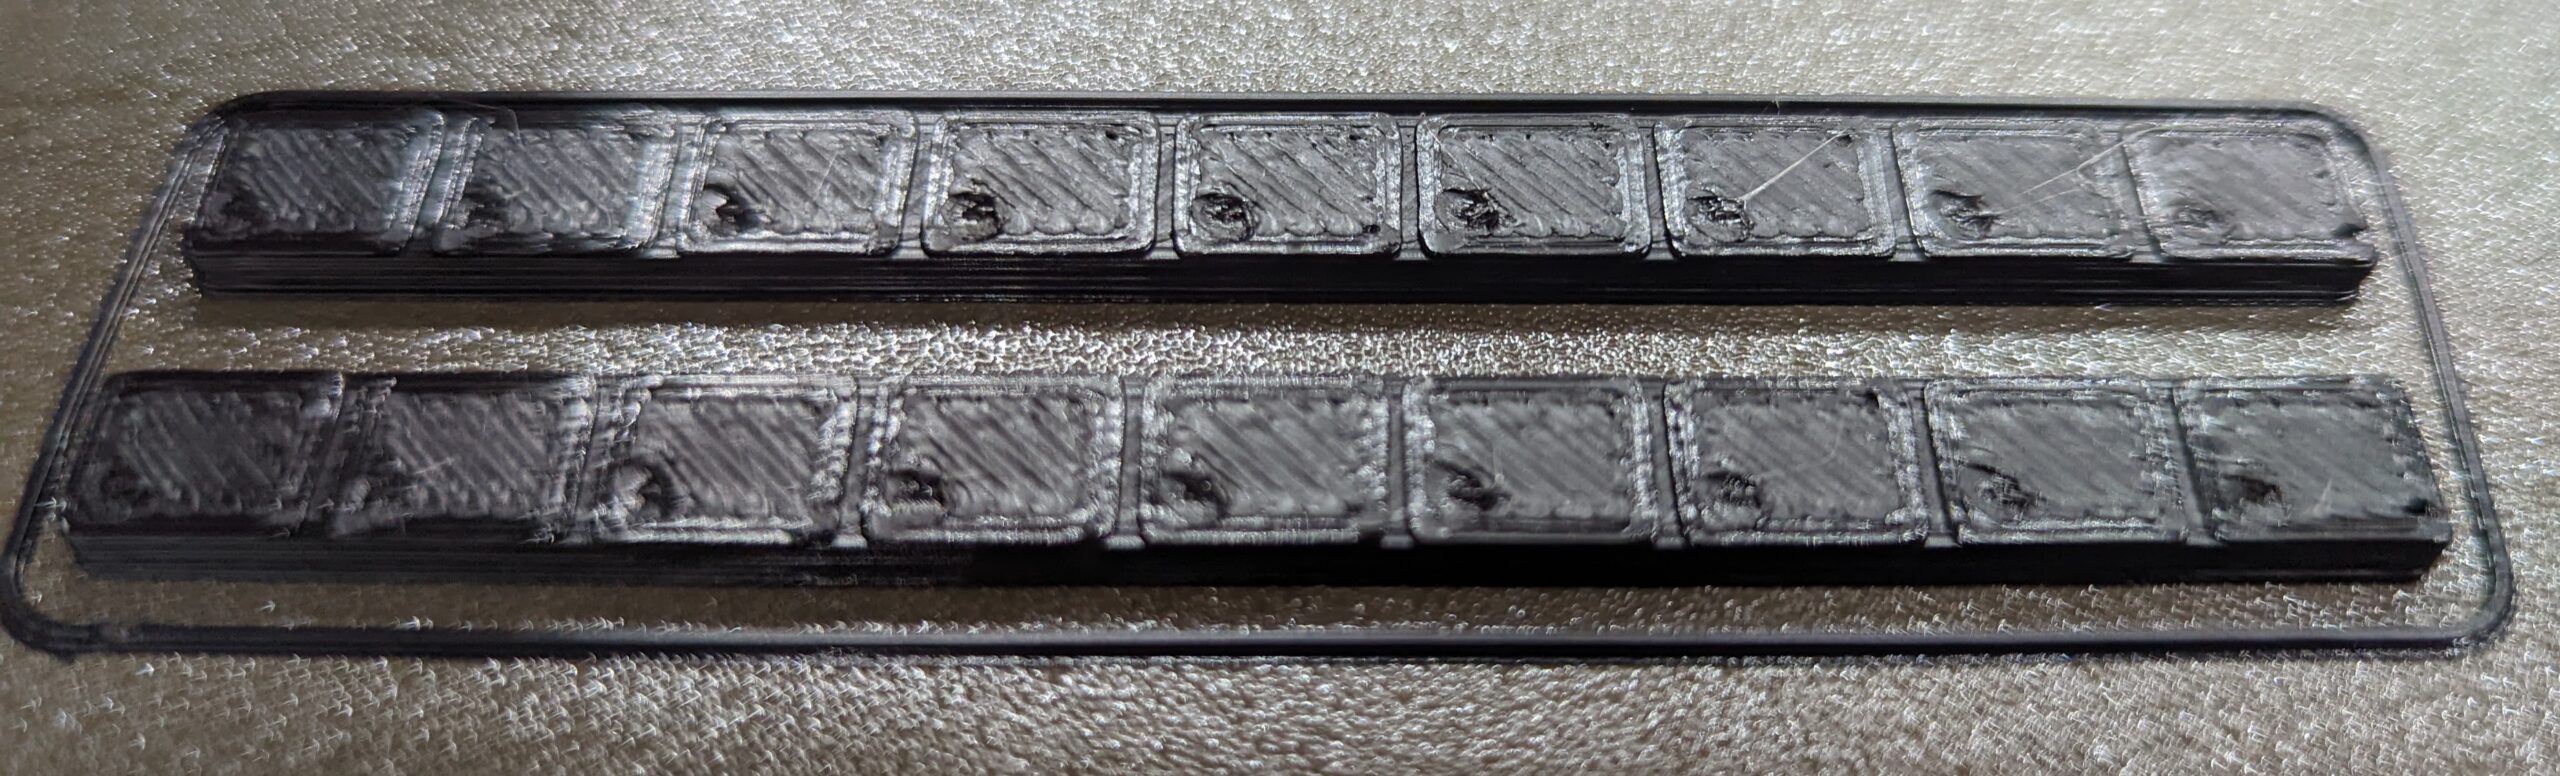
For reference, in the photo in my original post above I was using an old spool of blue MatterHackers PLA with the "Generic PLA" filament system preset.
The model is "AdjustableSpoolCradleCrossbarV5.stl" from here: https://www.printables.com/model/137317-airtight-filament-canister/files
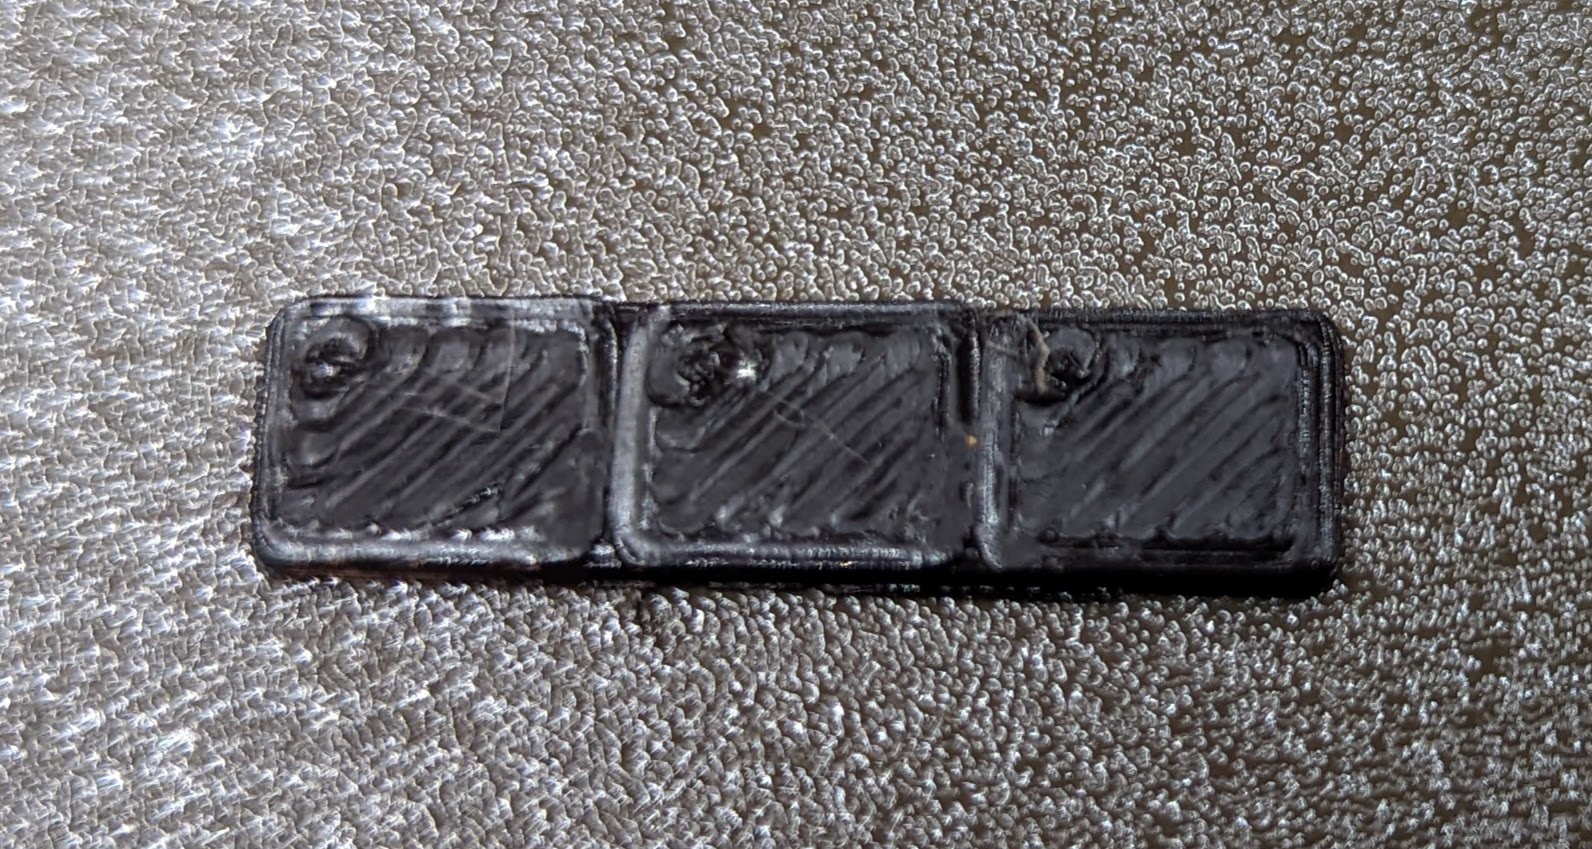
Now, to me it looks those round marks have something to do with the nozzle wiping before retraction:

RE:
Pretty bad results for Prusament and default Prusament settings in PrusaSlicer. It should be much better than that. Mind uploading your 3mf file so that I can take a look at the settings? (I think you need to zip it to be able to upload it on the forum)
Retractions and wipes at those spots can indeed exacerbate the issue a bit, but they're not the cause. You should keep those on and figure out what causes the over-extrusion instead.
BTW what printer do you have? Are you sure you've selected the correct printer profile?
RE: How to avoid these marks on the top of my prints?
Pretty bad results for Prusament and default Prusament settings in PrusaSlicer.
Agreed. Not just the blobs, the whole top surface looks suboptimal.
Formerly known on this forum as @fuchsr -- https://foxrun3d.com/
RE: How to avoid these marks on the top of my prints?
As @fuchsr and @fortinmike said: Something is wrong with your extrusion. To narrow down the cause (hardware or software) we need to know what printer you have and if there are any mods or upgrades installed and we need the project file from slicer to check your settings. Also helpful to know: did you do any calibration routines? And if so: which ones?
If at first you don't succeed, skydiving is not for you.
Find out why this is pinned in the general section!
RE:
Hi all,
I've attached the project file. I have a Prusa MK3S+ and use all of the default printer settings. The only thing I've changed is add the Octoprint connection settings.
I also use a 0.6mm nozzle.
I believe I've run through the full wizzard calibration a few weeks ago. I could try again and see if that changes anything.
RE: How to avoid these marks on the top of my prints?
So I've redone a full wizzard calibration but the issue is still there.
I've shot a video of what's happening: https://photos.app.goo.gl/fLEURFb56yrfexfQA
It looks like the nozzle does a circular wiping motion that digs a round hole just before lifting up.
Here's also another closeup photo:
Also BTW, my MK3S+ doesn't have any mods. It's all stock parts.
RE: How to avoid these marks on the top of my prints?
One more thing I forgot to mention, I'm printing with the "0.30mm QUALITY" print settings preset using a 0.6mm nozzle.
RE:
Don't focus on the circular motion (wipe) at the end. The whole top surface shows clear signs of over-extrusion, so something is probably wrong with the flow. When this issue is corrected, the hole will go away and your top surface will look much cleaner (and won't be deformed).
With that said, I'd say it's highly unexpected for a stock MK3S+ with PrusaSlicer and Prusament with default settings to result in that kind of top layer finish. The default profiles are pretty good for all Prusa printers AFAIK. I wonder if this could be somehow caused by a hardware issue as I'd expect the "all Prusa" hardware and software combination with default settings to work perfectly fine even for small prints without any changes in the slicer.
Still, the only thing I can think of to try to fix this (in software) would be to reduce the extrusion multiplier as previously suggested. Please try this and post your results.
RE:
I had another idea: Another possible cause for this would be that if your Z (first layer thickness) is way too low, it could accumulate extra plastic while the first layer is being printed and drag that extra plastic around while printing subsequent layers until it reaches the top layer and makes a mess. The fact that your print's sides do not seem to be very smooth at all would fit the theory. I'm not very confident with that explanation as I've never set my Z low enough to observe this, but it seems logical that this could happen without over-extrusion being (too much of) a factor. So maybe try to calibrate this too: https://help.prusa3d.com/article/first-layer-calibration_112365
RE: How to avoid these marks on the top of my prints?
Posted by: @jphalip
I also use a 0.6mm nozzle.
Also BTW, my MK3S+ doesn't have any mods. It's all stock part
I thought the MK3S+ was a standard 0.4 nozzle-size?
RE: How to avoid these marks on the top of my prints?
I'd print a hollow-out calibration cube with a single perimeter. Measure the thickness and adjust your extrusion multiplier as needed. See https://projects.ttlexceeded.com/3dprinting_techniques_calibrating_filament.html#calibrating-your-extrusion-mutliplier
Formerly known on this forum as @fuchsr -- https://foxrun3d.com/
RE: How to avoid these marks on the top of my prints?
Hi all. Thanks for the answers and ideas!
One thing first: The 0.6mm is the only thing I've changed from the stock printer. BTW I've had that printer for a couple of years. I don't use it a ton but have gone through a few spools.
So, I was going to do a quick test print and nothing came out of the nozzle at all. First I thought the nozzle might be clogged. But from looking at it closer, I realized that the extruder gear wasn't pulling any filament in. It looks like the gear inside the extruder is out of alignment and can't pull the filament in. I tried to pull the filament out but it broke off. As a test I then tried to insert a small allen wrench but it's hitting something (I suppose the extruder gear) and cannot reach the hot end:

So it seems that something's off with the extruder gear being out of alignment. I suppose I might have to take the extruder apart to fix it, right?
RE: How to avoid these marks on the top of my prints?
Ok sorry for the noise. The blockage was in fact caused by a piece of filament. The extruder wheel now pulls filament in correctly. I'm now going to go through the tips and procedures that you've all suggested and will report back.
RE: How to avoid these marks on the top of my prints?
Be aware that you can not use the build in first layer calibration with a 0.6mm nozzle! See: https://help.prusa3d.com/article/different-nozzle-types_2193#first-layer-calibration-of-other-nozzles
If at first you don't succeed, skydiving is not for you.
Find out why this is pinned in the general section!
RE: How to avoid these marks on the top of my prints?
I came up with this calibration strip that can be used with any nozzle size and allows you to check multiple Live Z levels in one print: https://www.prusaprinters.org/prints/105404 .
Formerly known on this forum as @fuchsr -- https://foxrun3d.com/
RE: How to avoid these marks on the top of my prints?
The other really good explanation of how to check the extrusion multiplier is here: https://help.prusa3d.com/article/extrusion-multiplier-calibration_2257
Formerly known on this forum as @fuchsr -- https://foxrun3d.com/
RE: How to avoid these marks on the top of my prints?
Here is another way to calibrate the extrusion: https://www.thingiverse.com/thing:1622868
I like it, because it can be done by measuring and calculating OR by just iterating without any tools or calculations.
If at first you don't succeed, skydiving is not for you.
Find out why this is pinned in the general section!
RE: How to avoid these marks on the top of my prints?
Thank you all again for the tips. I actually didn't know that the built-in Z layer calibration only worked for 0.40mm nozzles.
So I just did a calibration using https://www.printables.com/model/105404 and this is what I got:
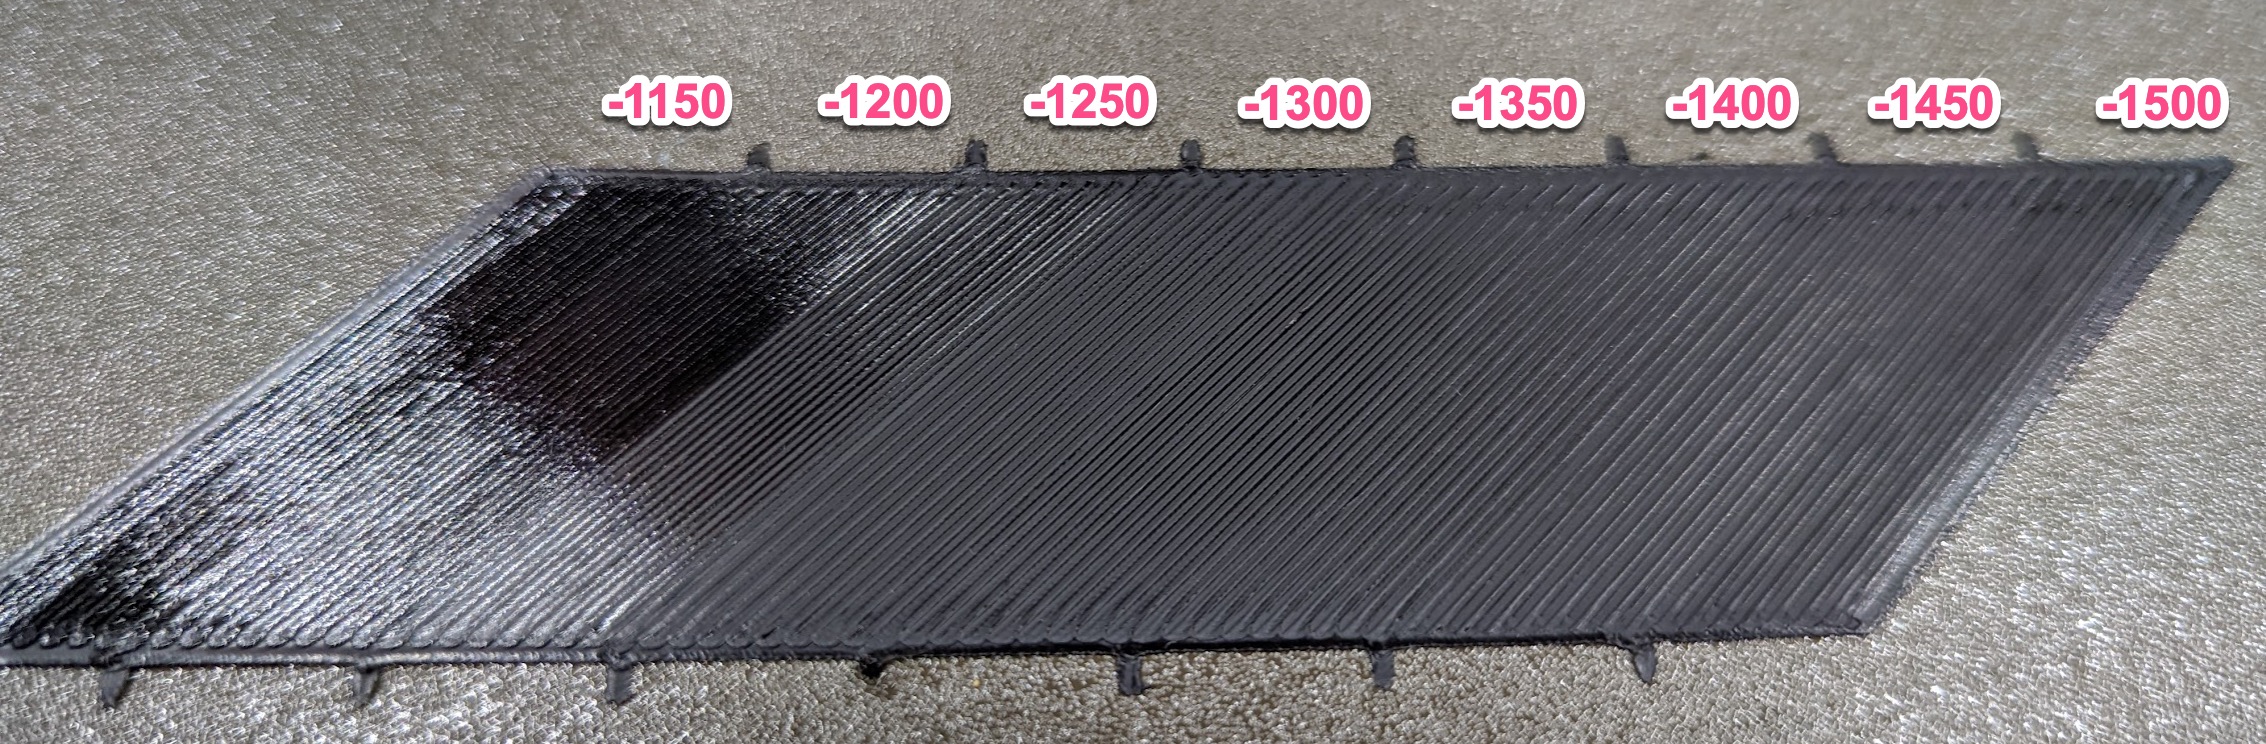
Based on the results I ended up picking -1300 (I used to be on -1400).
I then did the cube calibration ( https://help.prusa3d.com/article/extrusion-multiplier-calibration_2257). The cube came out looking very clean and pretty, without any discernible defects, as I'm used to with Prusament filaments:
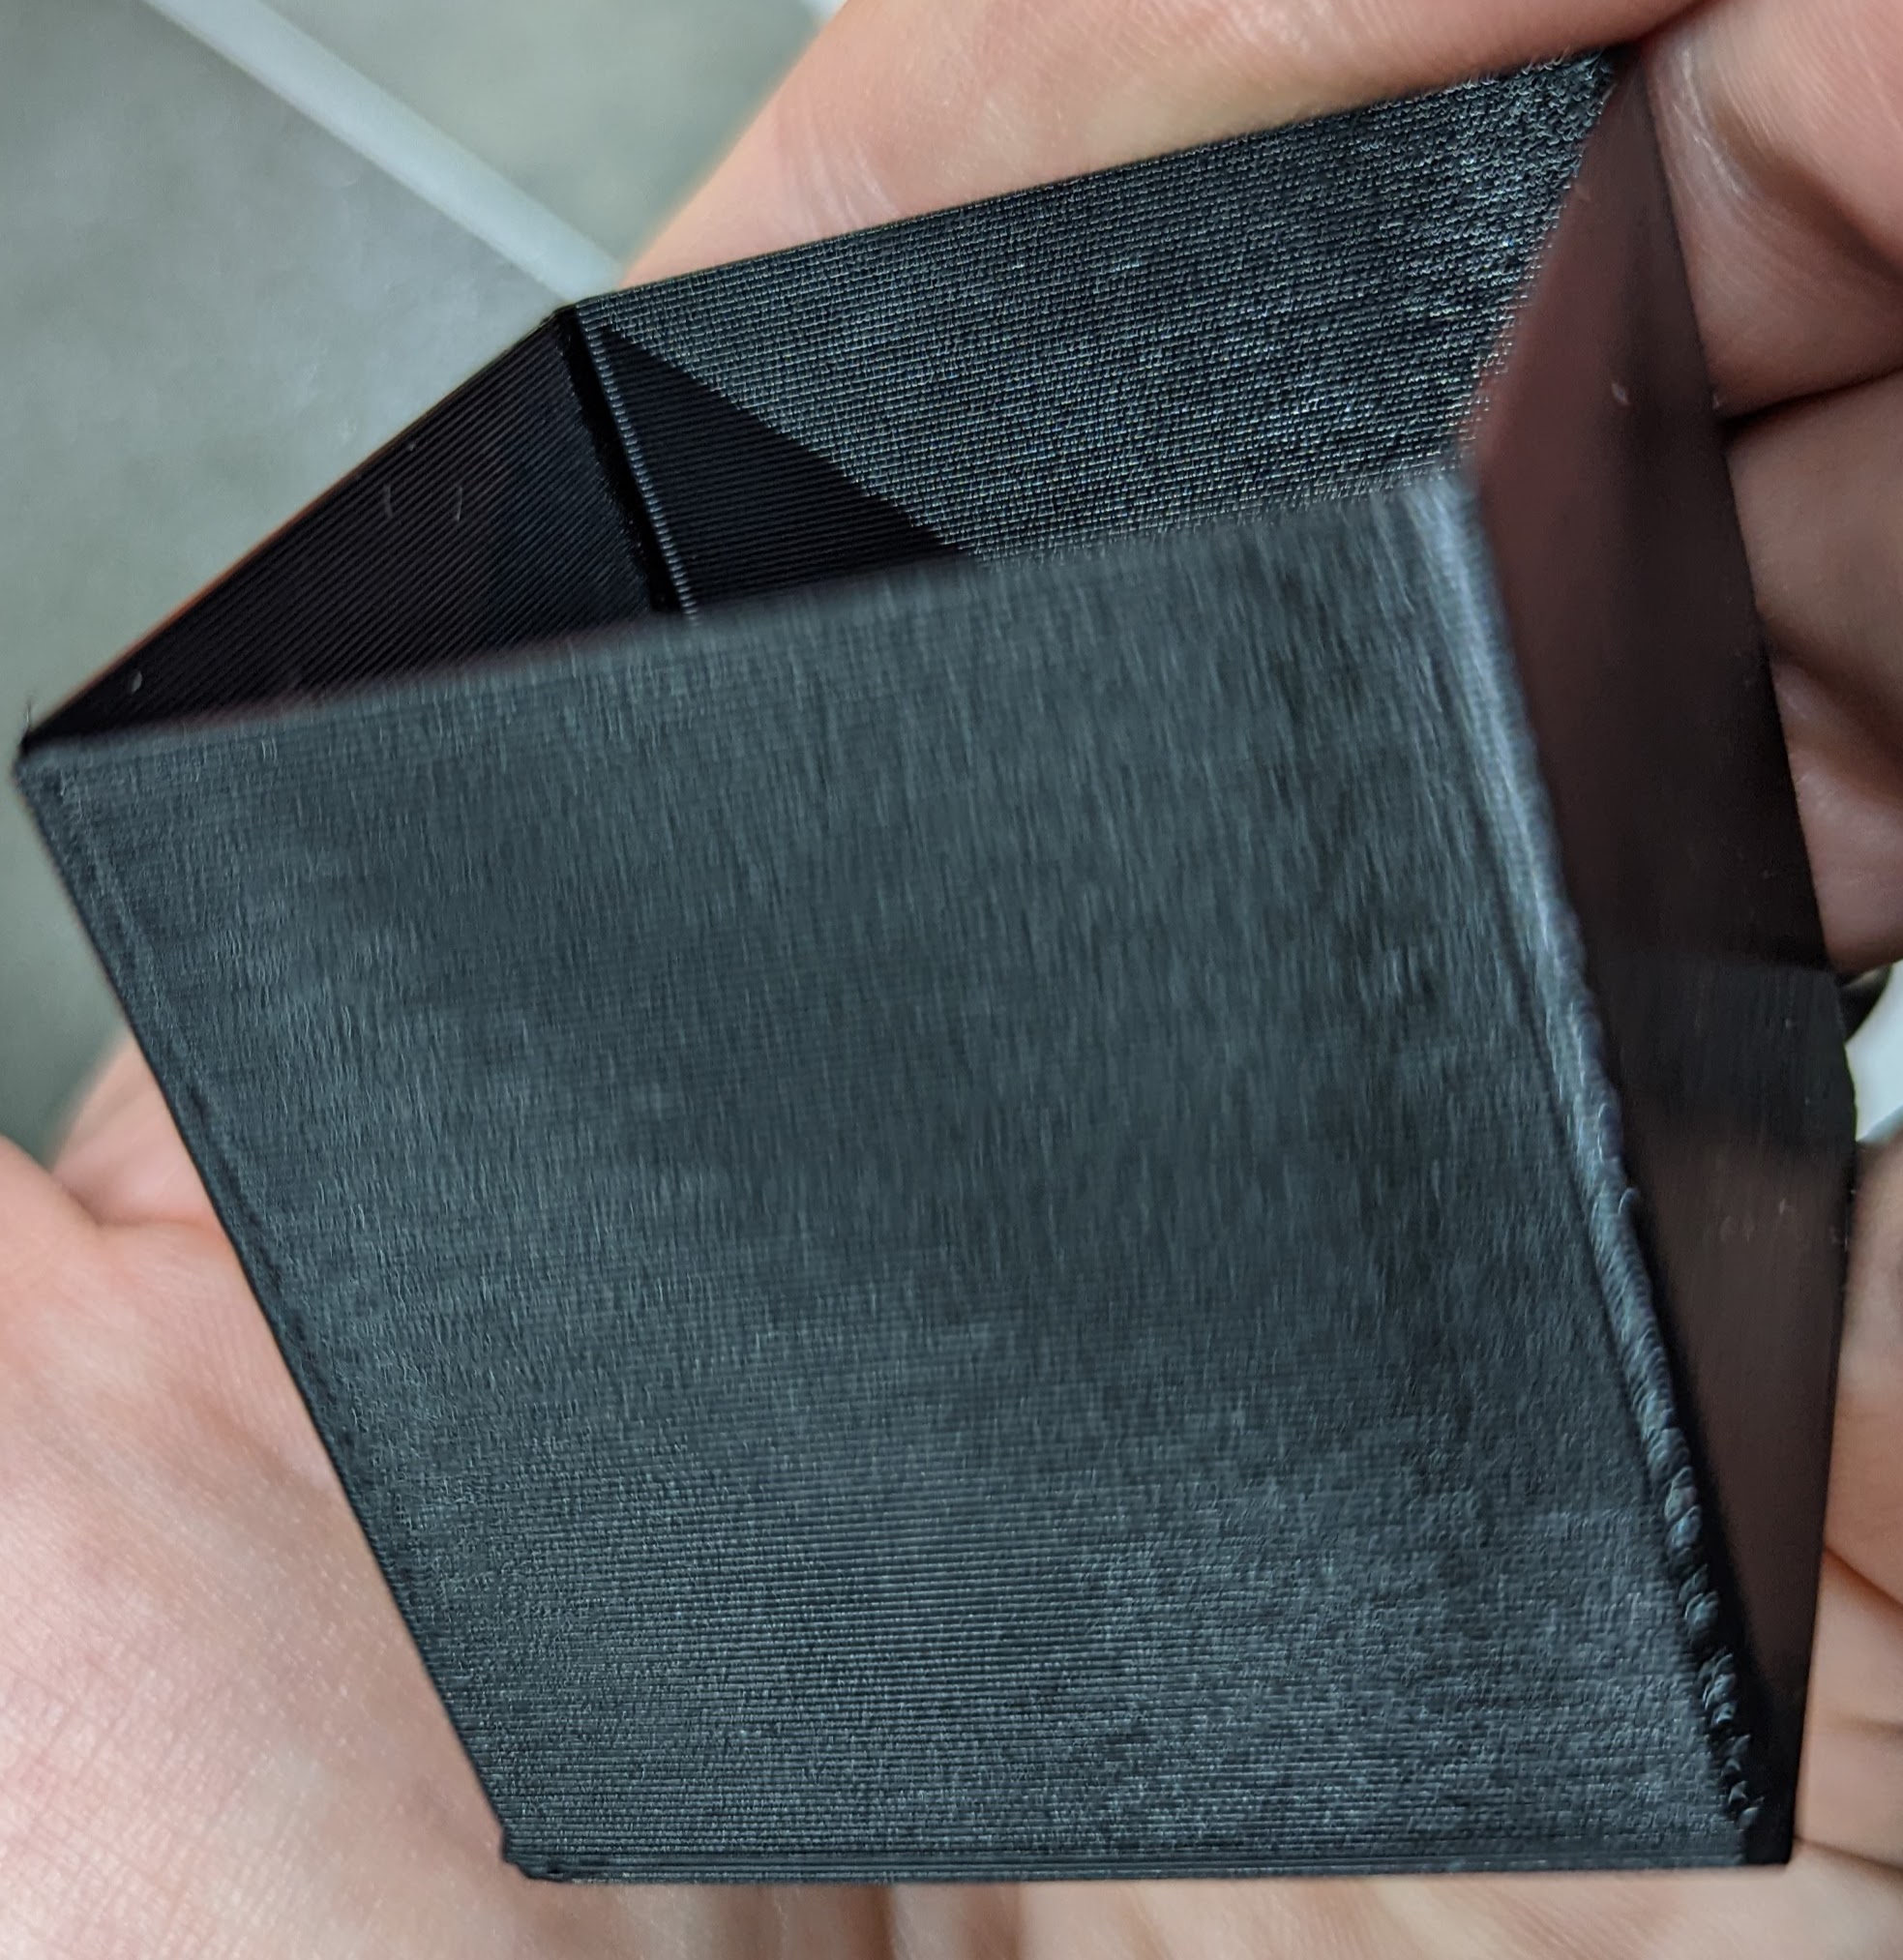
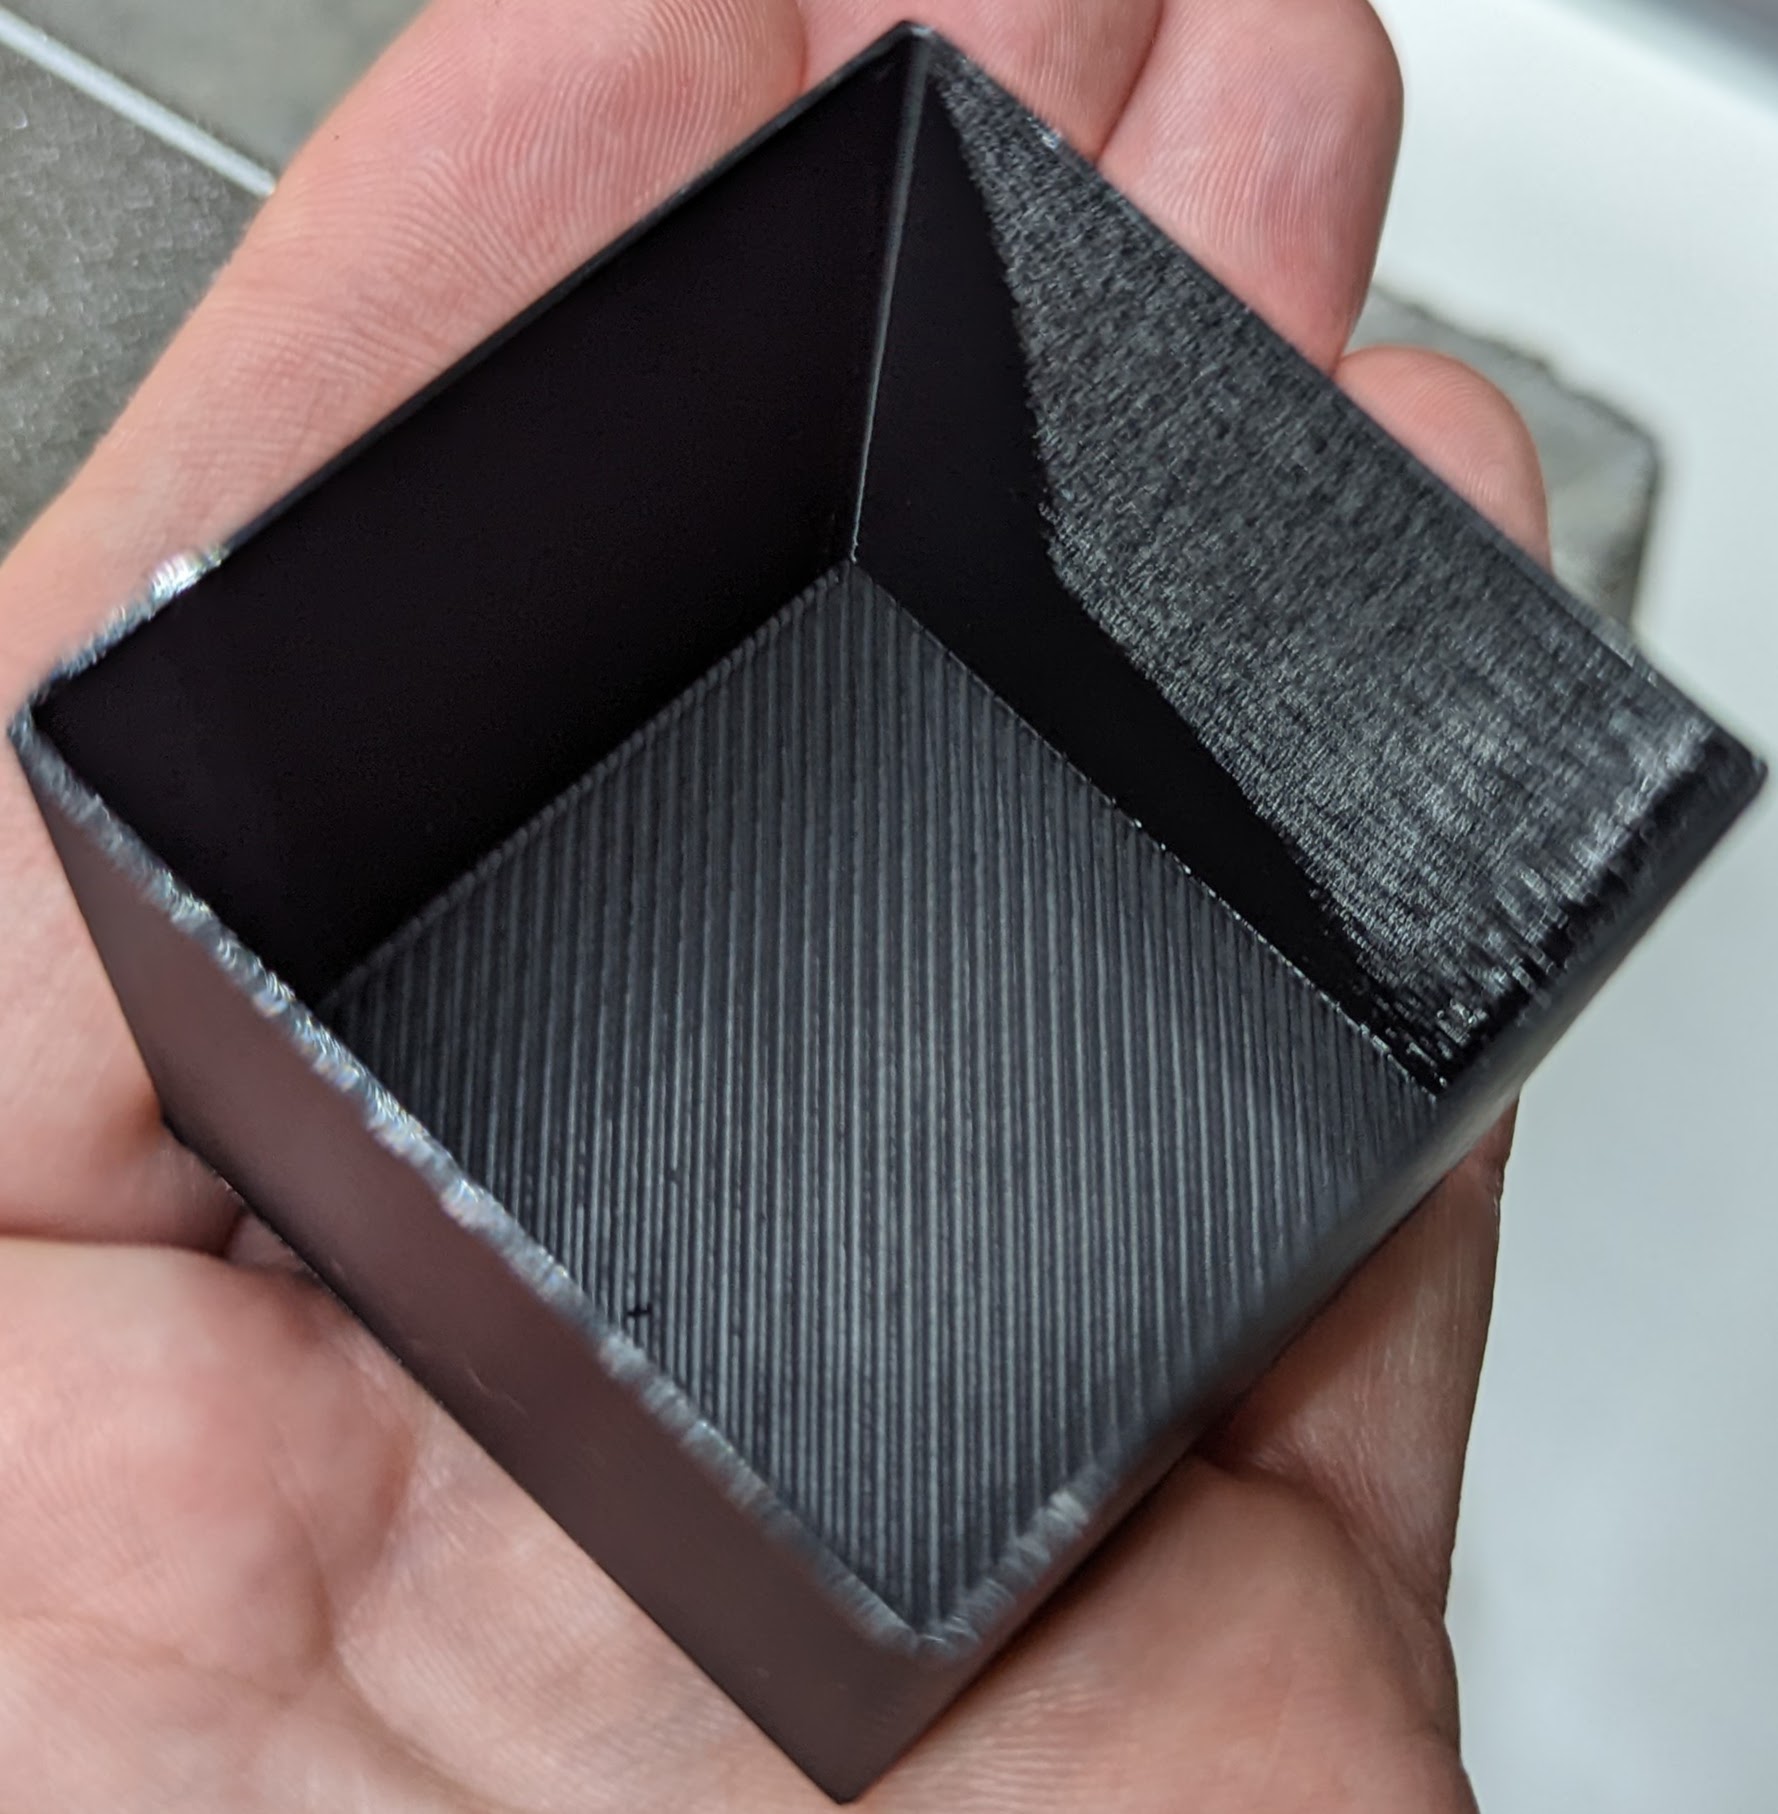
The average wall thickness ended up being 0.641mm instead of 0.65mm. So that in fact appears to indicate under extrusion, not over extrusion, no?
I'm kind of at a loss...
By chance, would any of you with a 0.6mm nozzle be able to print this test model (see 3MF model attached)? It uses only 0.5g of PLA and takes 2 minutes to print. I'd love to see what results to expect. Thanks again!