First Layer Problems
Hi Guys,
First off, I'm a complete novice with 3D Printing, so apologies in advance for mistakes and also the length of the post!
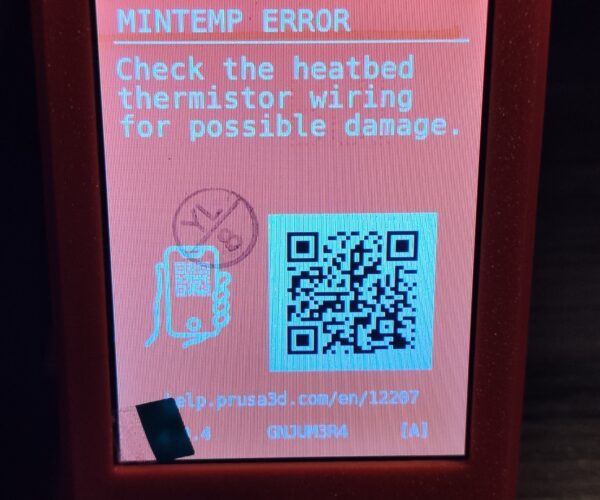
I bought the semi-pre built Prusa Mini+, which arrived last week and I was able to assemble it without issue. Now, this isn't my real problem with the printer, but I thought I'd mention it in-case it's related. Upon first boot of the machine, an error popped up on the screen saying "Mintemp Error - check the heatbed thermister wiring for possible damage - error 12207".
I then checked all the wiring and connections and they were all in perfect condition, no pinches, tears or damage. I also researched the code online, but it basically states the same info as what was on the printers screen. After about 20mins the error disappeared and didn't return during about 6 hours use....... until this morning, exact same scenario. Again after about 20mins the error went away and back to business as usual. Could this be a hardware problem and anything to worry about?
Anyway, the main issue I'm having with the Mini+ is with the first layer adhesion - as in, there is none! I've tried and tried for hours and nothing I do seems to help the situation. Using PrusaSlicer 2.4.1, I've added Brims, Rafts and loads of support material to a selection of different models, all to no avail. I'm using Prusa PLA and I've also tried adjusting the temps of the nozzle and the heatbed. but this didn't help either. I use IPA wipes before each attempt, but it's kinda redundant seeing as nothing adheres to the bed anyway! (I use paper gloves too!). After some research, I also adjusted the SuperPinda sensor as per instructions on the Prusa website (using a credit card). Each and every print still just blows off the bed, sometimes it's straight away and sometimes it can get about 30% in before it gets knocked off. Which has led me to some questions:
1/ Should the nozzle be hitting off the model as it's being built up, as I can hear and see it touching the model during the print? I was under the impression that the nozzles almost floats over the print, never making actual contact? I've tried raising the Z-axis height, but it still makes contact. This is what's knocking the print off the bed as it gets taller.
2/ From what I've read, a lot of first layer issues can be caused by incorrect Z-axis height. I'm confused as I also understand that incorrect Z-axis height will cause poor print quality. I can confirm that what does actual manage to print before falling off the bed is decent quality, so does that mean the Z-axis is correct or off? The last setting I used was about -1.4. Is there a generic sweet spot number that I can use or is it absolutely unique to each printer? The printers own First Layer calibration print seems to look okay when I run it.
3/ When using Rafts in PrusaSlicer, I understand their use and concept, however when I see people using them online there's a very definite bottom outline to the Raft radiating out from the model, whereas when I use a Raft it just prints out what looks like random blobs of mess before it starts to print!
Think that's all for now, as the post is getting crazy long.
Thanks very much in advance for reading this far and also for any advice you can provide!
All the best,
LP
RE: First Layer Problems
There are 3 primary reasons why your print pops off the bed, either the z-offset is too high, the bed is dirty or both.
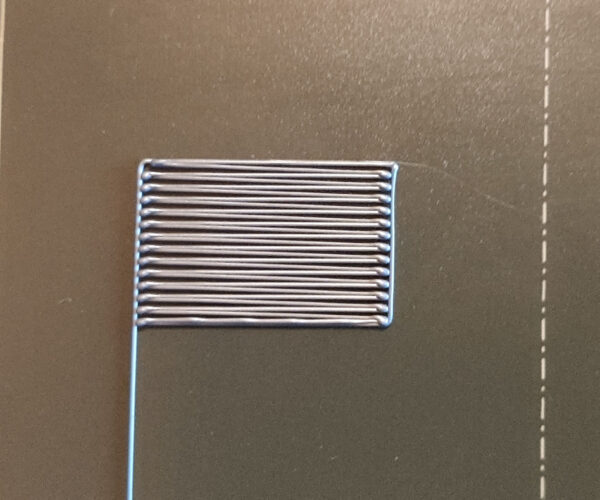
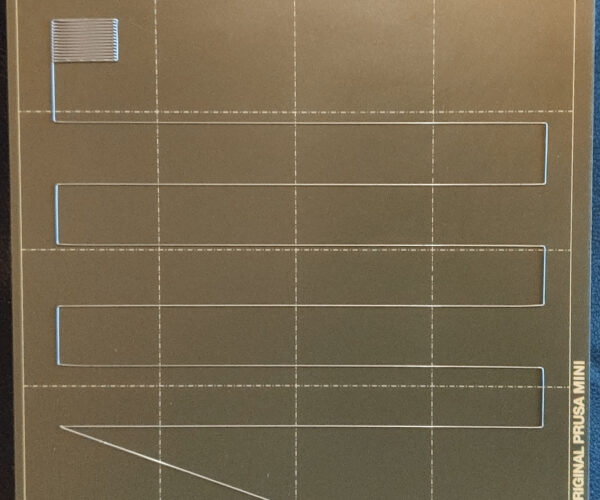
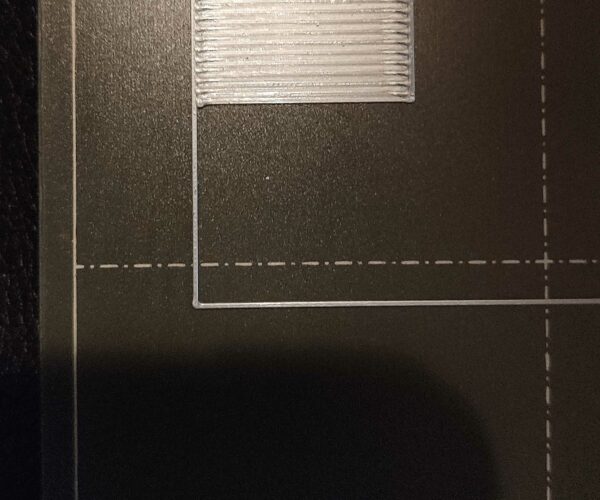
Redo your first layer calibration and take 2 photos and post them here, one of the full bed, the other of a close up of the tiny square at the end.
How cold is it where you have your printer? I've never seen this myself, but some people report when the printer is in a too cold space the min temp error pops up.
Cheers
-Bob
Prusa I3 Mk2 kit upgraded to Mk2.5s, Ender3 with many mods, Prusa Mini kit with Bondtech heat break, Prusa I3 Mk3s+ kit
RE: First Layer Problems
Hi Bob,
Thanks for the reply.
I've attached the latest calibration test photos, hope the quality is okay. The Z-axis offset is -1.425.
Interestingly, no Thermo error this morning, but it's not as chilly today as the last couple of days, so it could be just a cold environment as you say. I'll keep an eye on it I guess.
All the best,
LP
RE:
This is a candidate for the worst calibration of the month 🙂 but you´re absolutely not alone, most of us have been there, rest assured. Actually - the nozzle is supposed to squish the filament on the bed - you´re laying lines of filament without the nozzle even touching the filament; this is the general misunderstanding here.
Everything has been said about calibration, and before we all start repeating what has been said, please read the how-to by JeffJordan, this is the best read regarding calibration you will find anywhere, I´d say.
A 70x70x2mm square is attached for your use; put it in the center of your print bed and slice for your preferred material.
Hang in there and keep the pics coming!
Best regards
Chris
I try to give answers to the best of my ability, but I am not a 3D printing pro by any means, and anything you do you do at your own risk. BTW: I have no food for…
RE:
To elaborate on @justme3d's assessment, your first layer calibration is putting your nozzle waaaay too high. This adjustment is essential to get right. No amount of brims, rafts or temperature changes will improve your print quality with a first layer calibration that is too high.
Mk3S+,SL1S
RE: First Layer Problems
Yup, waayyy too high. What's remarkable is that you're getting 90 degree angles with the offset. I'd expect those to be all over the place.
Looking at the little rectangle at the end, that should be a solid sheet of plastic with no gaps between the filament strands nor ridges. From here, run your calibration again and take the nozzle down -0.100 and see what that gets you. If you still have gaps do it again and take it down another -0.100. Keep doing this until those gaps fill in. I'm recommending going no more than 0.100 so you don't overdo it and crash the nozzle into the bed. When you get close and you're fine tuning it, reduce your increments to 0.025 or 0.050. You know you're done when the bottom is smooth and the top has no perceivable gap lines. There is a danger of going too low, when you do instead of having gaps between the strands you get ridges. When you think you're done, post photos we'll be happy to tell you how you did.
Cheers
-Bob
Prusa I3 Mk2 kit upgraded to Mk2.5s, Ender3 with many mods, Prusa Mini kit with Bondtech heat break, Prusa I3 Mk3s+ kit
RE: First Layer Problems
Thanks, Chris - it's bottom of the class for me then! 😆
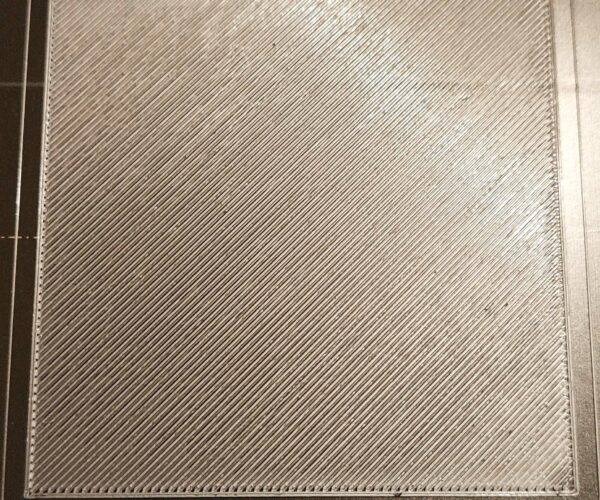
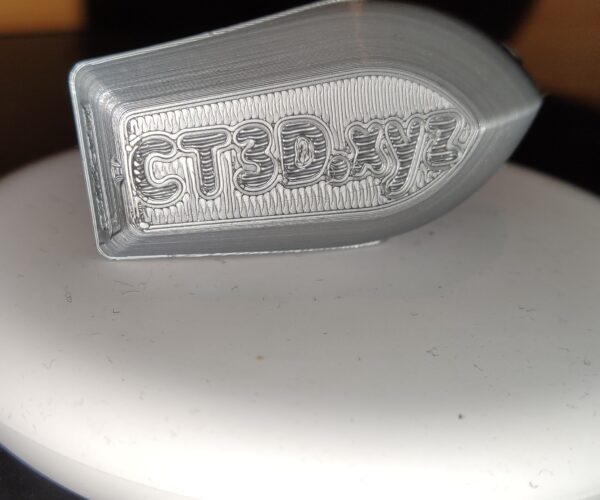
The post by Jeff was indeed excellent, as was the square test print. I've since printed it out and attached the results. It's quite thin, but it did stick to the bed in the end and looks okay to my eyes (maybe a slight bit wavey?). I had to adjust the Z-axis to -1.980 to get it looking smooth. I also redone the internal calibration test, again using the -1.980 config. I decided to print the Benchy model, and personally, I was very pleased with it, especially by the fact that it stuck to the bed for the duration! Does it look okay to your eyes?
Thanks again for all your help! 👍
RE: First Layer Problems
Hi Sylvia - thanks for the reply! I've since adjusted the Z-axis and attached some updated pics to the post. Hopefully there's some improvement. What do you think?
RE: First Layer Problems
Hi Bob - yep, it seems I was getting all types of special going on earlier! 😆
I've since changed the Z-axis using the square test that Chris linked me, but I had to go to -1.980 to get any decent results. Do you think that's too low though, as when I was originally looking into this issue I seen people setting their Z-axis to -0.180 and such? Just seems like I've had to go way above that to achieve similar results, so I'm hoping it's not a physical problem manifesting.
Thanks again for your help!
Yup, waayyy too high. What's remarkable is that you're getting 90 degree angles with the offset. I'd expect those to be all over the place.
Looking at the little rectangle at the end, that should be a solid sheet of plastic with no gaps between the filament strands nor ridges. From here, run your calibration again and take the nozzle down -0.100 and see what that gets you. If you still have gaps do it again and take it down another -0.100. Keep doing this until those gaps fill in. I'm recommending going no more than 0.100 so you don't overdo it and crash the nozzle into the bed. When you get close and you're fine tuning it, reduce your increments to 0.025 or 0.050. You know you're done when the bottom is smooth and the top has no perceivable gap lines. There is a danger of going too low, when you do instead of having gaps between the strands you get ridges. When you think you're done, post photos we'll be happy to tell you how you did.
Cheers
-Bob
RE: First Layer Problems
Thanks, Chris - it's bottom of the class for me then! 😆
The post by Jeff was indeed excellent, as was the square test print. I've since printed it out and attached the results. It's quite thin, but it did stick to the bed in the end and looks okay to my eyes (maybe a slight bit wavey?). I had to adjust the Z-axis to -1.980 to get it looking smooth. I also redone the internal calibration test, again using the -1.980 config. I decided to print the Benchy model, and personally, I was very pleased with it, especially by the fact that it stuck to the bed for the duration! Does it look okay to your eyes?
Thanks again for all your help! 👍
This is a candidate for the worst calibration of the month 🙂 but you´re absolutely not alone, most of us have been there, rest assured. Actually - the nozzle is supposed to squish the filament on the bed - you´re laying lines of filament without the nozzle even touching the filament; this is the general misunderstanding here.
Everything has been said about calibration, and before we all start repeating what has been said, please read the how-to by JeffJordan, this is the best read regarding calibration you will find anywhere, I´d say.
A 70x70x2mm square is attached for your use; put it in the center of your print bed and slice for your preferred material.
Hang in there and keep the pics coming!
Best regards
Chris
RE: First Layer Problems
Hi Sylvia - thanks for the reply! I've since adjusted the Z-axis and attached some updated pics to the post. Hopefully there's some improvement. What do you think?
To elaborate on @justme3d's assessment, your first layer calibration is putting your nozzle waaaay too high. This adjustment is essential to get right. No amount of brims, rafts or temperature changes will improve your print quality with a first layer calibration that is too high.
RE: First Layer Problems
The z-offset value you get is a semi-arbitrary number. What I get when I'm dialed in could be wildly different from what you get or what someone else gets. It's only purpose is to give you a way to calibrate the z-offset. If you're concerned that the number is too large (in an absolute value sense) then you can raise the Minda probe a little bit and by that I mean no more than 1mm, that'll reduce that number.
However, as long as you're getting a good, reliable, repeatable first layer then what that number is doesn't matter, it's just there for reference.
Regards
-Bob
Prusa I3 Mk2 kit upgraded to Mk2.5s, Ender3 with many mods, Prusa Mini kit with Bondtech heat break, Prusa I3 Mk3s+ kit
RE: First Layer Problems
Gotcha, that makes perfect sense. Thank you!
The z-offset value you get is a semi-arbitrary number. What I get when I'm dialed in could be wildly different from what you get or what someone else gets. It's only purpose is to give you a way to calibrate the z-offset. If you're concerned that the number is too large (in an absolute value sense) then you can raise the Minda probe a little bit and by that I mean no more than 1mm, that'll reduce that number.
However, as long as you're getting a good, reliable, repeatable first layer then what that number is doesn't matter, it's just there for reference.
Regards
-Bob
RE: First Layer Problems
Hi. A pic of the Benchy bottom would be a good indicator of the improvement.
Cheers
Chris
I try to give answers to the best of my ability, but I am not a 3D printing pro by any means, and anything you do you do at your own risk. BTW: I have no food for…
RE:
Hey Chris, pics of Benchy bottom attached! Seem okay?
Hi. A pic of the Benchy bottom would be a good indicator of the improvement.
Cheers
Chris
RE: First Layer Problems
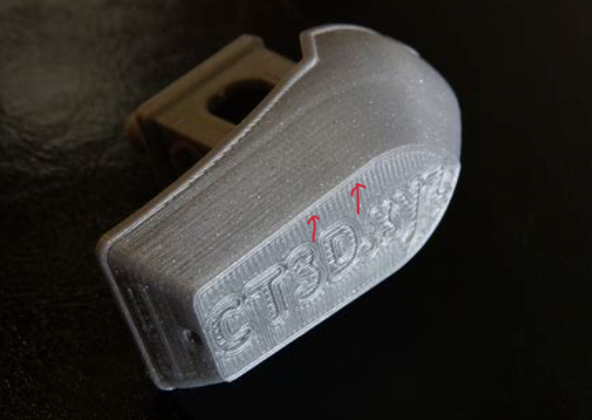
Much improved but your first layer calibration is still putting you nozzle a bit too high. The picture below is what you are aiming for. Notice how the lines of extrusion in the fill snug up to the perimeters.
Mk3S+,SL1S
RE: First Layer Problems
Cool, I see what you mean. I'll maybe try -2.000 next (currently on -1.980) and aim for that level of snug!
Thanks for your advice, Sylvia - it's very much appreciated.
Much improved but your first layer calibration is still putting you nozzle a bit too high. The picture below is what you are aiming for. Notice how the lines of extrusion in the fill snug up to the perimeters.
RE:
I agree with Silvia, but hey, you´re getting there!
I just printed the first mm´s of a Benchy with ASA in silver; I stopped after the first layer to take a pic, too. So here is a pic of the first layer and another pic of the bottom of that test piece together with the bottom of a part I printed yesterday. I´m too stupid to add them to the text so see the attachments, please.
Best regards
Chris
I try to give answers to the best of my ability, but I am not a 3D printing pro by any means, and anything you do you do at your own risk. BTW: I have no food for…
RE: First Layer Problems
Hey Chris, thanks for the images - very smooth!
I think I'm nearly there, at least with the Z-axis/first layer problem. I printed a little Grogu model and it came out pretty decent IMHO and stuck perfectly to the bed for the duration. Maybe a few tweaks and it'll be even better next print.
Can I just say that this community has been absolutely awesome and so helpful with a complete noob such as myself. I'm very happy indeed to be a part of it. I've learnt so much over the past few days from you guys that I feel much more confident now with the basics of the 3D printing process and how things work. I understand things a lot better now, whereas last Friday I was so disheartened that I was pretty much regretting my decision to start this cool hobby.
Only regret now is that I made bit of mess of my Steel PEI Sheet, in that during my Z-axis/Pinda fiddling, the nozzle hit the bed and scraped it quite a bit before I could stop it. Ah well, another teachable moment and sure I can pick another one up if need be.
Thanks to everyone again for all the help and advice! 😎
I agree with Silvia, but hey, you´re getting there!
I just printed the first mm´s of a Benchy with ASA in silver; I stopped after the first layer to take a pic, too. So here is a pic of the first layer and another pic of the bottom of that test piece together with the bottom of a part I printed yesterday. I´m too stupid to add them to the text so see the attachments, please.
Best regards
Chris
