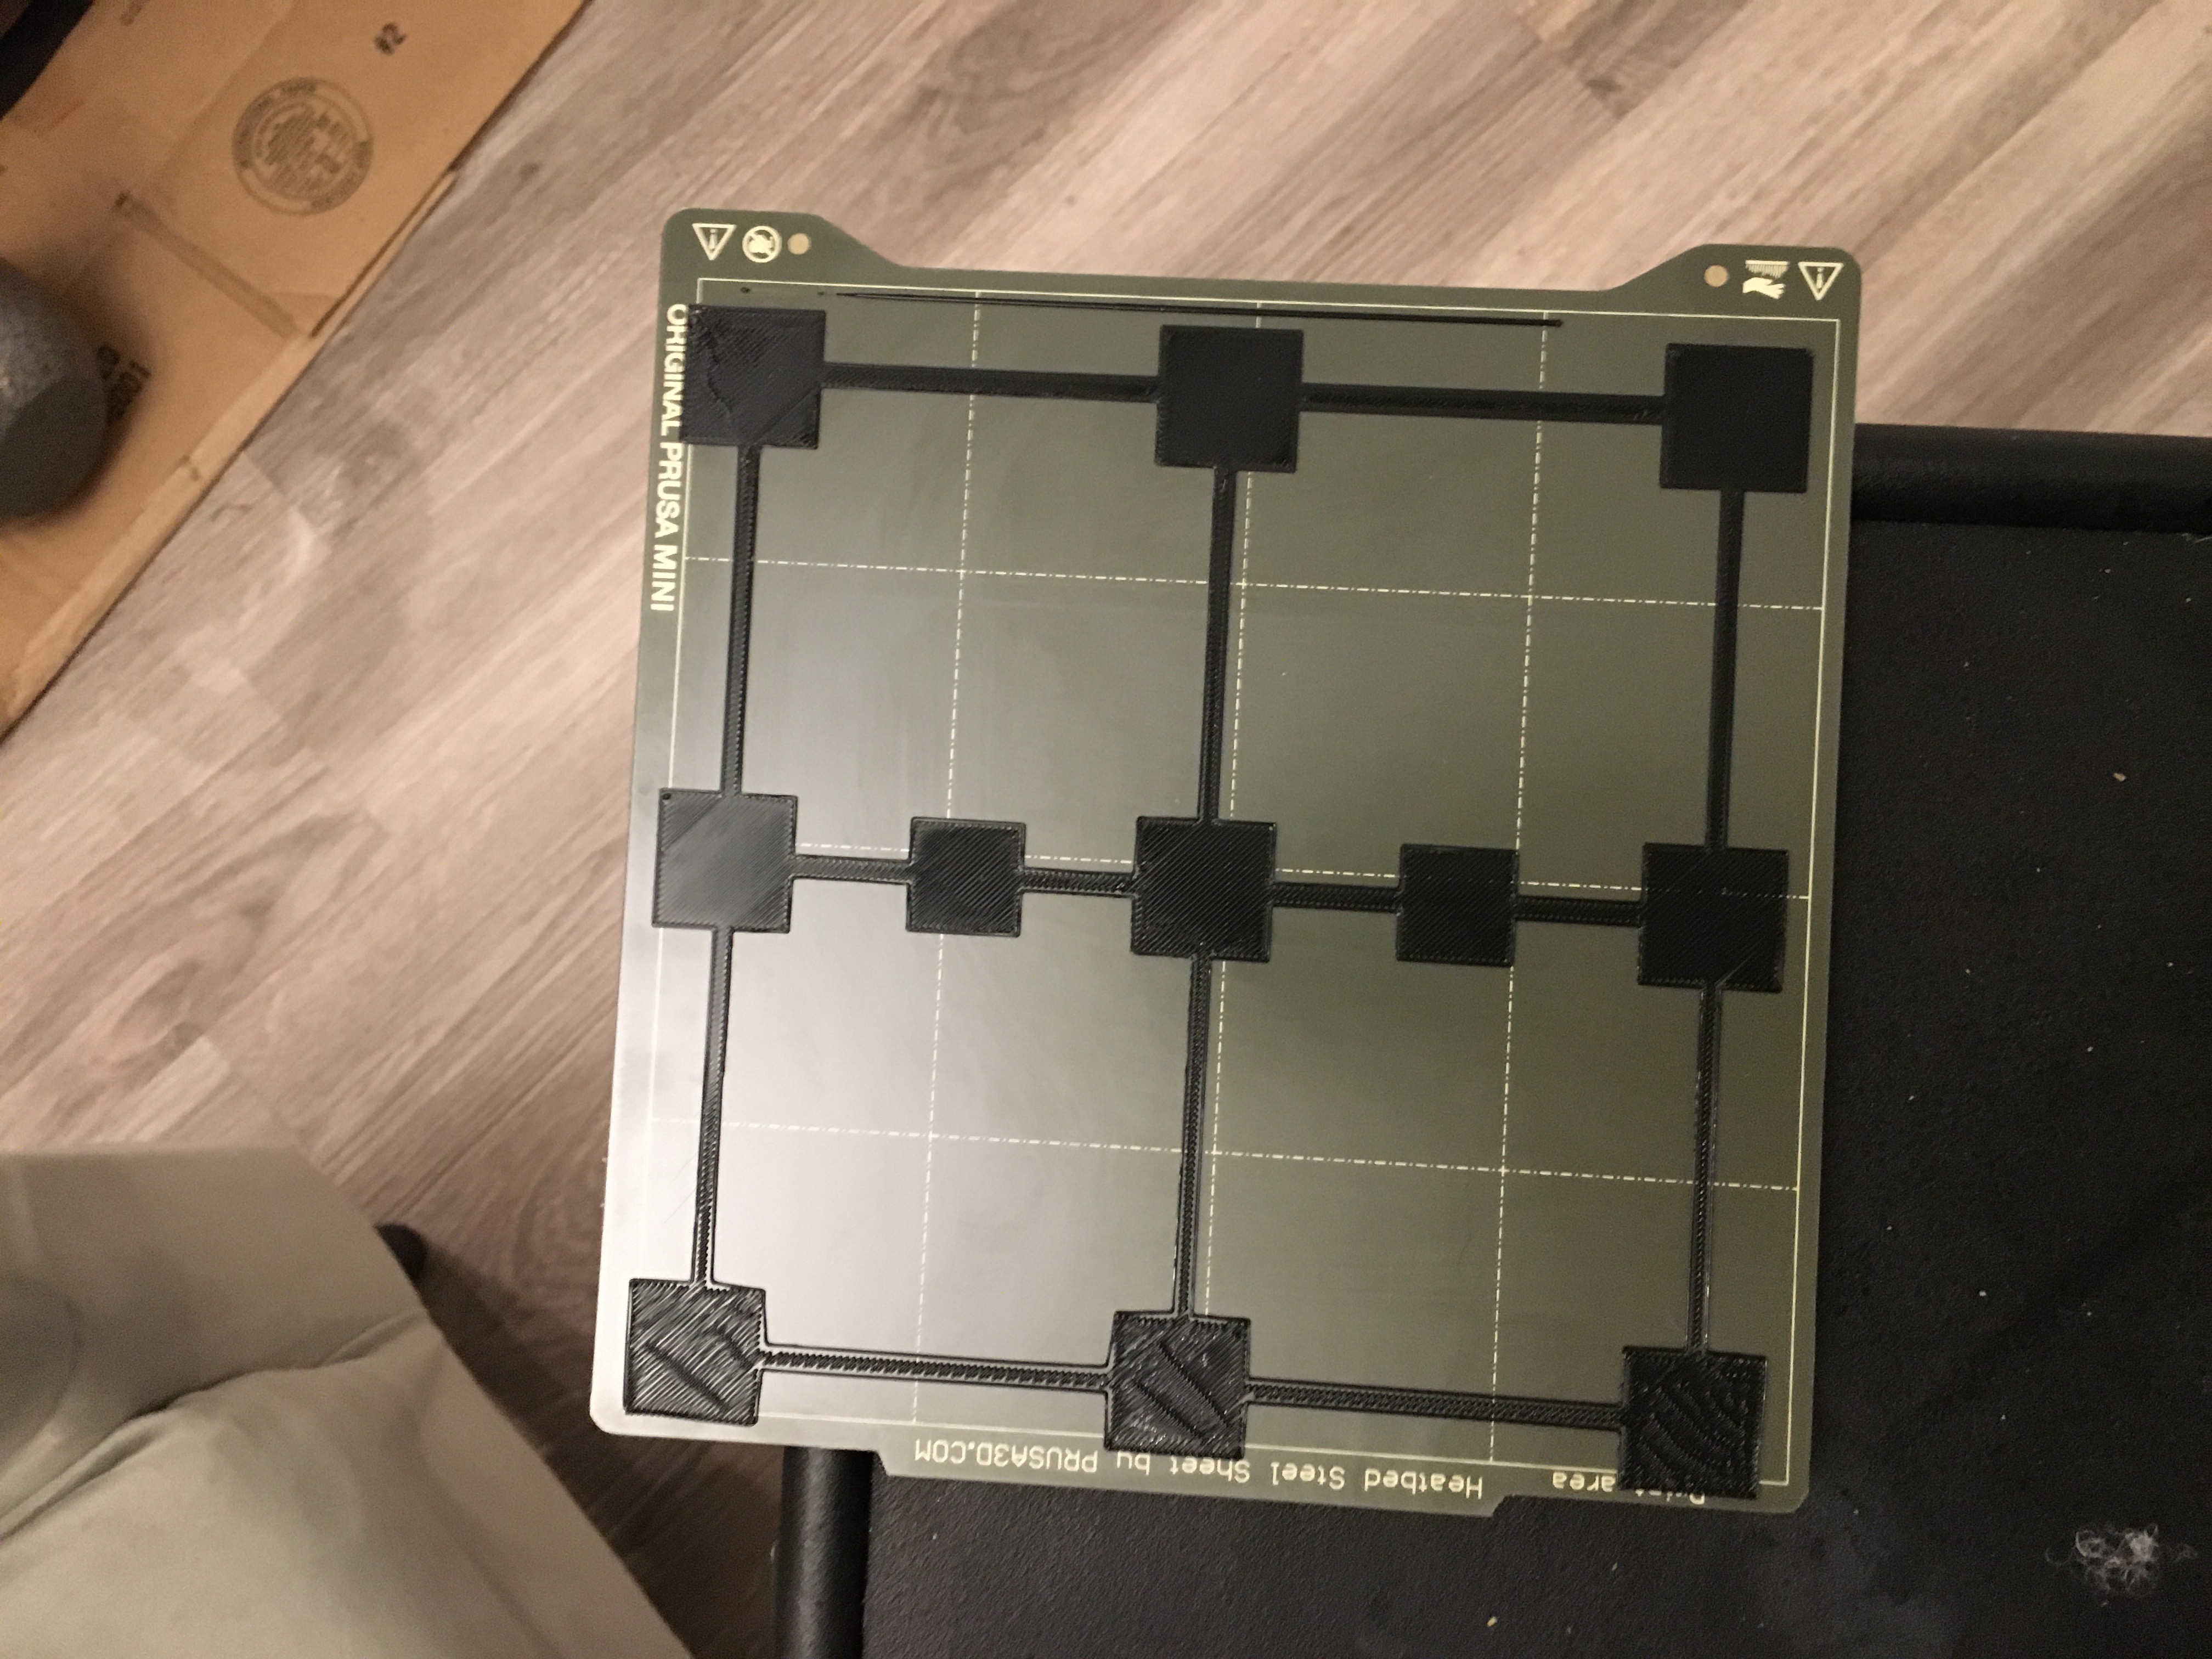
Bed leveling fails
You can see in this photo that the mini fails to auto bed level front to back. I just got this and I'm not sure what to do because you can't adjust this like you can in the other printers. It is very easy to tell that the level isn't working. The front is slightly too close (just so) and the back basically isn't touching at all. Nothing I can seem to do fixes this. Loosing bolts etc etc. It seems to be in the leveling algorithm itself. Can anyone help me? I can't fix this because the problem appears to be with the bed leveling and there is no way to fix or do it manually. Please advise.
Best Answer by Gauge:
I know it's been a long time, but I put this on hold for real life stuff. I have finally permanently resolved this, the previous post was a temporary fix and very hacky. You can see my reply on this thread.
Thank goodness for that guide. This also proves I'm not crazy because I am getting PERFECT prints now, and perfect first layers every time. The probe simply cannot compensate for the factory variance of the prusa minis. .3mm tolerance is simply not good enough and for the money we spend extra on these units, there should be some method other than the manual hack in that thread that fixes it. Having said that, I am in love with this printer now that it does level. It's a machine and prints so reliably that I don't even touch my ender anymore. I just wish it came like this out of the box.
RE: Bed leveling fails
Have you tried goning -0.030 lower?
--------------------
Chuck H
3D Printer Review Blog
RE: Bed leveling fails
@cwbullet
I can't go lower. It's hard to see in the photo, but the front is as low as it can go without blocking the nozzle and dragging. "Perfect" is somewhere between the first two rows. I said this on github, there is not currently a method of fixing y calibration issues on the mini. For now I'm going to try to put paper towel strips under the steel sheet in the back to see if it's possible to do a manual correction that way. If it is, I'm a software engineer, so I'll fork the firmware and adjust the bed correction myself. This is something that should be available on the unit itself, like with the MK3 IMO. It's new firmware though for the new buddy board, so I suppose it's reasonable it hasn't been done yet. If I can figure out how to adjust the calibration of the bed level in the firmware with some hard code I will report back how to do it. Heck, if I can figure out their UI maybe I will make a pull request to add in bed level calibration 😀
RE: Bed leveling fails
@gauge
Then, I would contact support via chat. If you cannot go lower, you need their help determining you next option. You have tried everthing I can suggest. Either you have assemmbled somethign wrong and you bed is warped.
--------------------
Chuck H
3D Printer Review Blog
RE: Bed leveling fails
Well, the paper towel was a dumb Idea because the pinda probe activates off the steel sheet. Going to try G81 bed correction in prusa slicer. Maybe if I do -1 front and +1 rear I can get close?
RE: Bed leveling fails
I sent support an email. We'll see where it goes.
RE: Bed leveling fails
@gauge
Email is not an efficient and is rarely successful. Use the chat box from the shop.
--------------------
Chuck H
3D Printer Review Blog
RE: Bed leveling fails
You state: "You can see in this photo that the mini fails to auto bed level front to back." Are you saying when doing Mesh bed leveling it does not complete the leveling procedure (all 16 sample locations)? Or is it that the printing is not consistent across the bed?
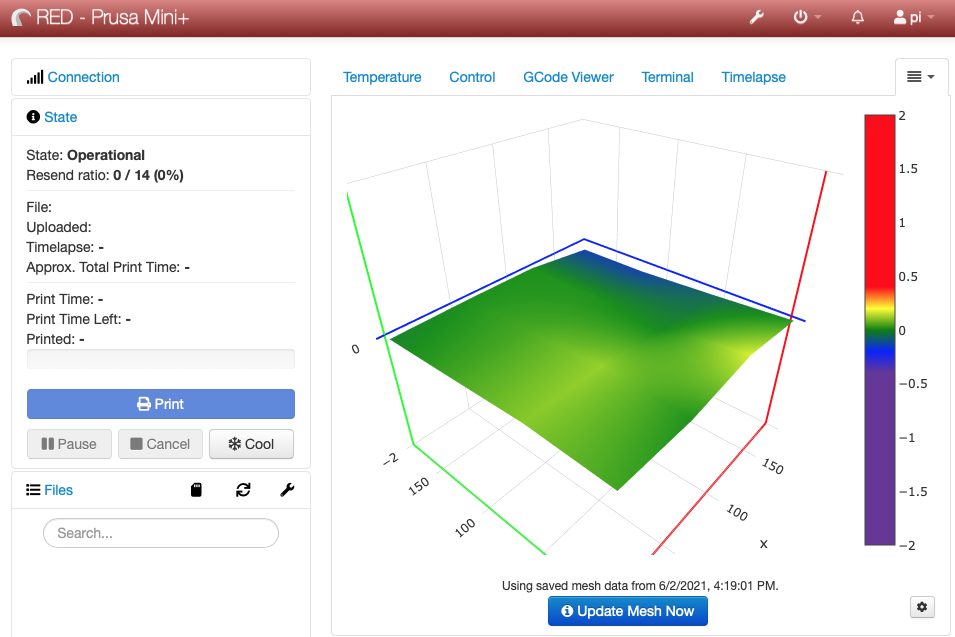
BTW - if you use or plan to use OctoPrint, Bed Visualizer is a great plugin. Here's a pic of my recently completed Mini+ bed level readout:
RE: Bed leveling fails
I worked with support for 4 hours, the front and back of my bed are off by a full millimeter, which is apparently not within spec. We couldn't fix it and they are giving me a refund.
RE: Bed leveling fails
@gauge
Sorry to hear it. The Mini is really a remarkable printer, hope you'll give it another try.
RE: Bed leveling fails
@gauge
Glad to see you were able to come to a solution. It is rare but lemons do occur.
--------------------
Chuck H
3D Printer Review Blog
RE: Bed leveling fails
So, an update on this. Firstly, the return process for Prusa is horrendous. It is 100% designed to make you give up and not return it, which is what I did because the requirements/process is really just dumb. As a software engineer, I can tell you, this is what happens when you put an engineer in charge of systems non-engineers will use.
I decided to fix the issue myself. Using pronterface, and silicone sleeves around the bed nuts, I was able to slowly manually level the bed. These are what I used, Bed leveling silicone. I cut them roughly in half with an exacto knife. The hole him them is just large enough you can push it on the bed nuts between the heater bed and the carriage. They are made to "squeeze" so you can level a bed with the resistance. Doing this I was able to get my bed level to within .1mm. I was not able to get the bed perfectly level because the bed itself is not flat. I got to a point where the numbers were so close and the adjustments to be made were in odd spots (not linear), so I left it alone because it was "close enough".
Some thing I have discovered. The PINDA probe algorithm doesn't work very well. It's not broken, it just never worked well I suspect. The algorithm in the firmware BARELY compensates for bed level data. I'm sure it does something, but my bed is level to within .1mm and it can't fully compensate for that. Luckily .1mm is good enough to basically not even have correction and still get prints that are good enough with just a Z offset. The other thing I have discovered is that this is a major flaw in the design IMO. The design of this printer, and in fact all prusa printers, assumes that the Y assembly is so precisely engineered, that it could not have any flaws large enough that the PINDA probe can't compensate. Judging by my experience, and the experience of many others on this forum, that is NOT THE CASE. Again, what happens when you leave an engineer in charge, my stuff can't break mentality. The probe compensation in the firmware is so poor, I honestly would want to see code debug statements as proof that it does anything at all. I want to stress, my probe does work, and is incredibly precise, as pronterface bed leveling readouts have confirmed for me. To me this is a firmware failure.
For now, with some extreme pain, time, and trial and error, I have the mini printing pretty well. I won't ever buy another prusa now that I know what I know and that the return process is terrible and designed to make you quit. Maybe I got a lemon, but I seriously doubt it's just me looking at the forums. This is a major flaw IMO, and one that most people will not be able to fix because there is no way to compensate for it. So many things can cause the Y axis to not be flat, and all of them have to be 100% perfect for this machine to have a good first layer level.
Only came back to post this solution for others, so that there is some option for them to pursue other than a refund.
RE: Bed leveling fails
It seems, the worst scenario happened in your case: Y-axis not perpendicular and bed not flat (enough). I really can't comment on how effective PINDA firmware algorithm is, because I had no such initial troubles with my Mini. After I adjusted Z-axis (non-perpendicular) geometry, prints were ok and so I didn't care to check other parameters. That is, I'm quite sure none of axis are 100% perpendicular and bed probably isn't perfect either.. so PINDA must be effective within certain range.
About how Mini is designed.. yeah, I hear you. On one side, Prusa did a good job with chosen materials, I think. For example, deciding for two 10mm rods on Z axis for such small printer. But the way elements are assembled together, Mini is still quite fragile in my eyes. That's especially the case for how Z-axis is connected to mainframe: if not careful, Z-axis geometry can be lost by just moving printer few times. One can easily understand why's that, if checking the procedure for adjusting "Z-axis not perpendicular to bed". Saying that, I can't imagine putting some "carry" handle on Z-axis for moving the printer.
But then, we shouldn't look at Mini as being some industrial machine -it is only home hobby printer. And as such, it's quite good in my opinion.
Support... yes, there's a difference between friendly and helpful.. what else to say.
Glad you managed to make Mini running fine for you and thanks for sharing your experience.
[Mini+] [MK3S+BEAR]
My Z axis compensation works for sure. I have perfect printouts for just one layer for entire bed area but I know that left side of the bed is lower than right side and I can see how it is being compensated when printhead moves left right doing same layer but Z axis lead screw turns anyway.
RE: Resolution
I know it's been a long time, but I put this on hold for real life stuff. I have finally permanently resolved this, the previous post was a temporary fix and very hacky. You can see my reply on this thread.
Thank goodness for that guide. This also proves I'm not crazy because I am getting PERFECT prints now, and perfect first layers every time. The probe simply cannot compensate for the factory variance of the prusa minis. .3mm tolerance is simply not good enough and for the money we spend extra on these units, there should be some method other than the manual hack in that thread that fixes it. Having said that, I am in love with this printer now that it does level. It's a machine and prints so reliably that I don't even touch my ender anymore. I just wish it came like this out of the box.
How did you make the silicon spacers for the y axis platen?
Hello Gauge,
Thank you so much for sharing your problem with us. I am also fighting a similar problem in that I believe that my y-axis platen is not perfectly parallel to my x axis arm such that my left side of the platen is higher than the right side. I confirmed that by putting a machinist square on the platen after it was screwed down and light shown thru under pretty much under most of the right side. I guess that it means that the platen was bowing down to the right so I put a set of 3 paper washers on the three right most screws and it doesn't taper down as much now.
But your solution of making silicon spacers seems like a better solution. Is it meant to replace the hex spacers, and if so, how to you thread it on (perhaps a photo of the spacer in place would clear up my confusion)?
Hey there
Hello Gauge,
Thank you so much for sharing your problem with us. I am also fighting a similar problem in that I believe that my y-axis platen is not perfectly parallel to my x axis arm such that my left side of the platen is higher than the right side. I confirmed that by putting a machinist square on the platen after it was screwed down and light shown thru under pretty much under most of the right side. I guess that it means that the platen was bowing down to the right so I put a set of 3 paper washers on the three right most screws and it doesn't taper down as much now.
But your solution of making silicon spacers seems like a better solution. Is it meant to replace the hex spacers, and if so, how to you thread it on (perhaps a photo of the spacer in place would clear up my confusion)?
Hello there! You can see in that guide I posted how to do it. I followed the steps exactly. The only update is when you click the link that does the calculations for you, the website has move, but it says so at the top and gives you the new URL.
Yes the silicone socks replace the hex spacers. You replace the screws with longer ones and use low profile nuts so that it clears the y axis motor. You can see what you need in the guide there. If you need me to help you maybe we can hop on discord. I know how frustrating this was for me, and if I can help you I will. Very annoying Prusa's stance on this is that it's impossible for the Y axis to have so much variance you can't print.
Thanks for the clarification on how you used silicon spacers
Hello Gauge,
Thanks for the clarification and clever use of the silicon replacement sleeves on the heat bed. You said that you cut the four sleeves into 8 and I guess that they are position around the center screw which was left using a brass hex sleeve. How did you cut the silicon sleeve so you get 8 evenly sized sleeves (or does it matter since they get squashed anyway)?
Also thanks for putting me onto Pronterface application. Too new to this 3D printing game and have much to learn about the support environment used by the 3D community. Just learned about Prusa Slicer and have to delve & tinker with all the knobs. Guess I have to do the same with Pronterface but sometimes wish that I could just spend more time printing and less time setting up.
Take care and again thanks for sharing your experience with the rest of us.
Patrick Young
Also thanks for putting me onto prot