Revo Micro installation on my Mini+
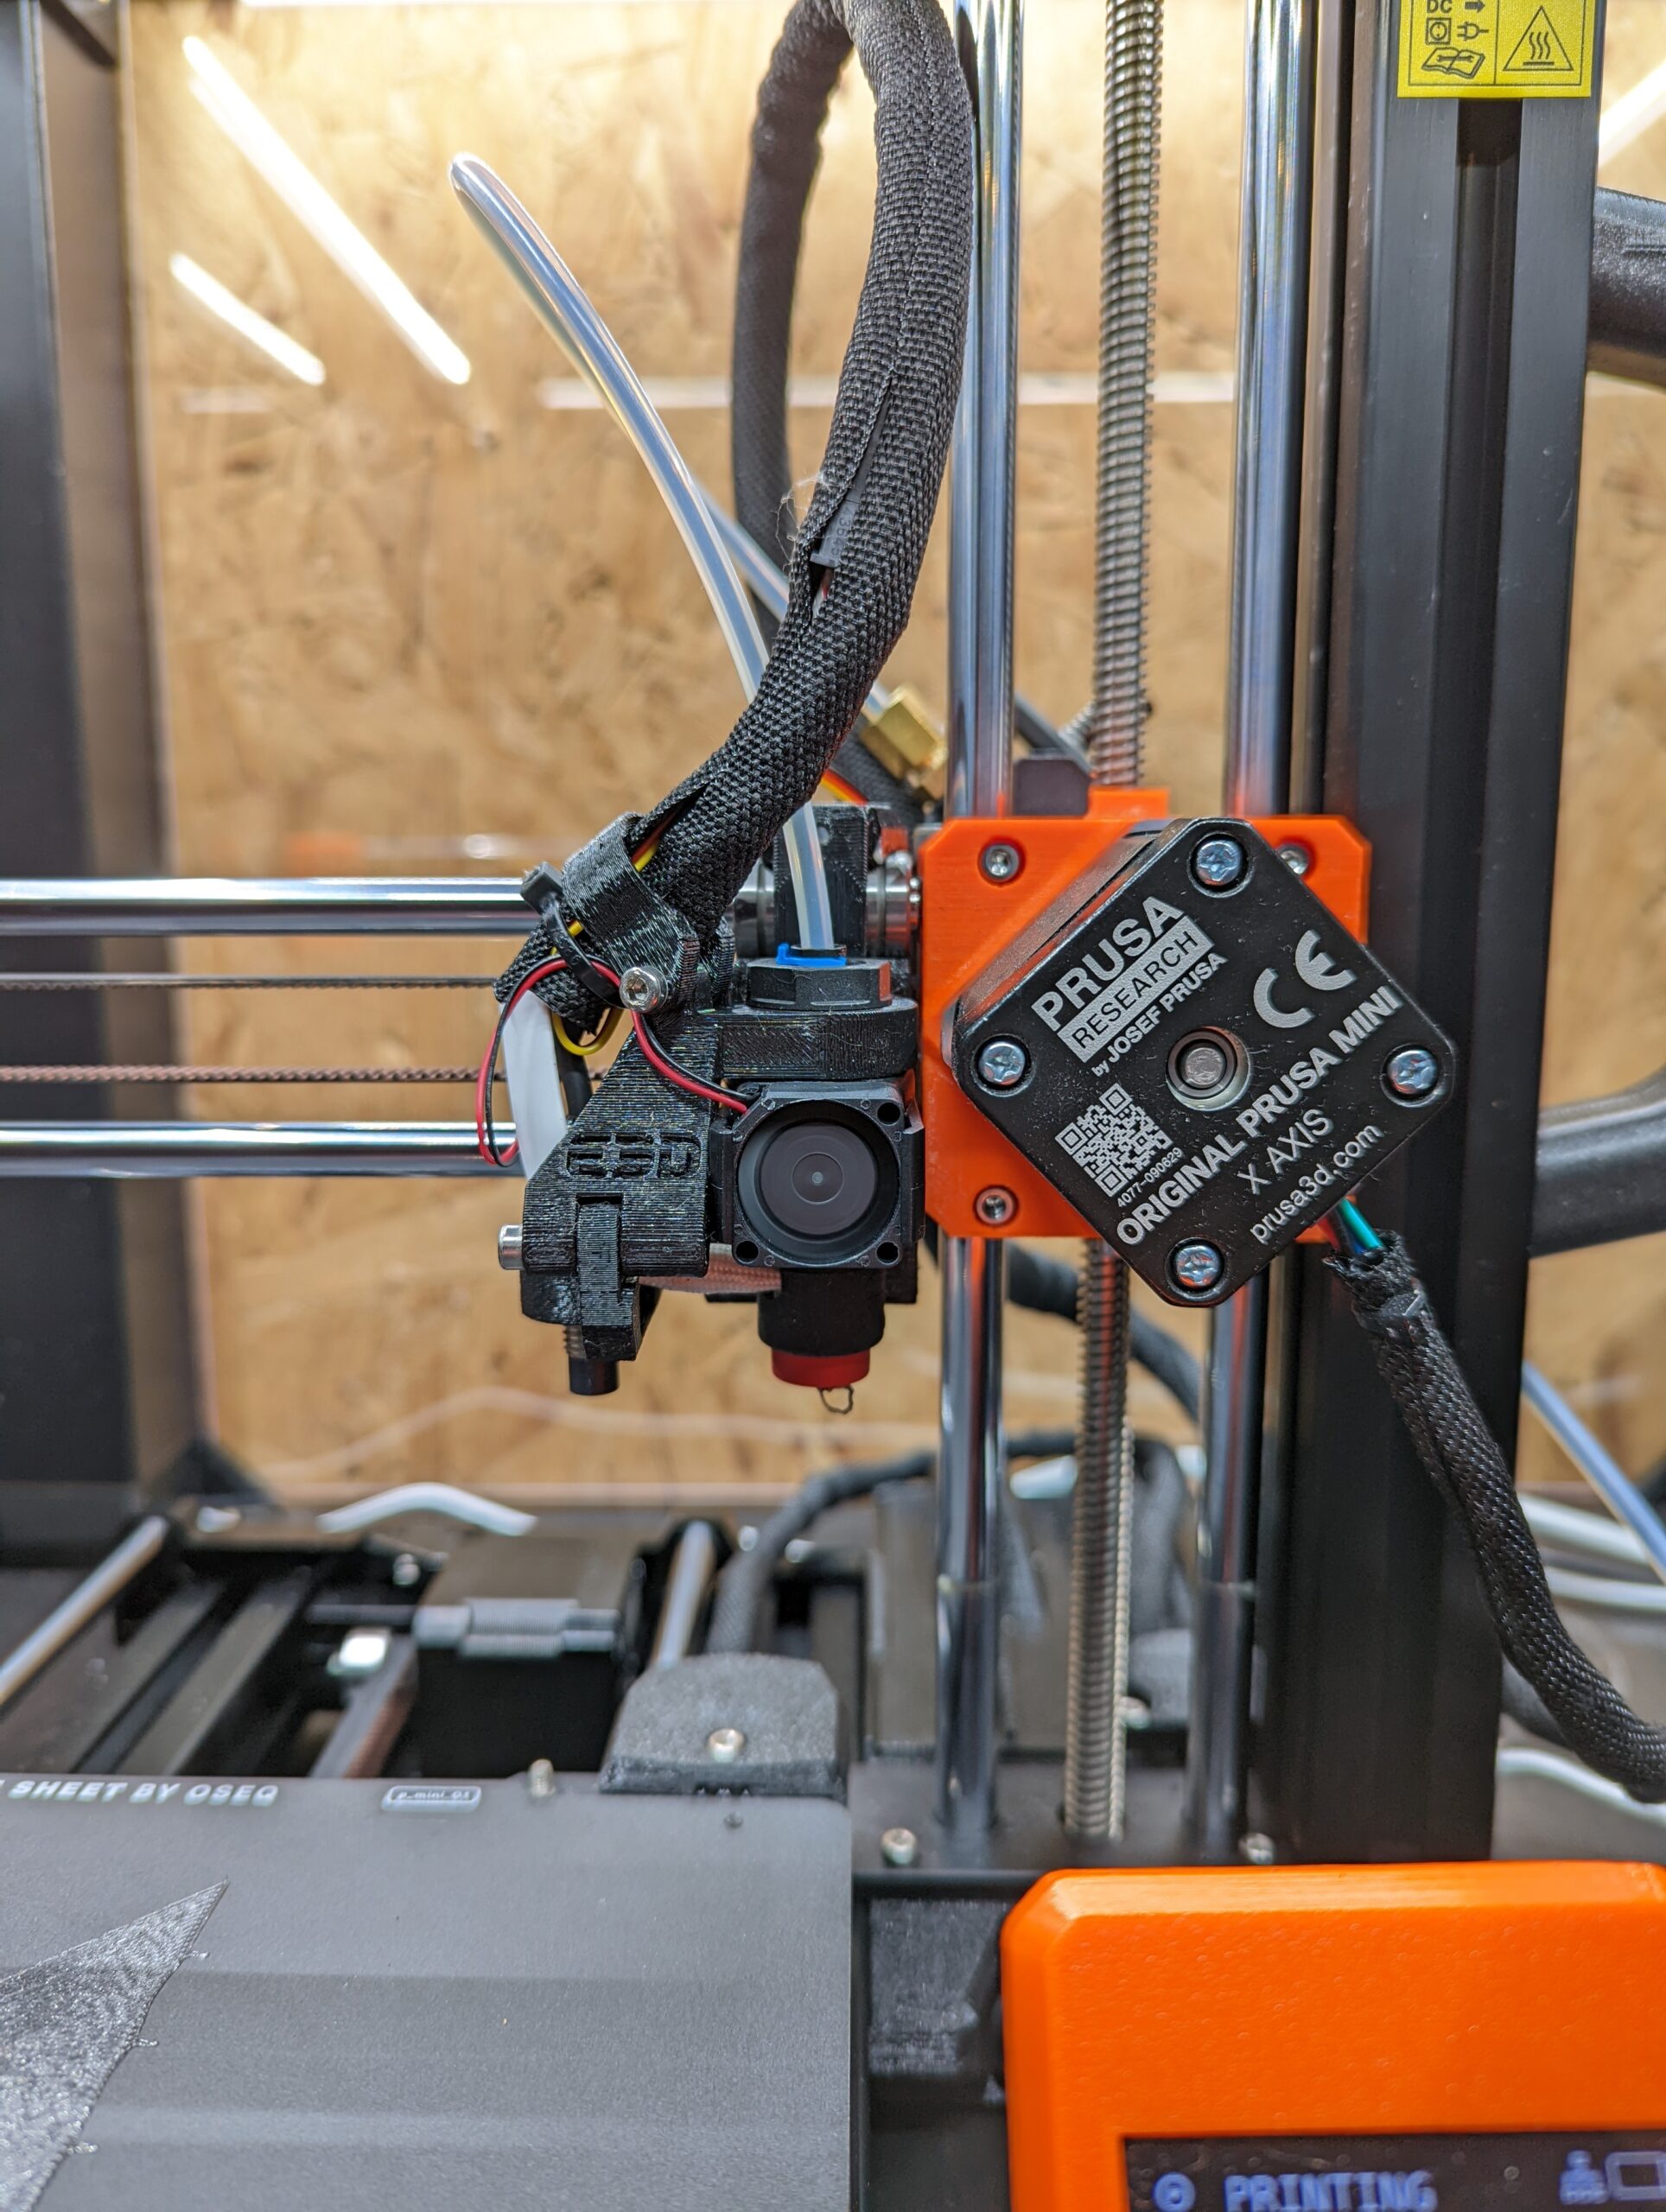
I thought people might be interested in the Revo install on the mini. I've attached a picture of the final product.
I took my time with the installation. It's all pretty straight forward, except for the wiring - the Mini's buddy box is pretty crammed. The only thing I think they got wrong is the print fan. At the start you remove it, and then it is not mentioned again until the very last step. If you have just followed instructions, all the wiring is wrapped and tied down at this point. I found it better to install the print fan as soon as the hot end is in place, then I could deal with it's wires at the same time as everything else.
The kit includes a 5V step down circuit for the fan - that is not needed on the Mini. The Hot End fan uses only two pins of the three on the buddy board, (providing the 5V it needs) which means the Prusa firmware can't control it's speed since the PWM pin is unused. A Fan self test thus fails for the hot end. The way to test it is to check that it activates when the hot end reaches 50 deg C, and deactivates on the way down again. The little fan is totally silent - a good change from the noisy Prusa hot end fan.
I did re-calibrate the PINDA probe after the install, to make sure it was at the correct height off the print bed. Then re-ran Z adjustment for all my build plates.
I've done a couple of prints, and it is all good so far. Watching on Octoprint, the hot end temperature has a few ups and downs at the start of a print (by a degree or so) and then settles into a steady state. No PID tuning is required.
The kit also provides a short length of PTFE tube. I have yet to work out what that is for.
RE: Revo Micro installation on my Mini+
What parts did you print?
--------------------
Chuck H
3D Printer Review Blog
RE: Revo Micro installation on my Mini+
What parts did you print?
Just some parts I designed, which I had a need for straight away. I'll probably do some standard calibration pieces tomorrow.
RE: Revo Micro installation on my Mini+
It is so tiny! I would be interested in one, but not without a nozzle x for it.
RE: Revo Micro installation on my Mini+
It is tiny. Works really well. I have mine in a new Trident build right now. It will eventually get moved over to the Mini (when the Voron edition Revo is shipping).
E3D is working on a hardened nozzle they are calling Obxidian. They a claiming it's better than Nozzle X. https://e3d-online.com/blogs/news/e3d-at-tct-2021
Mini+ (kit) - Revo Micro | Antler Cooling | WiFi (4.4.0RC1)
RE: Revo Micro installation on my Mini+
I am looking forward to the Obxidian Nozzles.
--------------------
Chuck H
3D Printer Review Blog
RE: Revo Micro installation on my Mini+
Have you made any modifications to the start/end gcode ? As I understand it, to be able to swap the nozzle you can´t have hardened filament in it, and heating it up kind of defeats the easy cold swap nozzle advantage of the Revo.
I was thinking of making a longer retraction at the end of each print, and then an equal length load before every print, but I´m not sure how to do it.
Have my Revo on pre-order so I guess someone will have figured that out before I get mine 🙂
RE: Revo Micro installation on my Mini+
You could try changing the Custom Gcode, End Gcode
as follows
G1 E-100 F2100 ; retract 100mm (instead of the normal 1mm)
{if max_layer_z < max_print_height}G1 Z{z_offset+min(max_layer_z+2, max_print_height)} F720 ; Move print head up{endif}
G1 X178 Y178 F4200 ; park print head
{if max_layer_z < max_print_height}G1 Z{z_offset+min(max_layer_z+30, max_print_height)} F720 ; Move print head further up{endif}
G4 ; wait
M104 S0 ; turn off temperature
M140 S0 ; turn off heatbed
M107 ; turn off fanM221 S100 ; reset flow
M900 K0 ; reset LA
M84 ; disable motors
and change the Custom Gcode, Start Gcode as follows
M862.3 P "[printer_model]" ; printer model check
G90 ; use absolute coordinates
M83 ; extruder relative mode
M104 S170 ; set extruder temp for bed leveling
M140 S[first_layer_bed_temperature] ; set bed temp
M109 R170 ; wait for bed leveling temp
M190 S[first_layer_bed_temperature] ; wait for bed temp
M204 T1250 ; set travel acceleration
G28 ; home all without mesh bed level
G29 ; mesh bed leveling
M204 T[machine_max_acceleration_travel] ; restore travel acceleration
M104 S[first_layer_temperature] ; set extruder temp
G92 E0
G1 Y-2 X179 F2400
G1 Z30 F720 ; this change may be needed to allow clearance of waste if autoload has been used, or the last print didn't retract the filament
M109 S[first_layer_temperature] ; wait for extruder temp
G1 E100 F900 ;Feed filament 100mm to restore filament load to nozzle status. (note this will cause the extruder to extrude additional filament if the auto load function has been used, or the filament hasn't been withdrawn after the previous print. )
; intro line
G1 X170 F1000
G1 Z0.2 F720
G1 X110 E8 F900
G1 X40 E10 F700
G92 E0
M221 S95 ; set flow
regards Joan
I try to make safe suggestions,You should understand the context and ensure you are happy that they are safe before attempting to apply my suggestions, what you do, is YOUR responsibility.Location Halifax UK
RE: Revo Micro installation on my Mini+
I've done the upgrade too. But I used my own printed parts. The e3D guide had some room for improvement.
RE: Revo Micro installation on my Mini+
I've done the upgrade too. But I used my own printed parts. The e3D guide had some room for improvement.
How is it working for you? I am planning on installing it on one of my Minis.
--------------------
Chuck H
3D Printer Review Blog
RE: Revo Micro installation on my Mini+
How is it working for you? I am planning on installing it on one of my Minis.
I've been printing with the upgrade for barely a day. However, my impression so far is increased reliability and I could increase the maximum flow rate.
I've always had great print quality on the Mini. (As long as the heatbreak didn't cause problems.) So at the moment, I can't see any change in overall print quality. Neither an improvement nor deterioration. But the quality of the overhangs has definitely increased with the new duct.
Plus, of course, the simplified nozzle change feature.
RE: Revo Micro installation on my Mini+
I have just spent a long day watching the 3D Benchy supplied on the Mini USB stick not printing properly 😐
Started off well, then about 1.5 hours in it started under extruding really badly. Extruder clicking, as if nozzle was blocked. Less than one month old Prusament PLA - so I'll rule out bad filament for now. Given I had just made a fairly major change to the printer, I spent a while checking over my work. The nozzle was indeed blocked, but with un-melted PLA. A purge immediately after the print just caused extruder clicking. (I have the Bondtech extruder.) Unloading the filament, and removing the nozzle confirmed a solid plug of material present.
However, a cold pull then revealed no blockage in the nozzle. Heated up to 240-C, pushed some PLA through, and everything cleared.
So - started experimenting with temperature and flow rate, starting from the Prusa defaults.
Long story short, the answer appears to be to raise the default PLA printing temperature, from 210-C to 225-C. Also, increasing the flow rate appears to help -I'm currently at 105%. This all resulted in a printed 3D benchy with structural integrity. Still not as good as the one I printed when the printer was brand new - so I've still got work to do here.
I'm guessing that the thermistor in the unit I have is over reporting the temperature. It stays at exactly the temperature I set, so I don't think it's broken.
I am wondering if printing PLA at just below the optimal temperature could lead to a build up of not quite melted filament in the nozzle, thus leading to a the gradual clogging I am seeing.
Anyway - I'm pretty sure this will work if I can find the correct combination of temperature and flow rate.
RE: Revo Micro installation on my Mini+
Please let me know if you determine anything new... I am having the same problems and I reached out to E3D support today. Thanks!
RE: Revo Micro installation on my Mini+
Just a tought, but if you used the pre-sliced gcode on usb, with you having the bondtech extruder installed, the esteps would be wrong.
Prusa Mini+ kit. BondTech extruder. FW 5.1.2
Prusa MK3S+ kit. Stock. FW 3.11.0
Prusa MK3S+, used. Stock. FW 3.13.3
RE: Revo Micro installation on my Mini+
Just a tought, but if you used the pre-sliced gcode on usb, with you having the bondtech extruder installed, the esteps would be wrong.
The e-steps are adjusted in the Prus Mini firmware. So I don't think it has anything to do with slicing. Plus - it worked OK for 3 months before I changed the hotend.
I have re-sliced (is that a thing?) the benchy anyway, to put in the adjusted temperatures and flow rate. So I'll see if that makes a difference later today.
RE: Revo Micro installation on my Mini+
Ok.
Is it only the PLA that does this, or also other types?
Prusa Mini+ kit. BondTech extruder. FW 5.1.2
Prusa MK3S+ kit. Stock. FW 3.11.0
Prusa MK3S+, used. Stock. FW 3.13.3
RE:
Just a tought, but if you used the pre-sliced gcode on usb, with you having the bondtech extruder installed, the esteps would be wrong.
The e-steps are adjusted in the Prus Mini firmware. So I don't think it has anything to do with slicing. Plus - it worked OK for 3 months before I changed the hotend.
I have re-sliced (is that a thing?) the benchy anyway, to put in the adjusted temperatures and flow rate. So I'll see if that makes a difference later today.
My apologies - I should have looked before replying. Opening up the Prusa supplied G-code and 10 lines in I find this:
M92 E325 ; set steps/unit for extruder
The Bondtech needs E415, and it is set in the Firmware advanced tab, but this will override it.
I am now printing a PETG bency that I sliced with default Prusa settings for Flowrate (95%) and Temperature (250-C).
After that I'll retry with a PLA bency that I have sliced with Prusa defaults.
But, I think this is the culprit. If my sliced versions work, I'll edit the Prusa supplied G-code to remove that line and see if it works.
RE: Revo Micro installation on my Mini+
Results of my tests;
- Benchy I sliced with Prusa defaults for PETG printed perfectly. Nice smooth sides, clean overhangs. Small bit of thin stringing - expected for PETG.
- Prusa supplied USB Benchy Gcode - with M92 line commented out printed to completion without obvious issues. However, the quality is not the same as whe I first printed the Prusa Benchy when the mini was brand new. The outer surfaces are rough, with many lines, and overhangs have little artefacts.
- Bency I sliced with Prusa defaults for PLA printed perfectly, same as PETG, with no stringing.
I am thus happy to call this upgrade a success for me. Small caveat about the Prusa supplied Benchy, but given when I slice things they work, I don't think it's worth pursuing.
Aside - there are eight gcode example files on the Prusa supplied USB stick. Only one of them has the M92 steps/unit for extruder setting. And that is the one I picked. This happened a lot when I was in quality assurance back when I was an IT bod. Perhaps I have some genetic disposition to pick things that will fail 😀
RE: Revo Micro installation on my Mini+
You could try changing the Custom Gcode, End Gcode
as followsG1 E-100 F2100 ; retract 100mm (instead of the normal 1mm)
.......
and change the Custom Gcode, Start Gcode as follows......
G1 Z30 F720 ; this change may be needed to allow clearance of waste if autoload has been used, or the last print didn't retract the filament
M109 S[first_layer_temperature] ; wait for extruder tempG1 E100 F900 ;Feed filament 100mm to restore filament load to nozzle status. (note this will cause the extruder to extrude additional filament if the auto load function has been used, or the filament hasn't been withdrawn after the previous print. )
regards Joan
Many thanks for this Joan. I was going to ask another forum question about it - and here you provided the answer, great!
I think I can improve the values a bit for the Revo specifically.
I put a micrometer over the nozzle-heatbreak assembly (the removable bit) and it is exactly 41mm long. I thus think that a retraction at end of print to 45mm would be sufficient. 100mm sends the filament quite a way back up the Bowden tube.
For the start print settings, again, the distance would reduce to 45mm to match the retraction. Where the filament has not been retracted (for example if it was changed directly before the print started), 100mm creates quite the blob of filament that is then dragged forward by the nozzle and deposited randomly somewhere. Also, the extrusion speed (F900) seems a bit fast, since I can hear the extruder struggling to push it through.
My modified suggestion for a start extrusion sequence would thus be:
G1 E45  F450   ;Feed filament back 45mm. Will cause additional filament to be extruded if already loaded
G1 E-1 F2100    ;Retract to detach any extruded filament
G1 E1 F450       ;Restore filament position in nozzle
I haven't tested this yet. Do you think this will work? The idea is to get the extruded blob to fall away, so as to avoid being dragged by the nozzle.
RE: Revo Micro installation on my Mini+
The easiest way to find out, is to try it!
I would retract a little further to ensure that the filament is completely clear of the revo assembly, so that you don't get issues when you screw the new nozzle in.
Good Luck,
Joan
I try to make safe suggestions,You should understand the context and ensure you are happy that they are safe before attempting to apply my suggestions, what you do, is YOUR responsibility.Location Halifax UK