RE: Revo Micro installation on my Mini+
So you use the ‘back-plate’ from the second link and the front part from the first for the REVO Micro?
Looks interesting. Especially on the cooling side.
Yes, I think it works really well. I printed it in ABS though, I think PETG may not be heat resistant enough.
RE:
Hi,
Just wanted to drop in and say thanks. I've been banging my head against this for weeks now, and this thread has helped me get back to a pre-upgrade quality benchy.
My setup:
Bondtech IFS extruder, and Revo Micro using the E3D V2 mount, and stock part cooling fan and fan duct. It was also relevant for me that I'm using the Mini Base upgrade. I did the extruder and hotend upgrades at the same time, which ended up being a mistake, but oh well.
My solution:
1. Stop using the pre-sliced benchy gcode (it overrides extruder esteps on line 693)
2. Remove the old Mini Base runout sensor mount, and consider printing something like this. I initially left the old mount in place, and didn't realise that the filament was catching on it, and getting completely stuck. I also printed this, but at least checking that it's not snagging should be enough.
3. I have no idea what Bondtech instructions mean when they say "4 1/2 turns" It's really ambiguous. Is that 4 full and 1 half turn, or 2 full turns? neither worked for me anyway. 3 full turns from completely tight seems about right.
4. Updated profile for PLA as per @arianne on Page 12 :
a. "Min Print Speed" from 15 to 20 mm/s.
b. "Slow down if layer time is below " from 15 to 5 seconds
c. "Retraction length" from default (2.0) to 1.8 mm
d. Nozzle temperature for "Other Layers" to 225
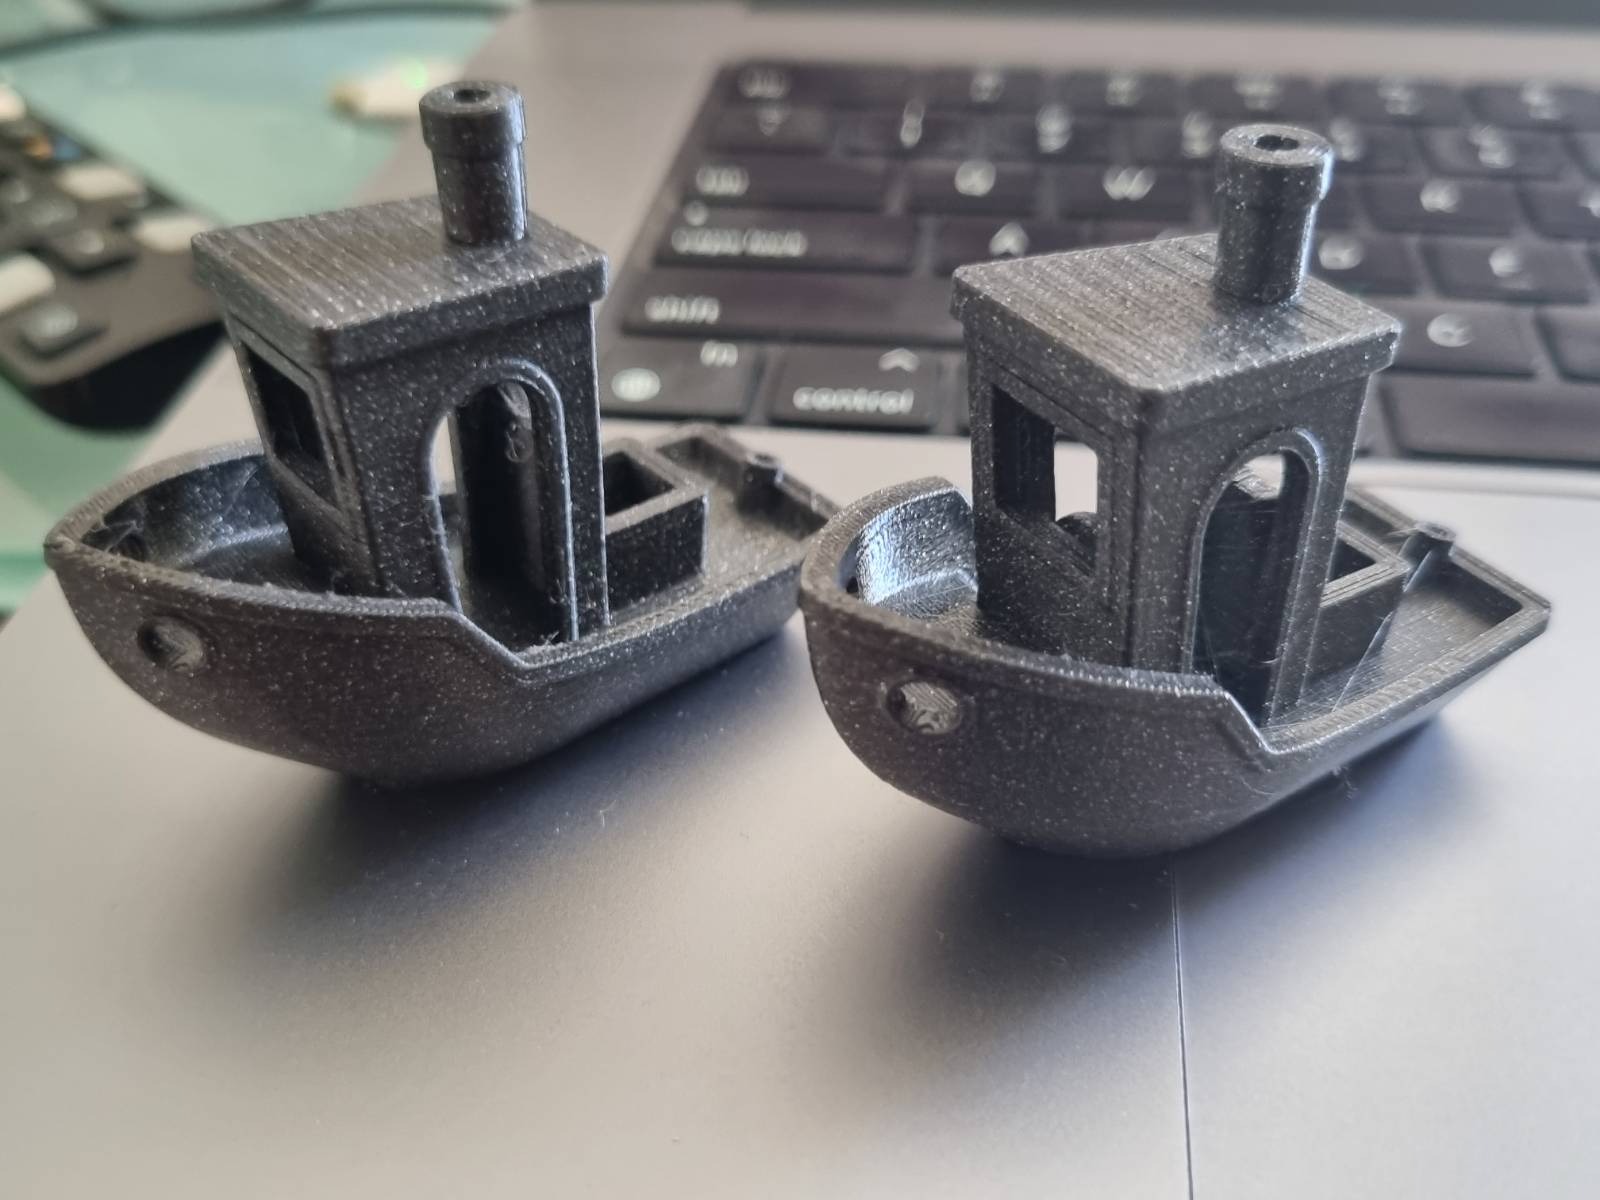
Before (left) and After.
There's some light stringing, and a barely perceptible hull line, but after many weeks of pain, I'm thrilled! Now to try different nozzles...
RE: Revo Micro installation on my Mini+
Oh, and also I think my 0.4 nozzle was clogged from the factory? First few prints I tried, I literally couldn't even complete a benchy. It would just outright fail at the pillars. Did a few cold pulls, and while I couldn't see anything obvious removed, suddenly I was printing benchies again (albeit poor ones)
RE: Revo Micro installation on my Mini+
Sooo, less than happy with all these parts.
-The main body keeps the same threaded attachment, which I guess is good, but I had already switched to the standard REVO friction mount for the tubing.
-It looks like you need two 'M3 thermal' attachments when it seems that square nuts would be more common and plentiful? I just took a hex nut, and used a soldering iron to sink them into the plastic.
The second REVO mini that matterhacker sent me has failed for the second time. I must have the worst luck or these REVO's have a fundamental design, quality and QC problem. I'm not sure why the first one failed. This second one the snap connector about 4 inches from the probe keeps failing. Throws a "0C" nozzle temp and the min temp error stops everything. I soldered it after a wire broke from connector, but it is still failing. If I squeeze and minipulate the wire bundle and I can get it to report a temp.
Pretty much a headache. I really need this printer to work this week.
I'm not a solder head. This cloth wire cover seems odd, I'm used to plastic wire cover. How to strip the wire? How to connect to the wire connector?
I've just used wire strippers in the past and then a lighter to burn it back, then clean the soot before soldering.
In unrelated news, my Revo was clogging for some PLA brands, no amount of tuning was fixing it, decided it was cooling related and swapped to this which fixed it perfectly (prefer this design to the official E3D one):
https://www.printables.com/model/139413-prusa-mini-revo-micro-upgrade
Also swapped to this cooling duct design and really pleased with the results:
https://www.printables.com/model/169138-prusa-mini-detachable-cooling-duct-assembly-v2
RE: Revo Micro installation on my Mini+
You have the worst luck. I have two on Minis and they work great. I just installed one on my Mk3s and it appears to work equally as well x 72 hours.
Sooo, less than happy with all these parts.
-The main body keeps the same threaded attachment, which I guess is good, but I had already switched to the standard REVO friction mount for the tubing.
-It looks like you need two 'M3 thermal' attachments when it seems that square nuts would be more common and plentiful? I just took a hex nut, and used a soldering iron to sink them into the plastic.
The second REVO mini that matterhacker sent me has failed for the second time. I must have the worst luck or these REVO's have a fundamental design, quality and QC problem. I'm not sure why the first one failed. This second one the snap connector about 4 inches from the probe keeps failing. Throws a "0C" nozzle temp and the min temp error stops everything. I soldered it after a wire broke from connector, but it is still failing. If I squeeze and minipulate the wire bundle and I can get it to report a temp.
Pretty much a headache. I really need this printer to work this week.
I'm not a solder head. This cloth wire cover seems odd, I'm used to plastic wire cover. How to strip the wire? How to connect to the wire connector?
I've just used wire strippers in the past and then a lighter to burn it back, then clean the soot before soldering.
In unrelated news, my Revo was clogging for some PLA brands, no amount of tuning was fixing it, decided it was cooling related and swapped to this which fixed it perfectly (prefer this design to the official E3D one):
https://www.printables.com/model/139413-prusa-mini-revo-micro-upgrade
Also swapped to this cooling duct design and really pleased with the results:
https://www.printables.com/model/169138-prusa-mini-detachable-cooling-duct-assembly-v2
--------------------
Chuck H
3D Printer Review Blog
RE: Revo Micro installation on my Mini+
I just looked at my first heating unit and the wires in the sensor 'clip' are loose too. I wonder if that was the problem there too. Is that connection just weak, or am I setting up my wire bundle so that it works it loose? Too much tension or flexing?
You have the worst luck. I have two on Minis and they work great. I just installed one on my Mk3s and it appears to work equally as well x 72 hours.
Sooo, less than happy with all these parts.
-The main body keeps the same threaded attachment, which I guess is good, but I had already switched to the standard REVO friction mount for the tubing.
-It looks like you need two 'M3 thermal' attachments when it seems that square nuts would be more common and plentiful? I just took a hex nut, and used a soldering iron to sink them into the plastic.
The second REVO mini that matterhacker sent me has failed for the second time. I must have the worst luck or these REVO's have a fundamental design, quality and QC problem. I'm not sure why the first one failed. This second one the snap connector about 4 inches from the probe keeps failing. Throws a "0C" nozzle temp and the min temp error stops everything. I soldered it after a wire broke from connector, but it is still failing. If I squeeze and minipulate the wire bundle and I can get it to report a temp.
Pretty much a headache. I really need this printer to work this week.
I'm not a solder head. This cloth wire cover seems odd, I'm used to plastic wire cover. How to strip the wire? How to connect to the wire connector?
I've just used wire strippers in the past and then a lighter to burn it back, then clean the soot before soldering.
In unrelated news, my Revo was clogging for some PLA brands, no amount of tuning was fixing it, decided it was cooling related and swapped to this which fixed it perfectly (prefer this design to the official E3D one):
https://www.printables.com/model/139413-prusa-mini-revo-micro-upgrade
Also swapped to this cooling duct design and really pleased with the results:
https://www.printables.com/model/169138-prusa-mini-detachable-cooling-duct-assembly-v2
RE: Revo Micro installation on my Mini+
I just want to share my experiences from upgrading to E3D's Revo Micro on my Mini. I thought some people might be interested in hearing, whether everyone is having problems or not.
For me everything went smoothly and almost better than expected. The installation was quite easy with only the rerouting of the cables being a bit tedious, but nothing major.
I used E3D's version 2 of their mount, printed in PC-blend.
Before my first print I changed my slicer-settings as suggested in this thread. That is, increased nozzle temperatures by 5-10 degrees, increased minimum speed to 20 mm/s, changed retractions to 1.8 mm.
I've been printing for roughly a week and had no issues with Prusament PLA, Prusament PETG and Fillamentum PETG. Also going back and forth between filaments, just making sure to do a thorough purge when going to lower temperature filaments.
I am very pleased with the results so far and happy I made the upgrade.
Thanks to everyone for the research, this thread has helped me avoiding frustrating first experiences 🙂
RE: Revo Micro installation on my Mini+
Wanted to touch base after putting a Revo on my Mini. My Mini is a day 1 pre-order OG, with Bondtech extruder. Latest FW, Super Pinda.
I initially has issues with wild nozzle temp data. You could watch random temps being reported during a print that were everywhere from high to low. I reset the printer, and I've yet to duplicate the issue, and I have zero idea what was causing that. I've had multiple successful prints since with no temp swings.
For settings, I put the retraction down to 2mm, with .05mm extra on re-start. Pressure equalizer (Expert mode, print speeds section) is set at 10 both positive and negative. With these settings, I get a perfect print.
I still want to run a PID tune. It runs fine, but not optimized. The Revo is just faster.
RE: Revo Micro installation on my Mini+
Hi All,
I recently installed the Revo onto my Prusa+ and had what I thought was pretty good prints.. walls were really good etc.. I did not really need to change and settings, still printing at 210 for PLA etc.. but I noticed a couple of days ago my perimeter walls were not joining together and were separating (looking top down). the side walls were perfectly fine... since then I have found so many others with issues with the Revo Mini and the Prusa Mini. It seems the feedback on my issue was under extrusion.. So the 2 main things I have tried to change are the temp (up to 225C at the moment) and the infill overlap (from default 10% to 25%). I am also going to check the esteps too.. I am still getting it, but not as much now.. I have ordered some new PTFE tube to make sure it is 30cm and to make sure there is no movement.. This has happened on both PLA (different brands and colours) as well as PTFE.. Any help to get this resolved would be greatly appreciated...
RE: Revo Micro installation on my Mini+
It is hard to tell with the picture, but is that under extrusion, or are your lines just not merging?
Hi All,
I recently installed the Revo onto my Prusa+ and had what I thought was pretty good prints.. walls were really good etc.. I did not really need to change and settings, still printing at 210 for PLA etc.. but I noticed a couple of days ago my perimeter walls were not joining together and were separating (looking top down). the side walls were perfectly fine... since then I have found so many others with issues with the Revo Mini and the Prusa Mini. It seems the feedback on my issue was under extrusion.. So the 2 main things I have tried to change are the temp (up to 225C at the moment) and the infill overlap (from default 10% to 25%). I am also going to check the esteps too.. I am still getting it, but not as much now.. I have ordered some new PTFE tube to make sure it is 30cm and to make sure there is no movement.. This has happened on both PLA (different brands and colours) as well as PTFE.. Any help to get this resolved would be greatly appreciated...
--------------------
Chuck H
3D Printer Review Blog
RE: Revo Micro installation on my Mini+
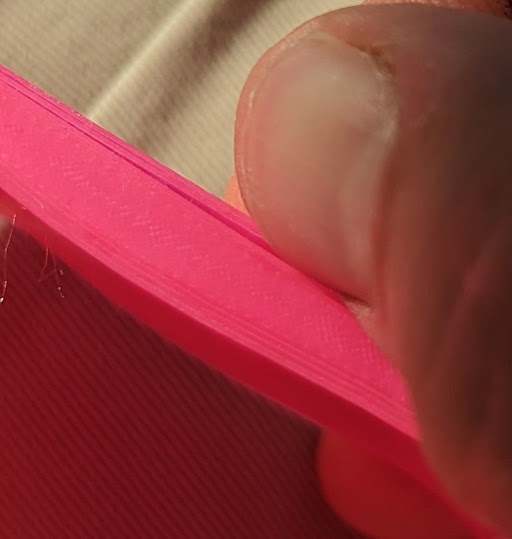
Hi chuck. I had posted this picture on a reddit post, and was advised it looked like under extrusion..
Someone had also mentioned that the Revo displays a temp on the mini that seems to be much higher than it really is. That took me down a bit of a rabbit hole, and finally to here..
To me the perimeter lines are just not merging and sticking together, just like you said - almost like pages in a book.. The rest of the print looks great.. not issues with the side walls at all.. The issue is with the vertical perimeter walls..
The only mod I have done is the Revo hotend.. As I have also said previously, I am going to replace the PTFE tube too and cut to 30cm, as that was also mentioned...
thanks
Nick
RE:
Just installed my Revo (E3D mount version 2), just wanted to give some information about what I've found for mine so far:
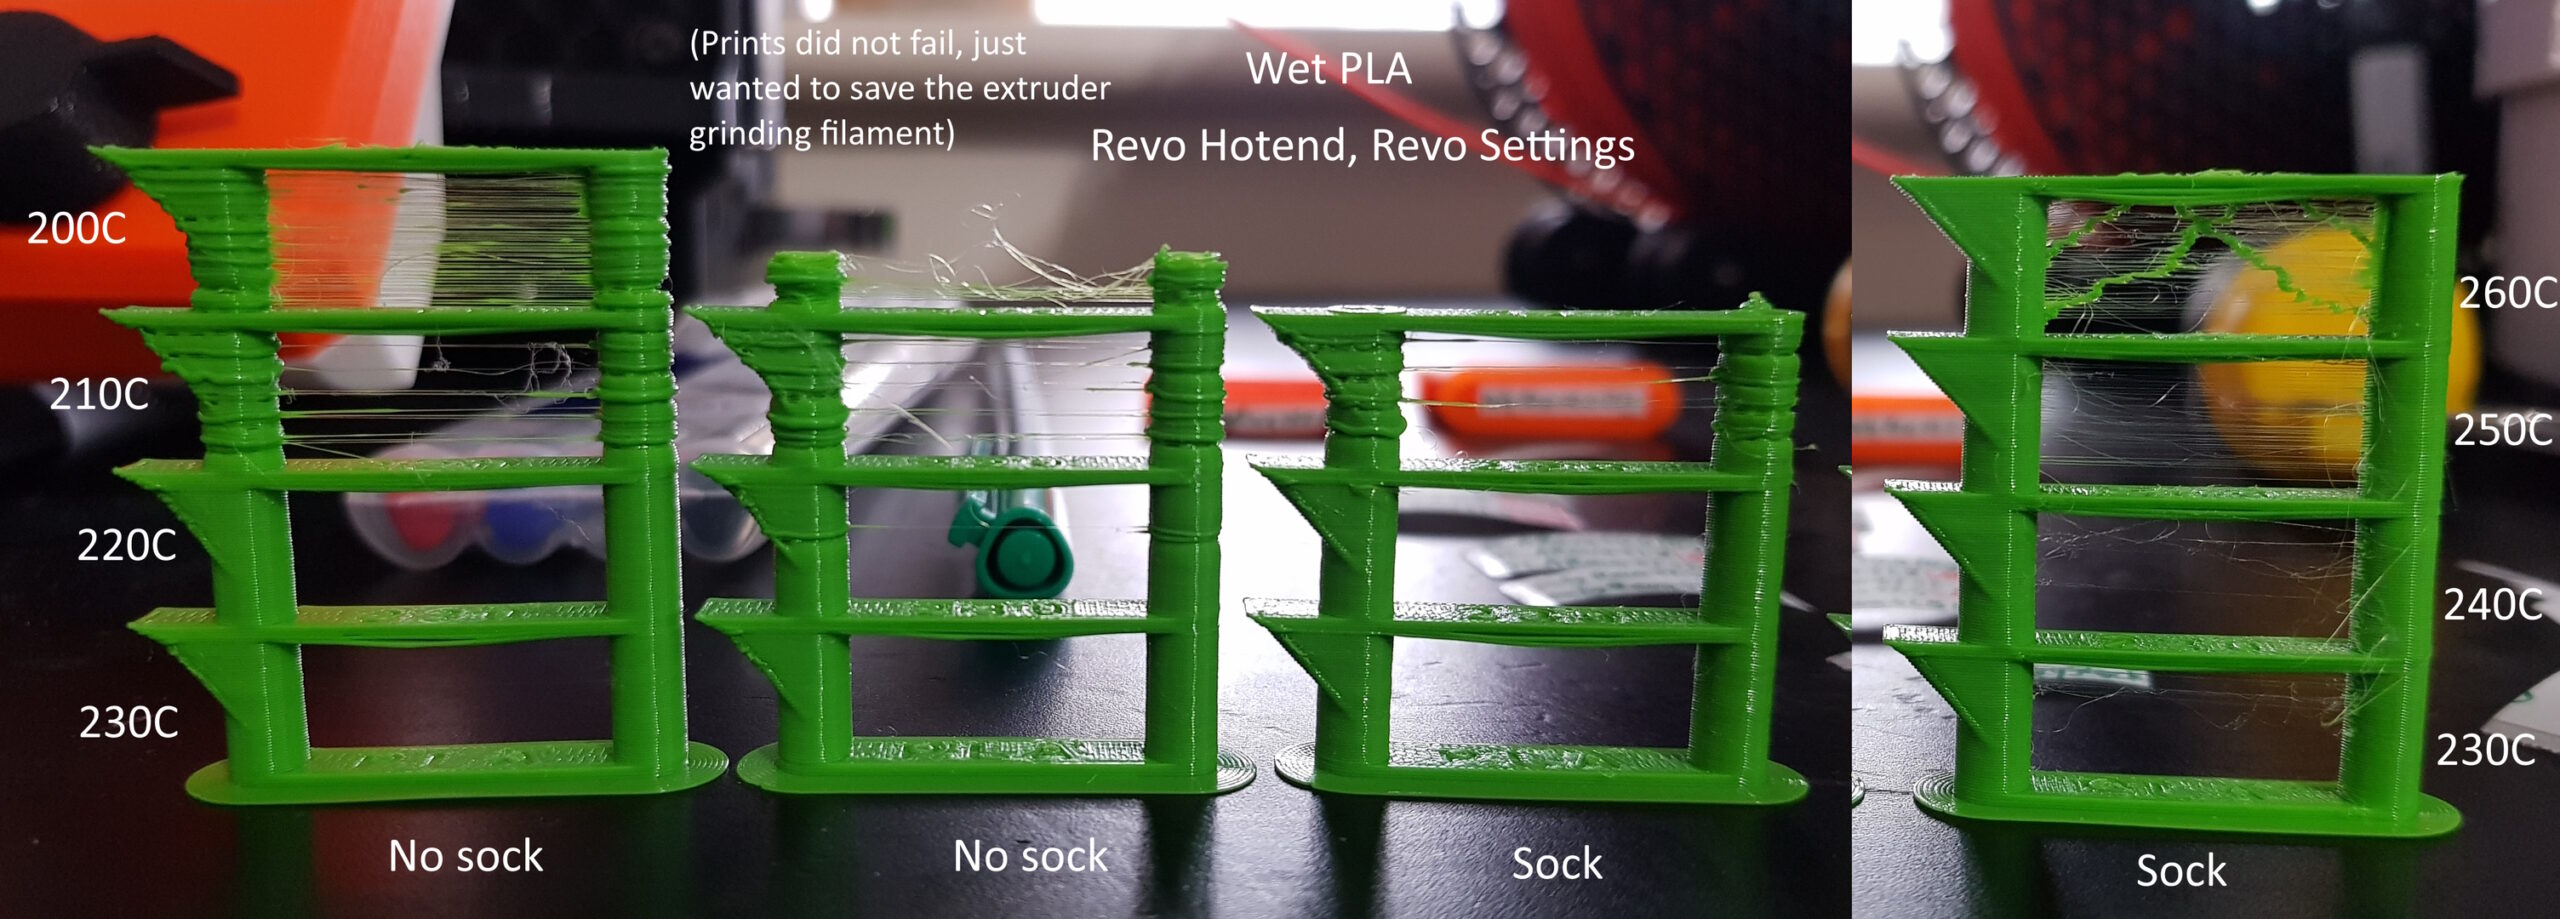
For some wet Simply Green Prusament PLA I've been testing with:
The settings stated throughout the thread (retraction: 1.8mm, slow down if layer time less than 5 seconds, min print speed 20mm/s) seemed to improve the pillars on my heat tower, but that heat tower was weird in that it was all 220C and below without underextruding (I hadn't worked out the temperatures yet), so will need re-testing to confirm if this helped.
210C nozzle temp and below starts severely underextruding, clicking extruder, filament dust, etc.
220C has the occasional underextrusion on a few layers together, occurred in one heat tower out of 3, one 50% Flowalistik Bulbasaur out of 4.
230C No underextrusion thus far, minor stringing (remember: wet PLA).
240C Minor stringing.
250C Major stringing, wet PETG levels.
I wondered if taking the sock off to theoretically get better part cooling (from building the Revo and stock hotends and carriages in SCAD, it seems to block the part cooling duct), but this didn't seem to change anything.
I've printed some small Bulbasaurs, but don't really want to compare them until I dry the PLA. They have a wobbliness to the layers, compared to stock, but I'll have to compare to my existing Benchys as I swapped to a Bondtech extruder recently as well (no affect on heat tower tests, all those were done after).
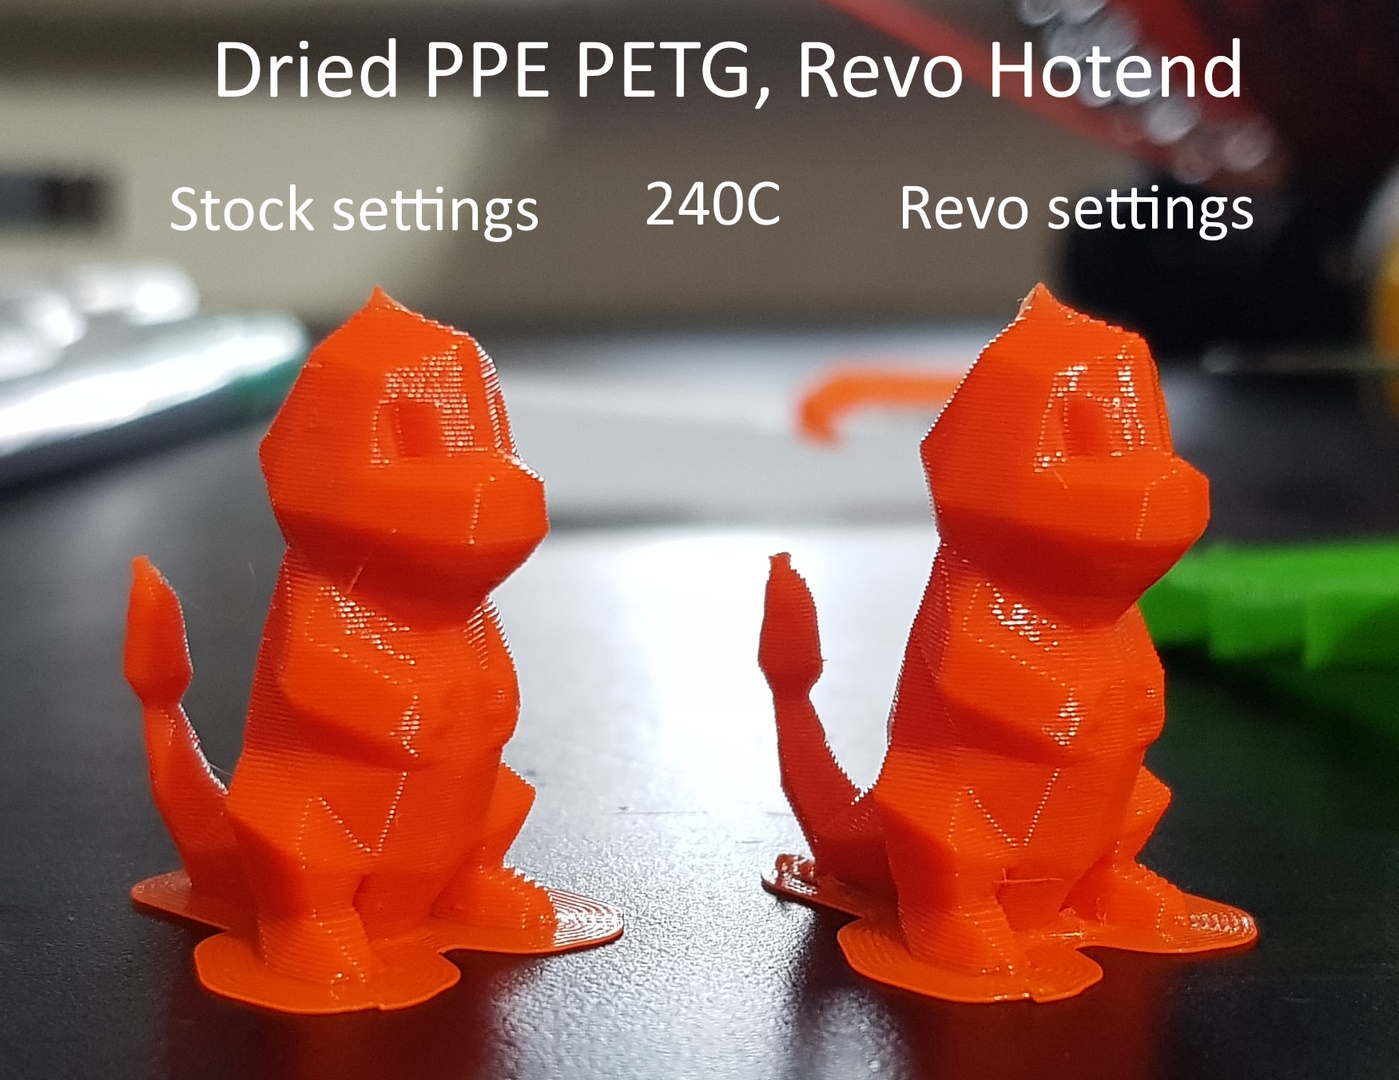
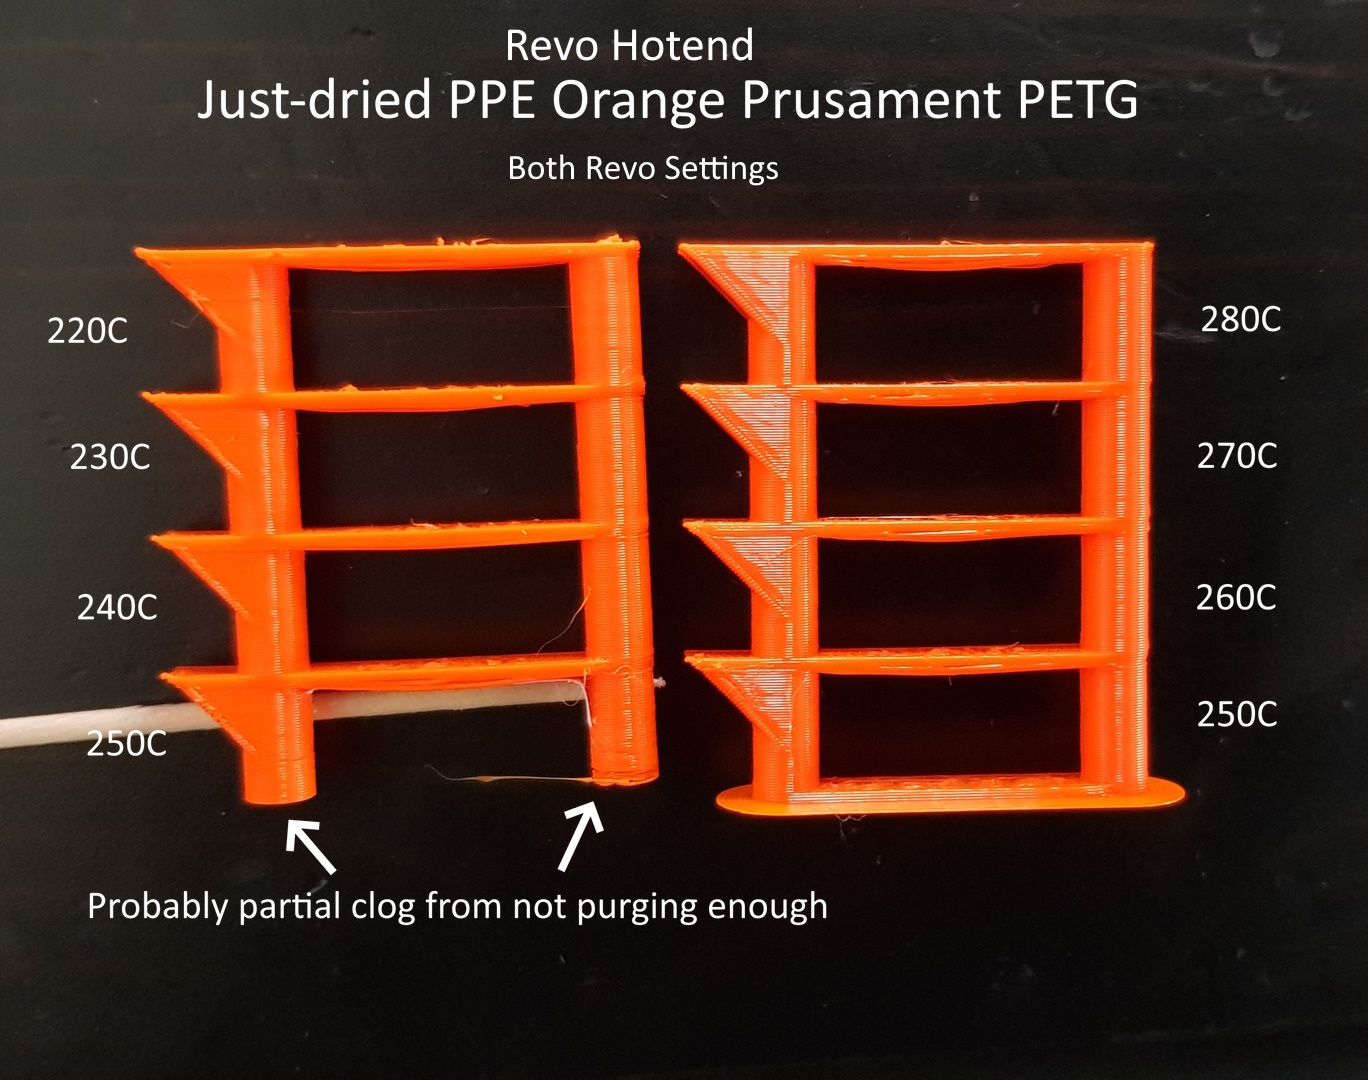
I also just dried some PPE orange Prusament PETG (24h at 55-60C), and the stock settings VS Revo settings on a 50% Charmander seem to give shinier surfaces, more akin to what I would expect to get from the stock hotend. Not seeing much difference apart from that.
The dried heat towers for the PETG gave little to no stringing from 220-280C. 220C may have a couple of defects that might hint I'm approaching underextrusion territory. The 250C base on the first tower did snap off, but I think this is due to insufficient purging switching from the PLA.
Having such a wide success margin on the PETG is actually a little annoying, because I don't know if my thermistor is reading maybe 40C lower than the nozzle is; or if it's not as severe a temperature difference, but PLA clogs easier with the Revo heatbreak-nozzle.
In regards to part cooling, I did once accidently flip my heatblock upside down, which negatively affected part cooling due to being in the way.
I saw quite rough texture on the overhang test in my heat towers when in this configuration, but I'm not seeing it in these prints.
One reason I wanted to upgrade my hotend was because I didn't like all the variables due to the PTFE tube in the hotend, correct assembly, etc, and was troubleshooting some gaps on retractions. I've just started a test with the Revo, with the Revo settings, and these gaps are not present.
My conclusions thus far:
• My wet PLA needed to be about 240C, as it clogs at 220C and below (suspect same for dry PLA).
• I'll aim for 260C for PETG, as the overhang test is nicest there, but my findings corroborate what others have said: PETG seems to still just work on stock settings.
• The Revo settings in the thread at least make PETG shinier, more akin to stock surface in that regard. I need to test their effect on dry PLA, and at the proper temperatures now that I've found them.
• Part cooling being blocked by the nozzle may not be quite as bad as I thought, although I'd still like to improve it.
• The gaps on seams/retractions seem to be gone, which is a win.
Not sure how to spoiler these images to take up less space, but (one is wide, can click it to view it fully):

RE:
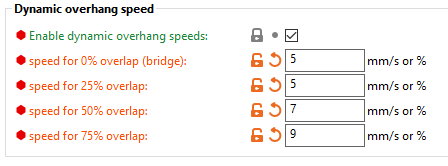
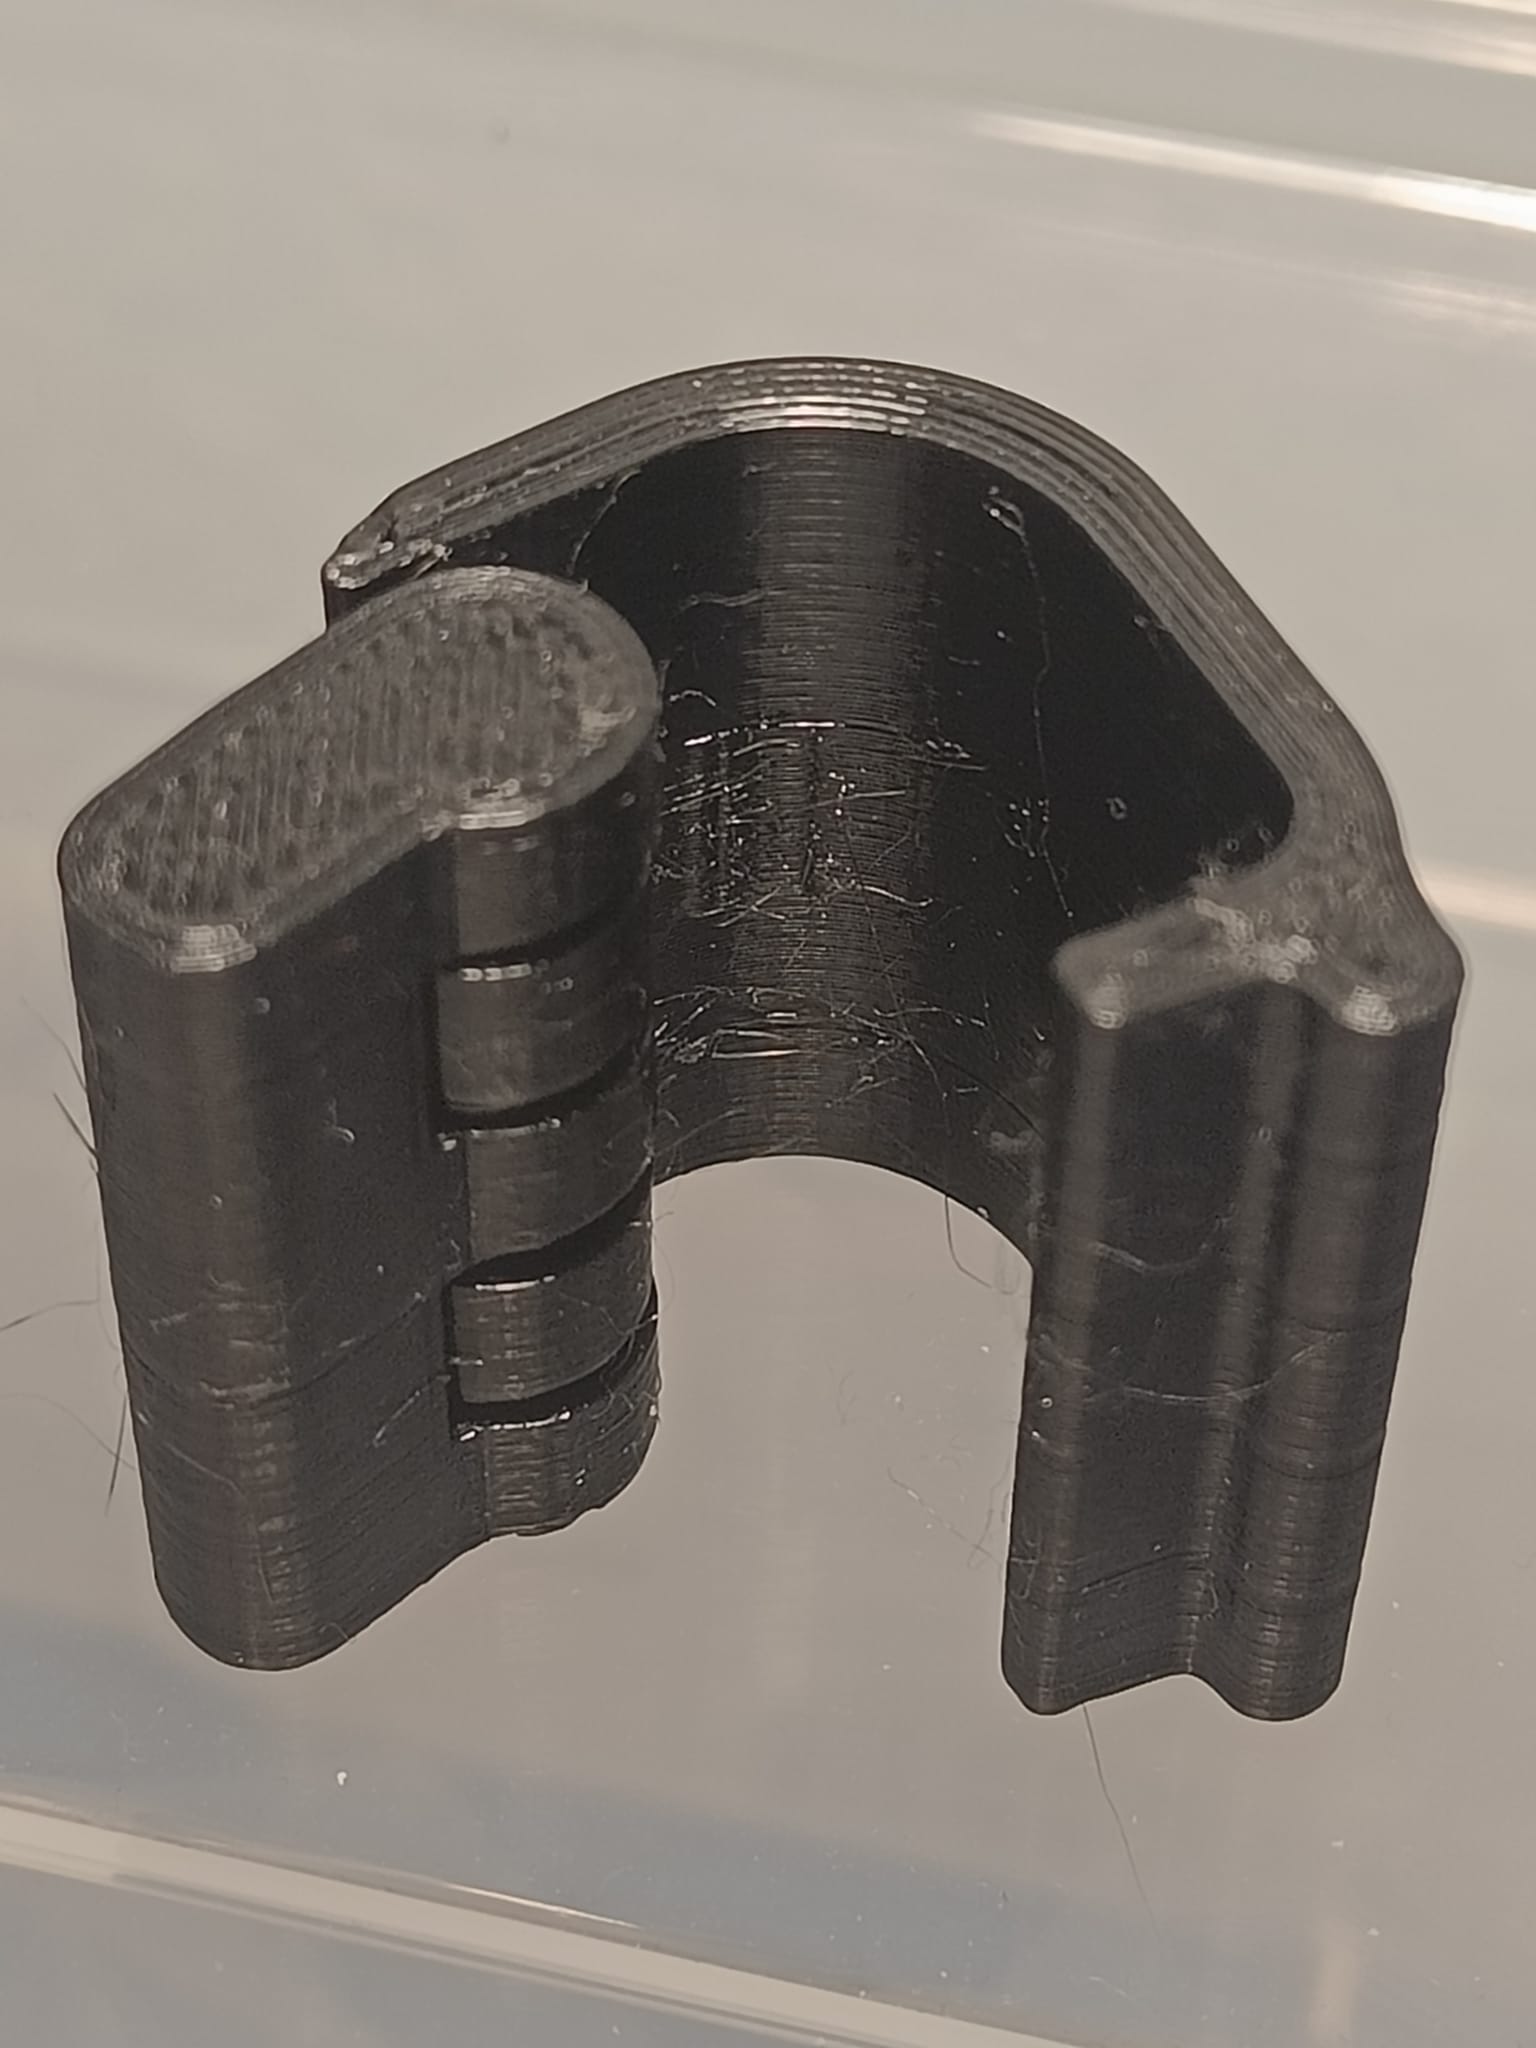
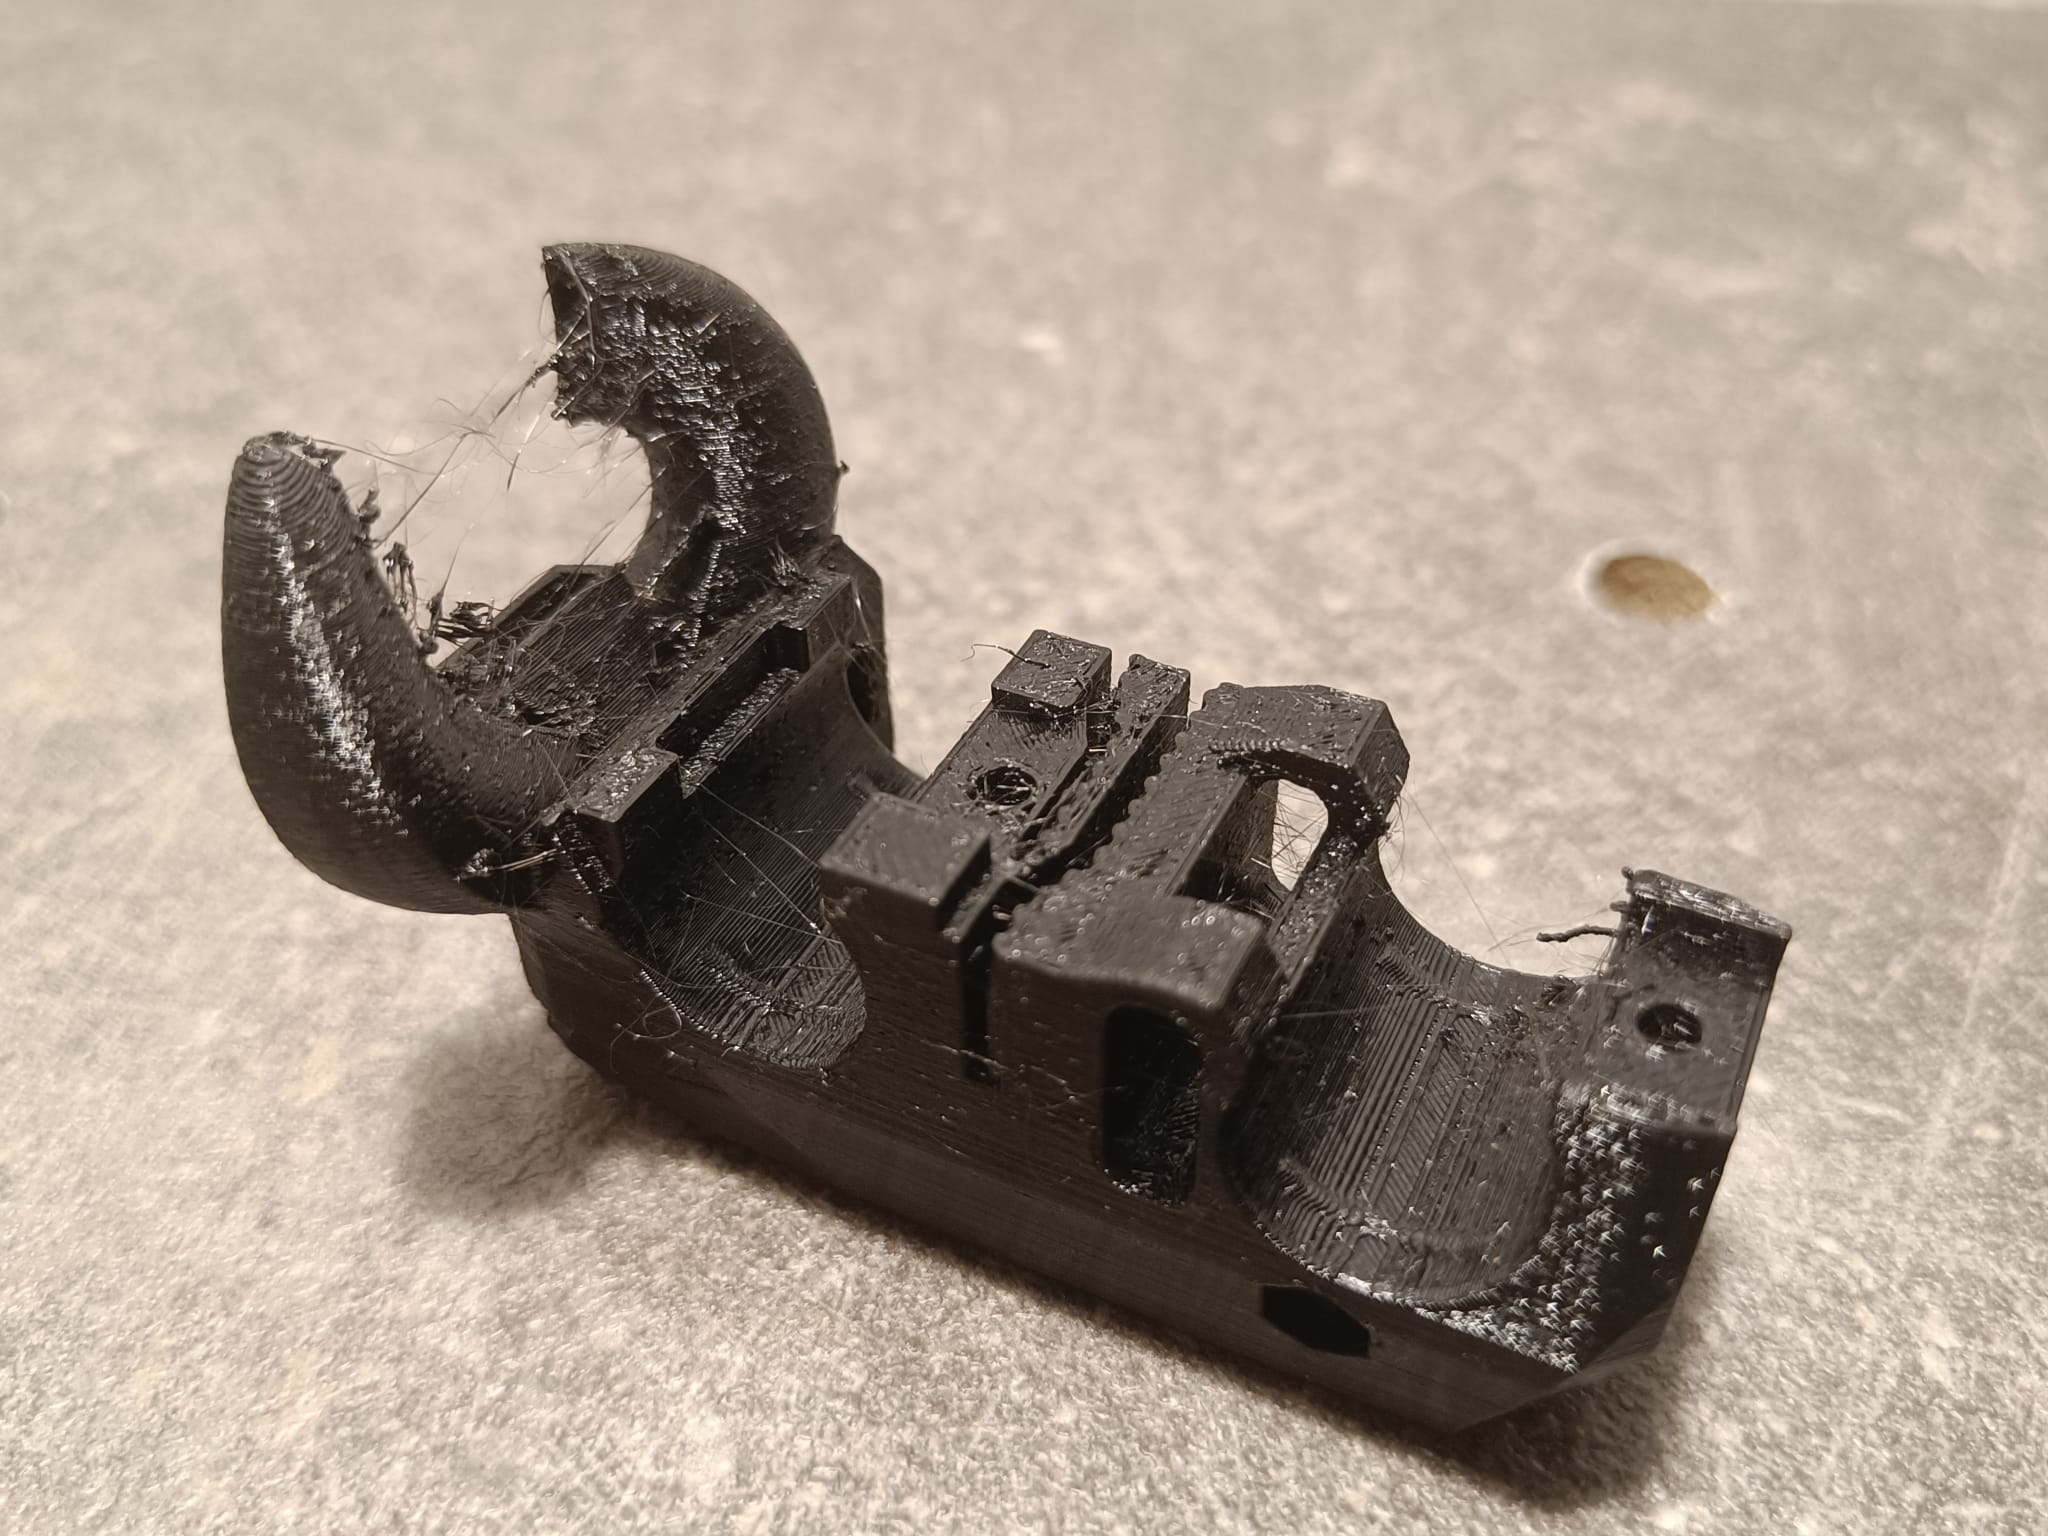
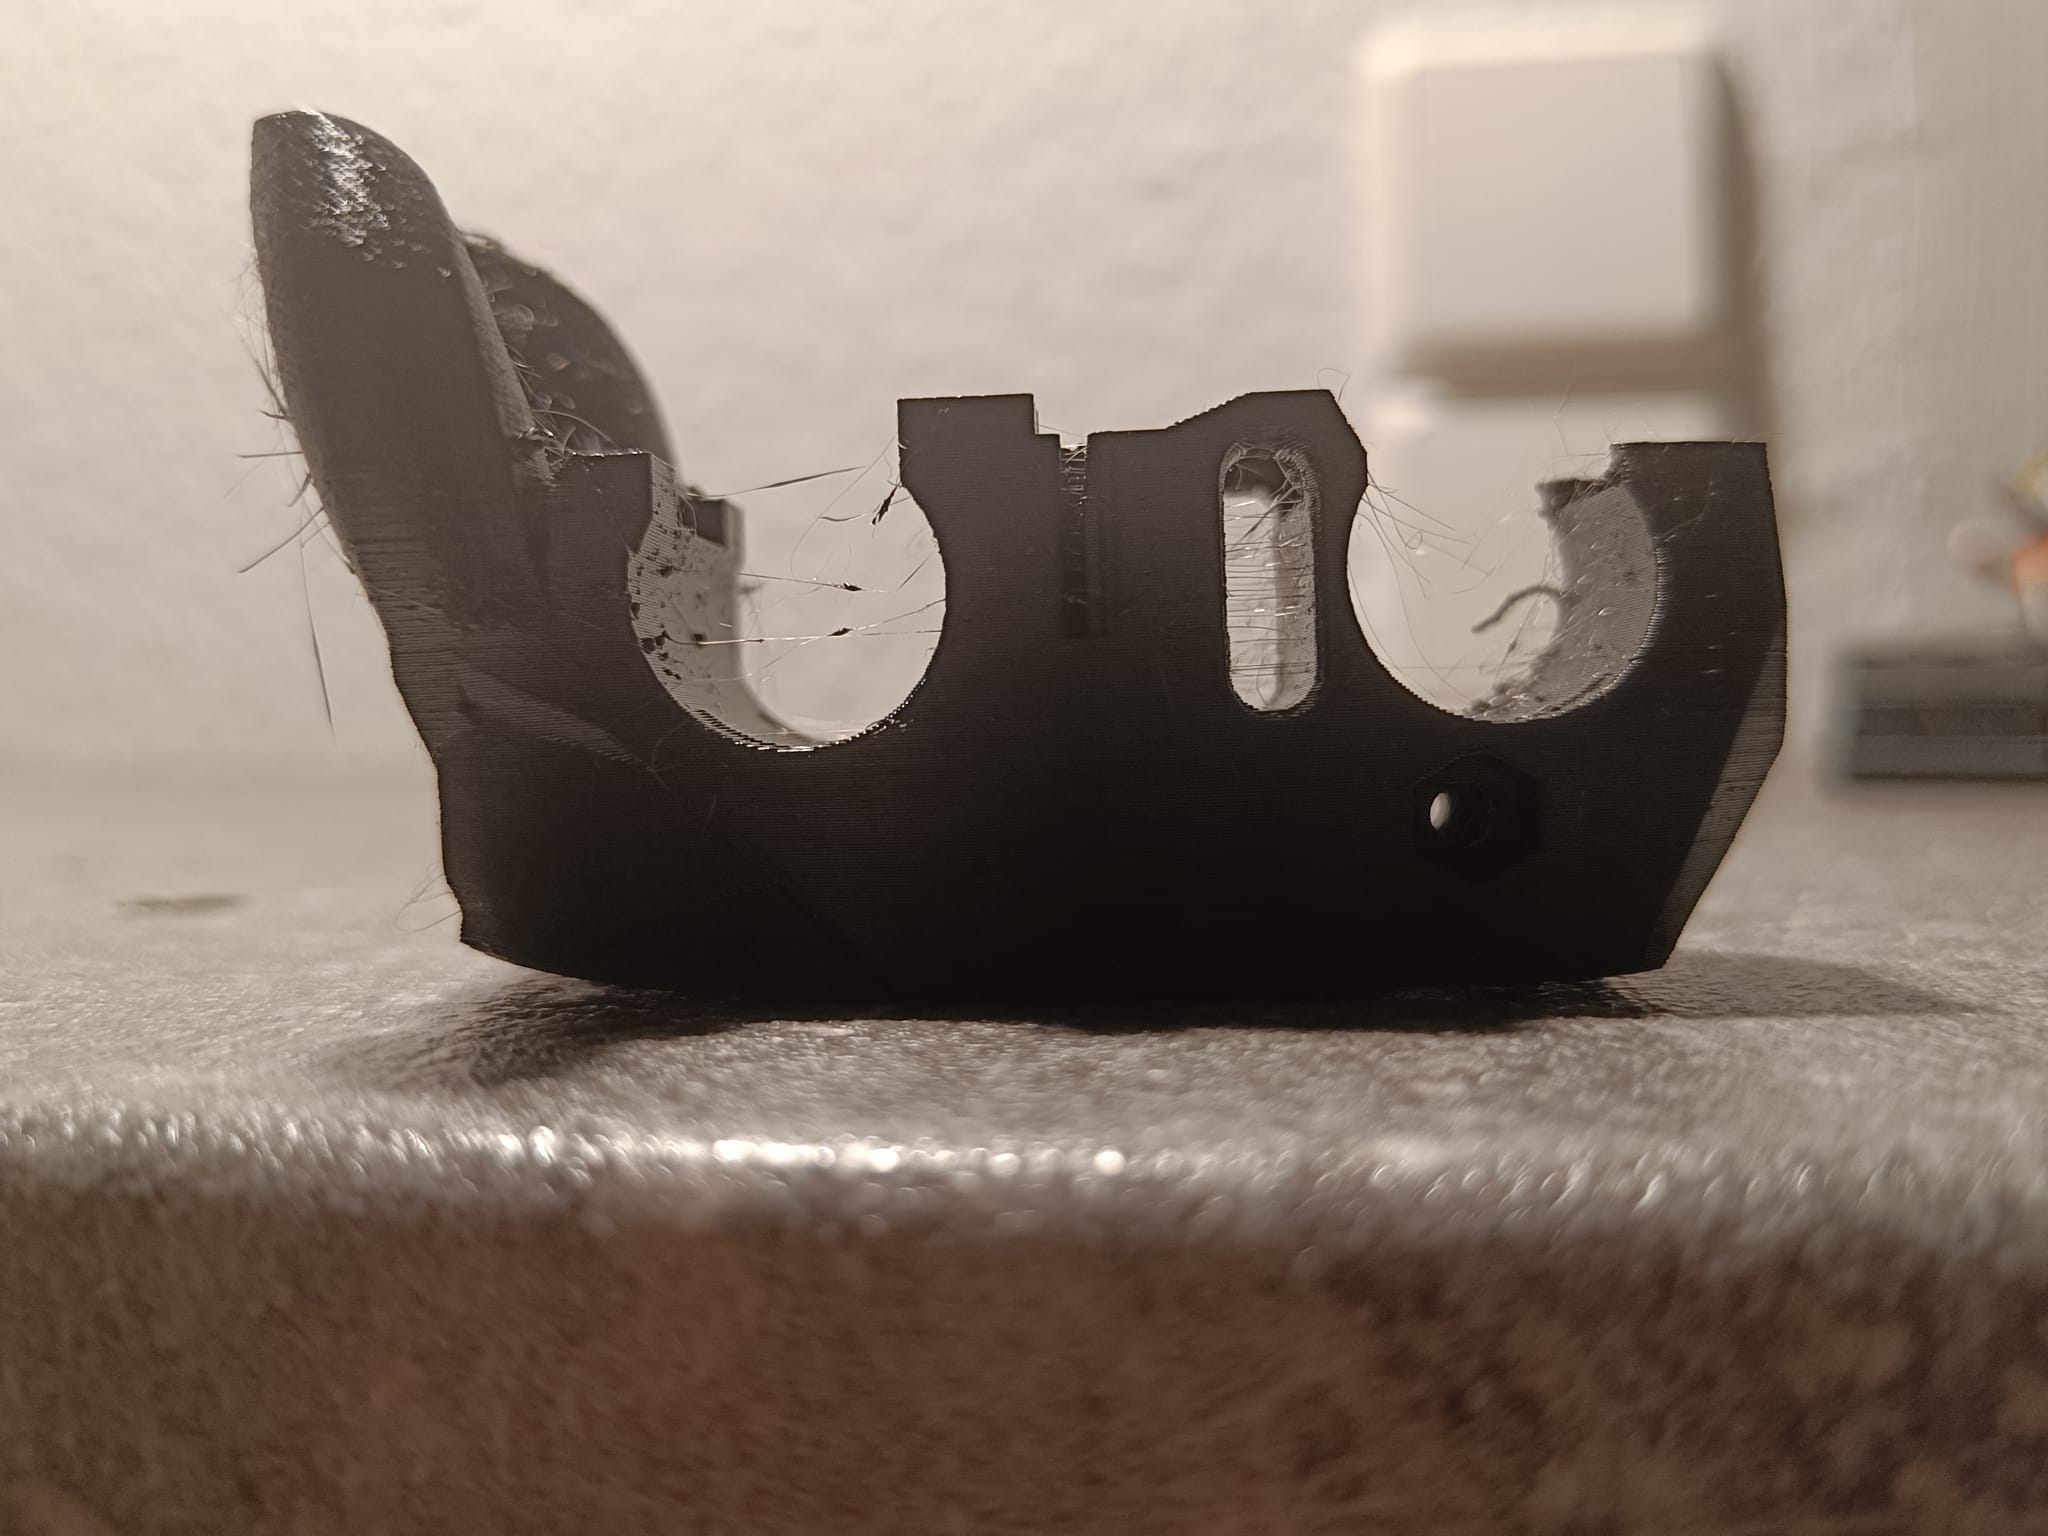
As we already know to print PLA using REVO following the @pickworthi reconditions we have to rise the "Min Print Speed" from 15 to 20 mm/s in order to deal with clogs. My question is how to deal with overhangs as I have very bad experience with Prusa Mini Revo in this regard. I usually use in PrusaSlicer the “Dynamic overhang speed” settings 5,8,10,10 to slow down the overhangs printing speed but it quickly causes clogs when using the Revo.
When I saw what @tekjunke managed to achieve using REVO and stock blower for overhangs I was very surprised.
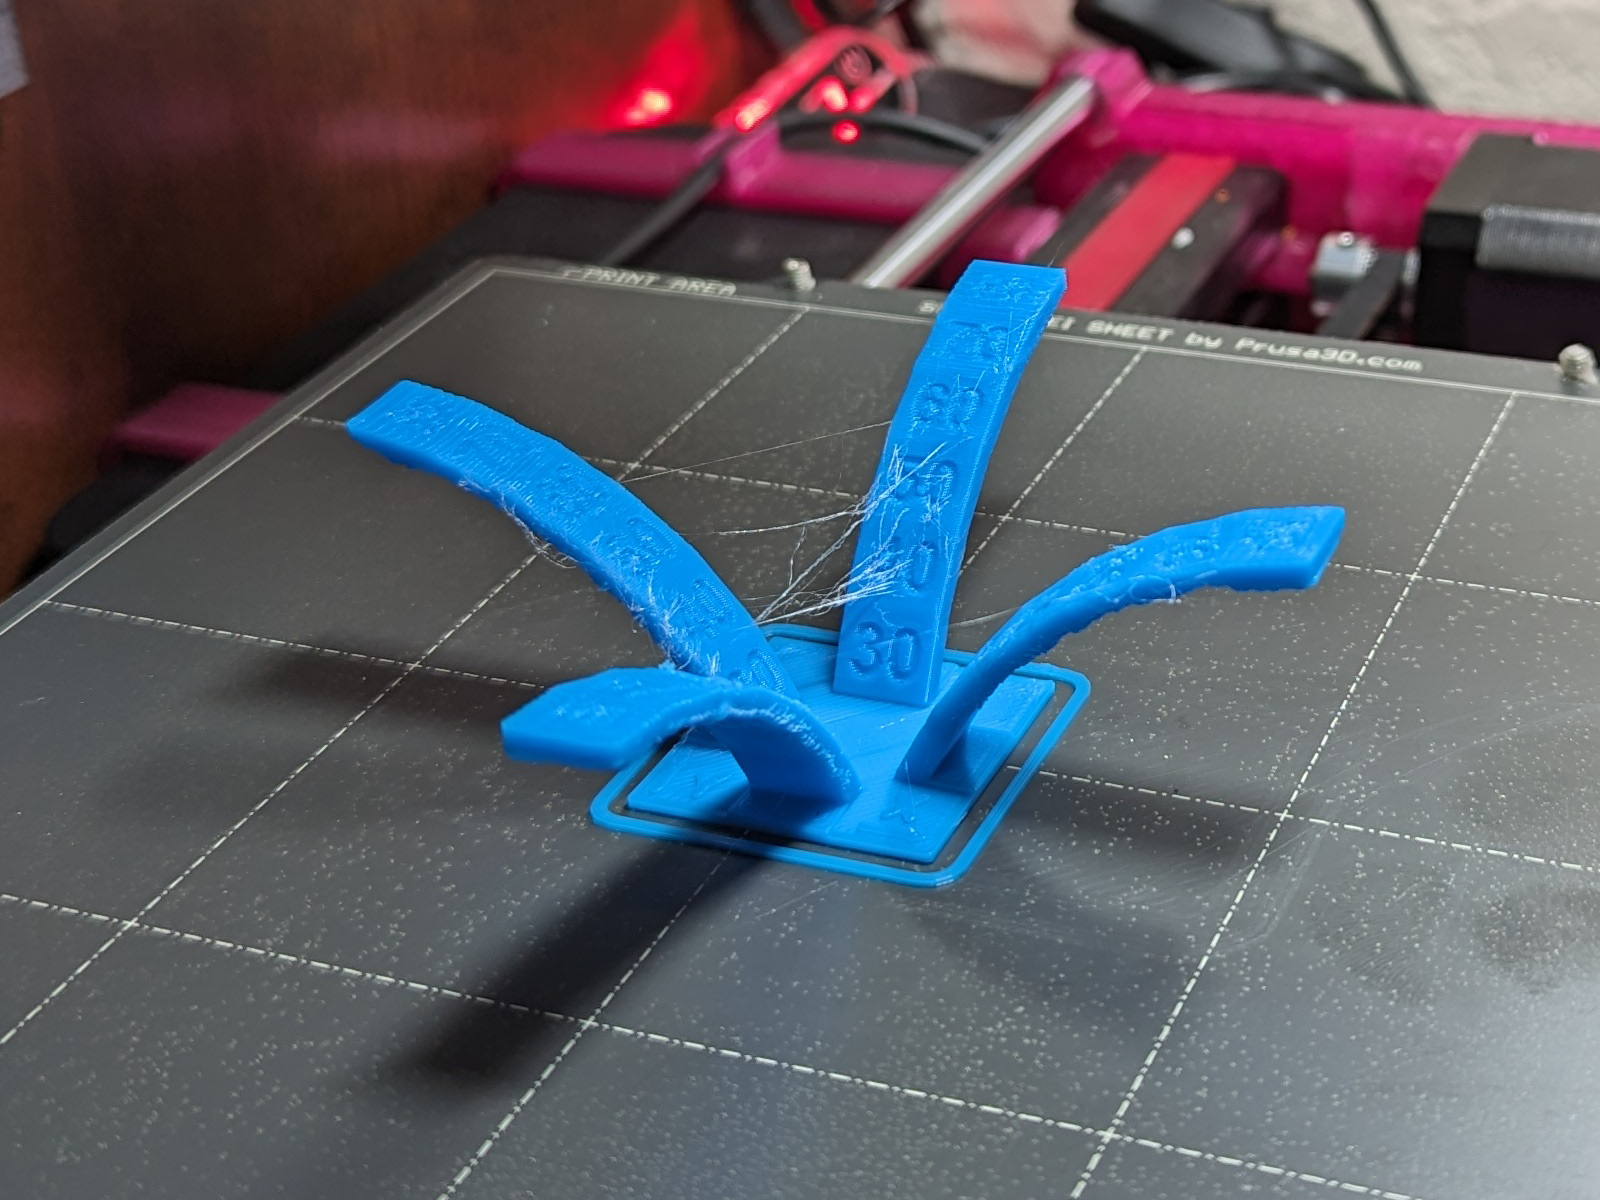
At present moment I am using “Fillamentum PLA Extrafill Rapunzel Silver” and without “Dynamic overhang speed” fixes I could barely achieve 50 degrees when printing this model as you could see:
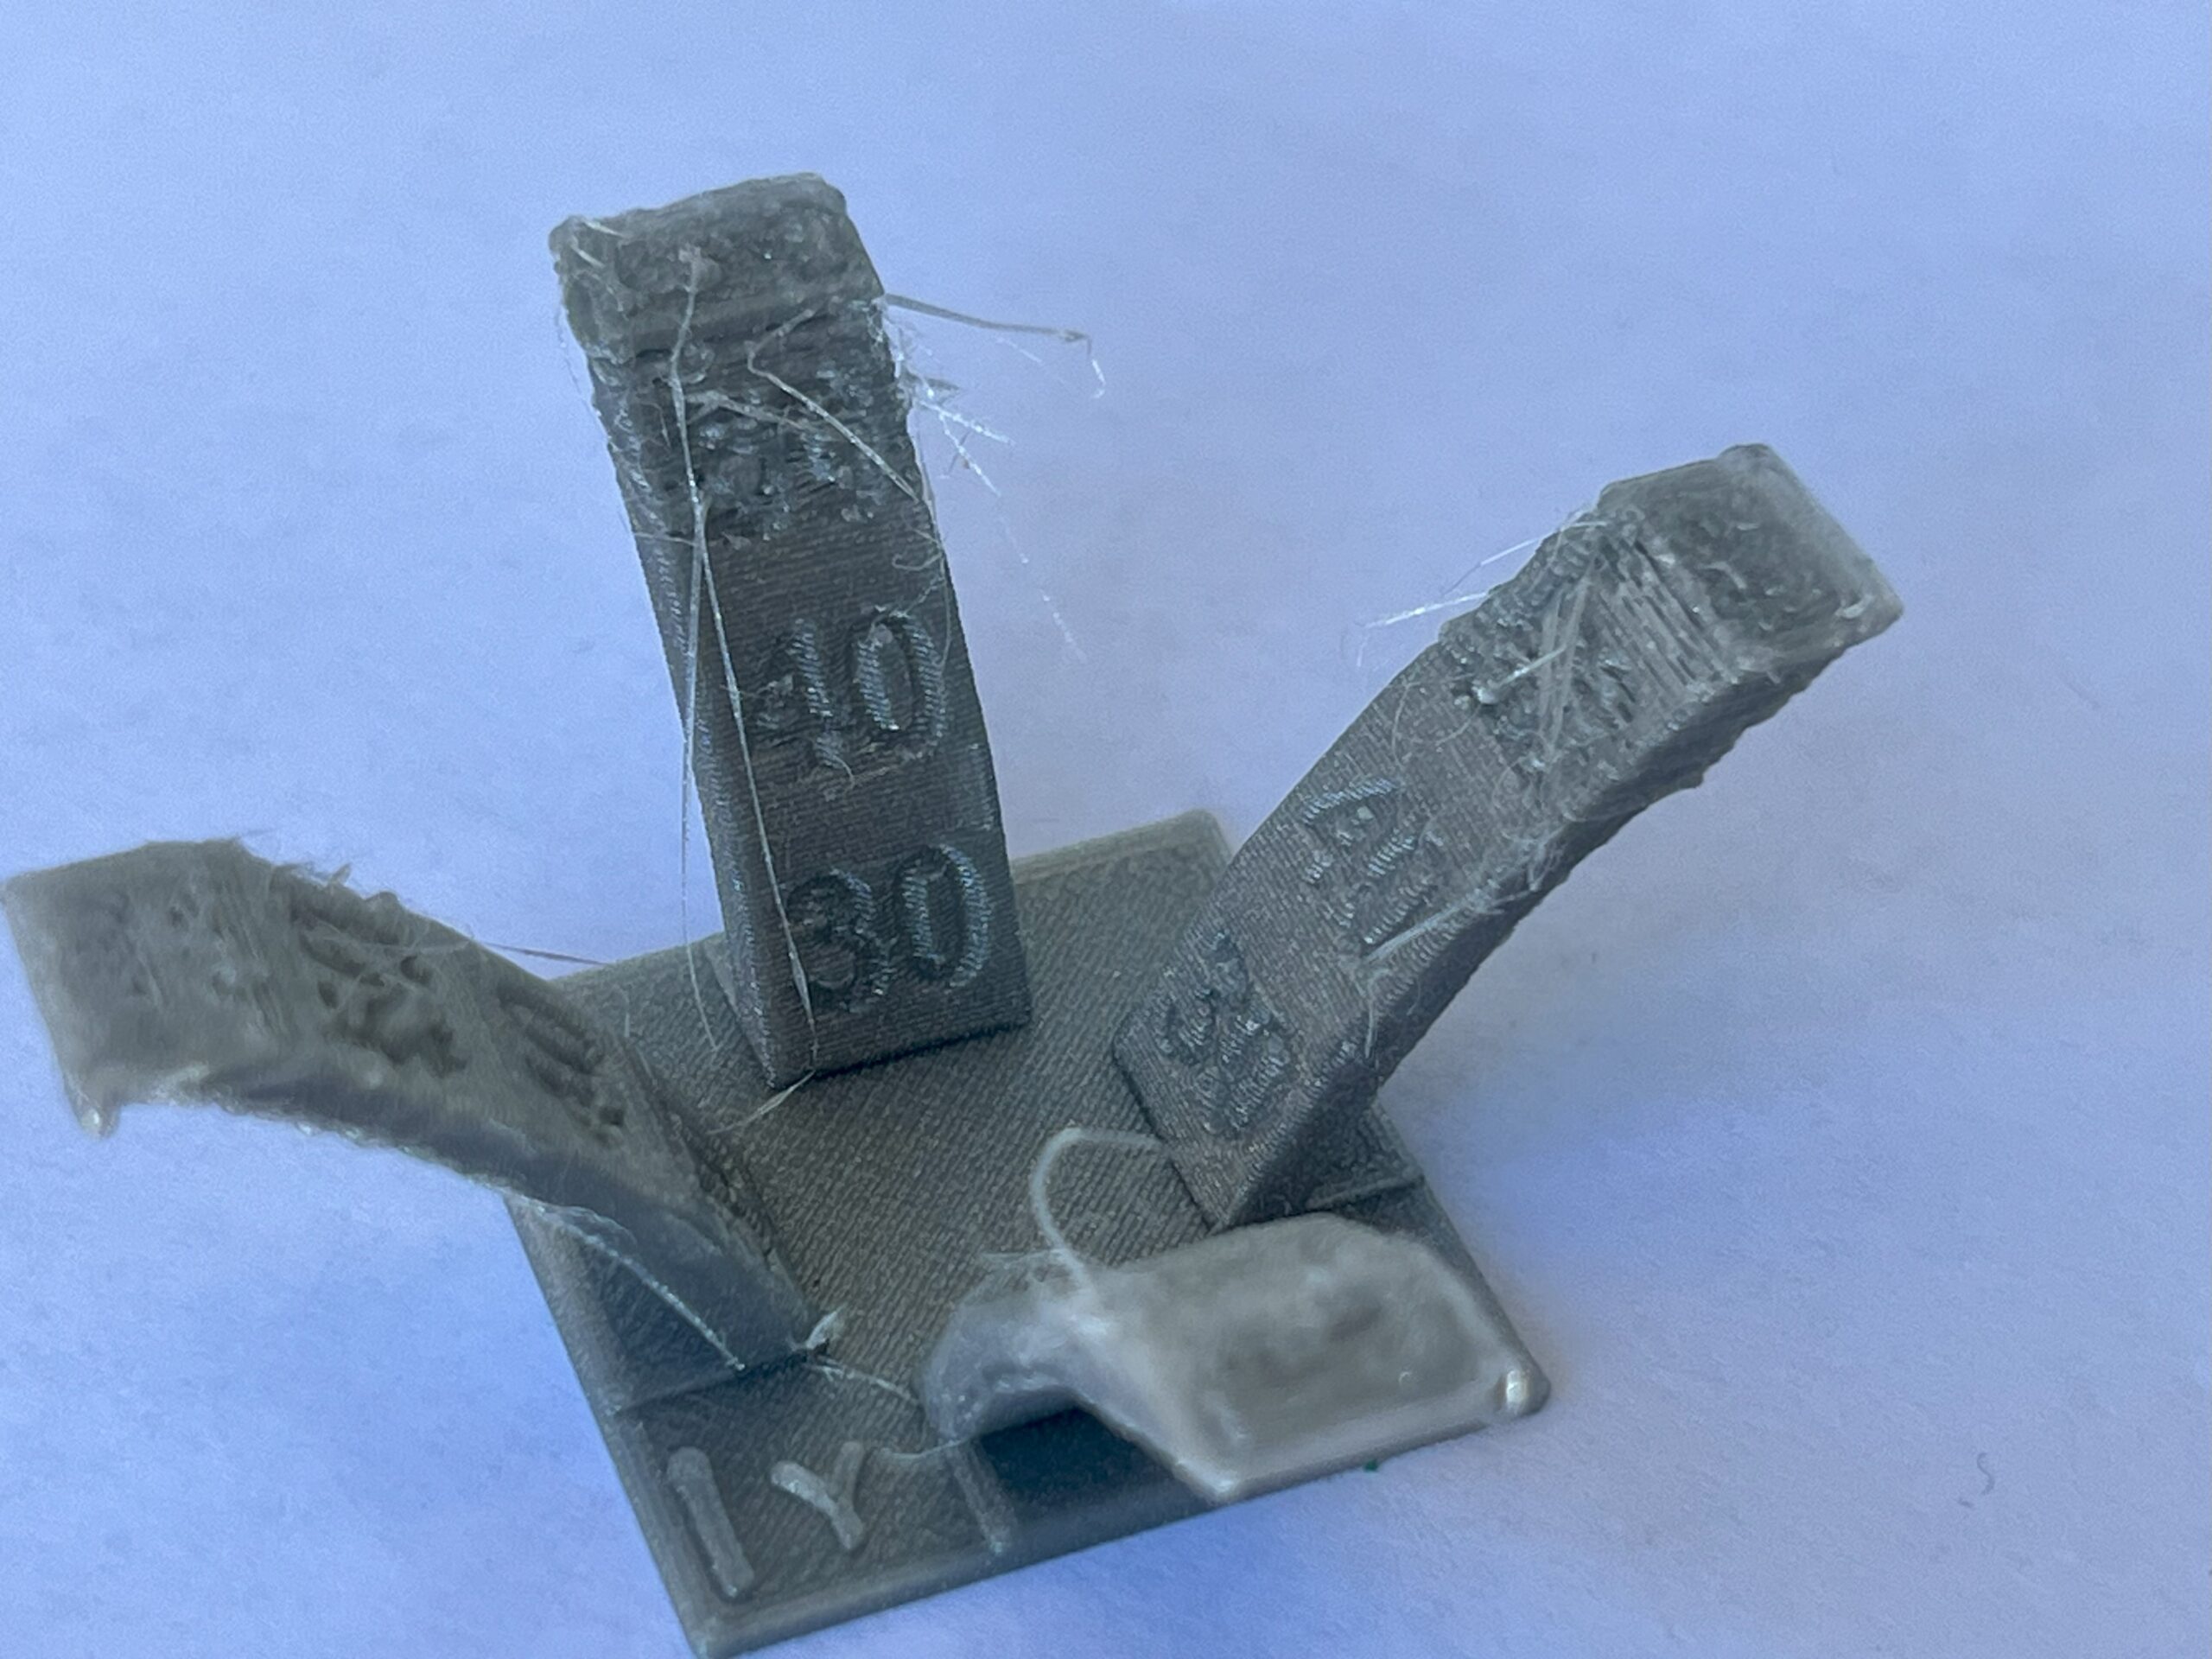
What settings are you using in PrusaSlicer when using Revo with PLA OR what hardware fixes should be applied for nice overhangs over 50 degrees?
RE: Revo Micro installation on my Mini+
I am not getting the clogs with the Revo on my mini. I will test this overhand test tonight.
--------------------
Chuck H
3D Printer Review Blog
RE: Revo Micro installation on my Mini+
My testing was done using a 0.4mm obXidian nozzle, Overture PLA Pro, and the same assembly/fan config as y'all (rev2 assembly/stock fans/shroud). Using the Bondtech extruder, capricorn XS tube.
A few things to address first.
- The model you're trying to print is a retraction torture test, which is a worst-case scenario for a bowden tube setup like the mini. As such, the retraction settings must be carefully tuned (this is a great tool for it). I have my retraction tuned to 3.5mm, and I have kept the cooling settings in the filament options as stock (contrary to the heat-creep/clogging mitigations recommended -- I have not had any issues).
- This model is VASTLY different to the model you're referencing that @tekjunke printed. This is 4 overhang tests printing at different directions, that one just has 2 in the same direction, at different heights.
Watching how the model prints, there's one thing that stands out -- corner curling at the extreme edges. Except, it's not all of them. The corners on the +Y side (farthest away) are well behaved, but the corners closest to the front are curled. This points towards the part cooling playing a HUGE factor for this print, and the end results show that the overhang on the +Y side looks basically perfect, while the others are a bit melty underneath (-Y side looking worst, and both -X and +X having better look on the +Y side).

Comparing these differences to how @tekjunke's model is oriented, we see that it's oriented in the best-case scenario, matching the +Y overhang of this test. I imagine the results would be very different if the model were rotated 180 degrees.
This actually has me wanting to upgrade my part cooling ducting to something with an all-around design, as this is obviously a shortcoming for general purpose. I've avoided looking into it mainly because of the clearance issues associated with it. Anyone have any suggestions that have worked well for them?
As we already know to print PLA using REVO following the @pickworthi reconditions we have to rise the "Min Print Speed" from 15 to 20 mm/s in order to deal with clogs. My question is how to deal with overhangs as I have very bad experience with Prusa Mini Revo in this regard. I usually use in PrusaSlicer the “Dynamic overhang speed” settings 5,8,10,10 to slow down the overhangs printing speed but it quickly causes clogs when using the Revo.
When I saw what @tekjunke managed to achieve using REVO and stock blower for overhangs I was very surprised.
At present moment I am using “Fillamentum PLA Extrafill Rapunzel Silver” and without “Dynamic overhang speed” fixes I could barely achieve 50 degrees when printing this model as you could see:
What settings are you using in PrusaSlicer when using Revo with PLA OR what hardware fixes should be applied for nice overhangs over 50 degrees?
RE: Revo Micro installation on my Mini+
1st post apparently didn't go through... if this somehow randomly shows up double, that's why.
Just got done with follow-up testing. tl;dr -- lower Dynamic Overhang speed.
Decided to do some extra tests. Increased temperature from 210c->230c to see if that would improve stringing. It has helped in the past for situations where retraction isn't fully tuned. It didn't seem to improve my results for this situation, but it could be something that might fix a bit of @prusatester2020's results.
Also, considering the observation of the curled corners due to lack of cooling, I wanted to see what the results of speed had on things. So, I tried a 50% speed test (adjusted in the Tune menu on the printer), and a reduced speed for Dynamic Overhangs in slicer settings.
All results oriented with -Y to bottom left, +Y to top right.
210c [1h 8m]:

230c [1h 8m]:

230c @ 50% speed [2h 16m]:

230c w/ Dynamic Overhang adjustment [1h 33m]:

The 50% speed test and Dynamic Overhang adjustment results are obvious improvements. Much longer total time with the 50% speed, but the Dynamic Overhang adjustments only add 37% extra time over stock (the actual times for each setting are lowered to ~1/3rd of stock). Obviously the 50% speed method could be improved by only lowering the speed for critical portions (getting past the slow initial layers), but even still, just adjusting Dynamic Overhangs gets most of the way there with a manageable time increase.
RE: Revo Micro installation on my Mini+
The problem I have using Prusament PLA is that lowering the speed when using REVO v2 mount causes under extrusion followed by over extrution. Now I am in a process of updating the printer (checking the fan airflows, etc.) in order to try to fix the issue and have the option to set slower speeds for Dynamic Overhang.
RE:
Hey everyone,
i updated my mini after an Bondtech extruder again. The hotend with the Revo Micro and an Obisidian nozzle and change the airduct/carriage with this one
https://www.printables.com/de/model/192627-prusa-mini-cfd-optimized-fan-duct
SunLu PLA works fine with stock settings and overhangs and bridging is way better now, but prusament petg sticks on the nozzle. I use ~260°C to print it now. Small objects work good. But if i want to print 3-4 small objects, the filament get wiped and sticks on the nozzle. If i print a bigger object around 2x6cm i have problems with warping and quality.
Any tips for petg settings? Only change the temperature at the moment. I would try to reduce the fanspeed more. - Stock min 30 / max 50 to maybe min 15 / max 30
Maybe thicker first layer (0,2mm stock)
Thanks and if you need something, let me know
RE: Revo Micro installation on my Mini+
Which plate are you using? I've gotten absolute best adhesion results with the smooth sheet using gluestick, but for general use I'll normally use the Satin sheet (gluestick required as needed).
It looks like you're printing too hot, and that model has a problem with small layer times for the upper section. Reduce temperature to 240c. If you're still having stringing at the upper duct section, look at where the surface finish changes on your printed model and insert a custom G-code at that line to drop temperature to 230c:
M104 S230
RE: Revo Micro installation on my Mini+
I just noticed as well... if that's the Matte Black Prusament PETG, use a different filament. Anything else. That stuff is different.