Improving air flow around nozzle
Hi All,
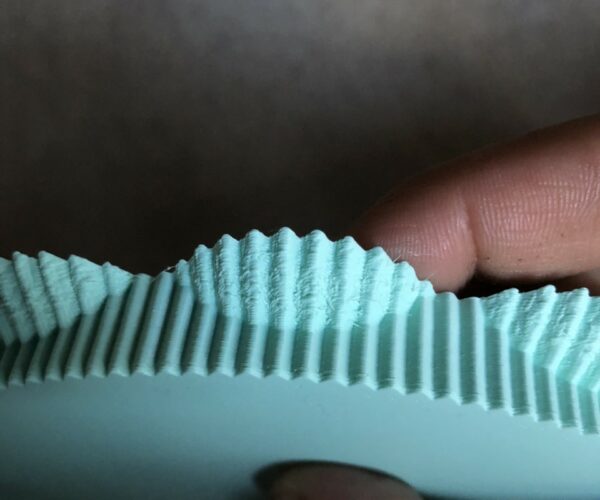
Im sure many of you have already realised this, but since im new, Ive noticed that the air flow around the nozzle isn't great as it only comes from one direction. So the the quality of the prints on the rear side turn out much better then the front of the print, especially when it comes to overhanging etc.
Im wondering how other have managed to solve this issue to improve air flow and print quality all round?
Im using a stock Prusa mini+
Thanks in advance, Manny
Search
There a number on Thingverse and the Prints Section of Prusa. Search “fan shroud” and Mini and you will find it.
--------------------
Chuck H
3D Printer Review Blog
Searching
Hi, do you think that I could use this?
https://www.prusaprinters.org/prints/37368-prusa-mini-mosquito-fan-shroud/files
Also I was thinking about upgrading my hotend as well, would you be able to recommend one?
Thanks
Manny
Work
That should work with the Mosquito.
Hi, do you think that I could use this?
https://www.prusaprinters.org/prints/37368-prusa-mini-mosquito-fan-shroud/files
Also I was thinking about upgrading my hotend as well, would you be able to recommend one?
Thanks
Manny
--------------------
Chuck H
3D Printer Review Blog
Found!
Based on assumption that you are running the stock Hotend.
I'm in the same boat, looking to increase cooling around the nozzle because I am getting poor cooling and also planning to replace my heaterblock with a V6 copper/brass block which fits the Mini but impedes part cooling.
I've found these prints which seem to do the job:
https://www.prusaprinters.org/prints/52553-prusa-mini-rhd-front-fan-duct
(Requires either a spare fan, or you relocate the current one)
and
https://www.thingiverse.com/thing:4894561
(Check the remixes for slim or bondtech versions)
Curious whether anyone else may have tried something similiar though.
tried both
i've tried both of those, and some others. back on stock now 🙂
With one fan it just didn't make enough difference for me. Sometimes even made it worse. With 2 fan setup it might be worth it?
Might be worth it!
By the looks of what people have written in various areas, I believe 2 fans might be worth it!
Though in either case, I imagine you would have to adjust cooling by a few % to make up for the extra distance the air needs to travel, and potentially heat up from ambient too!
I've ordered some PC and a spare fan to try the Prusaprinters linked one, will respond back if I have success.
RE: Ordering Parts
Thanks for the responses guys, Yea Ive gotten someone to print of the duct in PC so hopefully ill have that in a week or so to fit on and try out the print again. Adding a silicone sock to the heat block to help out as well.
I was looking at the two fan option but couldn't figure out how to actually connect it up.. any ideas?
Im using the fan on full as well... but still getting bad prints on the far side of the fan!
You dont really need PC, especially if you are prototyping/trying things out. PETG was absolutely fine untill you find a perfect one.
the only time I had some melting was with that detachable one from thingiverse, but mostly because its quite close to the back of the block, and if you got a silicone sock on, it sorta-kinda touching it. Thats assuming you are using the default heatblock. Oh and i *might* have been printing nylon at 280 at that time 🙂
but in any case, just print all those prototypes in PETG and have fun testing it with overhangs and water dishes. Then you realise that if you use a custom heatbreak or nozzles the height is off, or that the heatblock wires are annoying and end up with this one in the end 🙂
Improving air flow
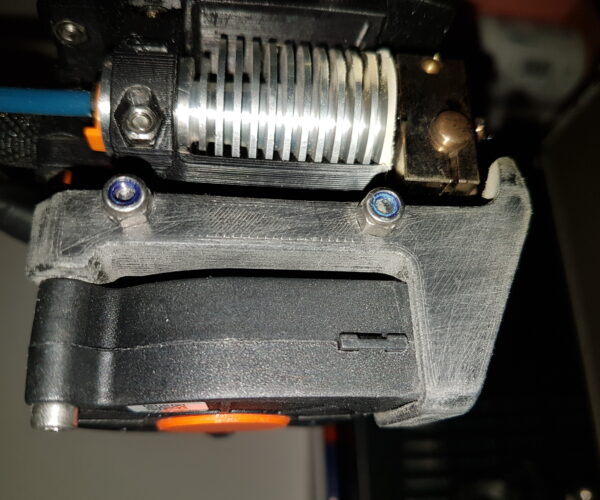
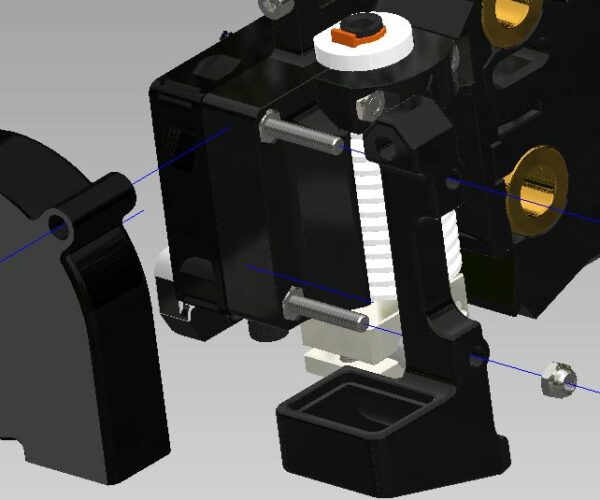
I mounted a 2nd fan on my Mini some time ago. However, the hotend was replaced with an E3D V6 (MK3) variant. It looks like this and works properly:
(printed with temperature resistant carbon nylon)
If anyone wants to rebuild or test it, I would share the data.
wbr,
Karl
Statt zu klagen, dass wir nicht alles haben, was wir wollen, sollten wir lieber dankbar sein, dass wir nicht alles bekommen, was wir verdienen.
RE: 2nd fan power source connection
That looks pretty slick!! my biggest question is about how would you connect the 2nd fan to the power source?
And how much does the new hotend improve printing?
RE: 2nd fan power source connection
At least I have no problem with clogging and the air is better circulated, which can affect the quality of the print results. You don't have to, but you can do the changes.
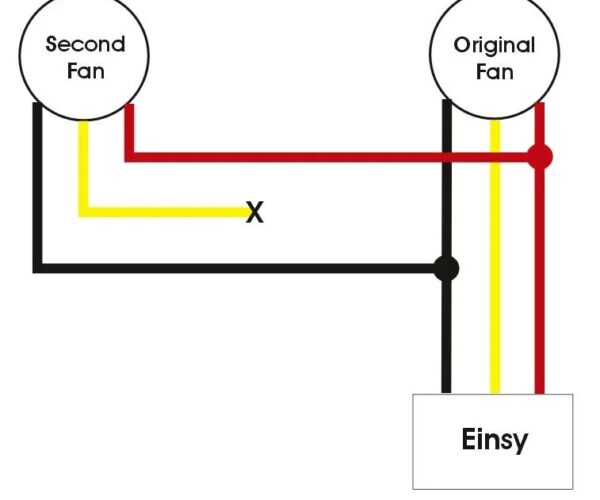
Fan connection schematic:
(Connection scheme on the example of an Einsy, was also implemented in the Mini in this way - only one tachosignal).
wbr,
Karl
Statt zu klagen, dass wir nicht alles haben, was wir wollen, sollten wir lieber dankbar sein, dass wir nicht alles bekommen, was wir verdienen.
RE: 2nd fan power source connection
ok thanks for this, but then how is it actually connected? soldered? I don't have that kind of equipment if that's the case... but is there another way?
I would like to test you build if I can as well? what material did you print your components in?
RE: 2nd fan power source connection
No, I did not solder anything, but used Molex connectors. To mount the Molex connectors you also need special tools, which are very expensive. Best you look that you find a Y-connector, something like this: 3pin-Y-Molex
I printed the complete hotend parts out of ASA (PETG also would work), the holder for the additional front fan out of heat resistant carbon nylon.
wbr,
Karl
Statt zu klagen, dass wir nicht alles haben, was wir wollen, sollten wir lieber dankbar sein, dass wir nicht alles bekommen, was wir verdienen.
Picture of issues
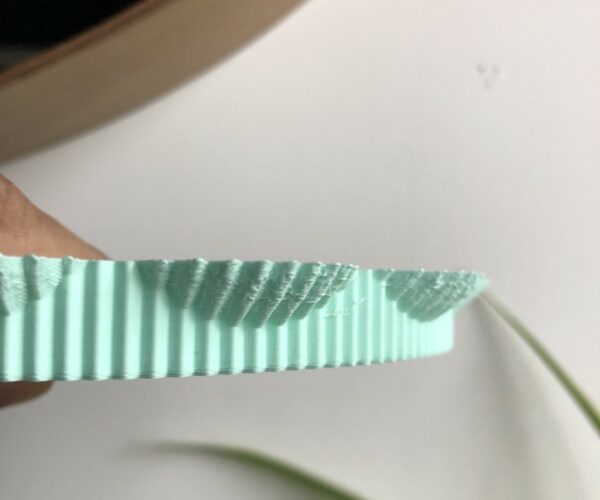
Thanks for you help.. just to show you... this is the overhang issue that im trying to solve!! any tips?
and here is the 3MF file if you want to have a go?
Print Settings Ive been using
The settings that I use for this is: 0.6 Nozzle - 1.1 Extrusion width - 1.1 Extrusion multiplier - 0.2 Layer height.
But ive also bee playing with these settings and flow rate (100-90), Temperature (215-190), Layer height (0.1,0.15,0.2) but still no luck yet!!
with PLA and overhangs you want to go full fan and slow. PrusaSlicer is not really good (yet?) for that unfortunately. the only solution would be to go real slow on external peremeters. like 10-5 mm slow. This will probably take forever to print.
You can use Cura with its overhang tweaks in "experemental" section. I go with 30 for "overhang wall angle" and "overhang wall speed" about 33%, but it really depends on your external wall speeds. This way it only slows on overhangs and keeps the rest of the print fast.
There are a ton of other things which you can tweak but usually you start with "blow and slow" and see how it goes
There is also cura master which has the overhang speeds feature tuned even better.
When connecting two fans use this connector
Noctura makes a Y-cable for the purpose of connection two fans to one connection. The second fan does not have the speed signal wire connected.
https://www.amazon.com/gp/product/B00KG8KCK4/ref=ppx_yo_dt_b_search_asin_title?ie=UTF8&psc=1
Fan connector
That would be perfect.. thanks for that.. sadly they don't make/sell them in Europe!! the shipping costs are crazy!! are there any brands who are based in UK/Europe?
RE: Splicing cables, ghetto style
This is probably sacrilege to the bright maker community here, but you could go the automotive car stereo wiring route - just splice wires together in parallel. Eg. You use a cable stripper or wire cutters (some people have used teeth before) to take the plastic shielding off the cable anywhere along the mid section. Twist the second fans wire around the exposed copper, and either solder or just tape/shrink wrap it. Atleast to test it, then solder or do a proper job later.
One of the people on thingiverse or prusaprints spliced wires together directly. I believe their reply title was "why not have both?" Or similiar
They also sell quick connects and cable splicers on AliExpress for dirt cheap!
Also that overhand doesn't look TOO drastic. I've made similiar with petg though I'm not too experienced, I'm surprised that PLA is looking like that. I've been printing drawer dividers that angle out like that before going directly up into a box. I've succeeded by slowing down to about 20%, maxing fans and increasing flow from 95% to 100. YMMV
