Enclosure plus MMU3?
Just an off the wall question for potential purchase. I've only ever seen pictures of a single spool mounted inside the enclosure. How would the enclosure work with the multiple spools for the MMU? I don't think they would all fit inside the enclosure. Modify it and replace the top with a bigger box maybe?
RE:
I was looking this exact same info myself. I'd love to know if MMU3 will work with the MK4 with enclosure we have already placed an order for? For me it wouldn't matter if filaments are outside the enclosure, but there needs to be means to feed them.
RE: Enclosure plus MMU3?
Check out Prusa's blog on dryboxes. They have pictures showing 5 dryboxes feeding an MK3 without an enclosure. But scroll down a bit and they've got a picture showing a printer inside the enclosure. Looks like they just drilled 5 holes in the plastic on the back of the enclosure and fed the Teflon tubes into the enclosure that way.
Should be very easy to do, but note that drilling clear plastics often can lead to cracking, if you are not careful. I have only drilled acrylic before though, the PETG panels of the enclosure may be less brittle. Generally sharp drill bits, high speed, low pressure, and drilling with the plastic securely held on a flat piece of sacrificial wood that supports it are general techniques for drilling clear plastics.
RE: Enclosure plus MMU3?
I guess that makes sense, the filament inputs are in a fixed position on the MMU, so nothing needs to move around. They do make special drill bits for plastic (especially acrylic), so investing in one of them might be worth it to be doubly sure nothing shatters.
RE: Enclosure plus MMU3?
There is no need to drill through the plastic of the enclosure. There are 4 possible entry points:
- Left/right cutouts of rear acrylic
- Top panel rear
- Top panel mid
Each of these options has a printable piece not included with the enclosure itself, so it's up to you to figure out which to actually use. The rear option pieces are included in the liftable-top modification model group, so that's what I've installed in mine for the time being -- not for MMU PTFE routing, but for general USB cable access for webcam/printer to the raspberry pi.
If you were going to use an external solution like a RepBox or other drybox options, then that would normally be the top-rear option that would be used, as you could mount the filament box above the enclosure and just run the PTFE tubes straight down to the MMU with minimal length/bending.
I will mention, the enclosure manual does have instructions for using that damn official buffer, with new printable pieces to attempt to fix a few things with it. I can't endorse it in the slightest unless you have the patience of a saint.
RE: Enclosure plus MMU3?
I forgot to post a link: https://blog.prusa3d.com/dryboxes-and-alternative-spool-holders-not-only-for-multimaterial-upgrade_30525/
I'm planning on building some of the Prusa printable dryboxes. I would have already but I cannot print them on my MINI, it's too small. So once I get the MK4 I will.
RE: Enclosure plus MMU3?
Here is my setup with mk4 and mmu, spools and buffer mounted outside. Printed models with 1200 changes zero interventions
RE: Enclosure plus MMU3?
do you have the stl loaded for this? it looks like the only reasonable option I've come across. TIA
RE: Enclosure plus MMU3?
I would recommend print this: https://www.printables.com/model/273426
When I had MK3S+ with MMU3, I have spools sitting on shelf just above enclosure and feed through filament buffer that was mounted under shelf. The feed goes through in the back of enclosure using grommet (included in above link) to MMU.
No picture since I have taken down mounted buffer and I upgraded my MK3S+ to MK4 last weekend. I plan to add MMU3 to my new MK4 shortly.
RE: Enclosure plus MMU3?
We have a MK4 and recently added the MMU3. We had the MK4 housed in a two-story lack enclosure but found that the height was a bit tight with the added MMU3. A few modifications to the upper story and we ended up with the enclosure shown in the pictures. The printer sits in the upper story, the filaments and buffer in the lower. So far this has been working great. The printer sits in the office of a dusty woodworking shop so it is helpful to have the filaments protected. The boxes on the top control the lights and the fan timer.
 Two story plus drawer encloser for MK4 with MMU3 and filaments
  Power box sits on a shelf in the lower part of the enclosure.
  Back of the enclosure. The filament tubes feed through holes in the floor of the 2nd story.
  The buffer sits on a shelf above the filaments
  Filaments enclosure and accessories drawer
  Switches and timer to control lights and fan
RE: Enclosure plus MMU3?
Not sure what happened to the pictures that were supposed to accompany my comment so I'll try again.
RE: Enclosure plus MMU3?
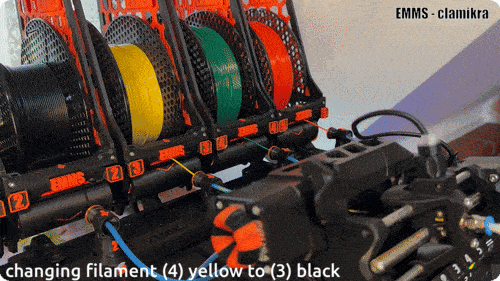
https://www.printables.com/model/914116-external-mmu-mounting-system-emms-for-original-pru
I made a system with autorewind spools for Original Prusa enclosure, MK4(s) and mmu3. Spools are placed without any modification on the carriers outside the OPE and all components are easily accessible!
runs without issues for almost a year now.
download and instruction are on printables for free (see link above).
