Easiest way to figure out custom build colors?
I figure it's time to print off custom color MK4 parts for my MK4 kit, so it's done before I get the kit. What's the best way to figure out what parts go where so I can plan the colors? Doesn't look like the assembly instructions are released yet.
I suspect I can probably figure things out by looking at the names and comparing it to pictures of the printer.
Another option is I simply print all parts twice, first in one color then in the other color. Then when assembling the printer I can mock up different colors and see what looks best.
Background: I got my MINI+, my first printer, earlier this year. I got the kit version, and later saw cool custom color printers, but I didn't have a desire to undo the 6+ hour build merely to change the color of the printer. So, with the MK4, now that I already have a printer, I will print off all the MK4 parts before I get the MK4, and put it together with my own color scheme parts during the original build.
I'm going to go with purple and yellow. Just ordered a roll of purple and yellow from Atomic filaments. First time with Atomic, been using Prusament and Jessie so far, but neither had purple or yellow that I liked.
Printers printing printers! Back in ~2009, I thought about building a rep-rap, but never did. This is pretty much the same concept. I think it's pretty cool.
Best Answer by szara:
I am printing the 8 parts that are visible in the pictures of the Mk4. They are:
Two Z-Axis (Bottom-Right & Bottom-Left Motor Mounts)
Two parts: X-End-Idler & X-End-Motor
Two COPIES of the X-End-Clip (for the X-Ends Idler and Motor)
Two parts: Z-Axis-Top-Right & Left
I'm printing these in White PETG, and also in Black, before my kit arrives. I believe the rest of the Mk4 parts are printed by Prusa in black already.
RE:
There is a user on Printables who has figured out the black parts and the orange parts. That is for the upgrade parts, I see, but probably enough to get you started. 🙂
RE:
I am printing the 8 parts that are visible in the pictures of the Mk4. They are:
Two Z-Axis (Bottom-Right & Bottom-Left Motor Mounts)
Two parts: X-End-Idler & X-End-Motor
Two COPIES of the X-End-Clip (for the X-Ends Idler and Motor)
Two parts: Z-Axis-Top-Right & Left
I'm printing these in White PETG, and also in Black, before my kit arrives. I believe the rest of the Mk4 parts are printed by Prusa in black already.
RE: Easiest way to figure out custom build colors?
There is a user on Printables who has figured out the black parts and the orange parts. That is for the upgrade parts, I see, but probably enough to get you started. 🙂
Thanks. Looks like they took some liberties and added a few more parts that are not orange in the MK4 pictures. But it is a useful starting point.
I am printing the 8 parts that are visible in the pictures of the Mk4. They are:
Two Z-Axis (Bottom-Right & Bottom-Left Motor Mounts)
Two parts: X-End-Idler & X-End-Motor
Two COPIES of the X-End-Clip (for the X-Ends Idler and Motor)
Two parts: Z-Axis-Top-Right & LeftI'm printing these in White PETG, and also in Black, before my kit arrives. I believe the rest of the Mk4 parts are printed by Prusa in black already.
Thank you! Doing comparison with the orange parts file from Printables above, and your list, I can see your list matches the photos.
I feel like it's hard to decide what parts I really want to be yellow, and which purple. As a starting point, I'm going to do the ones Prusa prints in orange as yellow, plus the knob. Not sure why on the MK4 they made the LCD knob and case black. On my Mini, the LCD case is orange and the knob black.
Anyway, I'll then do the rest of the part in purple. And if I decide when I'm putting it together that some of the purple parts should be yellow, or some of the yellow purple, I can print off those individually on my MINI at that point.
But this will at least get me a starting point, without printing everything twice. There's no issue with that, I'd just prefer to not waste filament on something that will never get used. If I needed a spare part, that would be a great way to do it. But you can't order the MK4 kit without printed parts, so I'll already have black and orange parts as backup parts in case one part ever breaks.
Plus, I'm still undecided if I'm selling my MINI or not. Original plan was to sell the MINI, but could be useful to have two printers. Especially if I set up the MINI with a 0.25 mm nozzle as a "dedicated" miniature and small part printer, and use the MK4 for regular and large parts...
RE: Easiest way to figure out custom build colors?
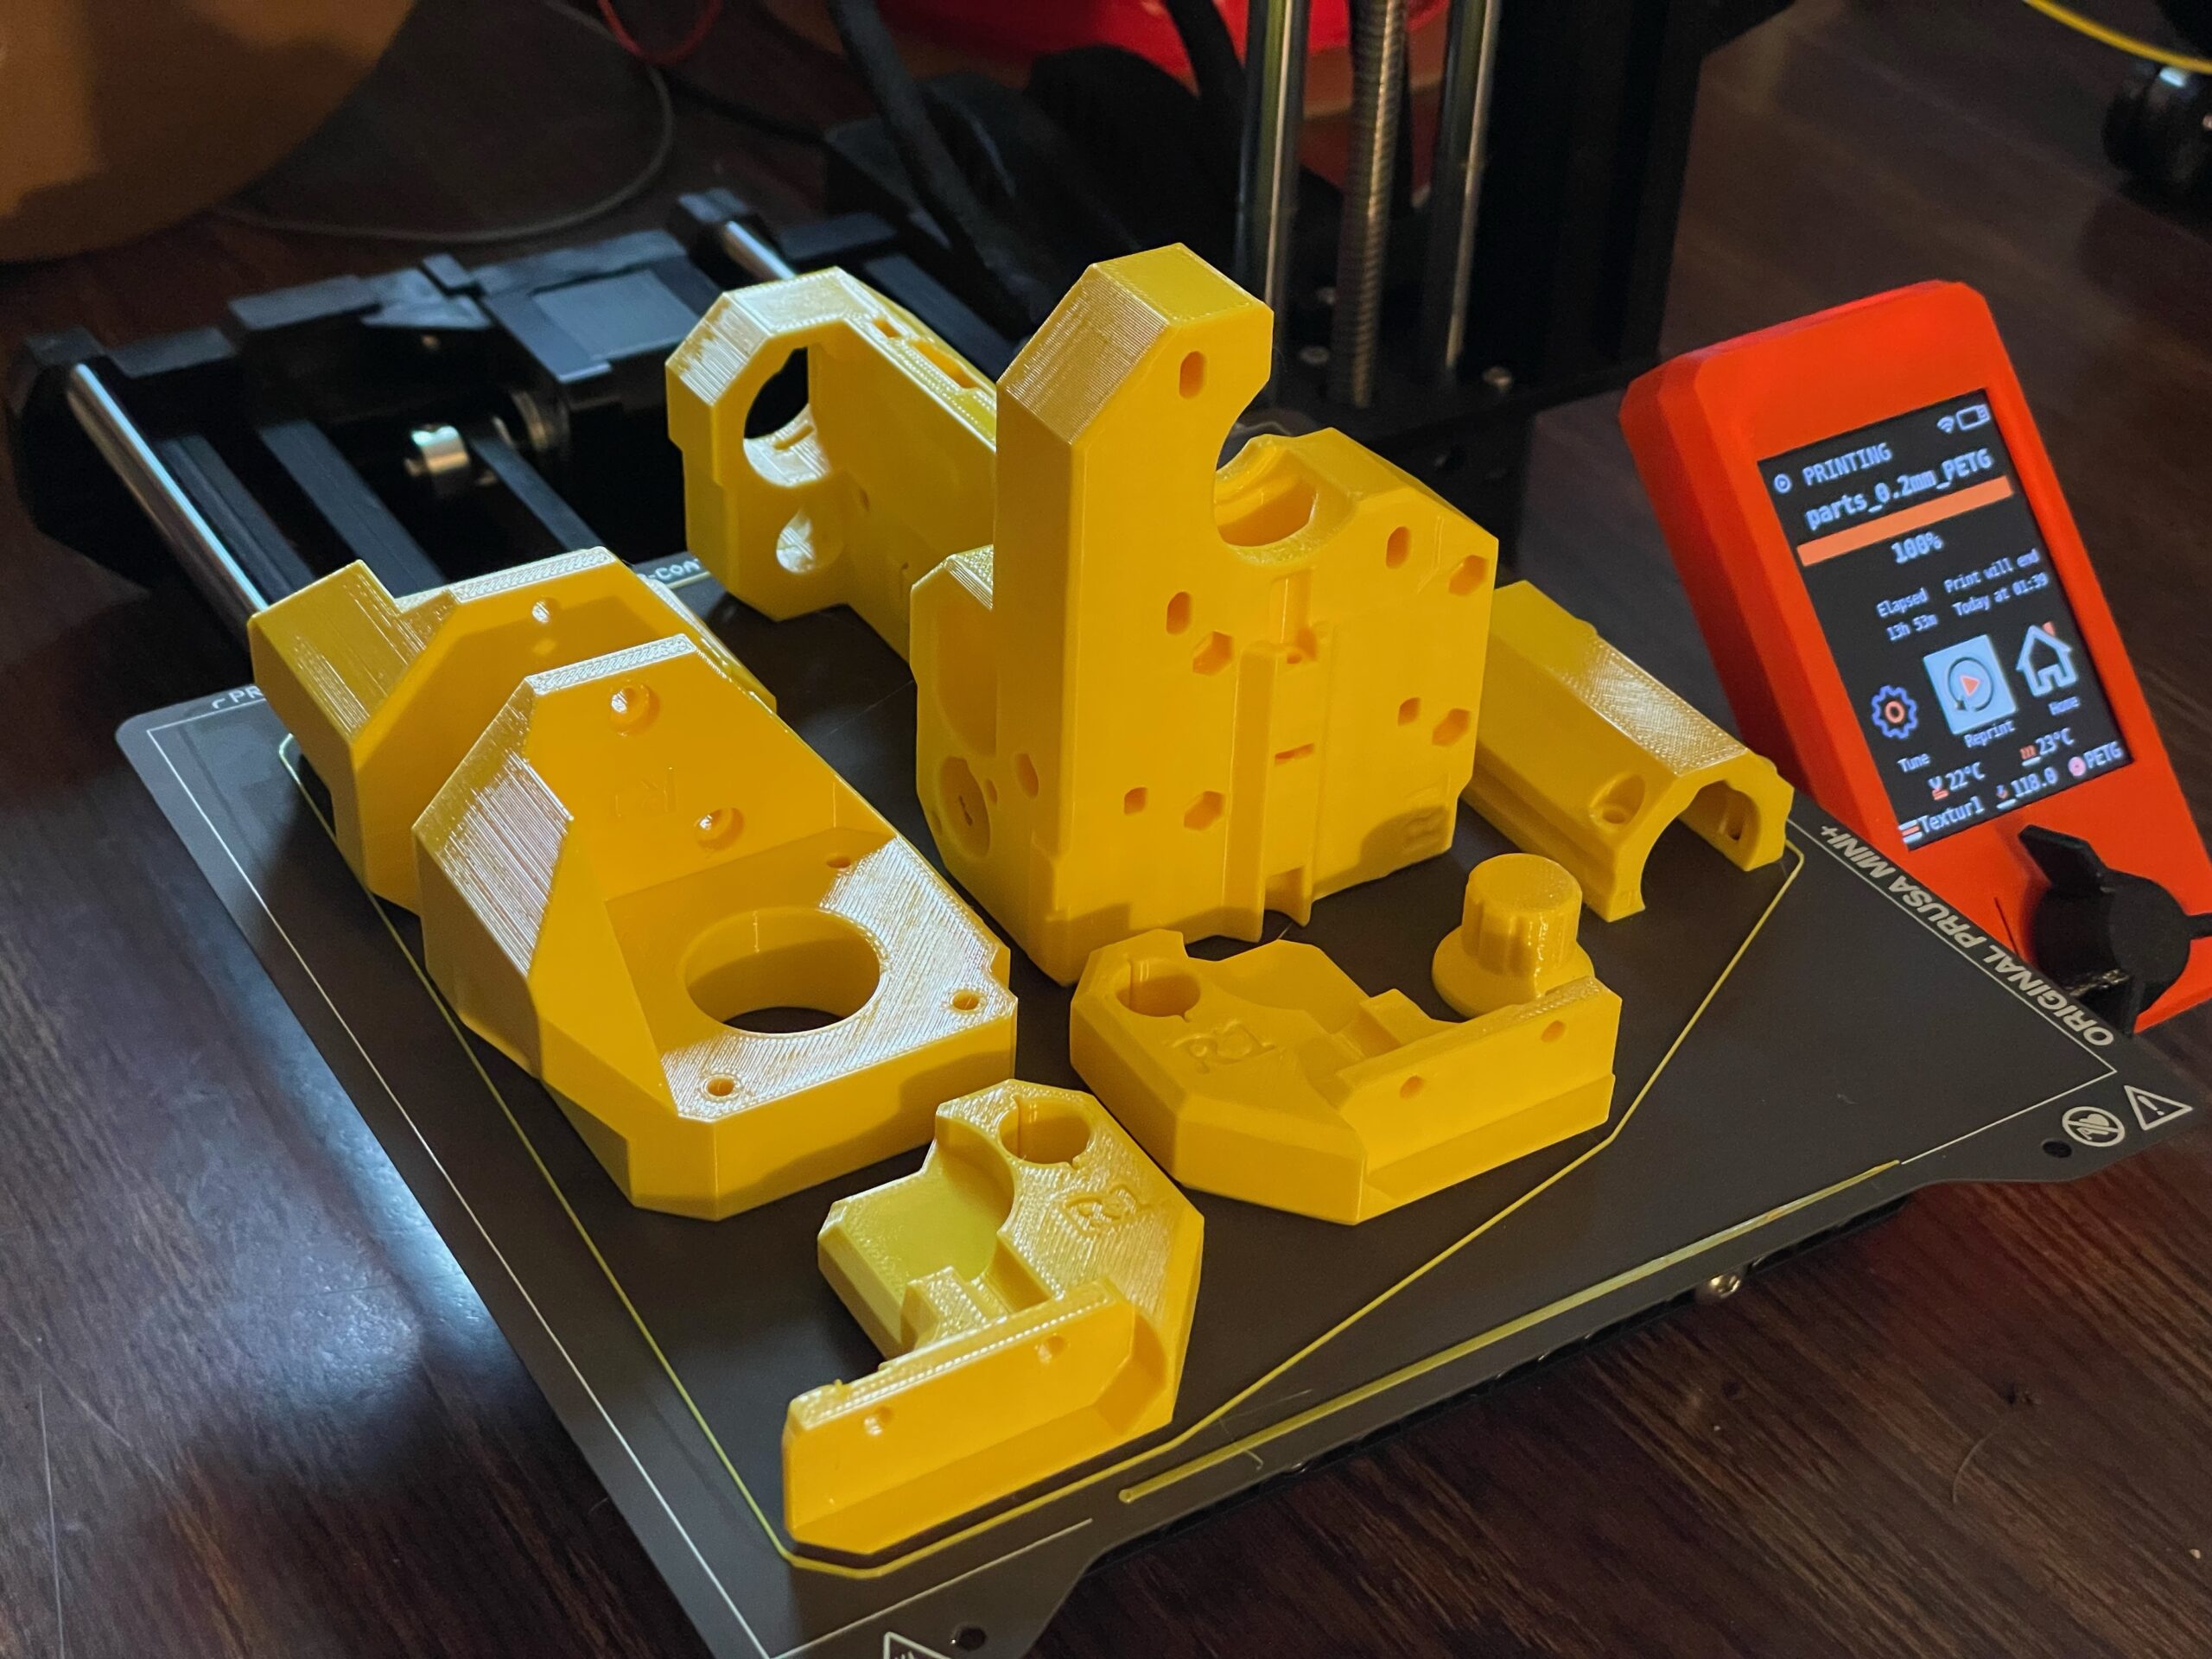
And there we go. Batch 1 of 5 for MK4 parts. Well, except any parts that need to be printed more than once, like the X-end-clip. That one I printed twice, but I don't know if any other parts need to be printed more than once. Or any reprints. Prusa oriented the knob upside right, but I didn't really pay attention to the slider assuming Prusa oriented everything for printing. The knob needs to be printed upside down, so I need to re-print that.
RE: Easiest way to figure out custom build colors?
RE: Easiest way to figure out custom build colors?
I printed everything in Prusament PC-CF. Oh my god, this is the coolest filament I've ever used. And you can have it in any color you like, as long as it's black.
Formerly known on this forum as @fuchsr -- https://foxrun3d.com/
RE: Easiest way to figure out custom build colors?
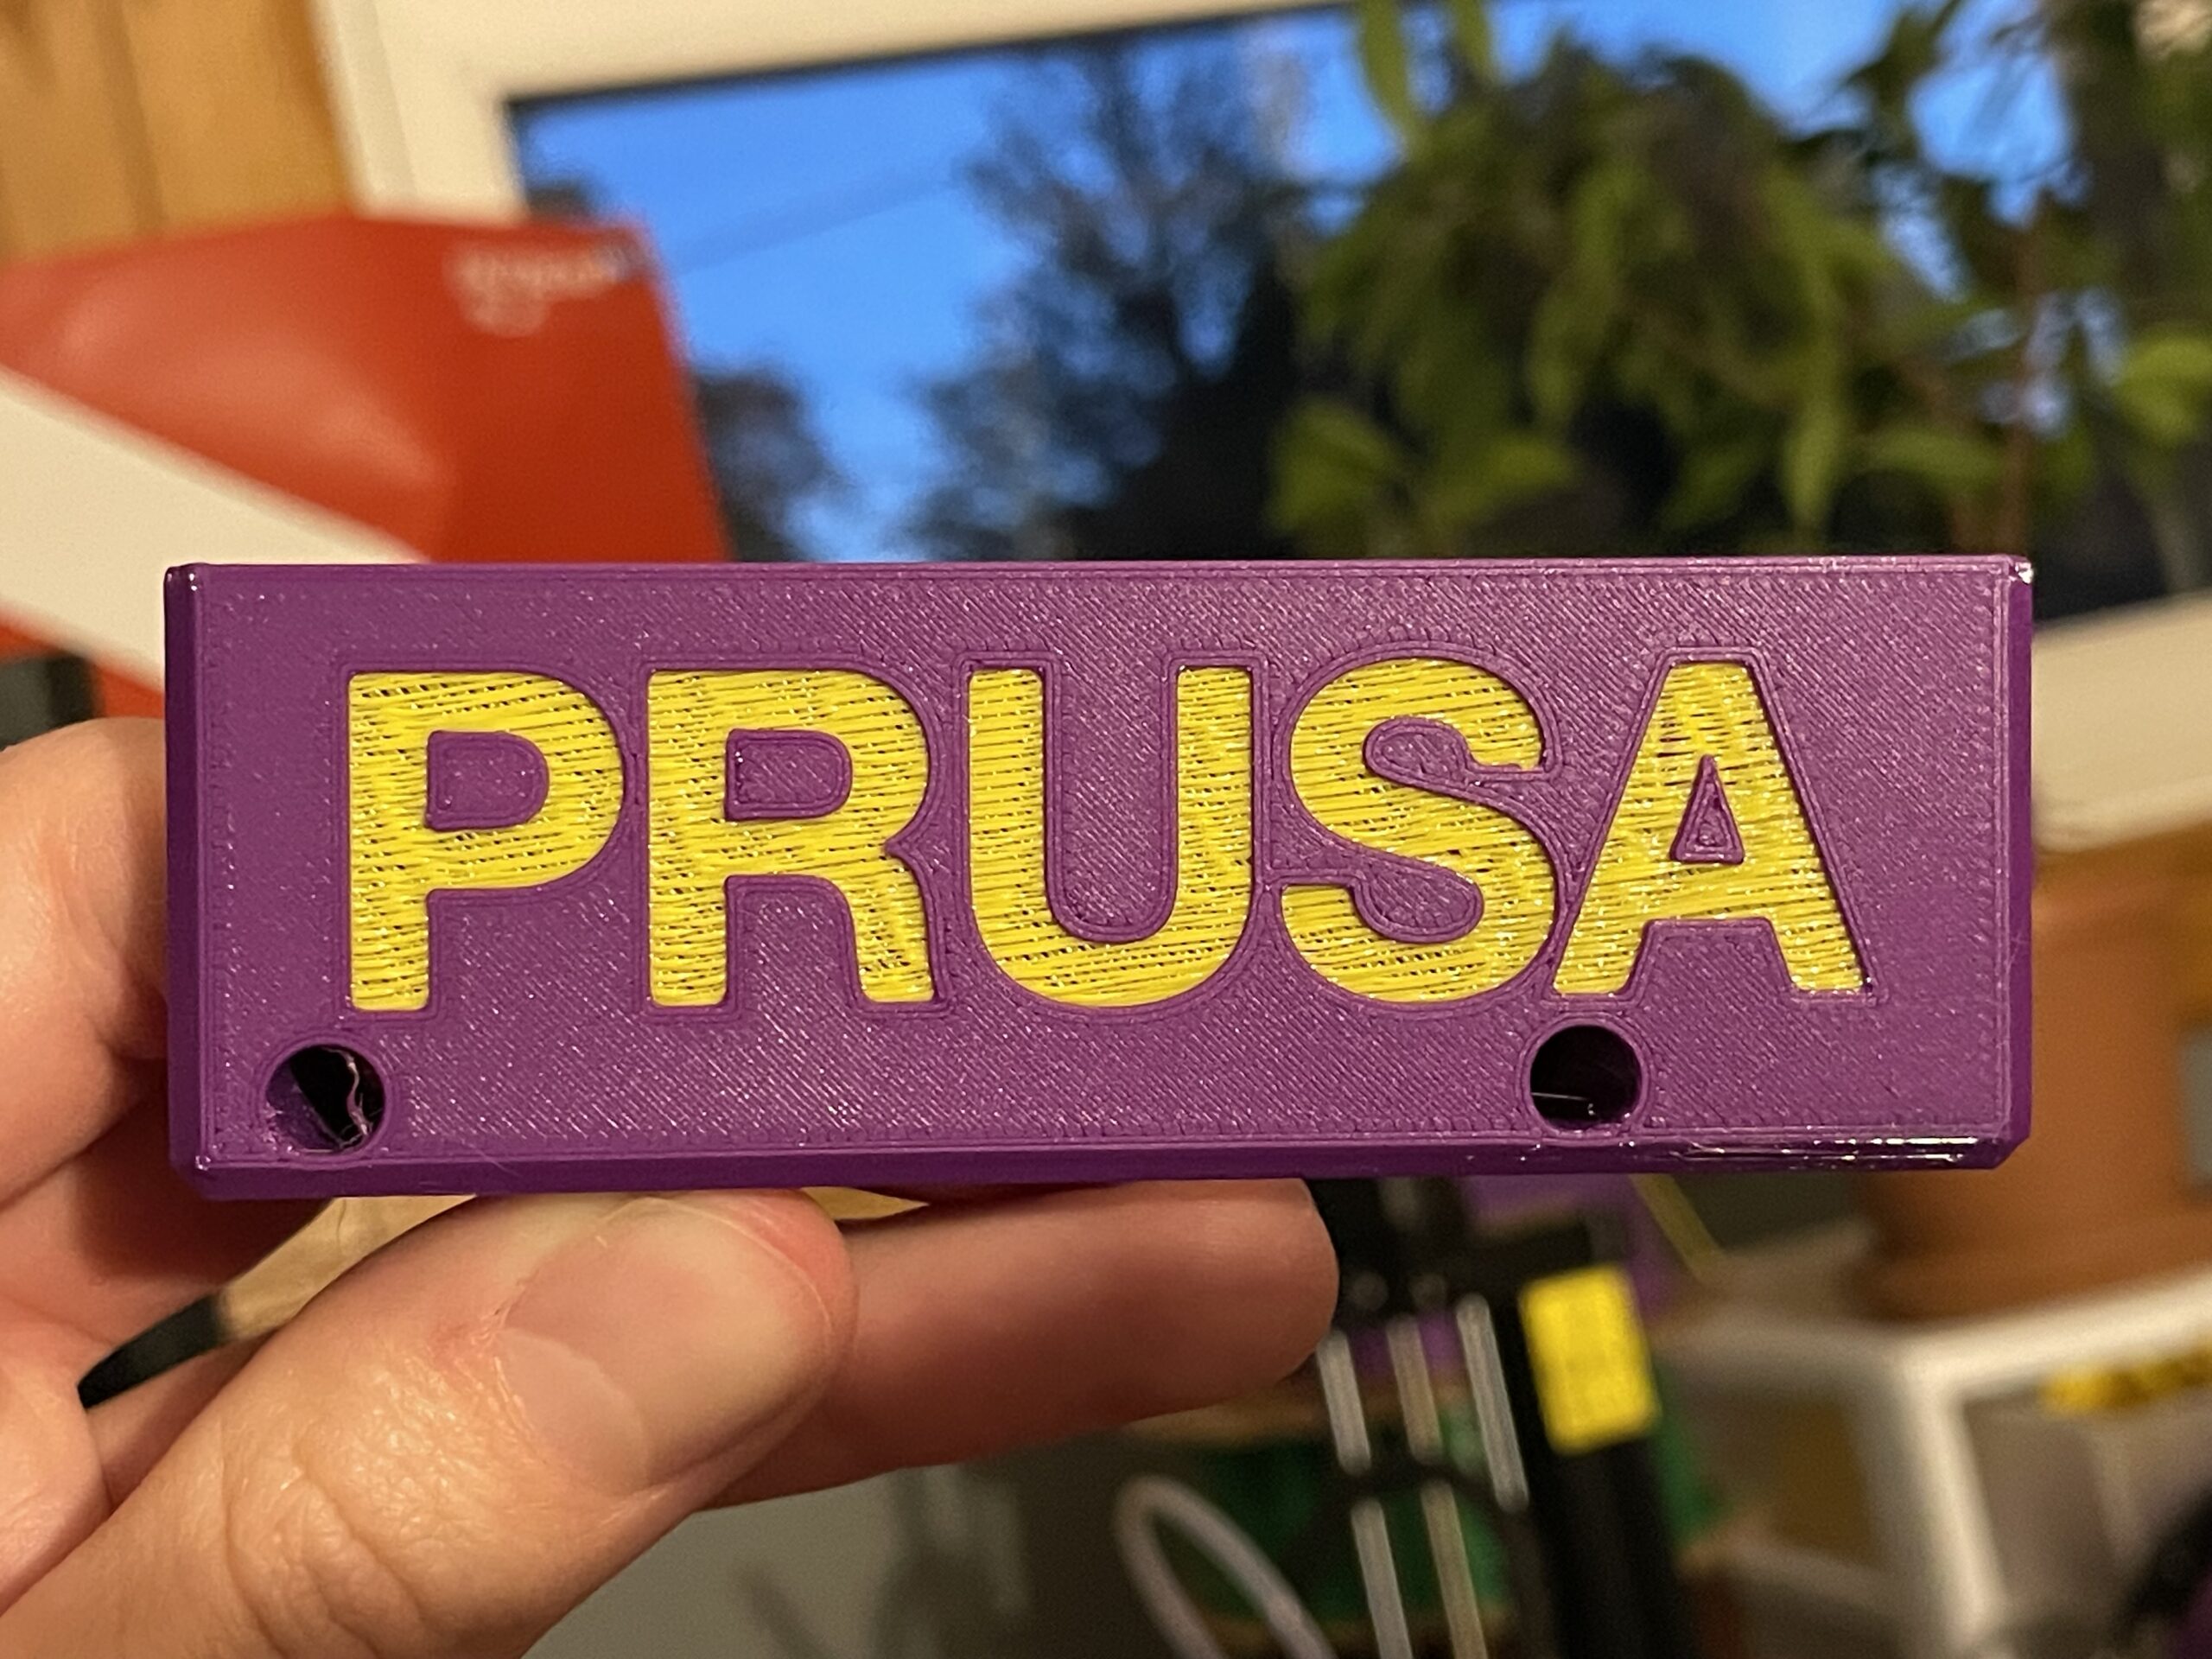
FYI for anyone who wants to dual-color print: 100% set up dual extruders in PrusaSlicer. What I had done in my above picture was manually modify the gcode to insert filament change on the default Prusa part. The text is recessed, with first layer not printed so that a printer printing in one color will make it readable. But there were three main downsides:
- You have to manually add the M600 commands in a text editor.
- You have to swap the filament twice per layer, as without extensive manual gcode editing you cannot have it start the 2nd layer with the same color.
- It doesn't look anywhere near as good as it would if the contrasting color were also printed on the first layer. Due to the bridging, you can see color peeking through in the back and a rough surface.
So, this has been explained before, but for those who haven't done it, my process was:
- Import the STL into FreeCAD
- Overlay a box on the part, covering the inlayed text on the STL.
- Convert box to mesh.
- Use the Mesh workbench, select the text first, then the object, then do the boolean difference. This gives you a mesh of the text.
- Export the mesh as an STL.
- In PrusaSlicer, import the STL Prusa part, and the STL text you made from the difference.
- I had to line the two files up manually in PrusaSlicer (not 100% sure why).
- Go to Printer Settings > General and set the number of Extruders to two, and check the Single Extruder Multi Material box below that.
- Optional: Go to Printer Settings > Extruder 1 and set Extruder Color to match color you'll print that part in. Gives better visualization.
- Optional: Go to Printer Settings > Extruder 2 and set Extruder Color to match color you'll print that part in. Gives better visualization.
- Go to Printer Settings > Custom G-code > Tool change G-code and enter M600.
- Optional, but recommended: Go to Print Settings > Multiple Extruders > Wipe tower and enable the wipe tower. Go to the bottom of that screen and uncheck Prime all printing extruders.
- I list this as optional, because it's not 100% needed, but when I did manual filament changes before, the initial printing didn't flow properly for the first bit of printing. Letting Prusaslicer make a wipe tower will ensure the filament is extruding properly before it starts printing the new color on the actual part.
- Return to the Plater and slice the part, and ta da!
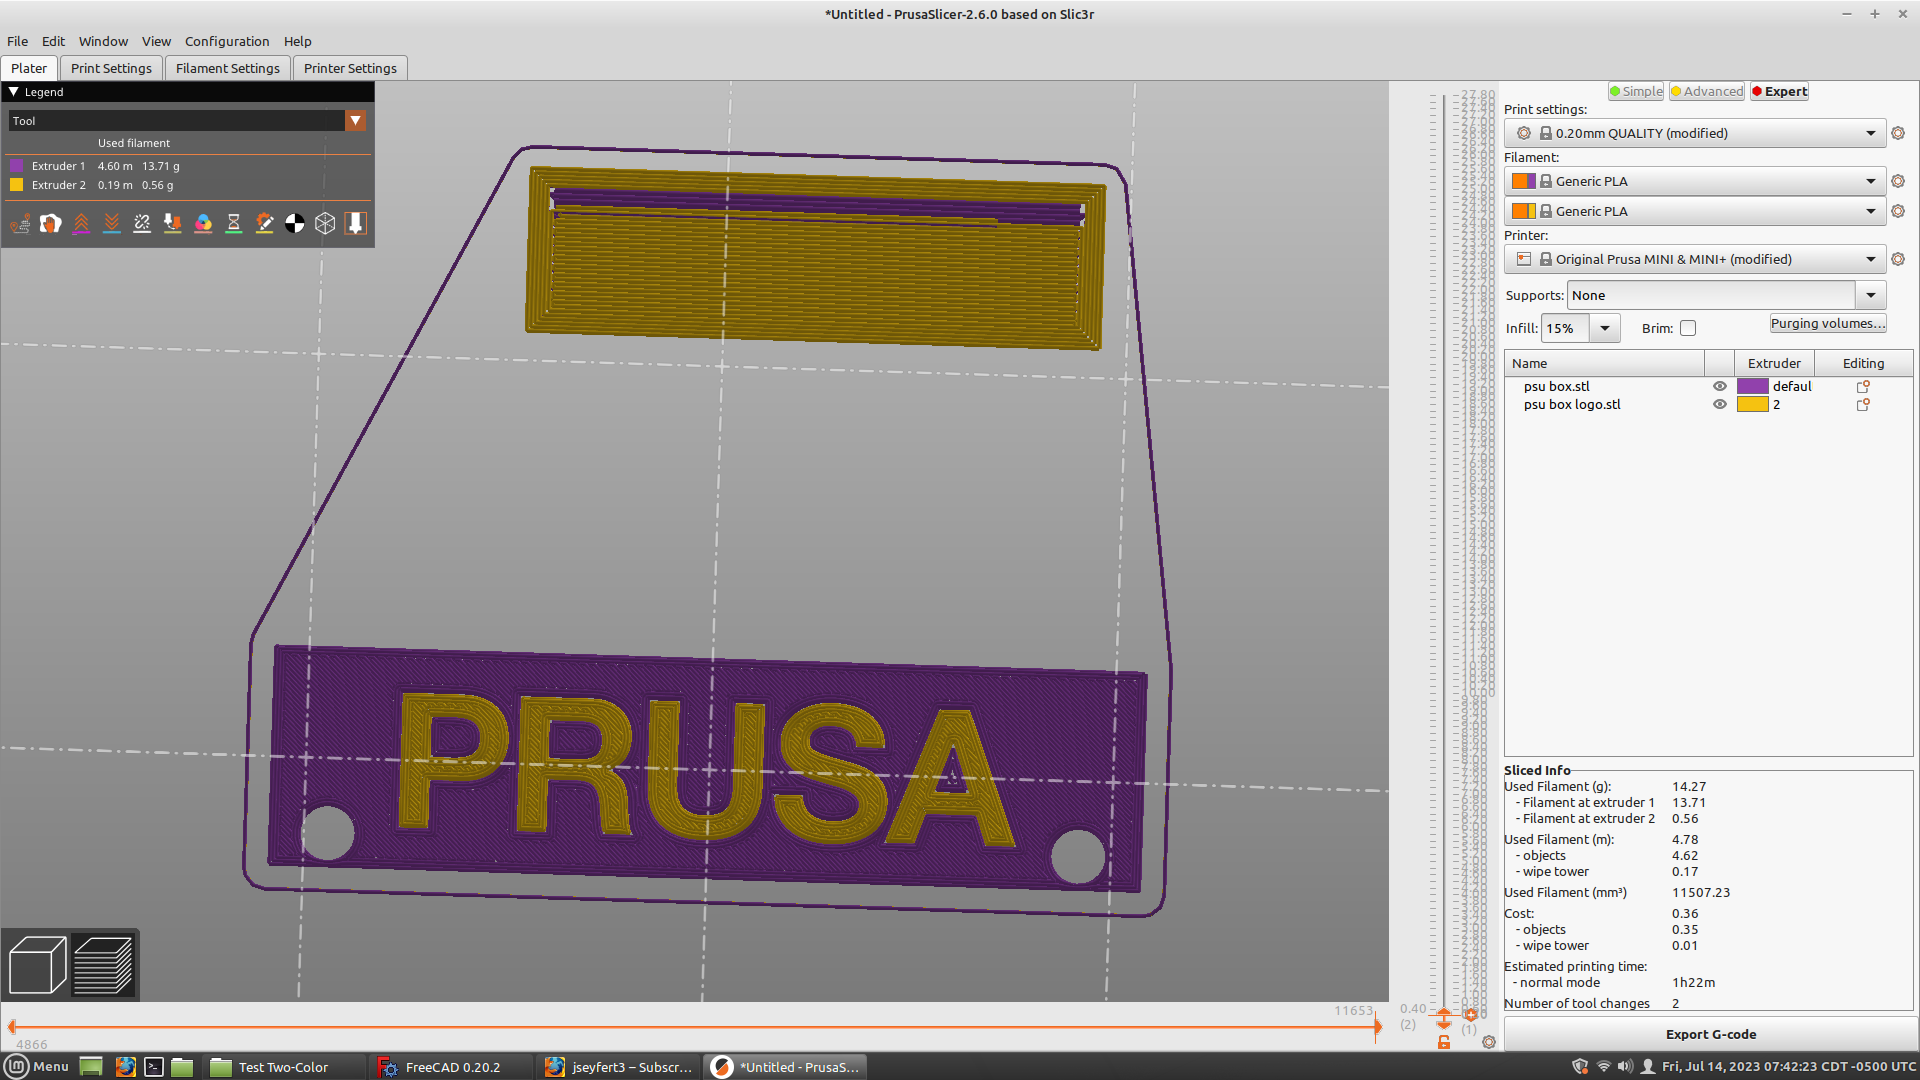
If you look at the G-code preview, you'll see in my below picture that at line 2984 there is a "M600", the filament change command. So after printing the lower part of the PSU cover, it'll put some purple on the purge tower (not sure why, but okay), then it will stop printing and ask you to change the filament, right here.
So after you change the filament, print will resume, and it will print the contrasting text on the same layer, after it prints on the purge block. This is way more purge than needed, since the manual filament change already does a purge, but ah well. Somewhere there's a setting in Prusaslicer that you can use to turn down how much purge is done on the wipe tower.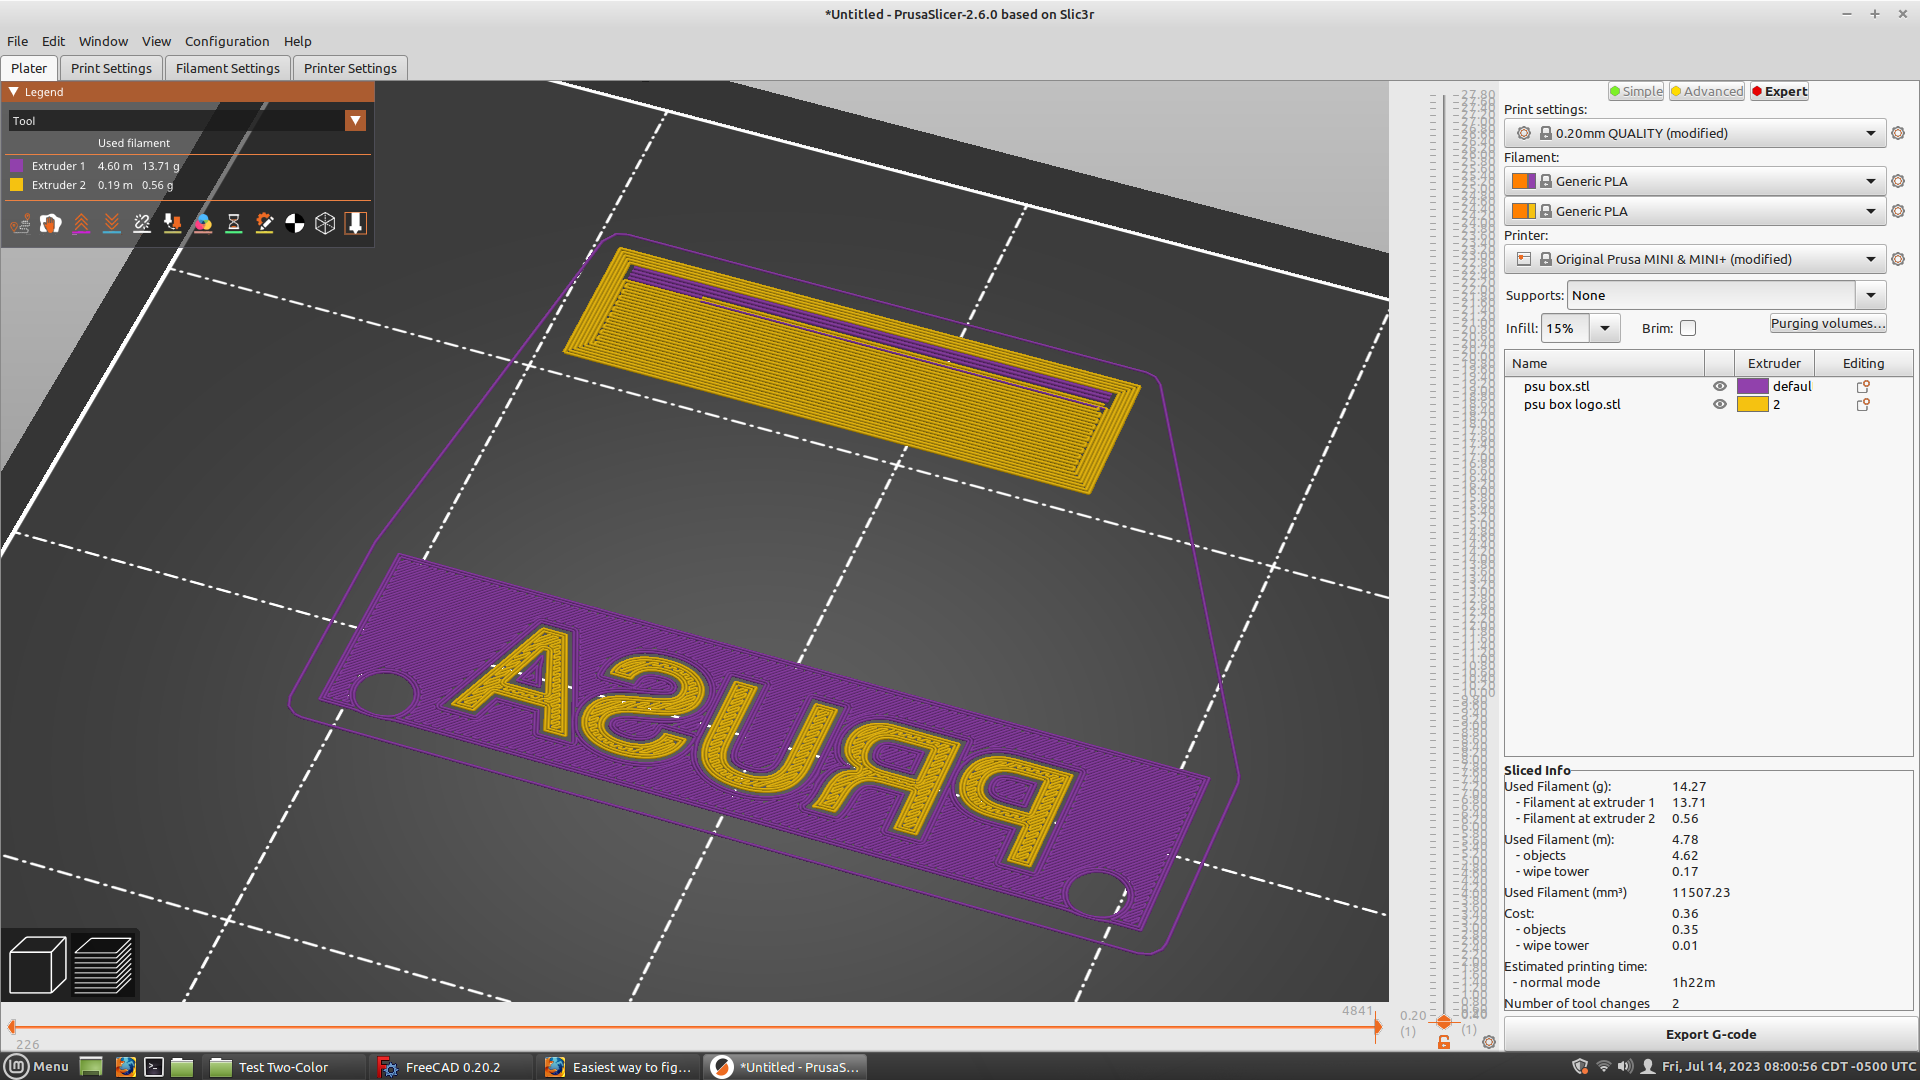
But, the second best part, vs my previous manual G-code editing, is that on layer two, it starts the layer with the same color as it finished layer 1! My manual G-code editing printed purple, switched to yellow same layer, then switched to purple for the next layer, before switching to yellow for the second layer. Two filament swaps per layer, with the PrusaSlicer dual extruder setup I describe it's one filament change per layer. Yay!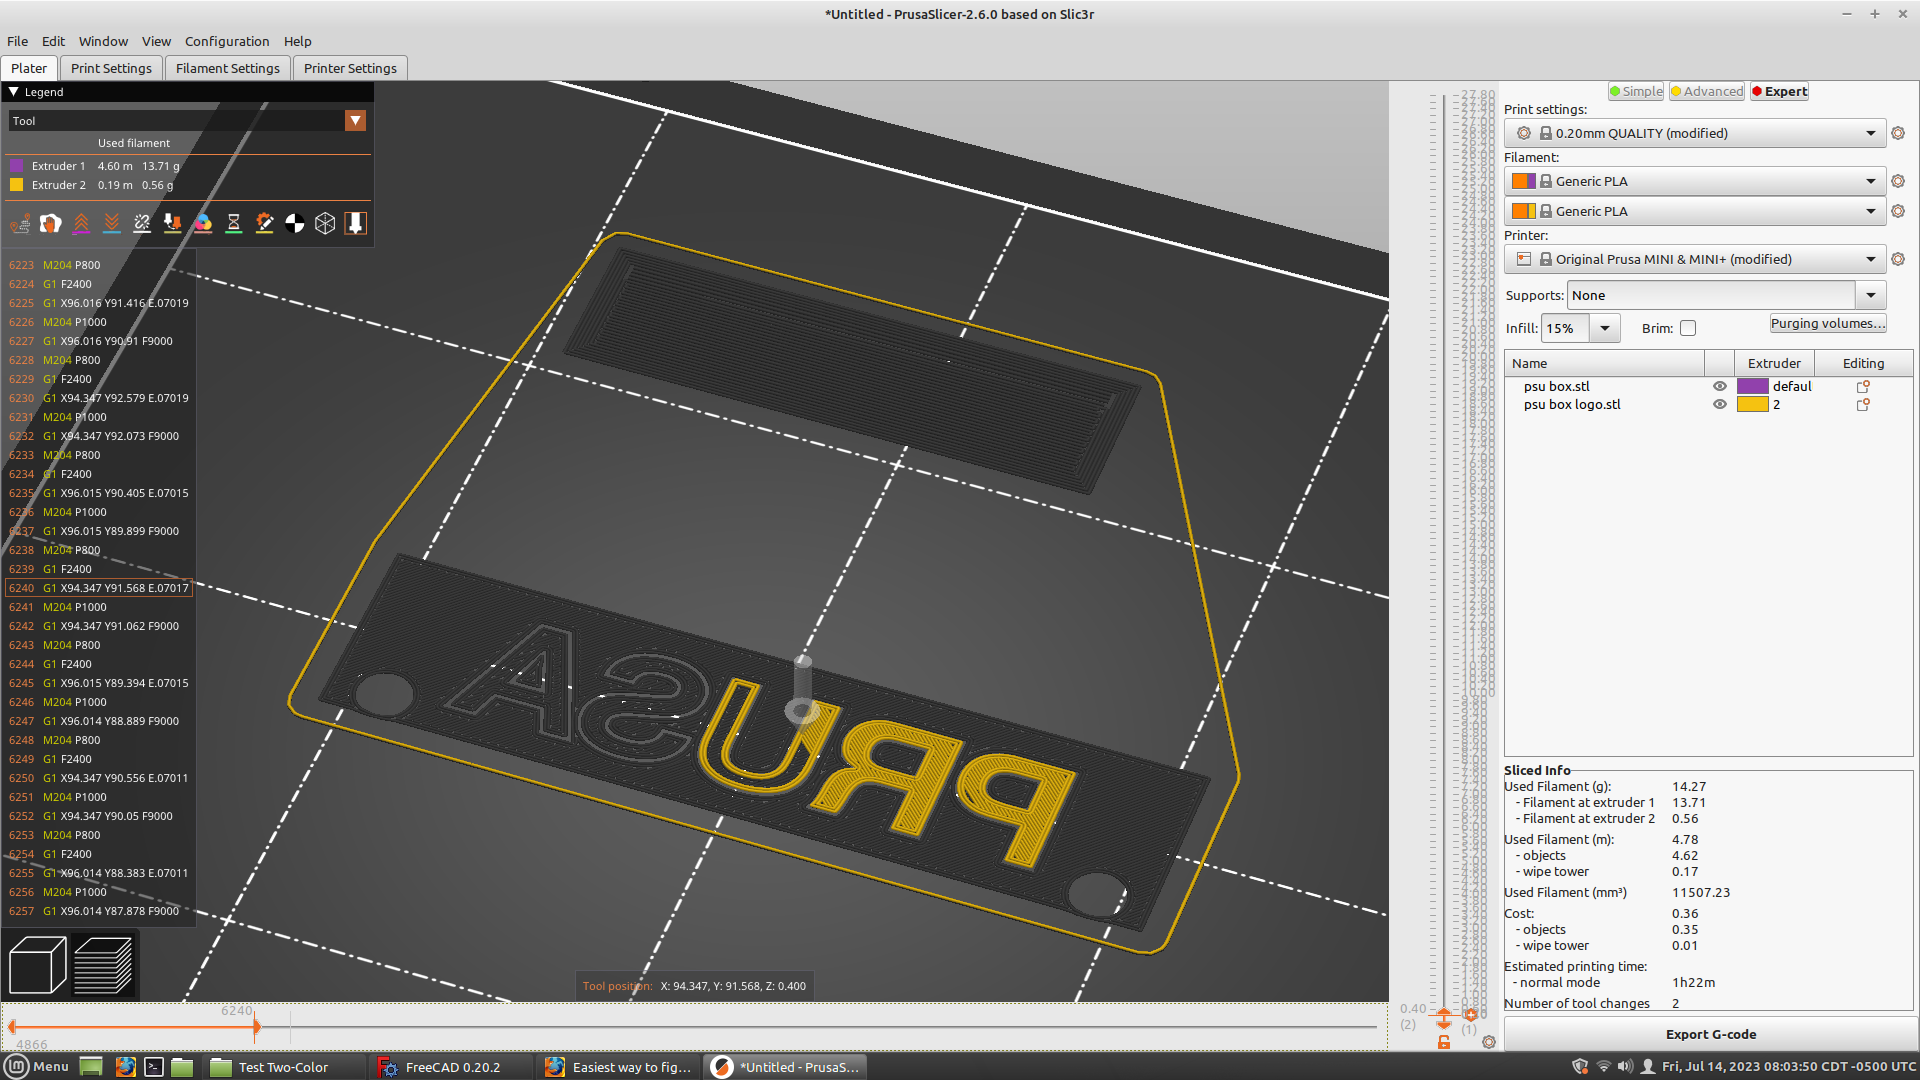
I think you get the idea now, but after it finishes yellow on layer two, it'll prompt for filament change, purge on the wipe tower, and fill in the purple portion of the second layer.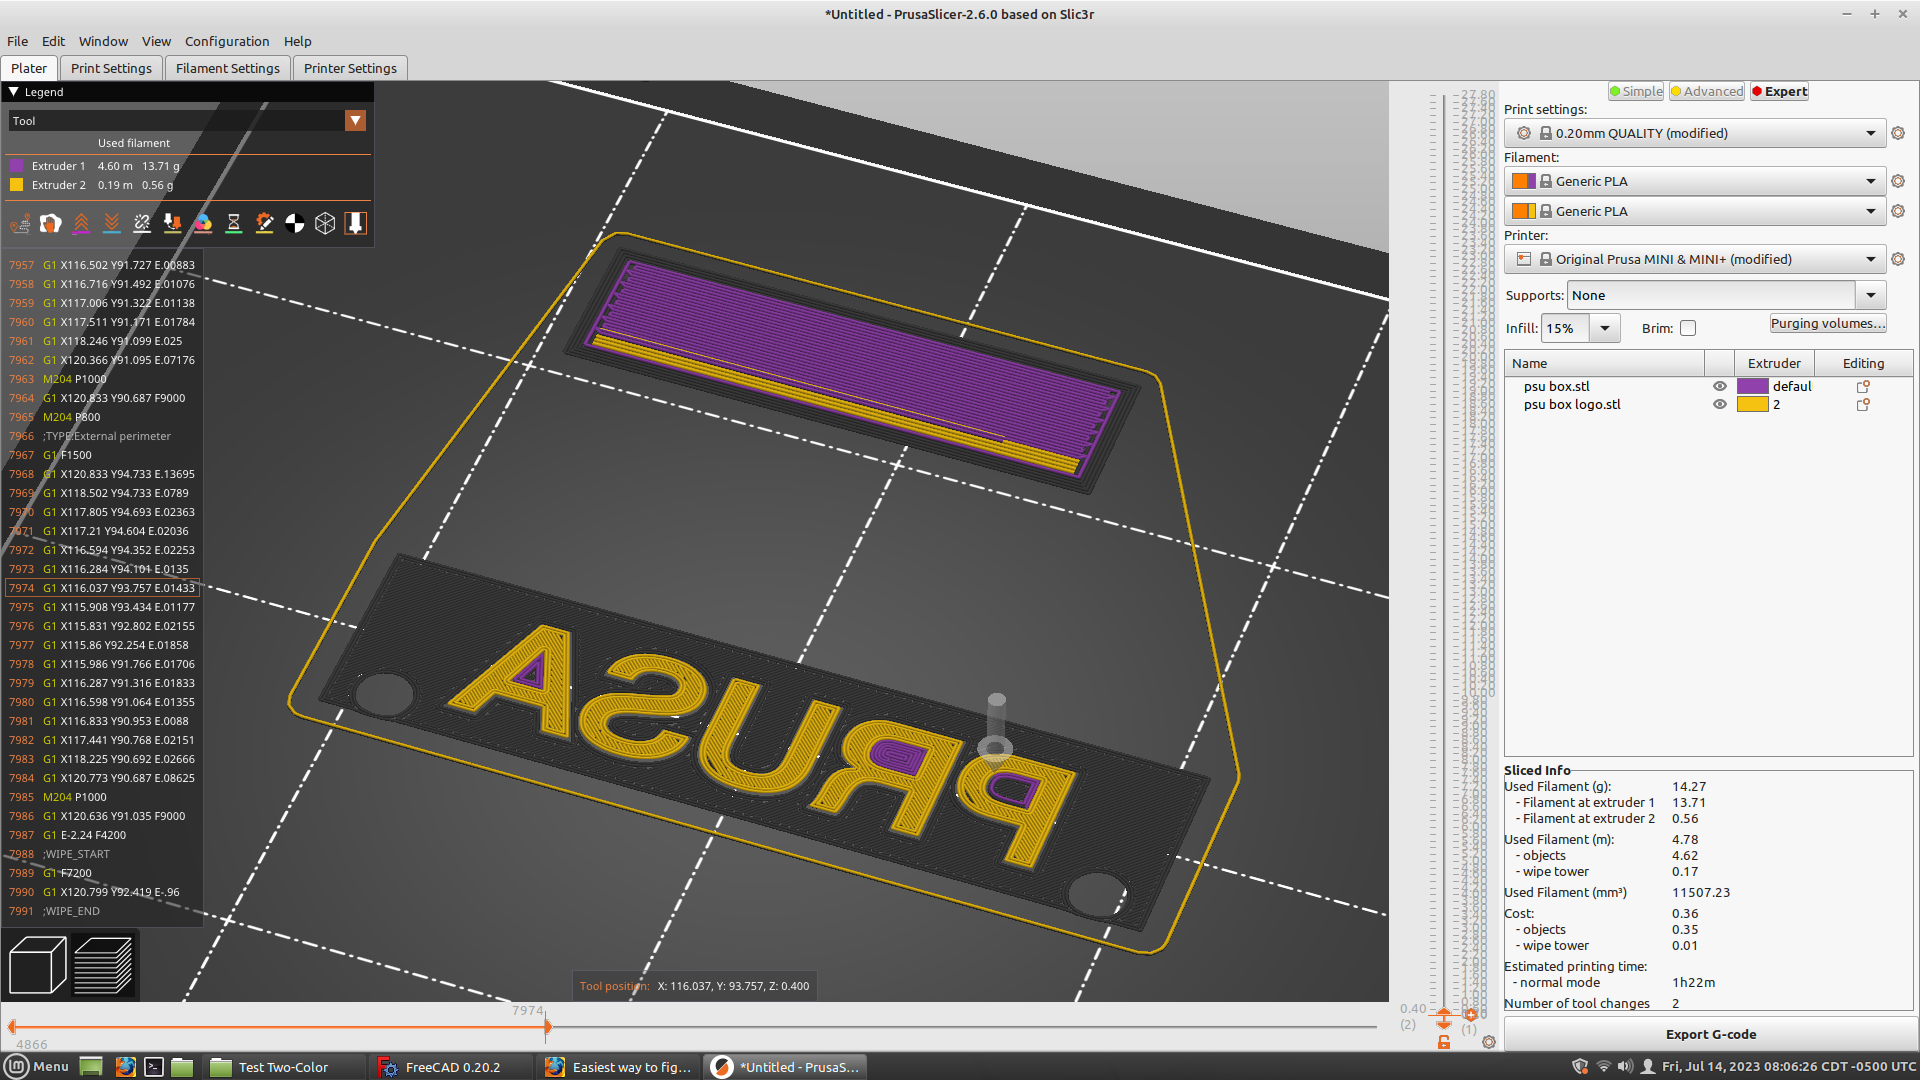
All told, for three layers of dual color, there are 4 filament swaps. And no need to manually edit G-code, PrusaSlicer puts all the filament changes in for you. Only issue I see is for some weird reason PrusaSlicer wants to purge on the last layer, when it stopped using the wipe tower after layer 3! Looks like a bug to me. Probably won't affect the print except having some filament stuck to the top layer that should be easy to peel off.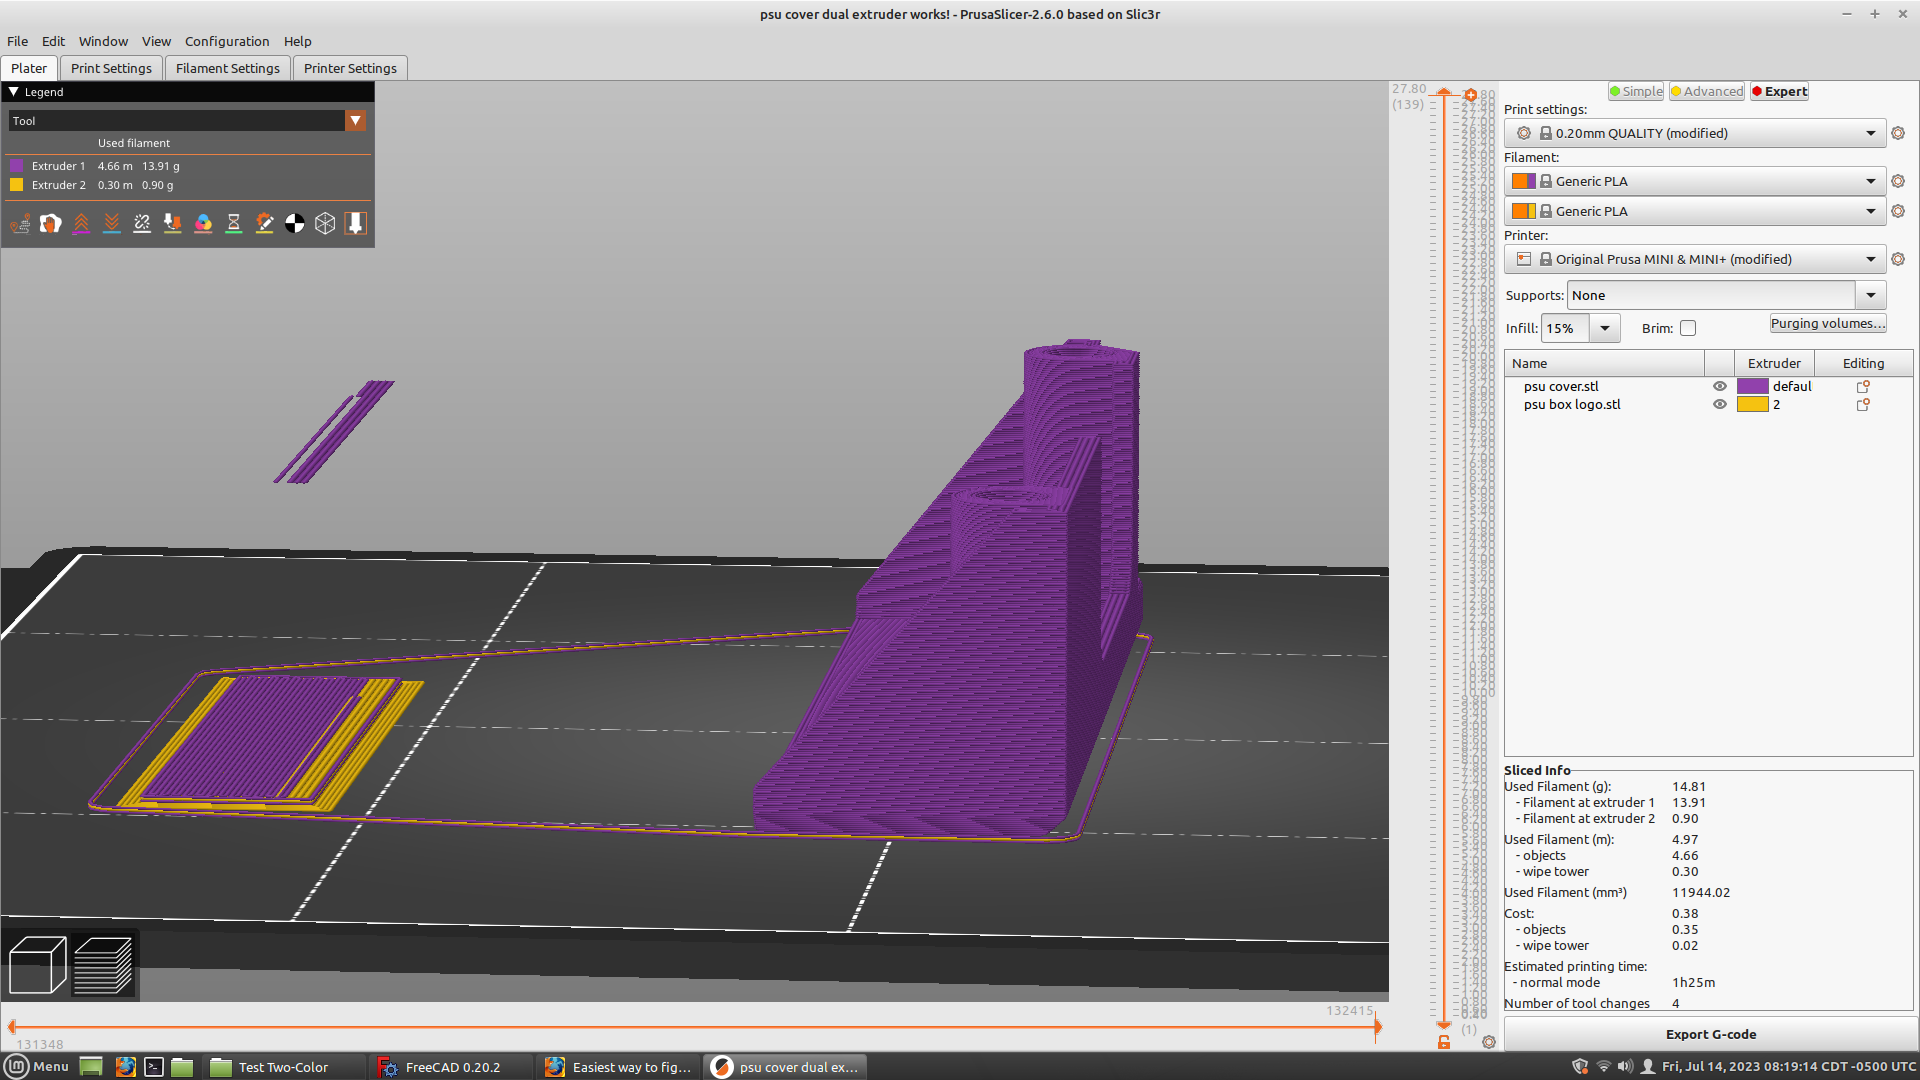
Unfortunately I won't have time to print this until Sunday evening or early next week, but I'll post a picture of the final product, to compare to my first attempt with manual G-code editing and the bridging from printing the Prusa part unmodified.
It's a lot easier to use the Manual MMU method:
https://forum.prusa3d.com/forum/prusaslicer/manual-multicolor/
Cheerio,
RE: Easiest way to figure out custom build colors?
That is exactly what I did, and what I outlined here. 😉
It's a lot easier to use the Manual MMU method:
https://forum.prusa3d.com/forum/prusaslicer/manual-multicolor/
Cheerio,