Support question in 2.4.0 RC2
I have a question that I originally thought was a bug and turned in a support issue but was told this is more a knowledge issue (ie: I am I doing something wrong 🙂 ). I have attached a zip file with 2 screenshots and the 3mf file.
Auto generated supports seem to be generating a support where none is needed. I tried using the support blocker but that did not prevent the support. I was told from my support request that I did not understand how support blockers work as I had supports everywhere selected. I had thought that you used supports everywhere and then used the blockers to remove supports where you did not want them. The videos I saw showed to choose everywhere when using blockers. The support person said I should post in the forums since this is a learning issue and not a software issue. So any help is appreciated. I know there are new options in 2.4 RC2 so maybe it is something I am missing there.
I will add that when I switch between the snug and grid style, it looks like in snug it is still trying to generate support that would be there if grid was being used. That is why I initially thought it was a bug since snug is a new option and I am using it for this print.
Thanks!!!!
RE: Support question in 2.4.0 RC2
When using paint on supports, select 'For support enforcers only'. I tried paint on supports on the largest areas where you would actually need them and this is how it sliced.

Mk3S+,SL1S
RE: Support question in 2.4.0 RC2
Btw gminnick, the “support person” in the GitHub thread is a PS user, like all of us. They aren’t on the Prusa staff.
They were quite correct though in that at the moment your understanding of how blockers work is wrong. They aren’t keep out areas. All blockers and enforcers do is define areas on the model that do and do not need support.
There are various ways to do that definition. You can use a modifier, they work where the modifier actually intersects the model as you are defining areas on the model. So placing a blocker below an area does nothing. You can use paint on (which is much superior imo). You can define an angle, either through the settings or through the paint on enforcer method. All of them are ending up defining areas on the model.
Once those areas are defined the support generation algorithm takes over and generates the supports based on your support settings, like spacing, interface layers etc. If an area needs support then it will quite happily build that support downward through a blocker or anything else. The only thing that will effect that is support from build plate option, that should stop support going down to rest on the model and only allow it to build from the build plate.
In practice now the paint supports enforcer is available then selecting for enforcers only and then painting areas where you explicitly want support is in general the easiest most efficient method now for most models. It’s gets even better in PS2.4 that has the new snug support options. I’m not saying the blockers are now useless but once you get the hang of enforcers you find it’s rare to use a blocker.
RE:
Thanks Neophyl,
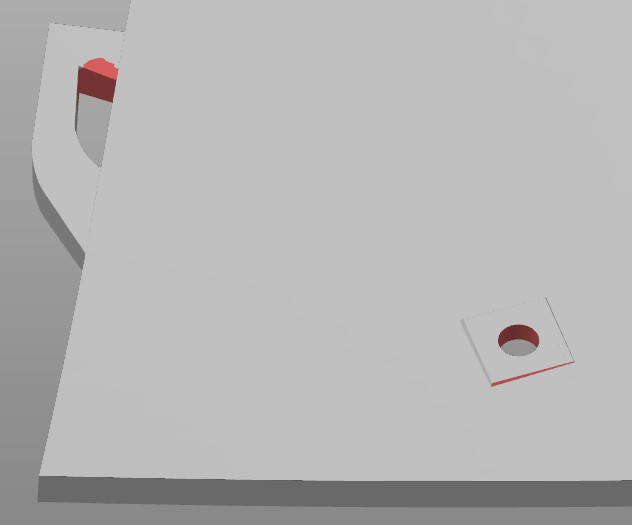
I realize I did not state that I was using the paint on supports. I tried to paint the area to block supports because the auto generated supports were putting a column where I do not see any need for a support as there is nothing to support. So I painted on a block area covering the supports from where they would start to where they would stop. I do understand if I painted below the supported area it would still generate a support. But I painted the whole area. If this was not correct how would you remove the circled areas support? I know I could do the reverse and just define supports but I would like to know how to paint the blockers correctly. I included 2 screenshots. Any help is appreciated.
RE: Support question in 2.4.0 RC2
Hello sylviatrilling,
Thanks for the advice. I may give that a try as that would be much less supports.
RE: Support question in 2.4.0 RC2
One approach is to slice and look at it from underneath. The dark blue areas are overhangs. If the overhangs are large, paint supports. If they are small spots, they might print without supports but they will be messy. It is a matter of personal choice if you prefer a messy spot to sand off or prefer to paint on and then need to remove supports. With experience, you get a feel for what needs support and what can be sanded.
Mk3S+,SL1S
RE: Support question in 2.4.0 RC2
Because the geometry slopes inward and support is built up in vertical lines those areas that are being supported can draw a direct line down to the build plate. Even with snug supports on that's not going to change. Basically the blockers aren't going to do anything as they aren't supporting those faces where you have blockers painted. You could really zoom in and only paint the very inside of the holes , not the areas where they are over the build plate. That would be finicky and time consuming and not really worth it. Those areas should print fine without support anyway. Same with all the holes. Just chase them out afterwards to make them properly round.
There is actually very little that actually needs support on that model. Also personally I'd increase the perimeters to 3. It will make it stronger and it decreases print time and only use 4gram more filament. Its what I do with a lot of 3d printed armour, in my case Mandalorian rather than Ironman 🙂
Take a look at the attached project. That's basically how I'd print it (with my printer and filament settings swapped in naturally)
RE: Support question in 2.4.0 RC2
@gminnick
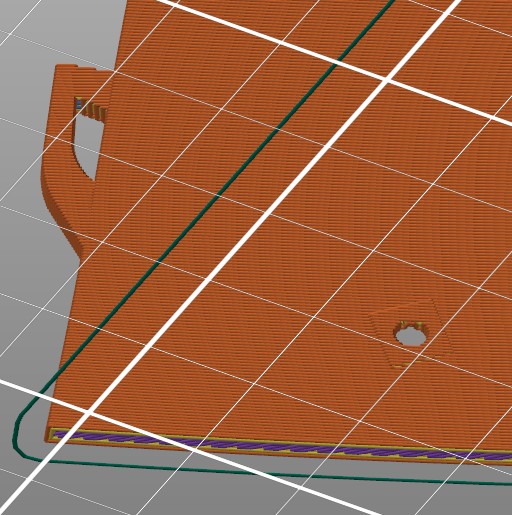
I used your file to create several examples of how you can use the "Paint-on supports" tool in PrusaSlicer 2.4 rc2. All the examples require that you use either the "For support enforcers only" or "Support on build plate only" options with Snug Style selected.
Note: "For support enforcers only" is the superior method, offering the most control.
If you choose "Support on build plate only" you will want to adjust the [Support material] / Overhang threshold: to 27 to match these results for this specific model.
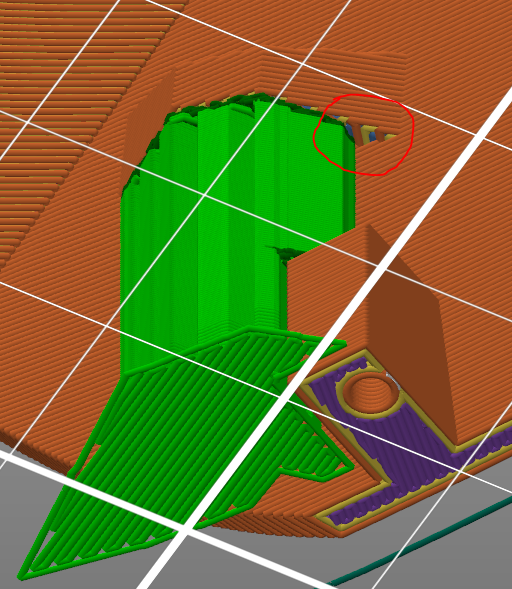
The first area I focused on was the area you specified. You wanted it blocked, so this is to show you two approaches on how to block supports using the "Paint-on supports" tool in PrusaSlicer 2.4 rc2. (I also added a bonus method in case anyone else is interested 🤔 )
Using the Brush tool and painting the area on the model that you want to "block" supports is simple, just select the tool and put the blocker in the area the supports would have been supporting, in this case that's here. (See Image)
you can also use the Smart fill option to farther simplify the process.

"Smart fill" will select Polygons (triangles) in a very clean way, quickly.
(The result of either tool is the same, (in this case)
Smart fill is the wise choice, however this does not negate the need for the Brush tool.
The Brush and Smart fill tools can compliment each other nicely.
For example In this image I show a Smart fill selection, but a small portion of the support was filling a hole beneath. for the sake of demonstration were going to say it was wasn't impotent to support that small area of the model and that we didn't want the hole filled with support to the build surface.

Using the brush tool we can simply add a small area of blocker over the Smart fill selection to resolve the quickly.

Frankly the results are better then I think anyone could have hoped for, given the past support issues in PrusaSlicer.
But wait!, There's more! 🤯
Now when using the Snug Style supports, we can actually expect Slicer supports to to honer added parts.

(It's blocking the hole)
(Please keep in mind This was very, very quickly done and can be done many orders of magnitude better.)
When adding parts to a model you can use them to intercept the supports and act as a base for the supports needed for the area above.
This has many great uses and implications for material & time savings.
In my example I created a box set it to 45 degrees, 1 perimeter, no infill.

The box prints much faster then the support, and if I had taken the time to do this right, it would most likely use less material.
You can copy and paste the box with it's properties and use it over and over to assist with your support related needs.
I left a couple of examples of this in the Project file, I just had fun with it. there is more they did also I only covered the most basic things to help get you going.
Get it while it's Hot!!, No telling how long the files will be there.
I don't really use Prusa supports, But if I did, I'd be really happy about them now.
I'm also adding a my Typo disclaimer, I'm sure I made some, and if I didn't I'm sure WordPress will add some in for me. 😉
Hope this helps, Good luck.
Swiss_Cheese
The Filament Whisperer
RE: Support question in 2.4.0 RC2
@neophyl
Thanks for the file. I may give this one a try.
Because the geometry slopes inward and support is built up in vertical lines those areas that are being supported can draw a direct line down to the build plate. Even with snug supports on that's not going to change. Basically the blockers aren't going to do anything as they aren't supporting those faces where you have blockers painted. You could really zoom in and only paint the very inside of the holes , not the areas where they are over the build plate.
So a question on this. I still cannot see what it is that the supports I marked are supporting. You mention painting the inside of the hole and I do see above the supports where there is a hole and they have supports in them. But the support that builds from the print bed is not supporting anything. It just stops against the wall. That is where I am confused as to why auto generation created a support. The side of the mask is very close to vertical and does not require supports. Those supports I marked do not connect to the supports in the holes. My first thought was that the snug feature has a bug because if I choose grid style instead of snug, the supports for the holes do work their way down to the print bed.
RE: Support question in 2.4.0 RC2
@swiss_cheese
Thanks for all the information. It was very useful. Your first picture does reflect a question I just posted back to neophyl. I was not attempting to block the supports of the holes. I was wanting to block the support that seems to just fade into the side wall without supporting anything above it. Nor do they connect to the hole supports. That is what I am trying to figure out.
RE: Support question in 2.4.0 RC2
@gminnick
OK I understand, and I believe Neophyl answered that above, which I see you have Quoted. I'll try to explain it in a different way.
In the file you posted you had supports "Everywhere" selected as your support type, when you use the Everywhere selection PrusaSlicer looks at a setting called "Overhang threshold" this tells slicer the angle on the model that will be the least limiting factor in the decision to support an area. For example your Overhang threshold was set to 60 degrees, so slicer analyzes the model and looks for areas 60 degrees or more and adds support to them (very simplified explanation of what really happens), you can use support blockers to block supports in the selected areas.
Here's where I think your getting confused, the holes/openings your showing in your images, meet the criteria for being supported by the Overhang threshold you had set, so slicer supports them. Part of the hole ever so slightly hangs past the edge of the model in that area, so slicer errors towards the side of supporting it, and slicer as we have mentioned will support it all the way down to the build surface. The reason it looks like its not contiguous is because it's not, and that is based on another setting in supports called (are you ready? this is a long one) "XY separation between an object and its support:" (Honest, that's the name of the setting) yours is set to the default value of 50%. this setting is designed to keep the supports a distance away from the surrounding unsupported parts of the model, so that it will not cause a mess bonding in more areas then it needs to. That separation is in conflict with the area that needs support, per your support settings.
The setting is choosing the lesser of two evils.
If you still want support in that area without the tag hanging off of it you can have that, but you have to be more meticulous in your application, simply using most of the default settings is not going to get you the cleanest result.


This image is with Support set to everywhere, and a more refined paint job, the supports are still in the hole.
The tools are there to do it. I hope this helps, there are many many settings for supports, this is a good thing, they are needed to have control over the countless situations we run into with different models, and printing needs.
Regards
Swiss_Cheese
The Filament Whisperer
RE: Support question in 2.4.0 RC2
@swiss_cheese
Thank you so much for taking the time to explain that. I see what both you and neophyl are saying. I played around with the xy seperation and could see the support getting closer to the hole as I decreased that number. In my mind that support had nothing to do with the holes, but actually it had everything to do with them. It was not the non contiguous part that was confusing me. Thanks to everyone for your patience on this. It is awesome to find people that will take the time out of their day to explain something to another person and help them learn. Now I am off to practice my soldering skills as I print out these parts and hopefully wind up with a motorized helmet.