Slicer not producing full model
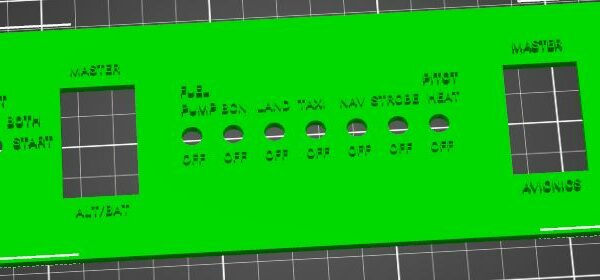
I have an STL file which when initially loaded into slicer shows all the detail of the part (specifically a bunch of lettering for labels on the part itself). The screen shot below shows the "raised" lettering.
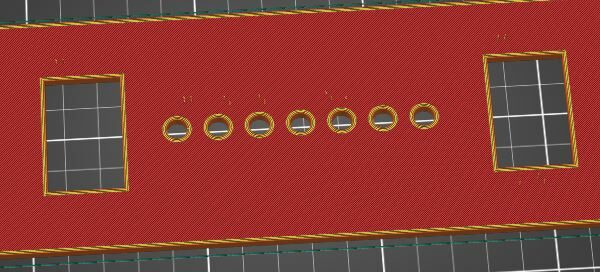
Yet, when I slice the object, none of the lettering appears and instead I get a few "posts", see below. Ideally I would like to change filament once the letters start but they don't even appear in the slice. If I slide the slider to where the lettering should start I just see some funky little posts and that's it (they appear as white dots in this pic).
So for some reason the slicer ignores or has some kind of trouble with the raised lettering... any ideas would be appreciated.
@richardschreier
Letters has too thin walls, thinner than 0,43mm, if printed with 0,2 layer height.
Try "detect thin walls" in "print setting" and see how it looks like.
Or if it is your own design, make the letters bigger.
The easiest way to get help here is to save a project file, (File, Save Project As), zip it, and upload
Prusa i3 MK3S+ FW 3.11.0 (kit dec -20), PrusaSlicer 2.6.1+win64, Fusion 360, Windows 10
Nozzle
Or change to a smaller nozzle.
Detect thin walls
Interestingly, when the detect thin walls option is clicked all the lettering appears and allows for a filament colour change. I don't see any "error" messages that would indicate something can't be printed, will the print simply fail or is there a diagnostic message i am missing?
No message, it just don't slice it.
There's a simple reason for that. If you think about it there ALWAYS some part of a model that can't be printed due to layer height, wall thickness, a sharp outer corner.
If "detect thin walls" is checked PS lay down filament even if the wall is thinner then extrusion width.
Hope it helped a bit.
Prusa i3 MK3S+ FW 3.11.0 (kit dec -20), PrusaSlicer 2.6.1+win64, Fusion 360, Windows 10
OK, so now I am confused a bit 🙂
So does that mean PS has indeed "sliced" the lettering and when printing it will try to print them but the quality will be crap because the nozzle is too big?
RE: Slicer not producing full model
My bad, I should have wrote,
"There's a simple reason for that. If you think about it there ALWAYS some part of a model that can't be printed due to layer height, wall thickness, a sharp outer corner, so slicer don't slice it"
Hope that was more clear 😀
If you have smaller nozzle, extrusion width is smaller, and PS can slice thinner walls
Prusa i3 MK3S+ FW 3.11.0 (kit dec -20), PrusaSlicer 2.6.1+win64, Fusion 360, Windows 10
Can I split the print?
The object is fairly large (220mm wide) and so going to a smaller nozzle overall will make this very long to print, as an alternative is there a way to print the first 3mm of the model with one nozzle (.45), leave it attached to the bed and then switch to a smaller nozzle (0.25) and do a second printing of just the lettering? I think I have to create two STL files, one with the base and one with just the lettering, but them how do I get the lettering to start printing at a vertical offset? And will they align properly?
I don't know if it is possible to do it in PS.
It sure is duable with a little bit of g-code hack.
Create one g-code with bigger nozzle, and a color change for the small letter
Create another g-code with smaller nozzle, and a color change for the small letter
Take the first part, up to color change, from "big nozzle" g-code and add the second part, after color change, from "small nozzle" g-code.
Beware of layer height, they must be at the same height at color change
I have never done it myself, but I am sure gonna try it this evening 😁
Prusa i3 MK3S+ FW 3.11.0 (kit dec -20), PrusaSlicer 2.6.1+win64, Fusion 360, Windows 10
Nozzle size = resolution
So does that mean PS has indeed "sliced" the lettering and when printing it will try to print them but the quality will be crap because the nozzle is too big?
At a very basic level, the slicer is digitizing the part. Just like early digital photos, we have limits on resolution. Instead of jagged images, we get prints with small parts simply left out. The smaller the nozzle, the higher our "resolution", so smaller parts print at the cost of larger gcode and longer print times.
and miscellaneous other tech projects
He is intelligent, but not experienced. His pattern indicates two dimensional thinking. -- Spock in Star Trek: The Wrath of Khan
RE: Be sure 0.25mm lettering is not too fragile
The object is fairly large (220mm wide) and so going to a smaller nozzle overall will make this very long to print, as an alternative is there a way to print the first 3mm of the model with one nozzle (.45), leave it attached to the bed and then switch to a smaller nozzle (0.25) and do a second printing of just the lettering? I think I have to create two STL files, one with the base and one with just the lettering, but them how do I get the lettering to start printing at a vertical offset? And will they align properly?
Before investing too much time on this, try just printing some of that text with a 0.25mm nozzle and make sure it'll do what you need. I tried something similar and found it was very fragile and prone to breaking off. Using thicker lettering produced a usable part.
I didn't save the link, but somebody recently posted a "text testing" tool that might be useful. I think it's on prusaprinters.org. This one is similar.
and miscellaneous other tech projects
He is intelligent, but not experienced. His pattern indicates two dimensional thinking. -- Spock in Star Trek: The Wrath of Khan

