PrusaSlicer: Generating Sheaths For Stepped Overhangs (Internal Edges)
I use a Prusa I3 Mk3 in a professional setting. We need a support generation that can handle everything with minimal scarring, big ask, I know. I have a worst case scenario print test model.

“With sheath around support” has solved the issue of the larger curved overhang, but not the smaller one. PrusaSlicer fails to recognize that a sheath is necessary on all edges. It ignores edges that are under a surface (internal).


Current support generating creates invalid free-standing lines that deform in the XY plane.

Manually painting supports is too time consuming. How can I get it to generate a sheath on “internal” edges?
RE: PrusaSlicer: Generating Sheaths For Stepped Overhangs (Internal Edges)
Hello.
And why you don't place the object on the large surface at the bed ? Turn over at 180°
RE: PrusaSlicer: Generating Sheaths For Stepped Overhangs (Internal Edges)
Hello.
And why you don't place the object on the large surface at the bed ? Turn over at 180°
If you read the original post, you will see that this print is deliberately terrible so that it represents a worst case scenario. We have many parts where features similar to this are unavoidable at any orientation. In my experience, curved overhangs are the hardest to print. Therefore, this test print is entirely curved overhangs.
Slicer generated supports are a fallback for those unable to design suitable supports into the original design - usually downloaders. If you are designing your own then it will be much more efficient to make tailored supports - in this case external bridging might be best.
Make external pillars, bridge a 'tabletop' across them and site the overhanging structure above.
Like this:
The illustration exaggerates the spacing; done carefully you will waste less filament in carefully designed supports compared to the slicer's generic ones.
Cheerio,
RE: PrusaSlicer: Generating Sheaths For Stepped Overhangs (Internal Edges)
Okay... I must explain my goal in a different way.
The goal is to print this item exactly as it appears below at this precise orientation with supports added only in PrusaSlicer. View this like an exercise. Those are the fixed constraints of this problem and cannot be negotiated.

Remember, the shape is deliberately designed to be as hard as possible to print. Adding supports to the model before importing it PrusaSlicer would obviate the goal.
Now that it's clear that the model itself cannot change in any way before being imported, let's discuss the option that you brought up. Adding supports manually is borderline, but doable if that's all we have. The next hurdle is getting this to work along side auto-generated supports. I added a support enforcer to the relevant edge.

Unsurprisingly, this is overwritten if Plater > Supports = Everywhere.

I wonder if there is a way to add support walls on top of existing generated supports.
The goal is to print this item exactly as it appears below at this precise orientation with supports added only in PrusaSlicer. View this like an exercise. Those are the fixed constraints of this problem and cannot be negotiated.
A strange requirement - and tough, I wouldn't bother if the source files are available as the results are likely to be suboptimal.
The next hurdle is getting this to work along side auto-generated supports. I added a support enforcer to the relevant edge.
Why? Unless these are one-offs without prototyping tailored supports will always be better - by the time you have a couple of prototype iterations the sunk cost will be relatively small. If this is a professional service then you will be billing it anyway.
It will look something like this:


Cheerio,
RE: PrusaSlicer: Generating Sheaths For Stepped Overhangs (Internal Edges)
From your pictures your goal also seems to be printing it with the minimum amount of support. That's a gamble at the best of times.
While auto supports in PS are in my opinion over enthusiastic normally, they do err on the side of caution. This is best for those users who are not familiar with supports in general.
That's why I prefer the manual method of using painted on support enforcers so I get support ONLY where *I* want them. You say its too time consuming, not really, its a skill like any other. The more you use it the quicker and easier it becomes. The auto painting tool also isn't 'too' terrible anyway and can be a good basis to start from that you can tweak afterwards.
Post your test model (don't forget to zip it up before attaching). That way people can play and experiment in a more intelligent way with the same starting point you are using for the discussion.
RE: PrusaSlicer: Generating Sheaths For Stepped Overhangs (Internal Edges)
The goal is to print this item exactly as it appears below at this precise orientation with supports added only in PrusaSlicer. View this like an exercise. Those are the fixed constraints of this problem and cannot be negotiated.
A strange requirement - and tough, I wouldn't bother if the source files are available as the results are likely to be suboptimal.
The next hurdle is getting this to work along side auto-generated supports. I added a support enforcer to the relevant edge.
Why? Unless these are one-offs without prototyping tailored supports will always be better - by the time you have a couple of prototype iterations the sunk cost will be relatively small. If this is a professional service then you will be billing it anyway.
It will look something like this:
Cheerio,
Please unsubscribe from this thread.
RE: PrusaSlicer: Generating Sheaths For Stepped Overhangs (Internal Edges)
From your pictures your goal also seems to be printing it with the minimum amount of support. That's a gamble at the best of times.
While auto supports in PS are in my opinion over enthusiastic normally, they do err on the side of caution. This is best for those users who are not familiar with supports in general.That's why I prefer the manual method of using painted on support enforcers so I get support ONLY where *I* want them. You say its too time consuming, not really, its a skill like any other. The more you use it the quicker and easier it becomes. The auto painting tool also isn't 'too' terrible anyway and can be a good basis to start from that you can tweak afterwards.
Post your test model (don't forget to zip it up before attaching). That way people can play and experiment in a more intelligent way with the same starting point you are using for the discussion.
Printing with minimal support is precisely what I am after. I can't proceed in optimizing these support settings until the sheath is properly generated. If I have to manually paint all supports to account for this one missing sheath, then I will be moving on to a different slicer
Model is attached. I thinned it slightly to reduce filament consumption, but the important features are unchanged.
RE: PrusaSlicer: Generating Sheaths For Stepped Overhangs (Internal Edges)
Thank you for attaching the model. When I slice it the little 'post' is not sliced as its too small with my settings as I normally use Classic rather than Arachne. Is that intentional ?
Anyway here is the results of automatic with my normal support settings. This is a couple of clicks (selecting the tool and clicking go). 
Perfectly printable and not really too much in my opinion. Its basically added painted areas to break up the longer bridging lengths as well as support the perimeters.
RE: PrusaSlicer: Generating Sheaths For Stepped Overhangs (Internal Edges)
Thank you for attaching the model. When I slice it the little 'post' is not sliced as its too small with my settings as I normally use Classic rather than Arachne. Is that intentional ?
Anyway here is the results of automatic with my normal support settings. This is a couple of clicks (selecting the tool and clicking go).
Perfectly printable and not really too much in my opinion. Its basically added painted areas to break up the longer bridging lengths as well as support the perimeters.
Yes, the tiny post is sacrificial and just there to provide consistent offset from the bed. I don't recall my default supports looking like that. I was going to check, but the system presets have disappeared... odd

As the name suggests, my profile is based on Default.
Can you highlight where you did any manual painting?
RE: PrusaSlicer: Generating Sheaths For Stepped Overhangs (Internal Edges)
I don't know why I didn't do this sooner. I manually drew what the support generation should be doing (excluding support infill).

RE: PrusaSlicer: Generating Sheaths For Stepped Overhangs (Internal Edges)
The one I generated was not using the generate supports automatically option form the support settings. I selected the object, select the paint tool and then theres a button for auto paint. It automatically paints where it *thinks* it needs supports. That works ok as you saw from the example and is essentially a couple of clicks, but once its done its then very easy to tweak the painted areas to add that human touch to the assessment.
It is usually a much better workflow and becoming proficient with the various paint tool options like brush or smartfill, the on overhangs only option etc makes for a quick and easy process.
RE: PrusaSlicer: Generating Sheaths For Stepped Overhangs (Internal Edges)
I completely forgot this feature existed. I will experiment with this.
I still think that PrusaSlicer should know better. An internal edge is identified as an overhang perimeter so all it needs to do is produce a continuous wall under all overhang perimeters and this would be solved.
RE: PrusaSlicer: Generating Sheaths For Stepped Overhangs (Internal Edges)
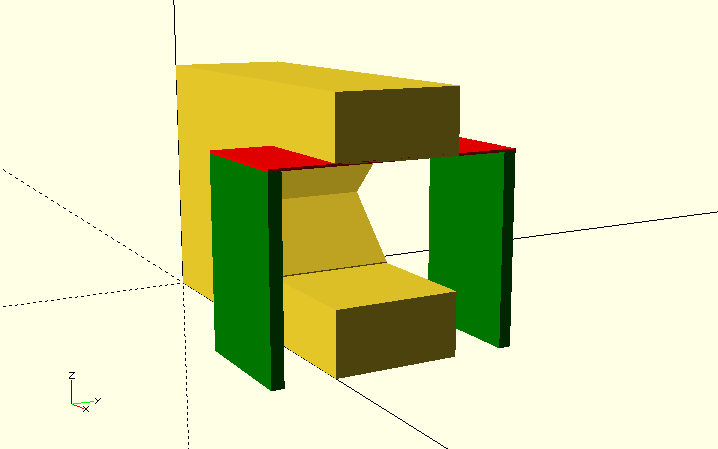
This seems to be hit and miss and still requires manual inspection of all edges, so too time consuming. I attached a better test part, picture below. This part demonstrates that PrusaSlicer can't do holes properly either.

Attachment didn't arrive, don't forget to zip it.
Cheerio,
RE: PrusaSlicer: Generating Sheaths For Stepped Overhangs (Internal Edges)
Ugh, it shouldn't even allow invalid file types to be attached. There was no warning that it was not uploaded.
That's a ridiculous shape for FDM printing, either redesign with the smaller, raised semicircular structure printed seperately, inverted and joined post printing or ask your firm to invest in a sintered powder printer.
What's wrong with the hole?
Cheerio,
RE:
Please read my original post carefully. This shape was chosen specifically to emulate worst-case scenario features. Changing the shape, orientation, or splitting would obviate the purpose of the print and is not allowed.
RE: PrusaSlicer: Generating Sheaths For Stepped Overhangs (Internal Edges)
A post has been removed at the OP's request.
Please read the entire thread, and the interactions carefully before offering comments.
Please note this model has intentionally been designed by the OP to be difficult to print, and no change of presentation angle or re design, is to be considered, custom supports are unacceptable. I believe any successful solution must use standard automated tool manipulation options within Prusa Slicer.
regards Joan
I try to make safe suggestions,You should understand the context and ensure you are happy that they are safe before attempting to apply my suggestions, what you do, is YOUR responsibility.Location Halifax UK