PrusaSlicer - GCode knocks off print
Hi everyone,
First, a disclaimer: I am at the beginning of my 3D Printing "career", so to speak, and I recently bought a non-Prusa printer. I had been looking at Prusa printers, but in the end chose something else based on a variety of factors. But enough with that.
I also used another slicer for a while, with very nice results... nice but not perfect. It kept adding irregularities to curves in Vase Mode, and after extensive testing I downloaded and installed PrusaSlicer. The vases I printed were great, so I moved on to print a regular model, a simple bottle stopper, the model printed well using other slicers.
PrusaSlicer knocked the model off.
Ok, maybe a small issue, resliced, triple checked everything, all settings, etc. The model was knocked off again.
And the next one. And the next one. All models were, sooner or later, knocked off. For most of them, while printing supports, the printing head dragged over the last printed layer, leaving a trail.
I tested and changed settings for three days, Dawn till dusk. The print head still drags over the model. Models are still knocked over. And there are other issues as well:
- Brim lines are always too thin, no matter what. I tried changing line width, first layer Z height, flow, nothing worked.
- Retraction (configured exactly like it was in the other slicer) yielded wildly different results, previously had no stringing, with same filament and temperatures, now there was a lot of stringing, mitigated after reducing speeds to ridiculously low amounts (50% of what bthey were in a different slicer).
Now, I know one should not compare slicers, and I was ready to spend quite a lot of time tinkering with PrusaSlicer configuration, starting with defaults (they totally did NOT work) and changing one at a time, until I managed to at least go past the first layer. Vases print great, though, for some reason.
Now, I probably shouldn't mention the printer brand I own, instead I was left with a strong impression that PrusaSlicer is meant for Prusa printers and nor much of anything else, even with a lot of time spent on trying to make it work. I have no clue why default settings for first layer height are 0.35mm and 0.3mm respectively for other layers, when stepper increments at 0.04mm multipliers. There were so many configuration entries set up in weird ways that I started doubting my own sanity. With that being said, I understand it works well for others, I just was not able to make it do anything well.
And there's that. I really like its UI and configuration complexity, I love being able to set specific support zones, but it's all academic if in reality I couldn't make it produce meaningful results.
RE: PrusaSlicer - GCode knocks off print
If all you want is to give up then why bother posting here at all?
Why not actually tell us what your printer is and post one of your projects that repeatedly fails to see if someone can spot anything that might be misconfigured (file>save as then zip it up and attach it). By saving the project 3mf file it allows us to see all the settings used for print, filament and printer.
Maybe a picture or two of one of the failed prints showing the bottom layer and also top top where the nozzle has knocked it off too would help.
RE: PrusaSlicer - GCode knocks off print
Sounds like you've got a bad printer profile and settings you picked up from an unknown source.
The generated gcode is unlikely to move the nozzle down into the print. If it did, nobody would get good prints with those same slicers. What is very likely is that you have some combination of:
- Poor bed adhesion
- Incorrect 1st layer height calibration
- Over extrusion, possibly aggravated by your slicer settings, that causes filament build up that is snagged when it pokes up above the layer being printed.
Accept that you have much to learn and that it's unlikely that you are the first to notice such fundamental flaws in software used widely by thousands and you're much more likely to find success. Provide us with some information (settings, pics) to help you with.
Lots of stringing suggests over extrusion. Did you calibrate your PrusaSlicer filament extrusion multiplier for the filament you're using?
and miscellaneous other tech projects
He is intelligent, but not experienced. His pattern indicates two dimensional thinking. -- Spock in Star Trek: The Wrath of Khan Unfortunately,…
RE: PrusaSlicer - GCode knocks off print
Sure, I can do that. And apologies for my rather angry post, it's how I feel and there's no shame to that.
Anyway, here goes...
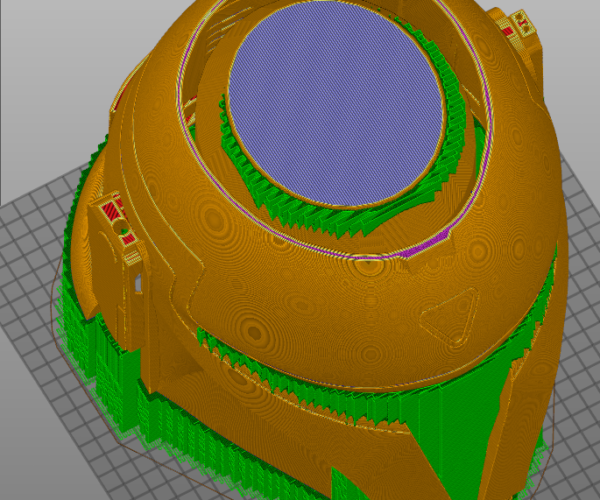
Here's the model for which the slicer generated GCode where the print was repeatedly knocked off: https://www.myminifactory.com/object/3d-print-owl-wine-bottle-stopper-7782
It happened consistently at the second ring from bottom to top. Once it happened at first ring. GCode is here: owl-wine-stopper-1
Sadly I no longer have the exact 3mf file, but I generated another one for the same model, using most recent configuration. I can't attach but here's a Google Drive link to it.
The model which had its support dragged over is this: https://www.myminifactory.com/object/3d-print-crow-support-free-5861
And here's the last iteration of the project, Google Drive link.
As for pictures, I have started documenting the prints of a very simple model I quickly created in Fusion 360, it's a very small cylinder to which I added a brim in PrusaSlicer to verify various brim configurations. Pictures below:

Above: Brim behavior - brim lines don't touch each other except at circle change points.
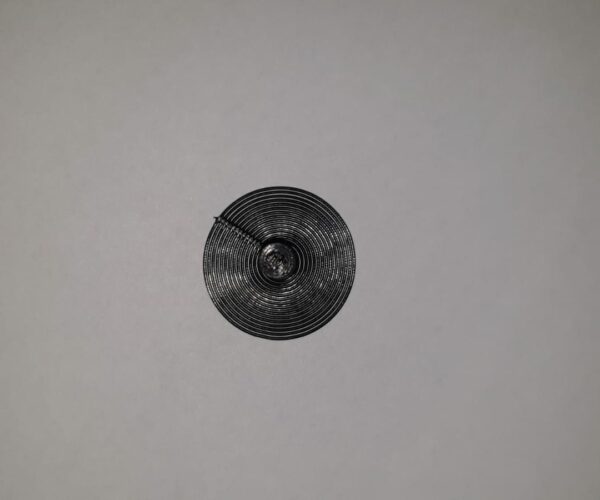
Above: same print viewed from above. Brim lines don't touch.
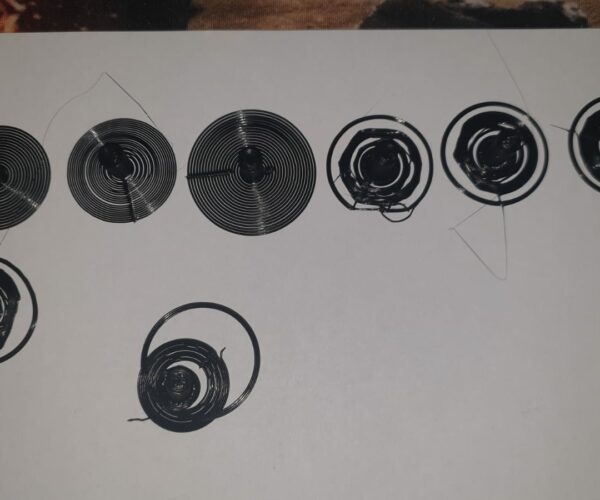
Above: a variety of print tests. Notably, the one with a larger amount of circles around it is the same cylinder but with a base 0.28mm tall in the model itself, you can differentiate the brim from the part belonging to the model by looking at the seam between circles. The ones with two circles are prints where I used both a skirt and a brim. Interestingly, the skirt lines are almost always bonded, while the brim lines are not.
Sounds like you've got a bad printer profile and settings you picked up from an unknown source.
The generated gcode is unlikely to move the nozzle down into the print. If it did, nobody would get good prints with those same slicers. What is very likely is that you have some combination of:
- Poor bed adhesion
- Incorrect 1st layer height calibration
- Over extrusion, possibly aggravated by your slicer settings, that causes filament build up that is snagged when it pokes up above the layer being printed.
Accept that you have much to learn and that it's unlikely that you are the first to notice such fundamental flaws in software used widely by thousands and you're much more likely to find success. Provide us with some information (settings, pics) to help you with.
Lots of stringing suggests over extrusion. Did you calibrate your PrusaSlicer filament extrusion multiplier for the filament you're using?
I have created the printer profile from scratch.
Ref bed adhesion, I have tried printing on: original bed (other slicers GCode generates prints that stick well), glass, mirror, mirror with hair spray.
I tried 1st layer height to all values between 0.2mm to 0.35mm, going through 0.24, 0.28, 0.3. The other slicer prints first layer at 0.28mm height and it sticks, lines are well bonded.
Ref overextrusion, it is not the case, the head was clearly leaving a plowing line across the support grid when moving back towards the crow tail. Judging by its behavior, the code didn't take into account that printing was already done on that layer in a certain area and was moving back to print on another area of the layer straight through what it just finished printing. I didn't cancel the print at that moment because the bed adhesion was strong enough to not move the whole thing and let it continue... until it knocked off one of the legs.
If you don't believe me, I have video proof. It's a timelapse, unfortunately, so things are moving fast, but in the video you can see the dragging lines across the support layer. Screen grab below: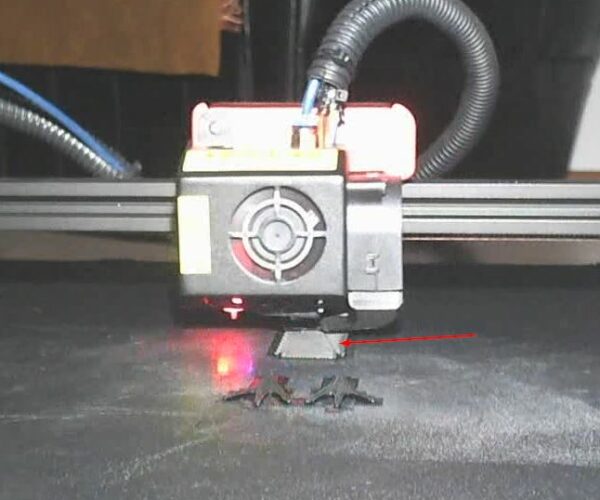
That's a drag line, the printer finishes laying down the support, moves back to work on the tail, straight across the support layer. This is the attempt where I used a raft to attempt better adhesion. It didn't work, by the way, the feet got knocked off eventually.
Filament extrusion multiplier is 1, just like in the other slicer, it works there very well. I wanted to change that slicer because it kept generating irregularities on prints in Vase Mode, but that's another topic by itself. PrusaSlicer did extremely well at printing the same vase model, came out beautifully, with same filament and temperatures, by the way.
RE: PrusaSlicer - GCode knocks off print
Sure, I can do that. And apologies for my rather angry post, it's how I feel and there's no shame to that.
No worries. Just be aware that a lot of folks are getting good results with PrusaSlicer and be open to suggestions. Every slicer has its pros & cons. IMO, PrusaSlicer comes out on top for the most important features so is well worth a bit of extra effort.
[...] As for pictures, I have started documenting the prints of a very simple model I quickly created in Fusion 360, it's a very small cylinder to which I added a brim in PrusaSlicer to verify various brim configurations.
There's no problem with mentioning other printers by name here. PrusaSlicer supports a variety, and I own an Artillery Sidewinder myself and am developing PrusaSlicer profiles for it. Looking at your picture, the extrusions making up your brim are not adhering well together. That means your 1st layer adjustment needs to be a bit lower so those 1st layers will squish together a bit. If you're getting good brims with another slicer, it's possible adjusting your filament profile extrusion multiplier a bit will help.
[...] I tried 1st layer height to all values between 0.2mm to 0.35mm, going through 0.24, 0.28, 0.3. The other slicer prints first layer at 0.28mm height and it sticks, lines are well bonded.
You can duplicate that setting with Print Settings->Layer height->First layer height if desired.
Ref overextrusion, it is not the case, the head was clearly leaving a plowing line across the support grid when moving back towards the crow tail. Judging by its behavior, the code didn't take into account that printing was already done on that layer in a certain area and was moving back to print on another area of the layer straight through what it just finished printing. I didn't cancel the print at that moment because the bed adhesion was strong enough to not move the whole thing and let it continue... until it knocked off one of the legs.
That sounds like z-lift (referred to as z-hop in other slicers). If your printer uses a bowden setup, you'll want significantly higher values for z-lift and all retraction values under Printer Settings->Extruder 1. If any filament is oozing from the nozzle on horizontal moves, it can drag across the already printed layers and cause scarring.
Take a look in your startup gcode and see if you have a line like:
M221 S{if layer_height<0.075}100{else}95{endif}
That reduces the flow rate to 95% if your layer height is 0.075mm or higher and can often cause confusion. I personally remove that line and do all the flow adjustments with Filament Settings->Filament->Extrusion multiplier.
and miscellaneous other tech projects
He is intelligent, but not experienced. His pattern indicates two dimensional thinking. -- Spock in Star Trek: The Wrath of Khan Unfortunately,…
RE: PrusaSlicer - GCode knocks off print
@war4peace
Looks like your first layer is printing too high above the bed; it needs to be squished down more into the bed more so the top of the extruded plastic is flatter and the pushed out more on the sides. Try adjusting your printers z offset to be a bit lower (by about -0.05mm at a time) via its control panel settings or by adjusting the z-axis lower end-stop lower until you get a thinner flatter top and touching sides on your first layer.
Your printer does not appear to have any bed tramming/leveling sensors.
RE: PrusaSlicer - GCode knocks off print
Sure, I can do that. And apologies for my rather angry post, it's how I feel and there's no shame to that.
No worries. Just be aware that a lot of folks are getting good results with PrusaSlicer and be open to suggestions. Every slicer has its pros & cons. IMO, PrusaSlicer comes out on top for the most important features so is well worth a bit of extra effort.
[...] As for pictures, I have started documenting the prints of a very simple model I quickly created in Fusion 360, it's a very small cylinder to which I added a brim in PrusaSlicer to verify various brim configurations.
There's no problem with mentioning other printers by name here. PrusaSlicer supports a variety, and I own an Artillery Sidewinder myself and am developing PrusaSlicer profiles for it. Looking at your picture, the extrusions making up your brim are not adhering well together. That means your 1st layer adjustment needs to be a bit lower so those 1st layers will squish together a bit. If you're getting good brims with another slicer, it's possible adjusting your filament profile extrusion multiplier a bit will help.
[...] I tried 1st layer height to all values between 0.2mm to 0.35mm, going through 0.24, 0.28, 0.3. The other slicer prints first layer at 0.28mm height and it sticks, lines are well bonded.
You can duplicate that setting with Print Settings->Layer height->First layer height if desired.
Ref overextrusion, it is not the case, the head was clearly leaving a plowing line across the support grid when moving back towards the crow tail. Judging by its behavior, the code didn't take into account that printing was already done on that layer in a certain area and was moving back to print on another area of the layer straight through what it just finished printing. I didn't cancel the print at that moment because the bed adhesion was strong enough to not move the whole thing and let it continue... until it knocked off one of the legs.
That sounds like z-lift (referred to as z-hop in other slicers). If your printer uses a bowden setup, you'll want significantly higher values for z-lift and all retraction values under Printer Settings->Extruder 1. If any filament is oozing from the nozzle on horizontal moves, it can drag across the already printed layers and cause scarring.
Take a look in your startup gcode and see if you have a line like:
M221 S{if layer_height<0.075}100{else}95{endif}That reduces the flow rate to 95% if your layer height is 0.075mm or higher and can often cause confusion. I personally remove that line and do all the flow adjustments with Filament Settings->Filament->Extrusion multiplier.
As mentioned before, I have changed first layer height to be all values between 0.2 and 0.32mm, in increments of 0.04mm. From what I've read, increments of 0.04mm are best for that type of stepper motor my printer is using.
Z-Lift and retraction values are the same as in the slicer that works, first it was 2mm in PrusaSlicer versus 6.5mm, I later increased it and most stringing indeed went away. Sorry I wasn't clearer before. So stringing indeed became very manageable (tiny wisps every now and then, easy to remove with a very quick heat gun pass).
There is no script line in the startup GCode.
@jonathan-lin - what do you mean by "Your printer does not appear to have any bed tramming/leveling sensors"? It comes with BLTouch and Auto Level is ON, I do a 16-point measuring before every print, and often do a manual leveling as well, using the paper sheet method. It's a large bed, so it will never be spot-on, but the difference between corners is usually less than 0.25 mm, which might only become a problem if auto leveling is OFF and for very large prints. My largest model was 370 mm on the X axis, in PETG, single piece, and printed perfectly (again, using a different slicer, before I tried PrusaSlicer).
Here's the bed mesh, just measured:
As for feeder calibration, I had performed the 100mm feed measurement, it was on my pre-print checklist from when I bought the printer.
below is the finished crow, it finished overnight, one single small issue, the front tree support (which was not needed anyway) moved a little during printing (did not adhere well to the bed) and got spagettified. However, the model came out just fine. First layer was 0.28mm.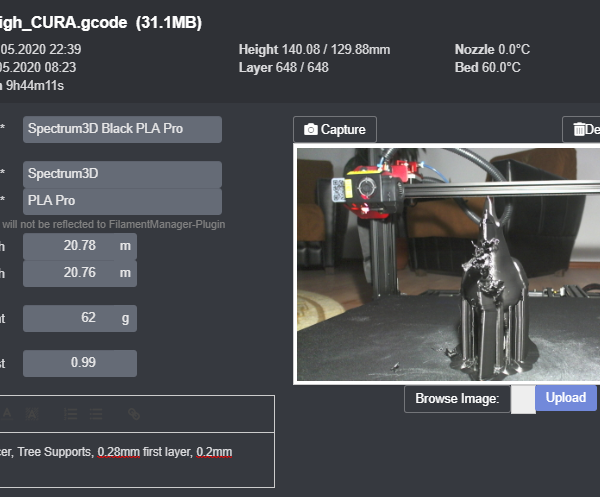
RE: PrusaSlicer - GCode knocks off print
I own both a Mk3 and a modified CR10 (THD firmware, direct drive modification, petsfang, removable steel pei sheet)
I would agree that the first layer isn't being squished as much as on a prusa or on my Cr10 either but I don't have a ABL on that so I don't know how that sets the bed distance, I would assume it can be adjusted on the printer.
I have had a look at the project settings you linked to for the Owl bottle stopper 3mf. My initial thoughts of things to try adjusting are as follows.
Printer Settings
Extruder 1
Lift Z - this is set to zero, this is the z hop setting that other slicers use. This is the most likely culprit of knocking the parts off as without lifting when moving it will drag as described. When you also have poor bed adhesion it doesnt take a lot of force for the parts to detach. Id add 1.5 to 2x the layer height usually, so 0.4mm for a 0.2mm layer height.
Retraction - you have 2mm in there. When my Cr10 was still bowden then the usual retract distance was around 6-8mm. 2mm is nowhere near enough for a bowden tube that long. Even after the direct drive conversion I still have to use around 0.8mm .
The Retract on layer change and Wipe while retracting are also turned off and these are usually a good idea to turn on with bowden setups so I would experiment with these on your setup.
Filament Settings
Not a lot to say with these, they all look pretty standard. The one thing I would mention is on profiles that have been tweaked for Prusa printers the filament gcode areas usually have the settings for Linear advance in them (M900 Kx.xx). As I based my Cr10 profiles from the prusa ones I ran Marlins K calibration process https://marlinfw.org/tools/lin_advance/k-factor.html to find the values for my machine and then added that to my filament profiles.
Print Settings
Layers And Perimeters
Id put the first layer height down to 0.2 same as your layer height.
Advanced
Here is your biggest first layer culprit. This tabs settings are the reason your first layers are not merging together and your brims dont connect. On your extrusion widths you have left everything as zero EXCEPT first layer. That you have set to 125%. Its the most common mistake people make with Slic3r and its derivatives like Prusa Slicer. If you read the tooltip for the setting you will see that anything set as a % is a percentage of the LAYER HEIGHT and NOT your nozzle diameter. So by having a layer height of 0.2mm and 125% your extrusion width is actually set to 0.25mm, which is way less than your nozzle diameter. For a 0.4mm nozzle just set it to something like 0.45 like Prusa profiles have or leave it at 0. Id adjust this immediately. The advice to squish your first layer more is probably not applicable with the first layer being under extruded.
The default elephants foot compensation of 0.2 is also a little too aggressive unless you are REALLY squishing that first layer. 0.1 is probably better.
I will also say that for the Owl bottle stopper I would expect there to be problems when it gets to the rings as the perimeters on those are printing in mid air. Anyway get those extrusion width and z hop settings sorted and give it another go.
RE: PrusaSlicer - GCode knocks off print
Just spotted another setting that is on the default but probably should be changed. That is Print Settings>Infill>Solid Infill threshold area. Currently its set to 70mm, this causes the entire bottom of the bottle stop to be filled with solid infill as the area is less than 70mm square. Prusa sets that to 0 on its profiles. It can lead to unexpected slicing results. Unless that's what you want of course ?
RE: PrusaSlicer - GCode knocks off print
Thank you all for your advices.
I am proud to declare success for the first time, managed to print the crow to 100%.
@neophyl the retraction was set to 6.5mm, which works very well. About the Advanced tab and leaving everything as zero, those are the defaults. They are actually not zero, but 0.45mm or 0.42mm, etc. - this is easily visible in the G Code, at the beginning, where those settings are put in as comments. The 125% you refer to is based on first layer height, which was 0.28mm, the default value was 200% which led to lines overlapping on the horizontal scale and making the first layer curl up in most areas. I was successful after setting the value to an absolute of 0.5mm, rather than a percentage of first layer height.
Now here's the weird thing... Before this successful print, I uninstalled and reinstalled PrusaSlicer, after saving the configuration snapshot. I then recreated all settings again, manually, and that made it work for some reason.
It's a wonderful thing to see the print finished without issues.
RE: PrusaSlicer - GCode knocks off print
Update: The printing head still sometimes drags over infill. Z-Lift is set to 0.4mm. I have captured a video in glorious 4K with my phone, I could Youtube it if you'd like to see. This time my wife noticed it while watching the printer do its job and called me.
Luckily the model stuck well to the bed, so it finished well. This time I printed a 250mm tall crow for my wife 🙂
RE: PrusaSlicer - GCode knocks off print
@war4peace
When I loaded your bottle stop project in the first layer settings had been saved as 125% not 200% which is why I made the comment. It sounds like you were having profile issues though which the re-install sorted. Glad you mostly have it working. If Z hop is still hitting at 0.4 then increase it a bit more.
I found that with the stock parts fan on my cr10 the cooling wasn't great and you can get more curling amongst other issues. Since I fitted the petsfang and bigger fan I can now do 120mm+ bridges, the interior support tube inside this helmet I printed has 140mm bridges at the longest point and they worked great.
