Pro Tips: ( The Brush Tool ) By Swiss_Cheese
Available in: PrusaSlicer 2.3.0 - 2.4.1 and associated (SuperSlicer) Flavors
Works with: Paint-On Support (L), Seam Painting (P), and Multi-Material Painting (N)
Disclaimer: I have only used these features and techniques in MS Windows, I’ve never seen this information documented anywhere, and I have no idea if they work with, or are available in, other versions supporting different operating systems. As well I use 3 & 5 button wheel mouses, and Wacom tablets on my machines, and can’t vouch for other devices.
Relative to (SuperSlicer) flavors, I have noticed intermittent glitchy behavior, mostly in Blocking mode (still very usable), as well Multi-Material Painting has not been implemented in the current stable release at the time of writing.
Normal operation: Middle Mouse Pan/Zoom
Brush operation:
Left Mouse Button: Support Enforcers / Seam Enforcers / Extruder # (color)
Right Mouse Button: Support Blockers / Seam Blockers / Extruder # (color)
Middle Mouse: Continuous Line operations
Shift+ Middle Mouse: Remove Selection (Erase) as Continuous Line operation
Shift+ Left or Right Mouse Button: Remove Selection (Erase) Freehand or single line operation
Alt+ Mouse Wheel/Brush Size (+/-) 0.4 - 8.0
Notes:
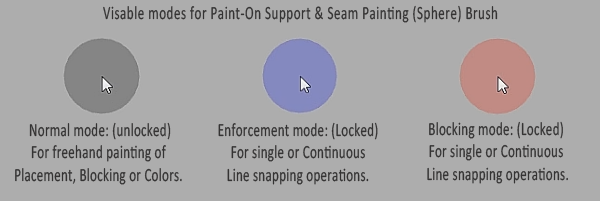
These modes are available for the Circle brush, however they do not visibly change the brushes appearance as they do with the Sphere brush.
When using Multi-Material Painting the Sphere brush will take on the color assigned to the material selection.
Once the brush selection is locked it is possible to change brush type & size and maintain the locked selection.
It’s also possible to lock the selection for the Triangles brush to the Middle Mouse button. (Although I’ve not found a use for this)
Lastly, pay attention to the order of the instructions given, if it says press the key first in sequence, it means press the key first, and vice versa.
Method one: Mouse & Keyboard
Single line snapping:
Press and hold the Left or Right mouse button + Tap Alt once, release the mouse button.
The selection is now locked to the brush.
Move the mouse to a different location and press the mouse button (while still holding the mouse button down), move with a very slight drag (Approx 1 pixel) in any direction.
If done correctly a line will be drawn from point A to point B, and the operation will end with the brush returning to its normal state.
Continuous line snapping:
Press and hold the Left or Right mouse button + Tap Alt once, release the mouse button.
The selection is now locked to the brush.
Move the mouse to a different location and press the Middle Mouse button (while still holding the Middle Mouse button down), move with a very slight drag (Approx 1 pixel) in any direction.
If done correctly a line will be drawn from point A to point B, however, the operation is not ended and the brush selection is still locked. Move the mouse to point C, click and drag again to connect. You can repeat this as many times as needed, when your ready to end the operation,
press and hold Ctrl + (Click) Left or Right Mouse Button to end returning the brush to its normal state.
Notes:
These continuous line snapping operations act as a single operation, Ctrl+Z (undo) will erase all lines produced during a continuous line snapping operation.
The Alt key has several functions, one of which is MS Windows specific, and selects the menus in the upper right of the UI you're in, you may find it necessary to tap Alt again after locking the selection of a brush, to return the brush to the cursor. When using single line snapping this isn't necessary.
(Menu bar selected after using Alt to lock the brush selection)
(Unselected state)
Alternate Method: Mouse Only
(Still requires Shift to Erase)
Press and hold the Middle Mouse Button+ (Click) Left or Right Mouse Button (This will lock the selection to the brush)
You can now use single or continuous line snapping as described above.
The operation can be ended by clicking either the Left or right mouse button as the last move, or by holding the last mouse position and (Clicking) Left or Right Mouse Button.
Worth a mention: While I find myself using this method more often than not, because it’s faster, and doesn’t invoke the Alt menu selection while locking the brush selection (avoiding the Alt double tap). I have different mouses on different machines, some of the older ones don’t play so well with this method, in that case the keyboard is the way to go. Of the mouse's my personal favorites are the 5 button, because I can use the 5th button in lieu of the Middle Mouse button. If you have one, try it. I think it’s more comfortable, you might agree.
Usage Tip’s:
While I’m on the subject of Brushes and Painting in Slicer, I want to pass along a couple of usage tips. These are methods I developed in slicer for me, to achieve my goals, in spite of tools or the UI’s shortcomings. I think they may be very helpful to others, or at least worth note.
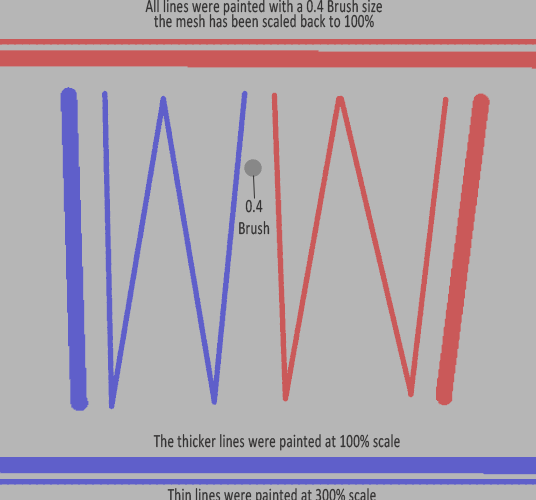
For starters, you may have noticed that the Brush tool has a size range, it seems that regardless of the size nozzle you're using, the smallest brush size you can have is a 0.4mm.
What if you're printing a miniature, or just a very small part with a 0.25 or smaller nozzle? On my version of PrusaSlicer at least, I can’t find a way to make the brush smaller to accommodate painting at these sizes.
My solution, scale the model up, you can paint on the model and scale it back to original size when you have completed the painting operation, the painted area will scale accordingly with the model, I have noticed that sometimes if you try and scale the model back to 100% all at once the painted area can disappear, however I figured out if I scale it back to 100% in two or more steps the information is not lost.
(Click for larger image)
This technique isn't just for tiny models, In fact I came up with it because I needed more control over a small area that needed detailed painting selection on a larger model, it works great for both Seams and Supports, we have to keep in mind as we use this technique the real world size of our extrusion widths for support material.
Lastly, and this is a quickie, you might have noticed that the Triangle Brush only offers two triangles when working with a box or a squarish low polygon flat surface. At the very least you will see less triangles on lower polygon models, and that makes sense. However, there are times when we need more iterations, (triangles to work with) when using the Triangle Brush, giving us a finer control over the selection.
(The default poly count for the example is 2)
Using the Sphere or Circle brush we can paint a line or lines if needed, buying a finer selection of an area. Doing so will increase the number of triangles radiating out from the Brush stroke to the lower polygon count areas with decreasing count.
(Same surface split with a single painted line.)
With practice this allows us to control the triangle count for more controlled selection of an area relative to the Triangle Brush selection. Even a single dot will affect the count. If you don’t see a need for this technique, well, you're not there yet. But when you do get there, it’s here waiting for you.
As best I know this information is undocumented. I checked before composing, and I checked before I posted, if you know otherwise please let me know, as I have other information, and I don’t wish to waste my time posting redundant information. This requires some effort on my part, and I don’t get free filament for it, or anything for that matter, it’s just me giving my time to a community I enjoy.
As well, If you find I’m in error with my information please let me know, it’s not my desire to offer faulty information.
If this information was helpful to you please give a like, If folks are interested enough I’ll make more of these types of posts, I’ll be mirroring this information on my website as well for safe keeping.
(Website not currently open to the public. I'm still building it.)
Enjoy
Swiss_Cheese
The Filament Whisperer
RE:
Nice!!! However... not surprisingly I can't get it to work on my M1 Macbook Air... no Alt key, and Ctrl or Option have no effect. I really hope the Prusaslicer folks turn this into an officially sanctioned approach, supported on all platforms. Ideally, allowing to see the line you're drawing the whole time while holding down a modifier key.
I also like the trick to scale the model up or down for fine tuning. I found myself often wondering how I could get more precision but it never occurred to me to just scale the model...
Formerly known on this forum as @fuchsr -- https://foxrun3d.com/
RE: Pro Tips: ( The Brush Tool ) By Swiss_Cheese
I have a Mac but I got this to work with the second technique using my standard logitech mouse that has left, right, and mouse-wheel buttons. Thanks, @Swiss_Cheese, I am sure this will be useful.
Mk3S+,SL1S
RE: Pro Tips: ( The Brush Tool ) By Swiss_Cheese
@sylviatrilling
I did wonder about Mac's, the closet thing I have to an Apple is my phone, or I would have tested them. I figured there had to be a way for Mac, I'm glad you figured one out and posted. It's quite useful as it is in Photoshop, when you need it you need it. Since the advent of the paint tool I've seen several requests for this functionality it's been there the entire time.
I almost didn't post the alternate mouse only method, because I thought folks might find it convoluted, even though it's my favorite way to use the tool. Now I'm glad I did.
Regards
Swiss_Cheese
The Filament Whisperer
RE: Pro Tips: ( The Brush Tool ) By Swiss_Cheese
Glad there is a way on the Mac. I'm out of town for a few weeks and all I have is the trackpad on my Mac (and no middle button). Can't wait to be back and try it with my Logitech mouse, or maybe try to program it into my Spacemouse.
Formerly known on this forum as @fuchsr -- https://foxrun3d.com/
RE: Pro Tips: ( The Brush Tool ) By Swiss_Cheese
@fuchsr
I'm interested to know if this works for you when you return, I'd would also like to know what do you do to scale your brush up? are you forced to use the slider in the brush menu?
The Filament Whisperer
RE: Pro Tips: ( The Brush Tool ) By Swiss_Cheese
Excellent work. This is why this forum should have implemented a dedicated and curated category for advanced user tips that is exempt from the <> image/file deletion policy. The lack of one will force highly skilled professional and advanced users to go elsewhere where their hard work will not get arbitrarily hacked to pieces in a few months. I have learn a lot from The Filament Whisperer... and others in this forum. We all lose if @swiss_cheese, @fuchsr, @bobstro, @diem, @neophyl and other members to numerous to mention here, cut back on their participation in this forum. But the BIGGEST loser will be Prusa Research. It should be happy to have such dedicated, knowledgeable, and passionate volunteer people supporting its products.
I appreciate the work they do helping people with their 3D printing journey. Thanks guys and gals!
Kenn
Quality is the Journey, not the Destination. My limited prints->
RE: Pro Tips: ( The Brush Tool ) By Swiss_Cheese
Move the mouse to a different location and press the Middle Mouse button (while still holding the Middle Mouse button down)
middle mouse button twice?
RE: Pro Tips: ( The Brush Tool ) By Swiss_Cheese
This needs to be said...again and again and again...
Does anyone know how we can say it to the people who need to know it? I doubt anyone in much authority is reading all these posts, and find it unlikely emailing standard customer service would help.
Thoughts? Suggestions?
Excellent work. This is why this forum should have implemented a dedicated and curated category for advanced user tips that is exempt from the <> image/file deletion policy. The lack of one will force highly skilled professional and advanced users to go elsewhere where their hard work will not get arbitrarily hacked to pieces in a few months. I have learn a lot from The Filament Whisperer... and others in this forum. We all lose if @swiss_cheese, @fuchsr, @bobstro, @diem, @neophyl and other members to numerous to mention here, cut back on their participation in this forum. But the BIGGEST loser will be Prusa Research. It should be happy to have such dedicated, knowledgeable, and passionate volunteer people supporting its products.
I appreciate the work they do helping people with their 3D printing journey. Thanks guys and gals!
Kenn
RE:
How about a thread on this board or a Github holding submissions to be added to existing Prusaslicer knowledge base. There must be someone who can point the curator of that document to the relevant thread.
RE: Pro Tips: ( The Brush Tool ) By Swiss_Cheese
Wow, what a cool discovery Swiss_Cheese! 😉
I am responsible for writing the PrusaSlicer documentation. However, what you discovered is not exactly a feature. 😀
It's an unintended result of input handling, a happy accident. While this works for painting straight lines, it's not very intuitive. Took me good 3 minutes, even with your great instructions to figure it out.
I am a little bit hesitant to add this to the PrusaSlicer documentation, as I suspect the team will add a simpler way to draw straight lines in future releases.
RE: Pro Tips: ( The Brush Tool ) By Swiss_Cheese
as I suspect the team will add a simpler way to draw straight lines in future releases.
We're all waiting with bated breath for that to happen! Would make life SO much easier.
Formerly known on this forum as @fuchsr -- https://foxrun3d.com/
RE: Pro Tips: ( The Brush Tool ) By Swiss_Cheese
@mikolas-zuza
As I imagine you're a fairly intelligent person, I can see how 3 minutes would seem like an eternity.😀 I recognise that my instructional writing is lacking 😋 . You can imagine how it was learning to utilize this feature um,uh “unintended result of input handling” 😉 without documentation.
While I do agree it’s not very intuitive (at first), I could sight Blender as having similar levels of intuitiveness of its interface (at first), as compared to other softwares in its class, and yet many are happy to take the time to learn how to use it.
I’ve been utilizing this, (now I don’t know what to call it?) method? since shortly after the brush was implemented in 2.3.X, and truth be told, until today I always thought it was put there on purpose and just never documented. Perhaps because it wasn't implemented fully on other platforms? I even believed that others knew about, and were using this tool. Until recently I made a point of not posting this information, even suggesting to users that they just use a straight edge.
I digress, my point being, I became so used to using the tool that I had to stop and think what I was actually doing when working with it, in order to write these Tips, and while I’m very keen on having Photoshop style key functionality for this, it has not been a burden to use at all, in fact I couldn't imagine not having it at this point.
So I hope whatever you Prusa has in store for us in the future will be at least as functional.
Just to be clear, It was never my intention to suggest that this be added to the PrusaSlicer documentation, I made this post as a test, to feel the waters, I wanted to see if there was any real interest or maybe “worth” is a better word to use, in spending my time showing people how I use this software. I have a great deal of this type of information relative to slicer, and this was just an evaluation, I decided not to pursue posting tips and tools and instead just help out the occasional user.
Regards
Swiss_Cheese
The Filament Whisperer
RE:
...Just to be clear, It was never my intention to suggest that this be added to the PrusaSlicer documentation, I made this post as a test, to feel the waters, I wanted to see if there was any real interest or maybe “worth” is a better word to use, in spending my time showing people how I use this software. I have a great deal of this type of information relative to slicer, and this was just an evaluation, I decided not to pursue posting tips and tools and instead just help out the occasional user.
YES! YES! Yes there is value and worth to making this type of information available to all.
...I’ve been utilizing this, (now I don’t know what to call it?) method?
It is called an undocumented feature 🙂 They are 'discovered' when users experiment with the software to see what it can do, or user trying to solve a specific 'problem' opportunity. While people may not need 'it' at the moment, there will come a time when they will be thankful for some making it available.
I made a suggestion in a response to a 'flash poll' on 12/12/2021:
But there has been no response or action that I can determine. 😥 But I am just one person. Maybe if everyone, new and experienced were to speak up... just thinking out loud.
Kenn
Quality is the Journey, not the Destination. My limited prints->
RE: Pro Tips: ( The Brush Tool ) By Swiss_Cheese
Move the mouse to a different location and press the Middle Mouse button (while still holding the Middle Mouse button down),
I must be very stupid but I don't see how to press the middle button if it's already held down.
RE: utility to lock either x or y of the mouse.
Having spent a while looking for a utility to lock either x or y of the mouse, for use with this and other apps, and failing. I wonder does anybody know of such an app.
RE: Pro Tips: ( The Brush Tool ) By Swiss_Cheese
@kennd and @zombipach
I recognize you as people that understand whats going on, and I don't' want you to feel abandon, I have spent several years of my life trying to correct monitory thinking, however its been my experience over many years, that you cant fix this, even to the point that its to the companies benefit in the long run. the companies do what they believe is to their monitory benefit in the short run. This is the way, the youth, the human beings that are hired to operate in the short run. It's to late to change this, trust me I'm a lot smarter then you think I am. I presented this information looking for people that understand, not looking for affirmation from people that make their money working for the company. the people that were interested let themselves be know the others are sheep. I watch you ask your questions and try to understand the answers, that are right before you, this a joke and a way to base the growth of a company. You Prusa should be going out of your way to educate users and not just listening to them. The whole buy a built unit and get access to the education thing, this is the users fault, your fault, you sad sad sheep, get a grip and learn what it is you don't have and wont have because you were to lazy to take the time to know. I've been in this industry since it's inception, and I've tried to help on several platforms over the years under several aliases. the problem is the user, the problem is you, there's no money in you. your to stupid to know what you have. the money is in people that create for a living, and the average user think it's about you, you have no idea how hard it is to maintain a company, relative to your lame ass not knowing your ass from a whole in the ground expectations.educate yourselves, explore what you have or lose it.
Fucking Sheep
Swiss_Cheese
The Filament Whisperer
RE: Pro Tips: ( The Brush Tool ) By Swiss_Cheese
BTW, Monitory is supposed to read "monetary" thanks wordpress and the lack of edit time.
The Filament Whisperer
RE: Pro Tips: ( The Brush Tool ) By Swiss_Cheese
Having spent a while looking for a utility to lock either x or y of the mouse, for use with this and other apps, and failing. I wonder does anybody know of such an app.
That would be very handy for a number of uses. I'm not aware of one, but will look for one now!
and miscellaneous other tech projects
He is intelligent, but not experienced. His pattern indicates two dimensional thinking. -- Spock in Star Trek: The Wrath of Khan Unfortunately,…
RE: Pro Tips: ( The Brush Tool ) By Swiss_Cheese
I’m using 3DConnexion space mouse and cad mouse. Within their driver there’s ways to lock axis’. Not a free solution I know, but an option. PrusaSlicer does claim support for 3DConnexion, but I haven’t dabled much with this aspect of the program to verify how well.


