Printing plateau on infill structure
Hello,
Is there an option in PrusaSlicer to influence plateau printing?
Most of my prints would be fine with +/-10% infill. Unfortunately prints turn out imperfect at plateaus. This happens when a plateau is printed on infill and surrounded by further infill structure. Especially when the pleateau edge has no support in the middle of the underneath infill structure. Sometimes the infill is printed prior to the plateau, this helps a little in providing support for bridging.
In my opinion there are two solutions to this issue.
1) Prior to printing plateau layer, printer should print a 1-2 line frame in layer below the plateau to provide support.
2) Whenever an infill structure is overlapped by a plateau structure, print should be extended to bridge over the whole infill gap towards the next available infill line.
Kindly let me know if something like this is already implemented in PrusaSlicer and where to find it.
If not implemented, pleeeease add.
Thanks,
Oliver
Best Answer by Swiss_Cheese:
@derminatore
I'd like to clarify more, the pillowing you are experiencing it due to poor slicing practices, it's caused by sparse infill and/or printing to hot, and in this case not enough top layers, adding a line will not fix this problem, going to the next infill position at 10% has it's pitfalls also. As you can do this also with modifiers and test for yourself.
I understand after reading your reply that you think of modifiers as a work around, I'm going to state that they are not a work around, but are in fact the solution, Every print has very specific needs, modifiers and alike are the only reasonable way to address that need. many of the so called new features we see in slicer today are based on the processes derived from the use of modifiers or older features in slicer that have been improved. Even if a button was made for this you would still have to spend the time to mark the areas you wanted this to apply, and you would still most likely have pillowing with the settings your using, there is no make perfect print button, and there never will be. you have to put in the effort to get the result.
I appreciate your desire for a feature that will help you out, I truly do. however you have to educate yourself and put in the time, there are literally billions of printing scenarios and no algorithm will ever be able to fix them all, not in our lifetimes, that's what our brains are for.
If you feel very strongly about this feature, you will want to go to GitHub and make a feature request, this is a user to user forum and we can only show you how to achieve the result your looking for. GitHub is where the slicer developers hang out.
I'm making these suggestions in the hopes of helping you to understand that learning how to use the tools that are already in place will help you to achieve your goals both from a time and from a material usage standpoint. I'm not going to cover this subject in depth but there are also many things you can do in your 3D program of choice that will save you a great deal of time in your slicer software.
Good Luck, & best wishes
Swiss_Cheese
RE: Printing plateau on infill structure
Not sure I fully understand what you mean by "plateau", some pictures would be nice to make the point.
If you mean a flat surface on top of infill, sure, with 10% infill you may not get a nice surface--depending on your infill type--unless a) you increase infill, b) add more top perimeters (my preferred option), and/or use a different infill type, such as adaptive cubic that will only increase infill as needed toward the top. Or a combination of above.
If you mean a flat area with no support beneath, many factors may influence the quality of the bridging required. I find the Prusa printers to be pretty good at bridging in most cases but I've sure seen situation in which either changing the bridging angle or supports below were required.
Formerly known on this forum as @fuchsr -- https://foxrun3d.com/
RE: Printing plateau on infill structure
Not sure I fully understand what you mean by "plateau", some pictures would be nice to make the point.
Concur - pictures required!
--------------------
Chuck H
3D Printer Review Blog
@derminatore
Yes, please share some pictures, and A Zipped up .3mf project file that Illustrates the issue you are inquiring about if possible. 10% can be a lot or a little depending on the size of the area your inquiring about, you need to be more specific, so that we may understand.
If including a .3mf file, understand that it must be zipped or the server will not allow you to post it, also please understand that the forums require you to have posted several times before you will be allowed to post without being moderated, so it may take a few hours before we can see your response, this is built into the forum to protect against spam and passes after just a few posts.
Regards
Swiss_Cheese
The Filament Whisperer
RE: Printing plateau on infill structure
Thanks for your response.
Here are some pictures, not too good quality as taken during printing.
In this picture I marked the two solutions I mentioned above. 1) with the red line, 2) with the blue line
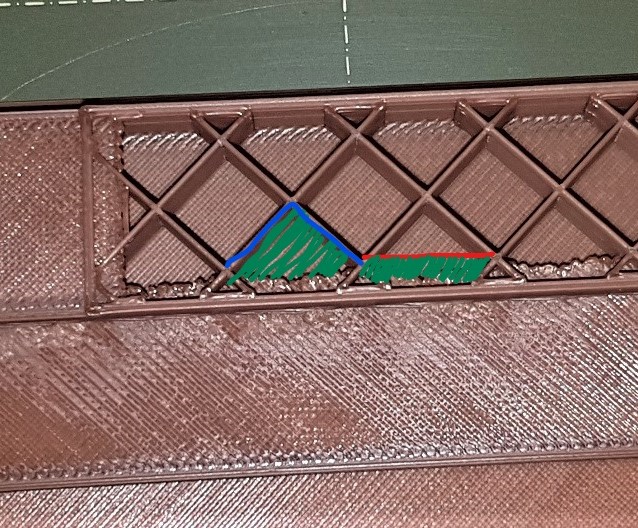
This is the issue that is visible in the finished print. I use standard settings for amount of of layers (I think 4 on top)
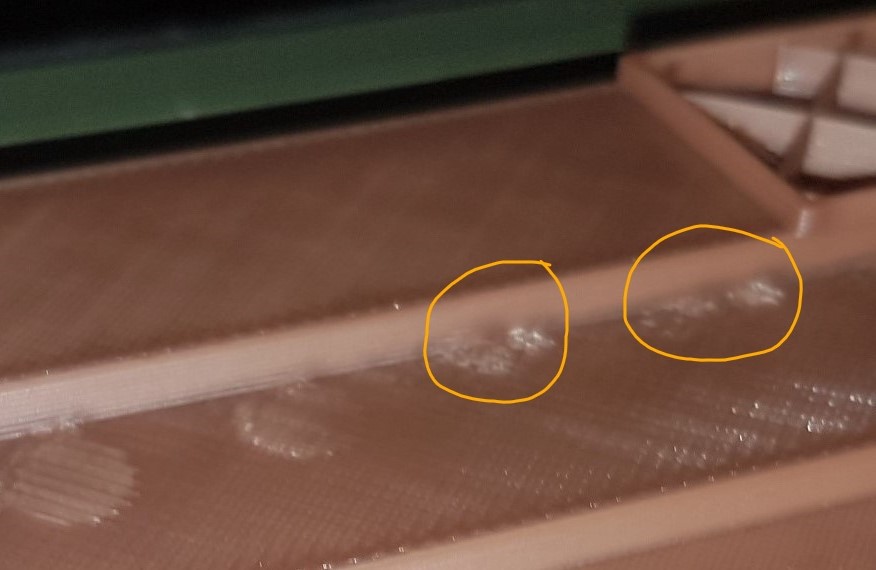
Beside the rough surface, there is another issue during printing.
Since the material printed in first layer on the infill has no connection it tends to bend upwards.
When the second layer is printed the nozzel "crashes" into / is forced above this bend up material. I do fear this is not very healthy for the printer.
I hope this makes it more clear.
For the structure of the printed object more than 10% infill is not required. In fact I even would prefer less.
This will reduce print time and required material.
So back to my question, is there an option in Prusa Slicer? I assume this might also be interesting for others.
Thanks,Oliver
RE:
As fuchsr wrote, adaptive cubic infill might help...
See: https://help.prusa3d.com/en/article/infill-patterns_177130
If at first you don't succeed, skydiving is not for you.
Find out why this is pinned in the general section!
RE:
Thank you for your advice with adaptive cubic infill. I sliced the part again but had to go up to 30% infill in order to benefit from the adaptive feature. This incerased the print time and material consumption by ~20%.
Still, if above mentioned solutions would be available in PS it would be a greater benefit.
Could be part of an eco mode.
I hope some developers will see this also 😉
RE: Printing plateau on infill structure
I'd say 4 top layers is bare minimum for 0.2mm layer height and 10% infill. Not surprised to see artifacts. As I said before, if you want lower infill, add more top layers. Or switch to say 30% adaptive cubic infill. Will only use what it needs throughout the model but then go up to 30% on top to provide enough support for the flat surface. You can play with the specific numbers to see what works. But one of the unfortunate realities of FDM printing is that you can't print on thin air. I don't quite see how the blue line would help, the red might.
Formerly known on this forum as @fuchsr -- https://foxrun3d.com/
RE: Printing plateau on infill structure
The blue line is just the existing infill structure to where the first layer could be expended to.
The red line is an additional frame.
Both shall provide the required support at the edge of the first layer.
I will experiment a bit with intermediate change of infill density by using modifiers. However, to me this is a workaround, I'd prefer not to do with every part that I create.
RE:
There doesn't look like there's enough height range on that part for adaptive or support cubic to make much difference. I think they are just going to have to accept that it needs the higher % infill to provide support for the large flat areas. At least with Prusa Slicer defaults.
I use Super Slicer quite a bit and it has an option that can be used to provide a 50% layer on the top of the support before it starts on the top layers.
I suppose they could also use a modifier mesh in PS to do similar and put a couple of layers of higher percentage support in before it gets to the top layers. Bit of a pain if you have many to do though.
@derminatore
I can't see all the specific's of your project (No .3mf), but It looks to me like you could just add a modified mesh (with a higher infill %) in the areas where the pillowing is occurring, that should take care of the problem.
Good Luck
Swiss_Cheese
The Filament Whisperer
@derminatore
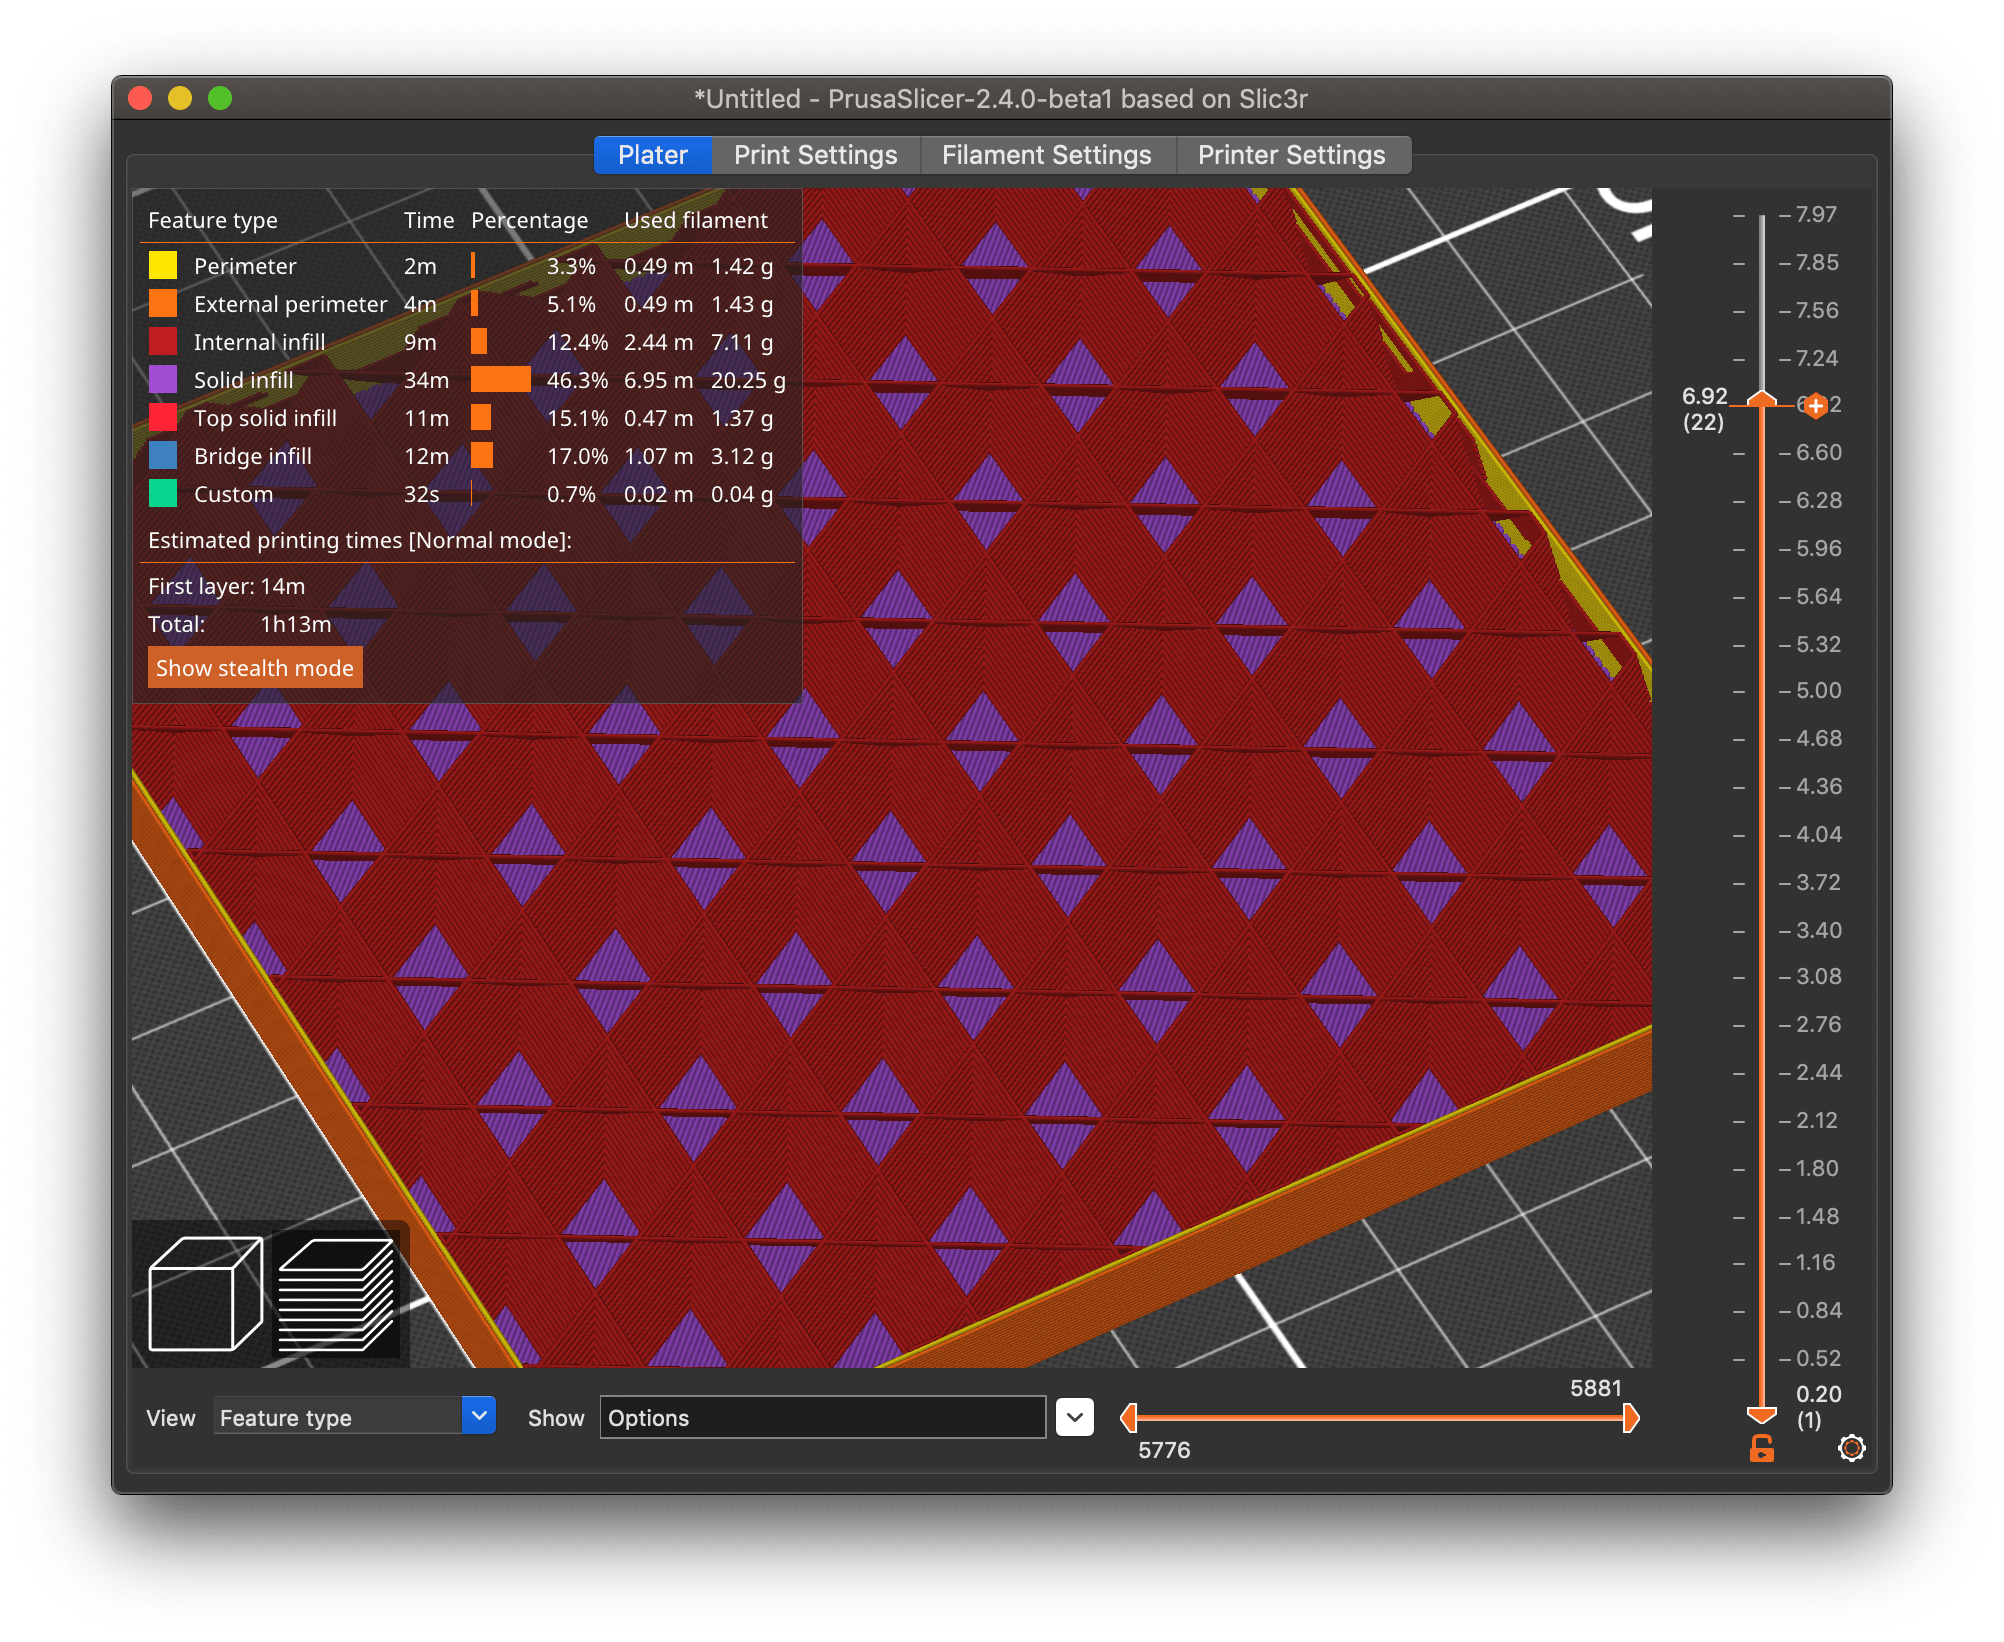
8mm tall box with 10% grid infill, I applied a mesh modifier to the top half 3mm deep with a 30% grid infill.
I turned off "perimeters" and "external perimeters" to offer a better view of the result.
this is done with a simple "modifier mesh" with it's properties set to "infill"
you can select the type and density for the volume of the modifier and move it around and adjust as necessary.
Good Luck
Swiss_Cheese
The Filament Whisperer
RE:
@swiss_cheese
Thanks for clarification.
As said bevor I started some experimenting on "modifier meshes". This in deed does help.
My current main use of the printer is to create boardgame organizer.
Due to the very individual size and shape requirements of the game material I create many individual parts for printing. The outer geometry is cubic for nice fitting in the game box. However, within these cubes I add deepenings to take up the game material. Sometimes it is just a box open on top side. But in several cases very different shaped forms are to be placed in on cube. By this several deepenings with diffenrent depth and location in one cube are required. For each of these depths an own modifier would be required and also placed carefully.
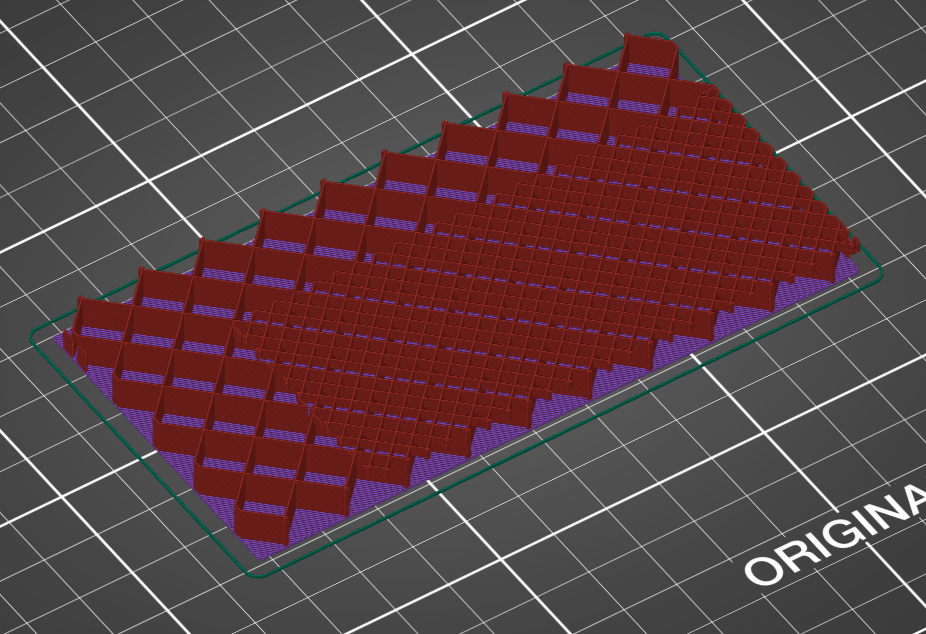
One example of my current build.
If one of the solutions I initially mentioned would be available it would make slicing way easier for applications as I described in this post.
This post also is meant to stimulate development of PS. I hope my suggestion is found usefull.
@derminatore
I'd like to clarify more, the pillowing you are experiencing it due to poor slicing practices, it's caused by sparse infill and/or printing to hot, and in this case not enough top layers, adding a line will not fix this problem, going to the next infill position at 10% has it's pitfalls also. As you can do this also with modifiers and test for yourself.
I understand after reading your reply that you think of modifiers as a work around, I'm going to state that they are not a work around, but are in fact the solution, Every print has very specific needs, modifiers and alike are the only reasonable way to address that need. many of the so called new features we see in slicer today are based on the processes derived from the use of modifiers or older features in slicer that have been improved. Even if a button was made for this you would still have to spend the time to mark the areas you wanted this to apply, and you would still most likely have pillowing with the settings your using, there is no make perfect print button, and there never will be. you have to put in the effort to get the result.
I appreciate your desire for a feature that will help you out, I truly do. however you have to educate yourself and put in the time, there are literally billions of printing scenarios and no algorithm will ever be able to fix them all, not in our lifetimes, that's what our brains are for.
If you feel very strongly about this feature, you will want to go to GitHub and make a feature request, this is a user to user forum and we can only show you how to achieve the result your looking for. GitHub is where the slicer developers hang out.
I'm making these suggestions in the hopes of helping you to understand that learning how to use the tools that are already in place will help you to achieve your goals both from a time and from a material usage standpoint. I'm not going to cover this subject in depth but there are also many things you can do in your 3D program of choice that will save you a great deal of time in your slicer software.
Good Luck, & best wishes
Swiss_Cheese
The Filament Whisperer
RE: Printing plateau on infill structure
Not sure what else to say here or to add to swiss_cheese's post. I've designed dozens of board game organizers and printed a lot more, never had any issues with pillowing — if proper infill and enough top layers are selected. There's no magic here.
Formerly known on this forum as @fuchsr -- https://foxrun3d.com/
RE: Printing plateau on infill structure
@swiss_cheese
Good hint to use modifier to test this by myself.
True, I am not very experienced yet. Could you maybe provide a good source to improve my knowledge?
Thanks
Consider Support Cubic infill pattern
[...] Most of my prints would be fine with +/-10% infill. Unfortunately prints turn out imperfect at plateaus. This happens when a plateau is printed on infill and surrounded by further infill structure. Especially when the pleateau edge has no support in the middle of the underneath infill structure. Sometimes the infill is printed prior to the plateau, this helps a little in providing support for bridging.
If you just want a general solution that works with most prints, try using another infill pattern. Others have suggested Adaptive Cubic which produces denser infill at walls and top/bottom layers. If you just need support for the top layers to print on, I go with Support Cubic which only increases density at the top. Even at 15% density (the density that will be used under solid top layers), it produces a finer pattern for the upper layers to build on.
This may help resolve your general issue without further twiddling. You do still need to provide sufficient top layers to get a good finish. On thinner prints, Support Cubic won't gain you any print time, but it works well when printing boxy things with large, flat top surfaces. Depending on your other settings, it can also gain you time with the Combine infill every X layers feature.
In my opinion there are two solutions to this issue.
1) Prior to printing plateau layer, printer should print a 1-2 line frame in layer below the plateau to provide support.
2) Whenever an infill structure is overlapped by a plateau structure, print should be extended to bridge over the whole infill gap towards the next available infill line.
This is already happening if I'm understanding what you're asking for. When printing supports (versus infill), you can specify dense layers to be laid down on top of the sparse supports. Since you want supports to be removable, this essentially adds a smooth(er) bridge atop supports. If you're printing infill (versus supports), the slicer already lays a bridge layer atop the infill on the next layer.
The problem is that without good infill support below that layer, you still have to print sufficient top layers to account for sagging and pillowing effects.
If your prints have multiple "plateaus" (horizontal solid top surfaces), this might be a less fussy approach. Just switching to Support Adaptive can also yield significant time savings with larger prints. If you're mass-producing these prints, this can be an important consideration. This has the advantage of not requiring a lot of settings changes regardless of your print (something that might be important if you're after uniform appearance between prints) and want to speed things up.
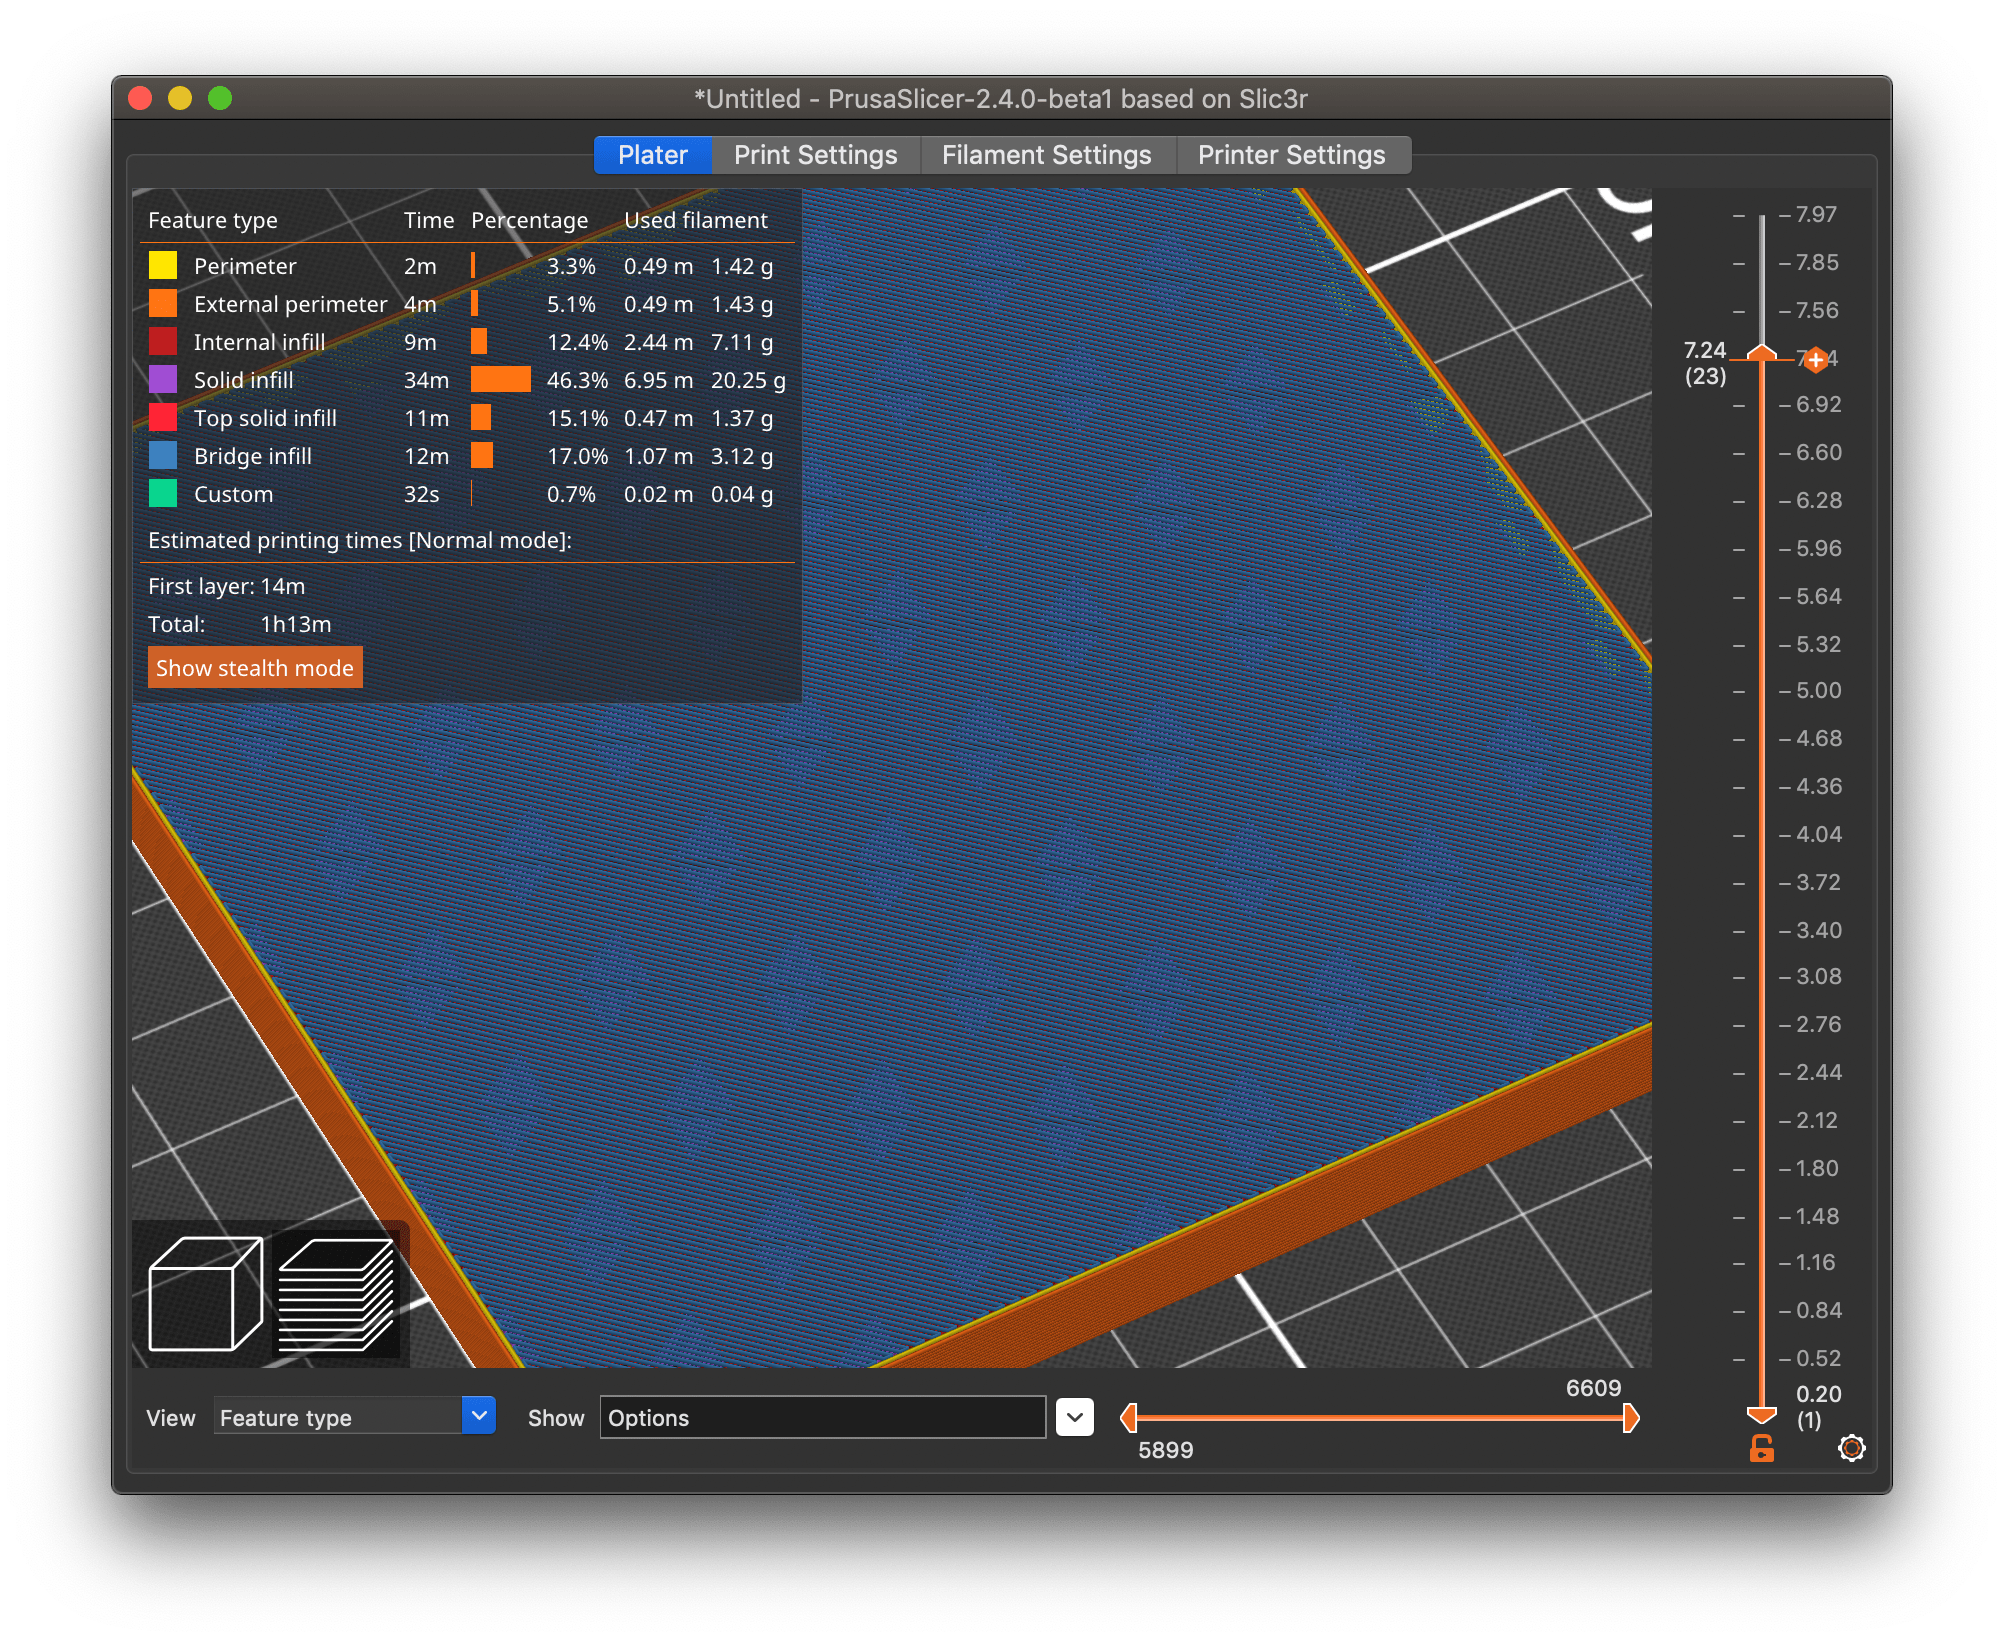
Here's a contrived example with two "plateaus" (top surfaces):
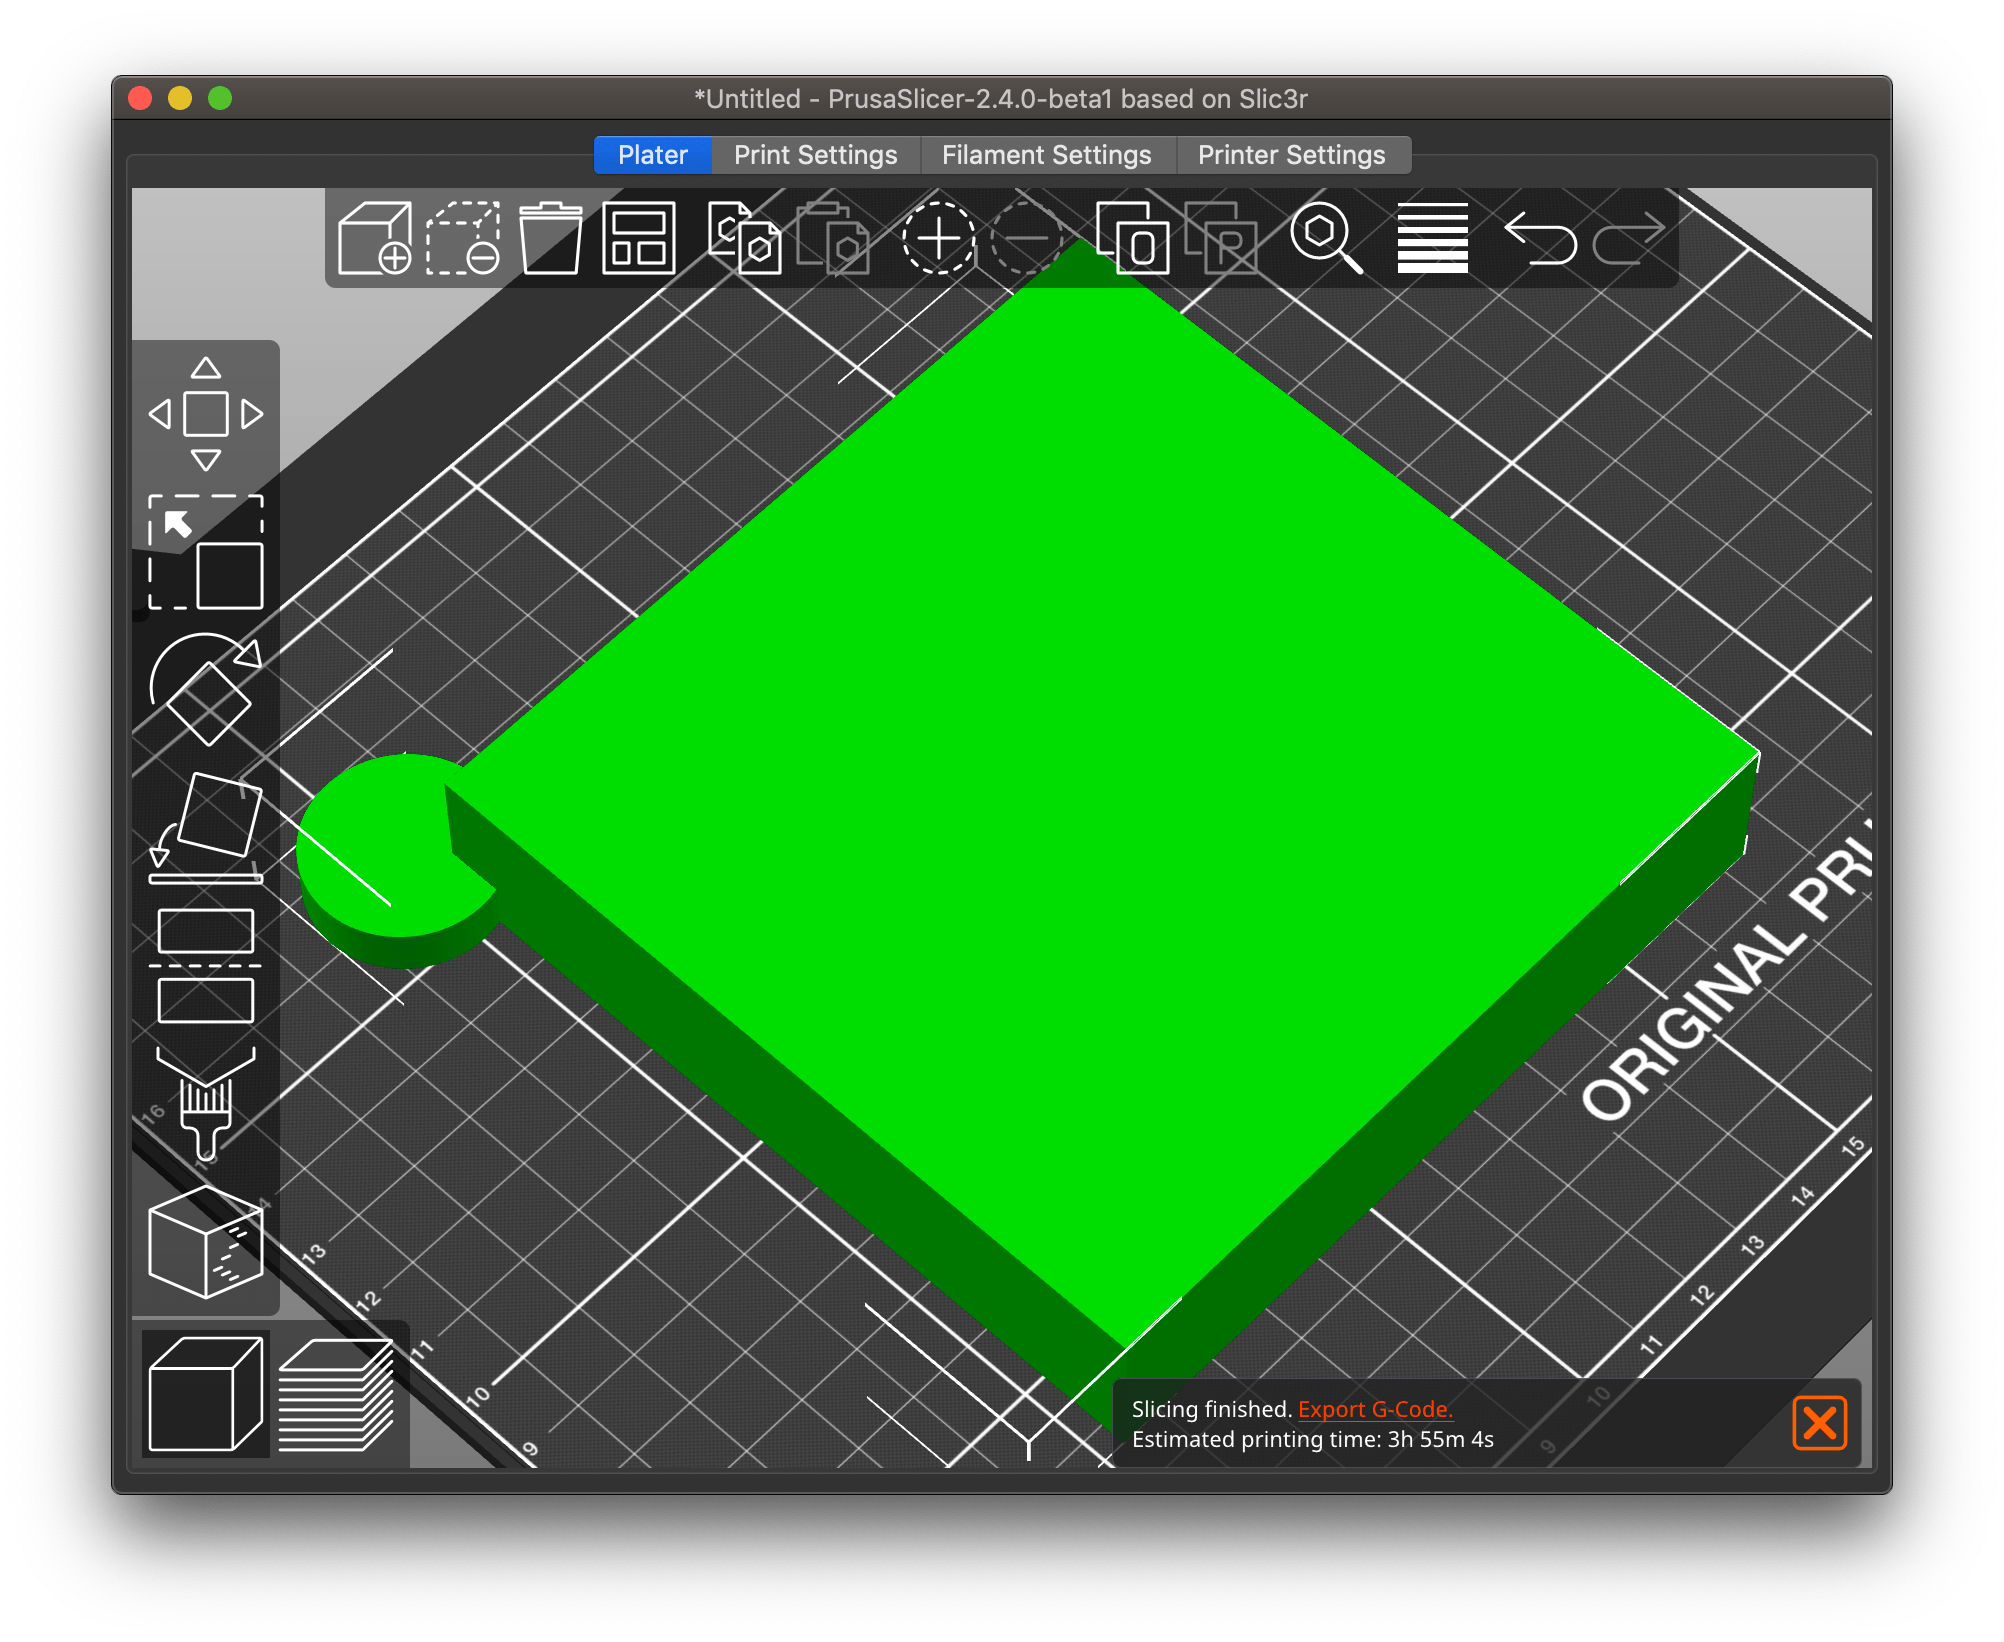
Using Support Cubic infill, a sparser pattern can be printed at the bottom of the large hollow area, saving a lot of time.
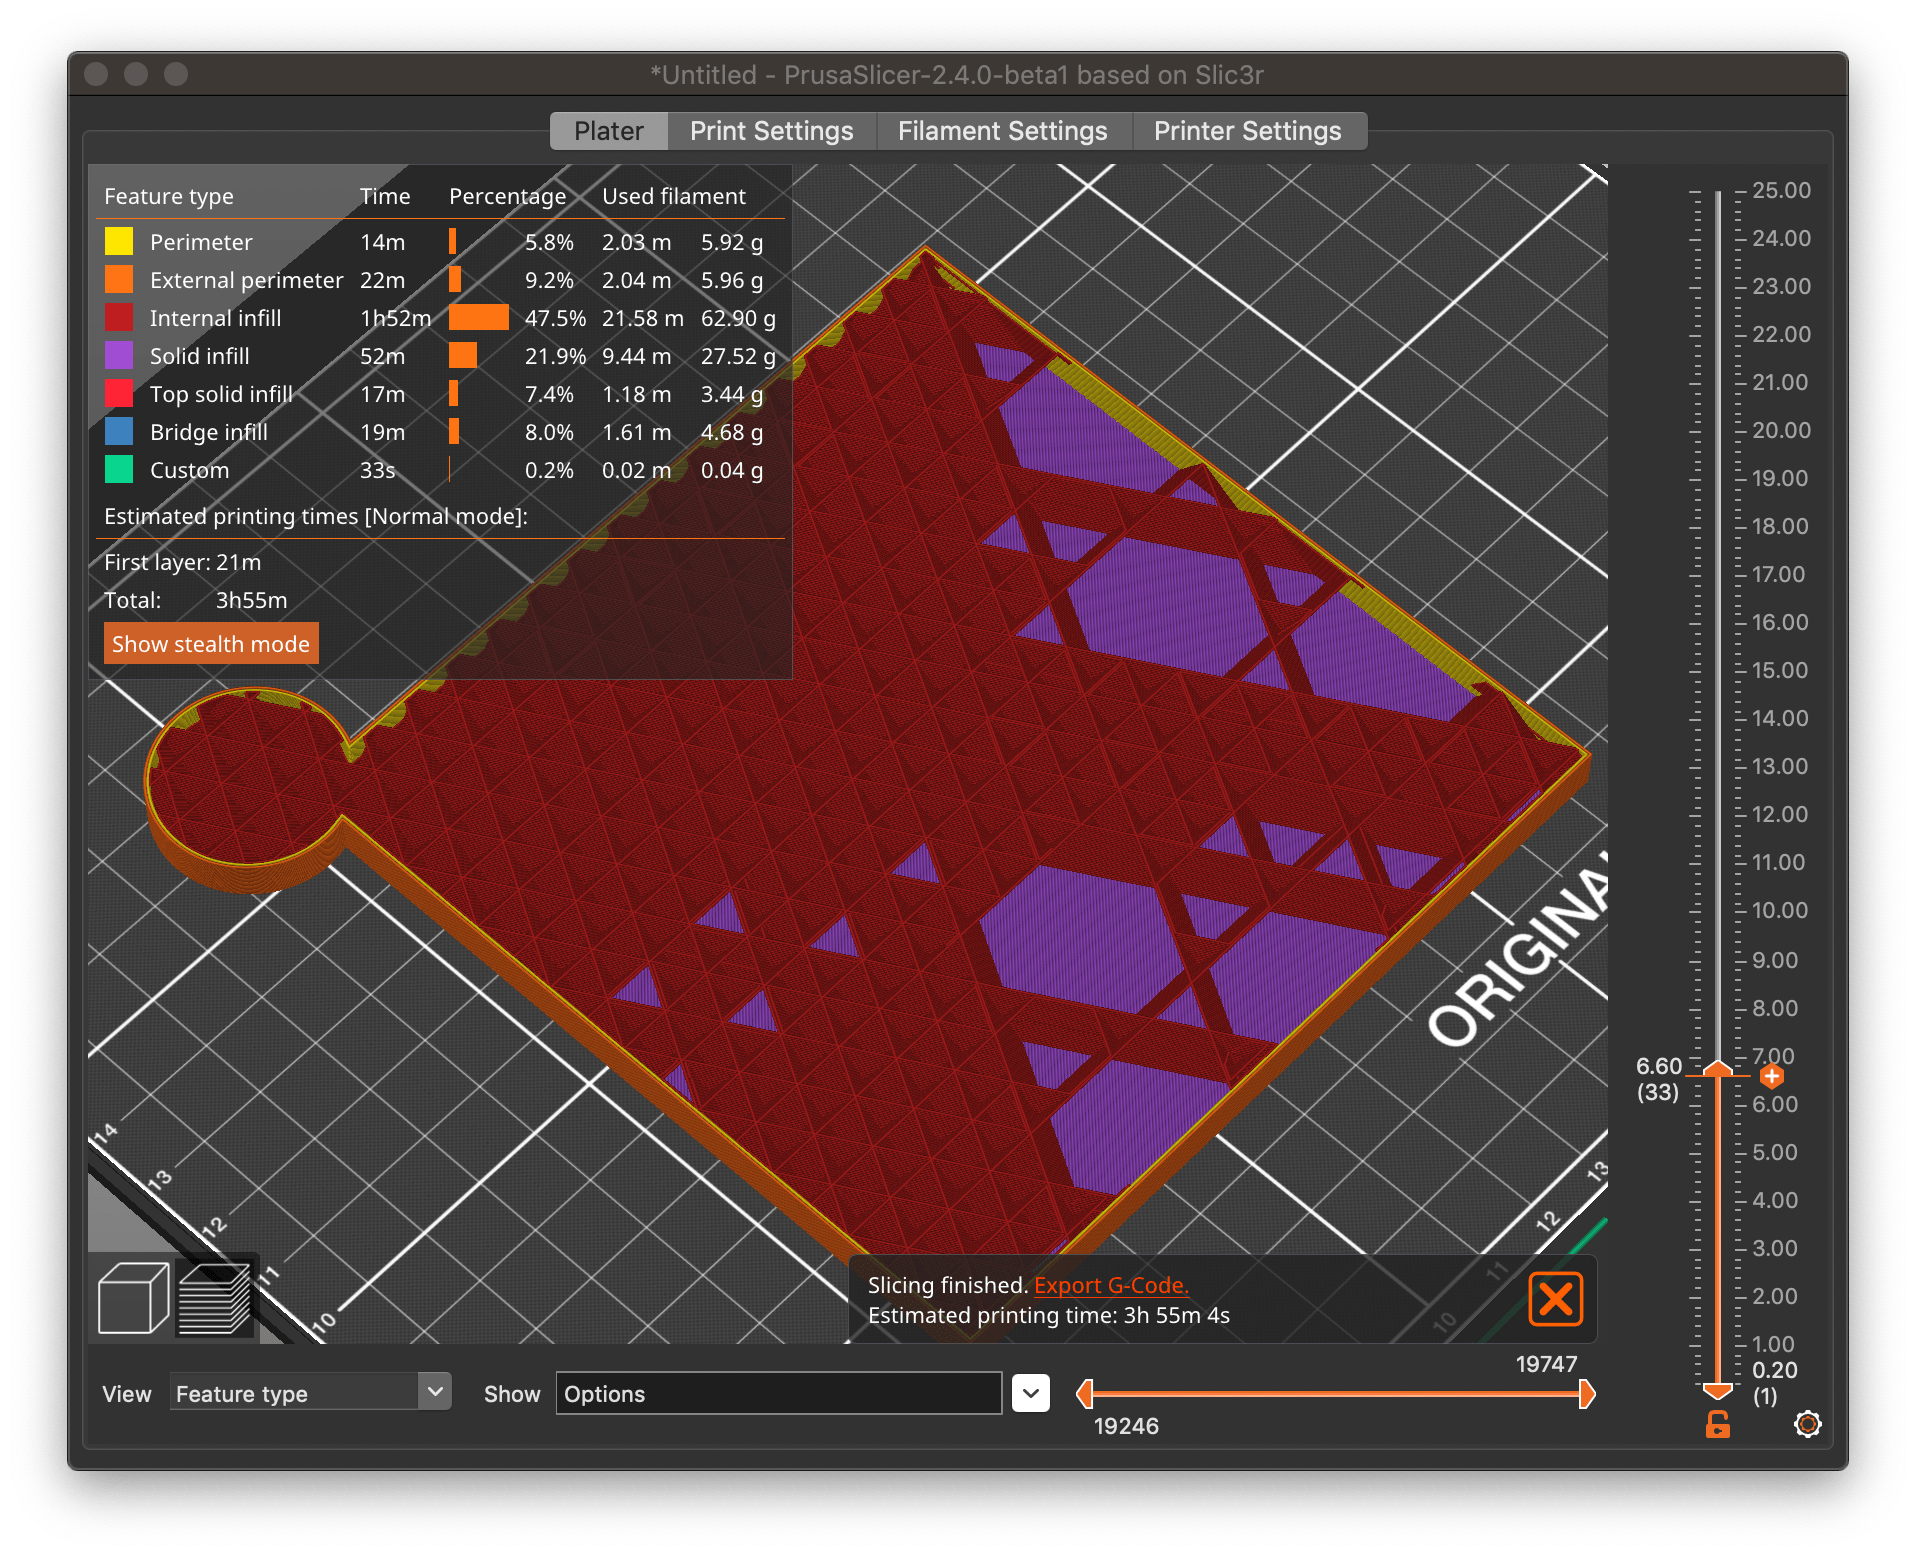
And of course, there's no reason you can't combine techniques to suit your needs. Just wanted to point out that the selection of infill pattern will make a big difference in these sorts of prints.
If you're out to maximize printing output, I've got some notes here that might be of interest.
@derminatore
Could you maybe provide a good source to improve my knowledge?
Thanks
If your very new, The Prusa knowledge base, has some information that can help you, though this forum Is hands down the best place I know of to gain knowledge and learn how to do the things your looking for as you move forward. You may not always get the answer your looking for (frankly it depends on whose doing the answering) but buried in this forum are many many great posts to help with every manner of subject to do with printing & Slicer, and two good ways to find some of this info are: (1) use google to search for posts and articles on the prusa forums, (2) if you find someone here that seems to involved in the kind of things you enjoy about printing or the type of thing you have a problem with look at some of their old posts or ask them directly, the folks here are very helpful.
I hope this helps.
Regards
Swiss_Cheese
The Filament Whisperer
Prusa documentation
Prusa documentation is improving over time. The Prusa team is currently in the process of documenting the current version of PrusaSlicer.
-
The Prusa Academy is being expanded to cover both slicer and printer topics for all Prusa products. 1
-
The Prusa Basics of 3D Printing ebook provides some very rudimentary intro material. 1
-
The Prusa PrusaSlicer documentation homepage is under heavy development and are improving daily.
-
The PrusaSlicer FAQ also contains useful information.
-
Most of the information in the Slic3r Manual still applies, particularly for settings and functions under the hood.
WOW!
What a crock of Crap! that's insulting.
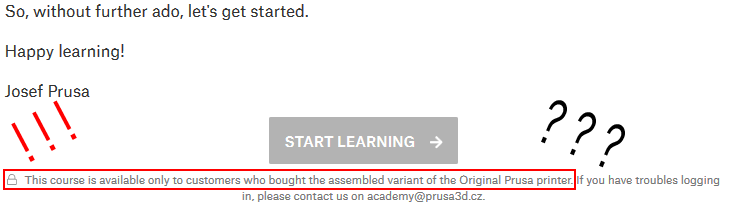
You weren't smart enough to put your printer together by yourself, so Prusa figures you'll need the extra help to get going.
Forget about the rest of us, who have spent thousands of dollars on Prusa printers, parts and filament.
I don't need this course, clearly but I could never in good conscience send anyone to that link.
Oddly enough I seem to remember Prusa suggesting that it was better to assemble your own printer so you could learn from the experience, but then they take away the potential for you to learn what is most likely the most basic of lessons, if their history is anything to go on.
I apologize, to the New users and folks that assembled their own printers, and I will do what I can to help.
Swiss_Cheese
The Filament Whisperer