RE: "Manual" multicolor
Your right, it didn't. Up till now I've manually edited the GCode file to remove the redundant M600, but no more.
RE: "Manual" multicolor
Thank you for this post! I believe it will work for something I would like to do. Do you happen to have the files that you originally attached? They have since been removed. Thanks!
RE: "Manual" multicolor
Sorry Millerjr,
I don't have the files.
can you ZIP Compress the STL, and attach it here,
OR better still, save your model with your preferred settings for filament in a 'Project File' (a .3mf file)
then ZIP compress that, and I will have a look at it.
regards Joan
I try to make safe suggestions,You should understand the context and ensure you are happy that they are safe before attempting to apply my suggestions, what you do, is YOUR responsibility.Location Halifax UK
RE: "Manual" multicolor
Hi Joan,
Thank you for the reply! The file is one that I downloaded from https://www.prusaprinters.org/prints/50183-mmu-lcd-cover-ultimate-prusa-casing/files. I have not made any changes to the file. My plan was to work through your example then attempt to apply the process to this file. I've attached the zip file from the prusa site.mmu-lcd-cover-ultimate-prusa-casing-model_files
Regards,
millerjr
RE:
I found another way of doing this at the webpage below which is, I think, simpler.
https://schlosshan.eu/blog/2019/03/02/prusa-i3-mk3-real-multicolour-prints-without-mmu/
Unfortunately, the webpage has vanished, but what it involves is adding the attached configuration file.
The different colours are added as separate files which must slot into one another exactly.
Examples:


A soft answer turns away wrath.
RE: "Manual" multicolor
Postscript to my last post. I've messaged Rainer, the author of the blog, and the link has now been re-instated.
A soft answer turns away wrath.
RE:
I basically combined most of everything above to print @Locki's LCD Cover in Orange, with black letters, on my MK3S+. Since it is only two colors, the filament changes were easy, and minimal.
Specifically, I opened up PrusaSlicer 2.5.0 alpha 3, and configured the following:
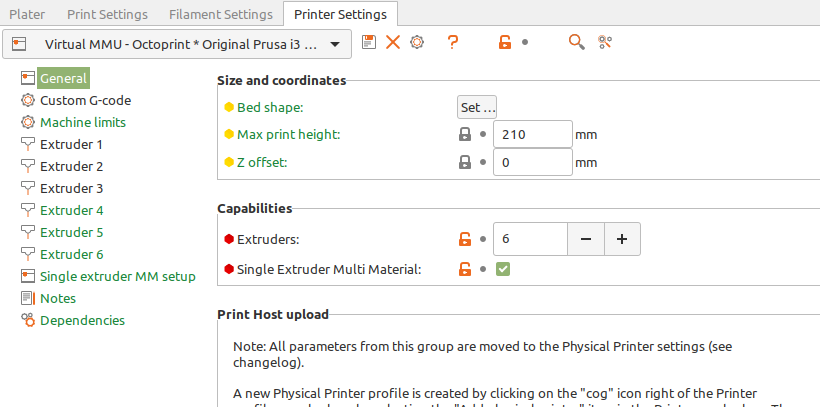
Printer Settings -> General
Extruders: 2
Single extruder multimaterial: Checked (enabled)
Printer Settings -> Custom Go-code -> Tool change (the Gzero Xzero Yzero line is very important! as it moves the head to the front left so that blobs don't end up on your print)
    {if layer_num >= 0}
    G0 X0 Y0 ; go to front/left
    M600 ; change to filament for extruder
    {next_extruder + 1}
    {endif}
Printer Settings -> Extruder 1 -> Retraction when tool is disabled
Length: 0
Printer Settings -> Extruder 2 -> Retraction when tool is disabled
Length: 0
Printer Settings -> Single Extruder MM Setup -> Single extruder multimaterial parameters
Cooling Tube Position: 0
Cooling Tube Length: 0
Filament Parking Position: 0
Extra loading distance: -2
Print Settings -> Multiple Extruders:
Wipe tower: Checked (Enabled)
Prime all printing extruders: Unchecked (disabled)
Plater:
- Set Filament 1 to Prusament PETG - Orange
- Set Filament 2 to Prusament PETG - Black
Added Locki's STL, flipped it face down then rotated it so that the open end (Pi end) faced left
Added the letters STL that I found elsewhere on printables (maybe ChrisD's LCD Cover?)
Manually aligned the two, then selected both, then rotated and positioned for printing
Moved the wipe tower to the front/right, this is the opposite side of the plate where the tool change G-code is going to position the head, and will help keep tool change/wipe tower movements from pooping on your print
Fixed my infill angle so that the fill lines aligned with the reset button lines (Print Settings -> Infill -> Fill angle: 81 based on my part's orientation on the build plate)
Generated the G-code and loaded it into my printer
I printed and watched for the filament changes. Made sure I removed the blob that comes out after the filament change, but the secondary blob that happens after you say "yes" that the color is correct does NOT occur with these settings. You may not want the wipe tower, but that gave me a chance to clean up any stringing/blobs that cropped up during the filament change.
Here's Locki's LCD Cover for Raspberry Pi 4B and Hyperpixel 4".
https://www.printables.com/model/72186-lcd-cover-display-hyperpixel-4-mk3s-rpi-4b/files.
Here's how I positioned the wipe tower: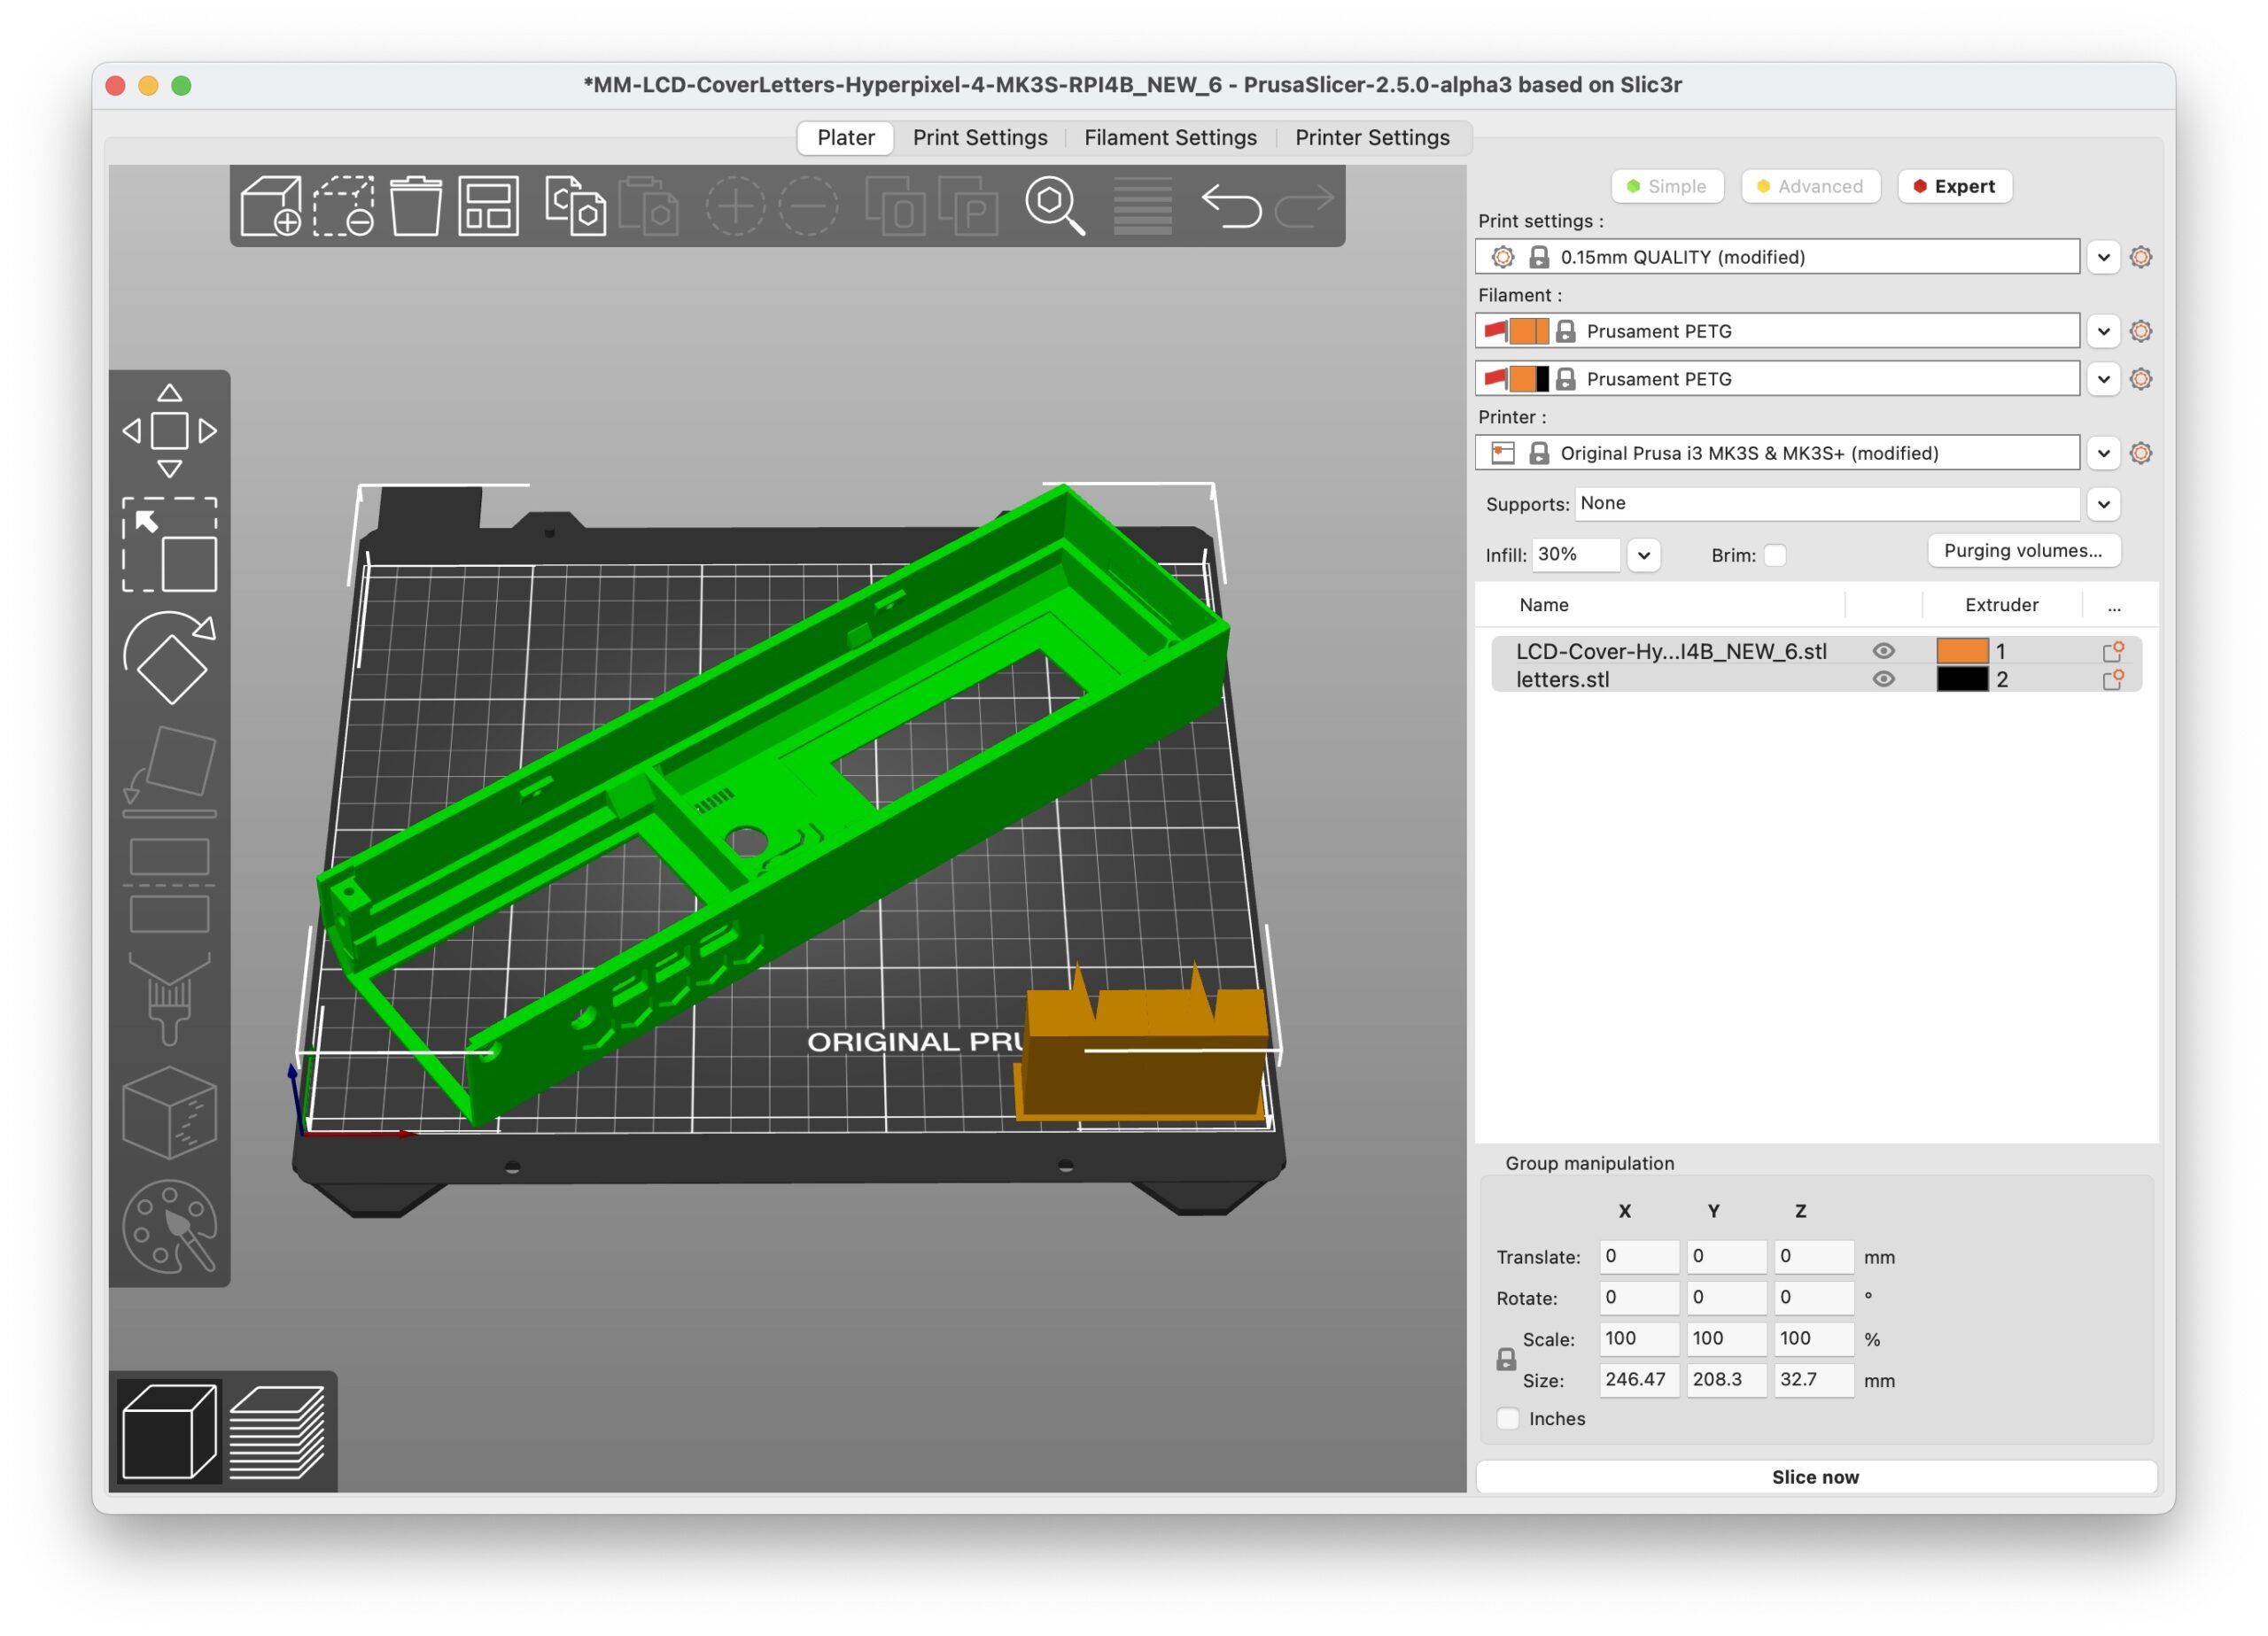
Here's my first attempt, printed on the satin sheet. Even with very little cleanup done (like clearing the hex holes), everything fits together nicely. Note that I don't have the side cover screwed into place, yet, but it fits nicely.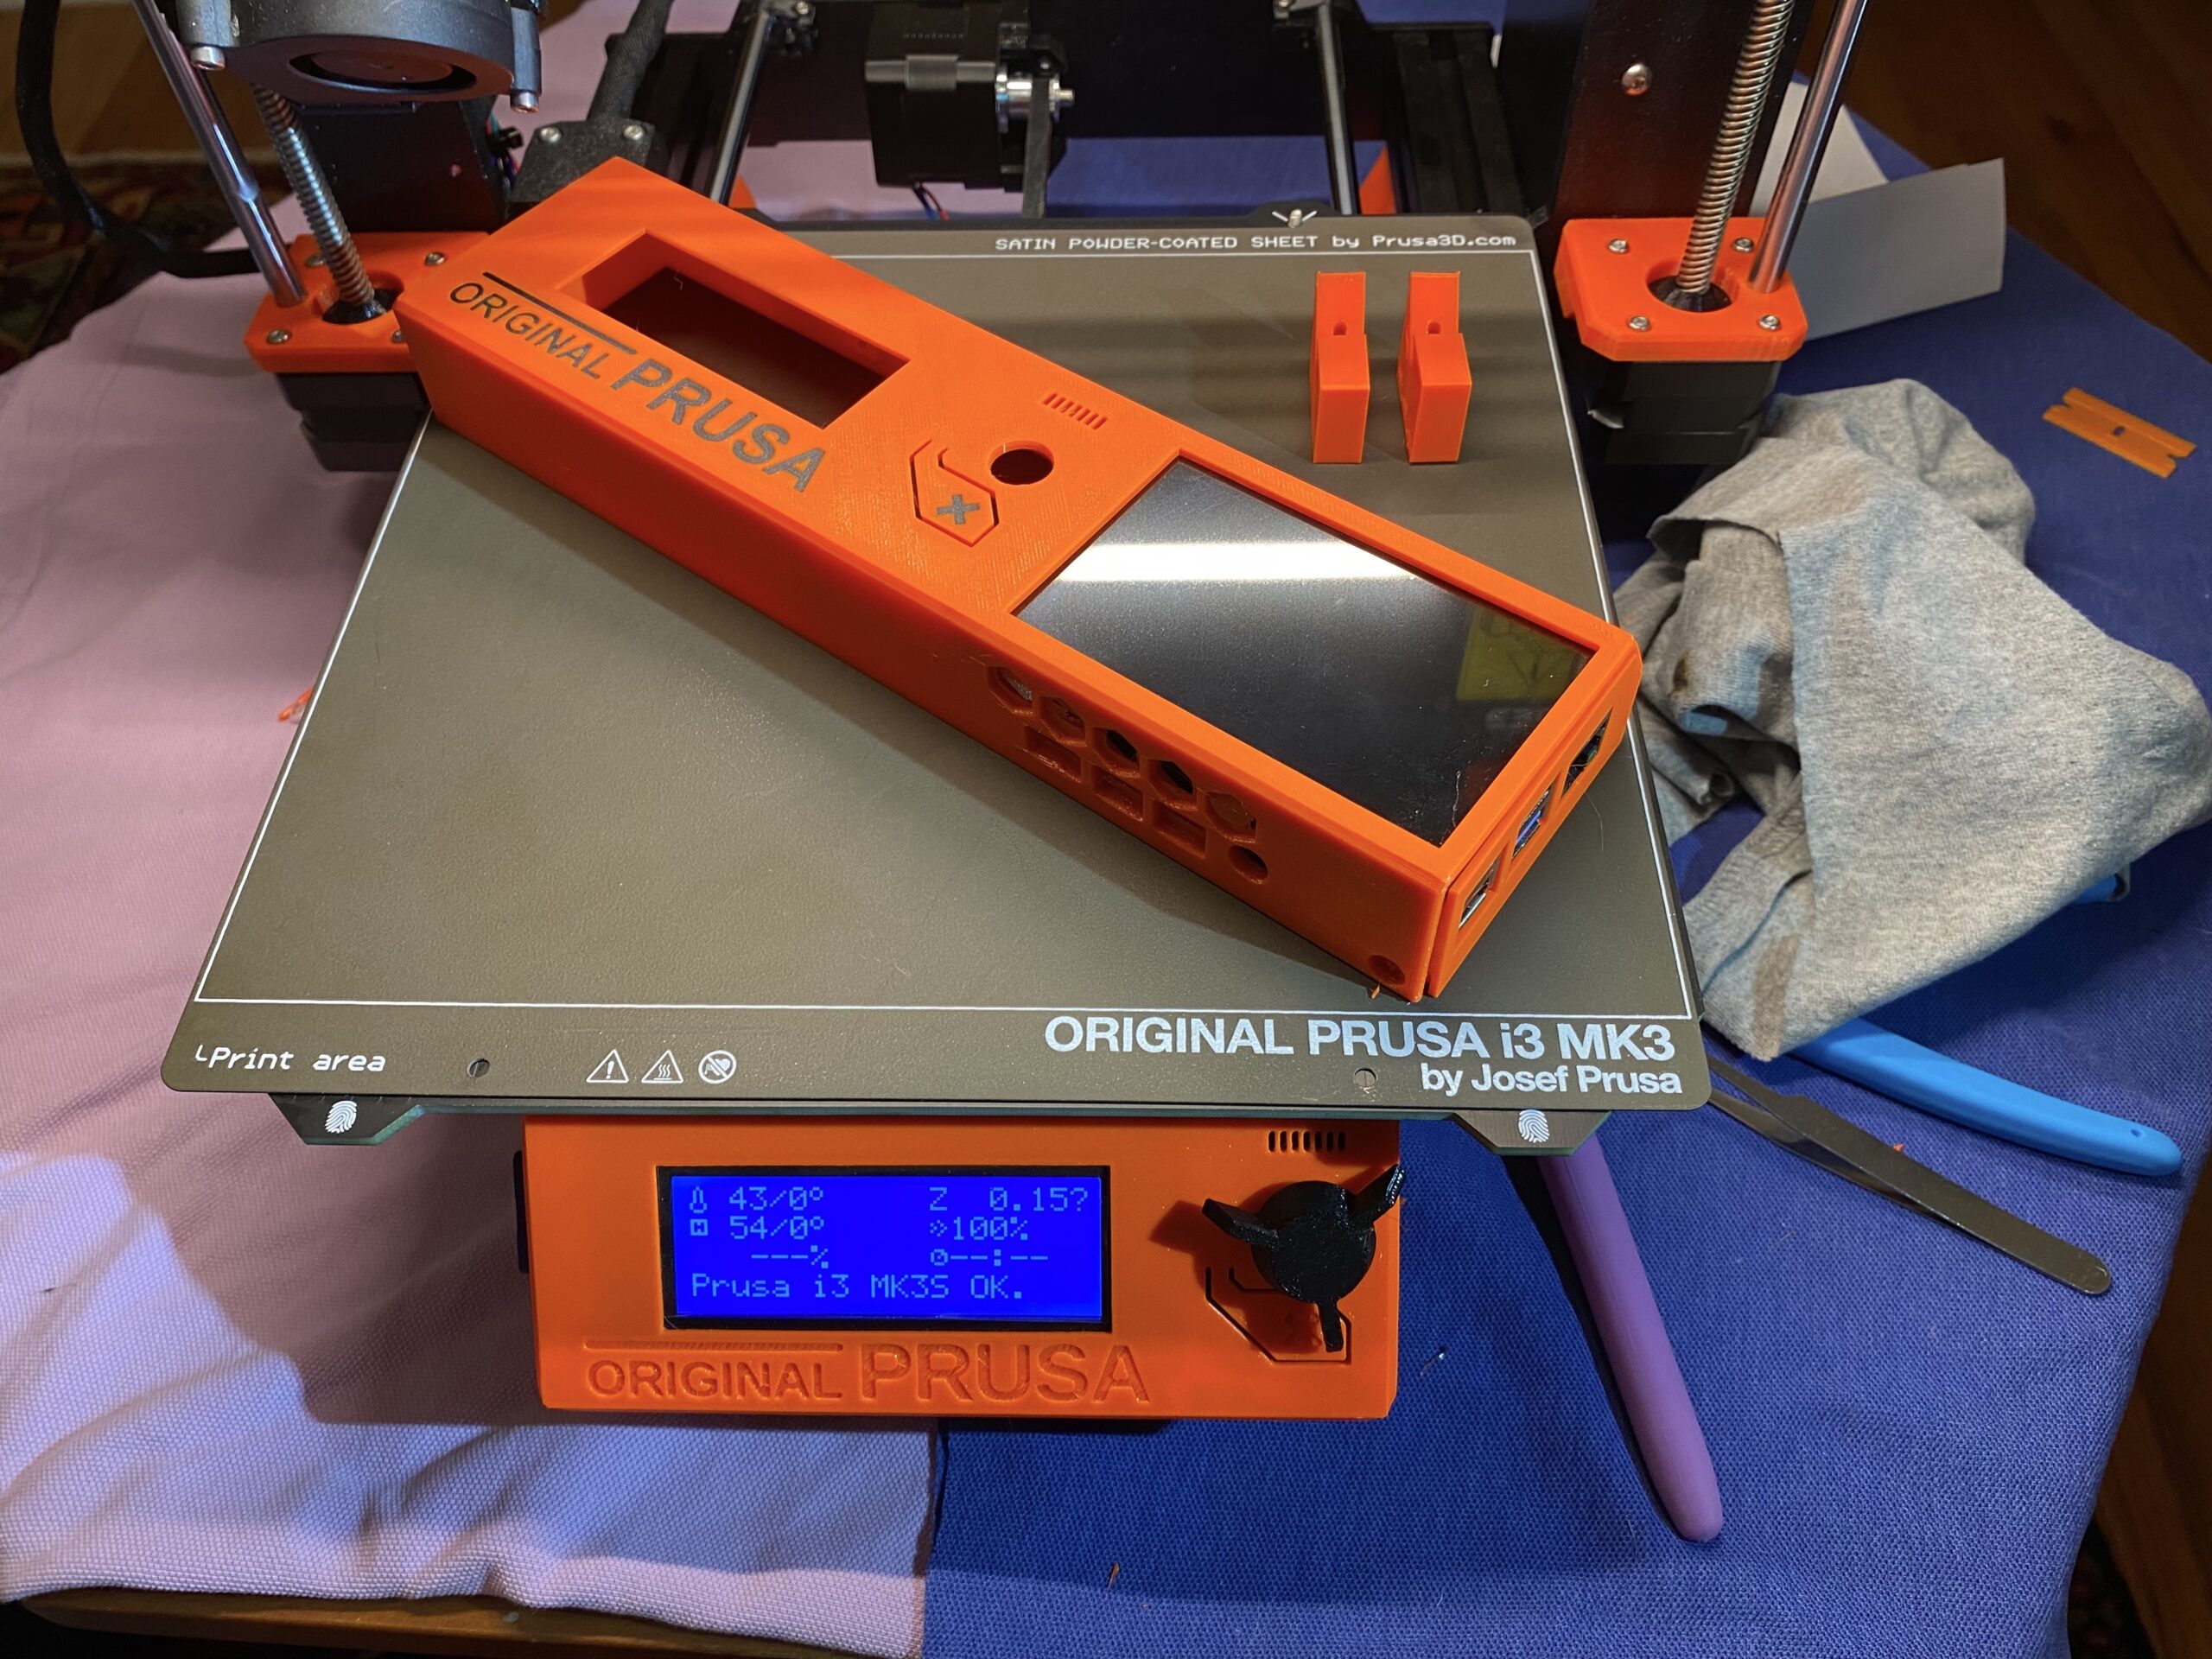
Thank you for keeping this thread going.
RE: "Manual" multicolor
This code:
    M600 ; change to filament for extruder
    {next_extruder + 1}
Should be combined into one line:
    M600 ; change to filament for extruder
    {next_extruder + 1}
RE: "Manual" multicolor
This code:
M600 ; change to filament for extruder {next_extruder + 1}Should be combined into one line:
M600 ; change to filament for extruder {next_extruder + 1}
Wouldn't the second line then simply become a part of the comment after M600?
RE: "Manual" multicolor
Wouldn't the second line then simply become a part of the comment after M600?
Yes--it's supposed to be part of the comment and not a separate statement.
RE: "Manual" multicolor
it's supposed to be part of the first line because it's a macro that automatically fills in the extruder number. Therefore, in the resulting g-code, you end up with lines that tell you which extruder (and which color) is going to be used. Yes, it's just a comment, but it helps when you're reading the g-code.
M600 ; change to filament for extruder 2
.
.
.
M600 ; change to filament for extruder 1
.
.
.
M600 ; change to filament for extruder 2
RE: "Manual" multicolor
Many thanks for sharing your 3mf file. I found that much quicker to understand than all the step-by-step instructions posted earlier
RE: "Manual" multicolor
how do you change the extruder from 1 to 2 because i can only see one but cant change to 2 is there a video how to do it?
RE: "Manual" multicolor
Don't know if the screenshot answers your question:
RE: "Manual" multicolor
thnx and the rest will go by the video on the at the start of this topic
RE: "Manual" multicolor
I'm a little late to the party but here's my recipe for doing "manual multicolor" with a wipe tower:
- In "Printer Settings"-->"General":
- Set "Extruders" to desired number of colors
- Enable "Single Extruder Multi Material"
- In "Printer Settings"-->"Single extruder MM setup":
- Set "Cooling tube position" to 10.
- Set "Filament parking position" to 0.
- Set "Extra loading distance" to 0.
- These settings eliminate the filament getting retracted into heatsink section and possibly jamming there as well as eliminating the big blob created in the wipe tower after changing filaments. I think the original values are appropriate for a physical MMU(2) where the filament is needs to be moved between the Bowden tube and the extruder tip but does the wrong thing for manual color changes.
- In "Print Settings"-->"Wipe tower", disable "Prime all printing extruders". Since we're manually changing filaments, there's no need to do this.
- In the "Printer Settings"-->"Custom G-code"-->"Tool change G-code" section, put the following:
{if layer_num >= 0}M600 ; change to filament for extruder {next_extruder + 1}{endif}
- M600 performs a filament change. The layer_num check skips the unnecessary filament change triggered by the tool change that occurs at the very start of the print (when layer_num is -1). I think this initial tool change is needed to ensure the MMU(2) has the correct filament selected but isn't needed when manually loading the filament.
It took me a bit to come up with these settings, but now manual multicolor prints on my Prusa i3 MK2.5 work flawlessly. I wouldn't use it for prints lots of color changes, but it's wonderful for embedding colored text in a layer.
Thank you! I wanted the wipe tower with the manual multicolor printing to stabilize the flow when the color is switched (not for purging to change color since the M600 already does that well enough on my MINI).
What I tried is just setting the filament parking position and extra loading distance to 0, and I saw that got rid of the "CP Toolchange Load" which is where the big blob on the wipe tower was coming from. It was trying to load in 18 mm of filament on my MINI after it was already loaded from the M600, and doing that right above the wipe tower, making a big blob.
I need to play around with it a little more though, because a normal unload, especially on PETG, gives me a super long string and badly shaped tip, and I always have to trim it. No big deal. But, I noticed with the wipe tower enabled, the printer does a special unload sequence that must be designed for minimal stringing for MMU reload ability, and there was NO STRINGING on my filament!
When I set the parking position and extra loading distance to 0, it still tried to shape the tip, but then ran the filament right back to the nozzle after it finished so I got the normal super long string. My goal is to try to play with the PrusaSlicer settings so I can get this tip shaping on unload, but avoid the blob.
RE: "Manual" multicolor
I tried to print in multicolor without the MMU on the MK4 4.7.2 using the manual filament change, and I noticed that at the end of M600 for the filament load, when the nozzle go back to print it first go back to the last position before continue to print, and often some plastic drops on that last position where is not expected to have the new loaded color. 😣
Adding a retraction on the g-code for color change that prevents future leaking do not solve the situation, because when it resumes processing the the g-code, the next g-code instruction do not contain any small purge to balance the added retraction, and it could cause missing material with a defective starting line. 😒
- Any idea how to solve ?
RE: "Manual" multicolor
Are you using the wipe tower? Most instructions I’ve seen say not to use it, but I used it on my mini to stabilize the flow after changing filament. When enabled, the printer uses the wipe tower before and after the M600, so the return dot should happen on the wipe tower and not on the print.
I tried to print in multicolor without the MMU on the MK4 4.7.2 using the manual filament change, and I noticed that at the end of M600 for the filament load, when the nozzle go back to print it first go back to the last position before continue to print, and often some plastic drops on that last position where is not expected to have the new loaded color. 😣
Adding a retraction on the g-code for color change that prevents future leaking do not solve the situation, because when it resumes processing the the g-code, the next g-code instruction do not contain any small purge to balance the added retraction, and it could cause missing material with a defective starting line. 😒- Any idea how to solve ?
RE:
I use this in my filament change g-code. This will move the nozzle somewhere else before the change, and that "somewhere else" will be where the nozzle returns to after the change. Update the g-code "G0" line to move the nozzle to an empty part of the bed for the particular print you're making. During filament changes, I manually remove any blobs from the nozzle, just before actual printing resumes, by watching for this nozzle move (after the filament change).
{if layer num >= 01}
GO XO YO ; Update this, tell the nozzle to go to an empty part of the bed
M600 ; change to filament for extruder {next extruder + 1%}
{endif}
RE: "Manual" multicolor
Are you using the wipe tower?
No, I did not used it. But I like the proposed solution of @rnbarrett so, I will do some tests with it.