How to config PrusaSlicer for custom metal printer?
We're involved in a research project to make best use of a custom-built metal printer. It can lay down extremely precise walls in straight lines and easy curves, but we're about to start working on more sophisticated shapes and intersections. Up to now, we've been driving motion through a custom set of controls, and we'd like to start using the output of a general purpose slicer.
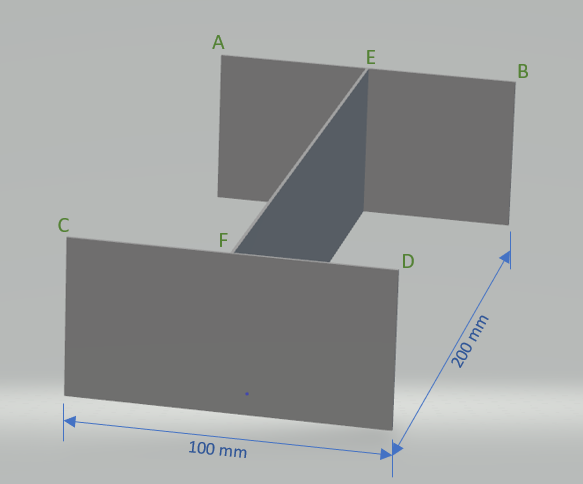
We have what we thought would be a trivial first step... a simple I-Beam shape. It was designed to have wall thicknesses that exactly match the depo-width from the system (1mm).
Referencing the attached image, I (naively) would have expected/liked the slicer to create straight line segments. For example, AB, CD, then EF, or some variations on that. Instead, PrusaSlicer is giving me AEFC, FD, then BE with rounded motions for the AEF and EFC corners and variable width depositions. These are problematic for us.
Long straight lines work best for us. What's the best way for us to proceed?
- Play with the many configuration options for PrusaSlicer? (I like this route, if possible.)
- Switch to a different slicer? If so, which ones should we look at first?
- Spin off a fork of our own from some public code?
- Dig in, and write our own slicer? (I like this one the least.)
Thanks in advance.
Best Answer by Neophyl:
What version are you using ? The later versions have a default slicing engine called Arachne, (Print Settings>Layers & Perimeters>Advanced>Perimeter Generator (its a yellow setting so you need to be in at least advanced mode to see it). That is designed to use variable width extrusions. Change it to classic. At least that way it will be using the configured extrusion width from Print Settings>Advanced>Extrusion Width.
Even with that though its unlikely to give a satisfactory result (might depending on your printer) as usually for a perimeter you want a 2 walls so it can trace your shape. If you try and print straight lines a single wall thick then where they meet generally has problems as getting the extrudate to perfectly be placed with the perfect amount is problematic (different pressures, travel distances where the pressurised nozzle is leaking a tiny tiny amount etc). You often get a thin spot where they join.
No attached image btw. For images its best to use the Add media button, top left of the edit field. For attaching anything else you generally need to zip up files (like stl's 3mf project files etc). You can attach images normally so I don't know why specifically your didn't make it. It might be that as a new forum member you cant attach yet. I think you need a minimum number of posts to be able to attach anything which is why I suggest you use the Add Media option.
RE: How to config PrusaSlicer for custom metal printer?
Also, I have the Printer Settings -> Extruder -> Nozzle diameter set to match the wall width (1mm).
Ditto for all the Print Settings -> Advanced -> Extrusion widths.
(Thanks in advance for being kind. I'm new to this.)
RE: How to config PrusaSlicer for custom metal printer?
What version are you using ? The later versions have a default slicing engine called Arachne, (Print Settings>Layers & Perimeters>Advanced>Perimeter Generator (its a yellow setting so you need to be in at least advanced mode to see it). That is designed to use variable width extrusions. Change it to classic. At least that way it will be using the configured extrusion width from Print Settings>Advanced>Extrusion Width.
Even with that though its unlikely to give a satisfactory result (might depending on your printer) as usually for a perimeter you want a 2 walls so it can trace your shape. If you try and print straight lines a single wall thick then where they meet generally has problems as getting the extrudate to perfectly be placed with the perfect amount is problematic (different pressures, travel distances where the pressurised nozzle is leaking a tiny tiny amount etc). You often get a thin spot where they join.
No attached image btw. For images its best to use the Add media button, top left of the edit field. For attaching anything else you generally need to zip up files (like stl's 3mf project files etc). You can attach images normally so I don't know why specifically your didn't make it. It might be that as a new forum member you cant attach yet. I think you need a minimum number of posts to be able to attach anything which is why I suggest you use the Add Media option.
RE: How to config PrusaSlicer for custom metal printer?
(let's see if this attempt to add media works - see below)
I'm presently using PrusaSlicer 2.5, so I'm assuming that helps me dodge the Arachne / variable width issue.
And yeah... managing the intersection corners is going to be rough for the single walls. That's exactly the puzzle we're trying to focus on... intersections.
RE: How to config PrusaSlicer for custom metal printer?
No Arachne is in 2.5 so you will have that issue. At least the image made it this time 😊
RE: How to config PrusaSlicer for custom metal printer?
Turning off Arachne made a huge difference!
The recipe is now much closer to what I can try to work with... no curves, no variable width depositions.
It's creating a plan that goes EF, then CFD, then AED. I need to look closer at what it's asking near the E and F points, but this is worlds better than what I was getting before. Thanks!
RE:
Hi,
Interesting project. I just had a quick play around with PrusaSlicer config using a 0.8mm nozzle. Feel free to play around with the attached (zipped) project.
From your original post above, it seems that you ideally want to have a single pass of the nozzle to form the walls i.e. one perimeter @ 1mm thickness. This is setup in the project file. I noted that the default tool-path seems to be five moves: B-E, E-A, C-F, D-F and F-E. As far as I can see it follows the same pattern of moves for each layer.
I'm not sure if the slicer settings will allow the tool-path to be adjusted in any way (I suspect not), but given the predictable paths and known XY end-points, you might be able to post process the G-Code file to reduce each layer to three moves: B-A, C-D and F-E.
As you have already identified, the strength at the intersections is most likely going to be the biggest issue.
Have you already built a custom PrusaSlicer profile for the printer?
Anyway good luck! Be interesting to hear how you get on.
Cheers,
Tim
P.S. Edit - that project was built on the PS 2.6 alpha4
RE:
Updated the project file for PrusaSlicer 2.5.0. The nozzle diameter on this one is set at 1.0 mm which seems to result in a different tool-path.
Hope it helps.
Cheers,
Tim
RE: How to config PrusaSlicer for custom metal printer?
@gazpachozen
You mentioned the printer is custom, I'm guessing you still have a sintering process? if so you might consider setting the model up as individual objects with a 25% overlap, and using the Arachne PG. This will result in single extrusions with no curves printing from C-D, E-F, A-B depending on the models orientation on the bed, rotating the model to the X axis produces C-D, F-E, A-B and is better in IMO. If sintering that should solidify the bond. I will add that you may want to play with the overlap as I don't know the specs of your equipment, I made an educated guess. You may also be able to do this achieving reliable results even if laying down a molten metal bead. An added benefit in this use case is its faster, by several min then the Classic PG.
Good luck, I'll be interested to know how it's working out also.
RE: How to config PrusaSlicer for custom metal printer?
@tim-weston, thanks for the extra effort and forwarding the zips. They were very instructive. I continue to be impressed with the configurability of this tool.
And no, I've not yet made a PrusaSlicer profile for our system, but I'm sure I'll be doing so at some point. There's a lot to learn though before I take that step. I'll keep everyone here posted on our progress.
RE: How to config PrusaSlicer for custom metal printer?
@rd, actually our system is wire based. 🙂
Your suggestion is interesting, and I'll add that to my ever growing queue of things to investigate. Overlapping multiple models and using Arachne is a little beyond my understanding right now, but you've given me a path to follow (no pun intended).