How to center an infill pattern on a specific point in the object
Hello All,
I am still learning the intricacies of Slicer so this may be a simple question, I did use the search and couldn't find an answer.
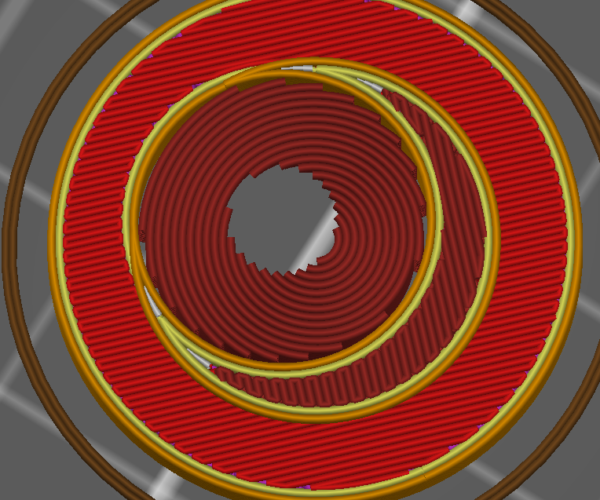
I am looking to change where the center of the infill pattern Archimedean Chord is placed in my object. As a default it looks like slicer places the center of the pattern in the center of the object. What I need to do is place the center of the pattern in the center of a hole through my object. I have tried using a Add Modifier >> Cylinder to create a localized area in which the infill pattern will center. It looks like the pattern in my Modifier Cylinder is still centered around the global center of the object. Is there a way to force the slicer to center or start an infill pattern around a specific point on the object? I have attached a screen shot of the object in orange with the Modifier Cylinder in green. I have also attached a shot of the object sliced with the Modifier Cylinder showing the pattern not centering at the center of the Cylinder but rather centering at the center of the global object.
What I am trying to do is create a print where the hole is clean and clear in the print as well as having the rest of the object be printed without voids. I am using this as a mechanical part so the strength of the object is the primary concern. As such the infill is 100%. I know I can up the number of perimeters to get a nice solid shell around the hole, unfortunately this creates a void where the perimeters from the hole meet the perimeters from the post. The Archmedian Chord seems to be the best infill to fit those requirements especially when I print with 0 perimeters but I need to get the pattern to originate from my though hole to get the effect I am looking for.
Thanks for your thoughts
RE: How to center an infill pattern on a specific point in the object
I am using this as a mechanical part so the strength of the object is the primary concern. As such the infill is 100%. I know I can up the number of perimeters to get a nice solid shell around the hole, unfortunately this creates a void where the perimeters from the hole meet the perimeters from the post.
100% fill is almost always a mistake.
If you really do want concentric filament then increase the perimeters until the part is all perimeter.
But solid parts lose a lot of advantages. Solid PLA is likely to shatter, solid PETG loses resilience and can even shatter too - solid Flex changes characteristic and suddenly becomes much stiffer ...
In most cases it's much better to max your fill around 80% thereby leaving voids to act as crack-stoppers and stress relievers; use extra perimeters for strength.
To move the placement of your fill right click on the part, add part, select box, make it too thin to print and place it to extend your shape in the desired direction.
Cheerio,
RE: How to center an infill pattern on a specific point in the object
@diem
Thanks for the reply. That is a great idea with the thin part and will let me do exactly what I need. Is there a way to locate parts in relation to each other in Slicer, i.e. center of a box at the center of a hole? I know I can also do it in CAD so it isn't an issue if its not available in Slicer.
I'm using Nylon which seems to work similarly to a solid piece of milled Nylon. 100% is necessary for my use due to compressive force in some areas where I need 100% to keep the part from crushing and other areas are under tension and I require the increased surface area between layers to provide sufficient bonding strength. Sadly perimeters create a noticeable weak area in this part where they meet, it was a setup I made but unfortunately created a failure line in the print.
Thanks for your help I do appreciate it!
RE: How to center an infill pattern on a specific point in the object
You can lay out multiple parts as you wish, just keep loading more and dragging them into place.
Sadly perimeters create a noticeable weak area in this part where they meet, it was a setup I made but unfortunately created a failure line in the print.
Can you rotate the part on the bed to take advantage of the lay of the filament? Or try changing the seam position?
Do you know in which direction your major stresses run?
Cheerio,
RE: How to center an infill pattern on a specific point in the object
Regarding seams - if that was what caused failures - they can be modified to not align (random). Also, if a seam isn't closing completely, there are settings to change them for better joins: calibrating K-factor and acceleration can help compensate, changing wipe parameters, etc. No one size fits all solution that I know of, though.
And so far, I also haven't seen any method to align parts in Pslicer. It's simple drag and drop. Though using arrow keys and shift or control seem to use some sort of snap grid I have yet to figure out.
RE: How to center an infill pattern on a specific point in the object
Hi Tim I did just learn something regarding alignment which admittedly may be common knowledge. The coordinates for a part or a modifier are based off the center of the model. So if you have a center point in your model you can use coordinates relative to that to precisely set the location of a part or modifier in slicer.

