How to add infill?
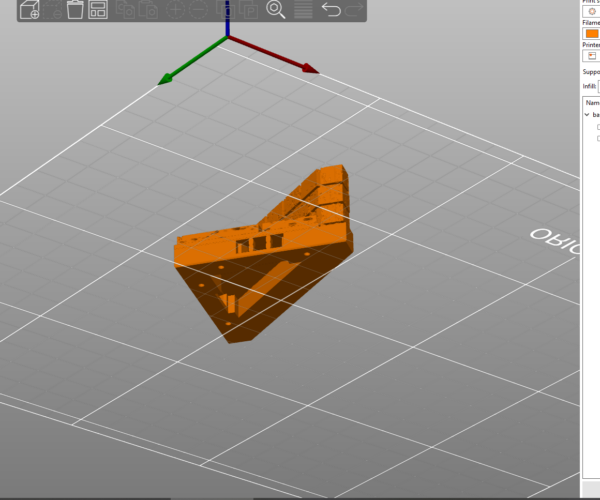
I am fairly new to printing, and have mostly printed pre-made designs, occasionally merging two pieces into one. I'm working on a piece and have merged several pieces into one piece, but there is a gap under a solid layer that seems to me to need infill below it otherwise it's just printing on thin air. I've attached a couple screenshots.
I'm unclear if Prusa Slicer is supposed to add infill where needed or if there is something I need to do.
Thanks!
RE: How to add infill?
In the Print Settings window there is a section for configuring infil.
If you need more infil in that one specific section you can add a layer height mod and specify a greater percentage for that layer.
RE: How to add infill?
I suspect you mean support and not infill. Infill is inside the perimeters and is completely internal to solid volumes. Support is the removable material that aids in printing geometry that would otherwise be not printable due to being printed in the air.
You have to turn supports on and there are several various methods to define where support is placed, from completely automatic to manually defining. The manual defining of just where to support also has multiple ways to achieve that. It can be quite a complex topic.
Please read the knowledge base https://help.prusa3d.com/category/prusaslicer_204 for the basics, specifically the section on supports, https://help.prusa3d.com/article/support-material_1698 and then come back with any specific questions that the basics don't answer.
For further specific help saving your project from Prusa slicer, (File>save project as) to save a .3mf file, then zipping that 3mf up and attaching it here is very useful. With a project file people can see the model and settings you are using, they can then modify it to use as an example and post it back. That way you can see what's been done and learn from it. A project contains not only the model but all the settings used, any modifiers, model placement etc etc. Its a complete snapshot of your slicing environment.
It MUST be zipped up though as the forum only allows a limited number of file types and 3mf or stl etc arent allowed.
RE: How to add infill?
Thanks, I may not have my terminology correct. I think I've attached the project correctly. In my original post, the orange model shows the underside where the internal gap is. The green model is flipped to get a better view - but that may just be confusing.
cut stone - low diagonal wall and floor and base as solid unit - 1 2x2
RE: How to add infill?
As you are using PS2.5 you don't get access to the new support options available in 2.6, but given that 2.6 isnt released yet and is still an alpha we should stick with the tools available 🙂
That leaves classic supports or snug. Snug every time as the classic leaves a lot to be desired. I've attached a modified project for you to examine, supports have been changed from 'None' to 'For Support Enforcers Only'. In effect this means you have to manually define areas on the model where you want supports.
This is by far more desirable to automatic as that just ends up putting supports all over the place.
So I've used the Paint on support tools to define areas. (look up the knowledge base to learn the gui and where all the tools are located.
I've also changed the default settings to something that gives you a chance of removing them once printed as the defaults tend to result in supports that weld themselves to the part and are difficult to remove.
Most of that will actually print without supports as most of the areas will 'bridge'. In fact Id have been tempted to try it without supports initially and see how it looks. Anyway have a look at the project and if you have any questions just ask.#
Its well worth practicing with the painted support tools, especially the highlight overhang option, the smart fill tool and the clipping of view in particular. Once you understand how they work its actually very easy to paint areas.
RE: How to add infill?
Thank you! This is exactly what I need. I appreciate the file and the directions so I can figure out how to do it on my own as well.

