How do I maintain infill angle for the entire 1st layer of print?
My appologies if this is a rookie question that I should know the answer too; however, after searching the forum and trying to figure out what key words would find me the answer, I've yet to find what I'm looking for.
The infill angle on the first layer is fine, I don't care what angle it uses, but I'd like it to use the same angle for the entire part. I'm printing a cover for a cup holder and it would look better if it was consistent.
I've read where I can change the fill angle in the advanced or expert settings...but how do I keep that angle for the entire 1st layer?
I have a good picture of this....but can't figure out how to post that either. I've never seen a forum that has a box to type in a "source" so......I guess I'll search how to insert image now.
Thanks in advance for any help.
Electrical Engineer/Drafter
RE: How do I maintain infill angle for the entire 1st layer of print?
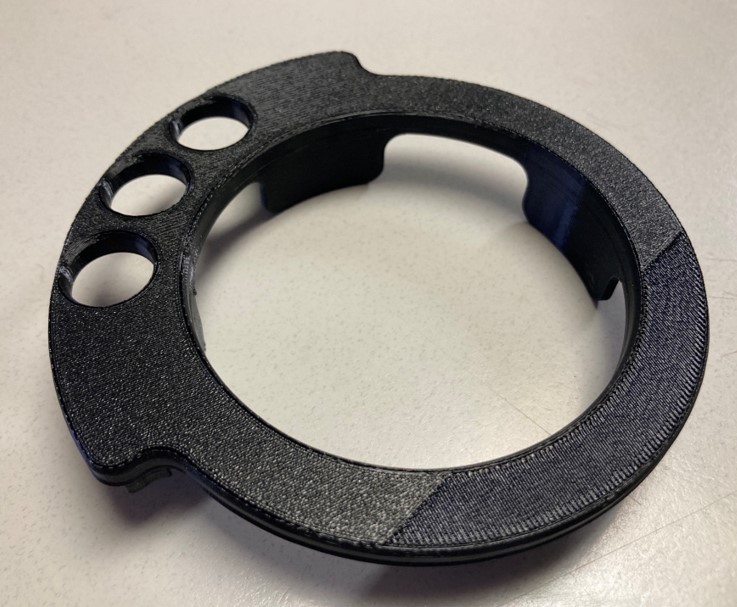
I guess the "Add Media" button was hiding from me. Here's the image.
Electrical Engineer/Drafter
RE: How do I maintain infill angle for the entire 1st layer of print?
I'm currently using monotonic pattern. Maybe I'll slice it using concentric and see what it looks like while I'm waiting for the thread to go live.
Electrical Engineer/Drafter
RE: How do I maintain infill angle for the entire 1st layer of print?
From the look of that model the surface pictured towards the camera is actually at 2 different layers. If they were all on the same layer (the first) they would all be going the same way.
The thing about infill is that for most of them they always cross at angles for strength. You could select zero bottom layers and then use aligned rectilinear infill which all goes in the same direction. Its a special type of infill that was added for use in getting maximum transparency on prints with the right filament and settings.
If you want to post your project file we can take a look. With a project file its a snapshot of all your settings and the model so we can slice and check the previews and alter settings etc. Use File>Save Project as to save a 3mf file.
As you have already noticed the forum has a few restrictions. To attach anything not a picture you have to zip it up into an archive. Its always best to also check it actually attached as the edit window is very short too.
RE: How do I maintain infill angle for the entire 1st layer of print?
After reading your post, I looked at it under a 10X loop magnification. You are right, the infill on the major part of the part is the actual bottom layer. The small portion that is different is actually layer no. 2. The slicer apparently didn't fill the entire first layer or the printer didn't print it, one or the other.
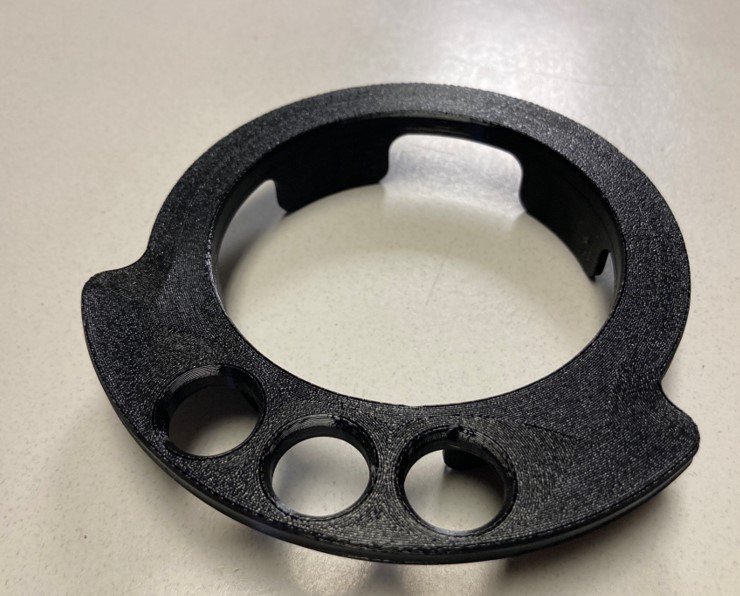
I'm reprinting now using concentric since this is a round part anyway. It might look better. This issue has given me the notion to flip the part over after slicing and inspect the bottom layer. Something else I'll know to check before I send to the printer from now on.
Thanks for the post, you were exactly right. Different layers.
Electrical Engineer/Drafter
RE: How do I maintain infill angle for the entire 1st layer of print?
I'm reprinting now using concentric since this is a round part anyway. It might look better.
But that's not fixing the problem. Either the bottom surface wasn't modeled correctly as a flat surface, or when placed on the print bed somehow a small rotation was introduced. You can try to use the Place on Face (F) function in Prusaslicer to flatten it out. Or use Cut to slice a bit off the bottom.
Formerly known on this forum as @fuchsr -- https://foxrun3d.com/
RE: How do I maintain infill angle for the entire 1st layer of print?
I'm reprinting now using concentric since this is a round part anyway. It might look better.
But that's not fixing the problem. Either the bottom surface wasn't modeled correctly as a flat surface, or when placed on the print bed somehow a small rotation was introduced. You can try to use the Place on Face (F) function in Prusaslicer to flatten it out. Or use Cut to slice a bit off the bottom.
I appreciate your post; however, the bottom face of the part is in fact flat as I modeled the part myself, not an import from unknown source. Also, I did in fact use the "place on face" option in the slicer to put the actual top face of the part down on the textured bed plate so that the part prints upside down. That removed the need for any support material and "should" give me a nice top face.
Electrical Engineer/Drafter
RE: How do I maintain infill angle for the entire 1st layer of print?
As neophyl said, if you could upload the 3mf, it's easy to double-check. The fact that you end up with two layers for the bottom surface tells me that it's not flat after all. Why I don't know.
Formerly known on this forum as @fuchsr -- https://foxrun3d.com/
RE: How do I maintain infill angle for the entire 1st layer of print?
As neophyl said, if you could upload the 3mf, it's easy to double-check. The fact that you end up with two layers for the bottom surface tells me that it's not flat after all. Why I don't know.
Roger that. Must have been a glitch in the matrix (old man joke from 1999 movie).
I reprinted using concentric with the exact same model and got the desired output.
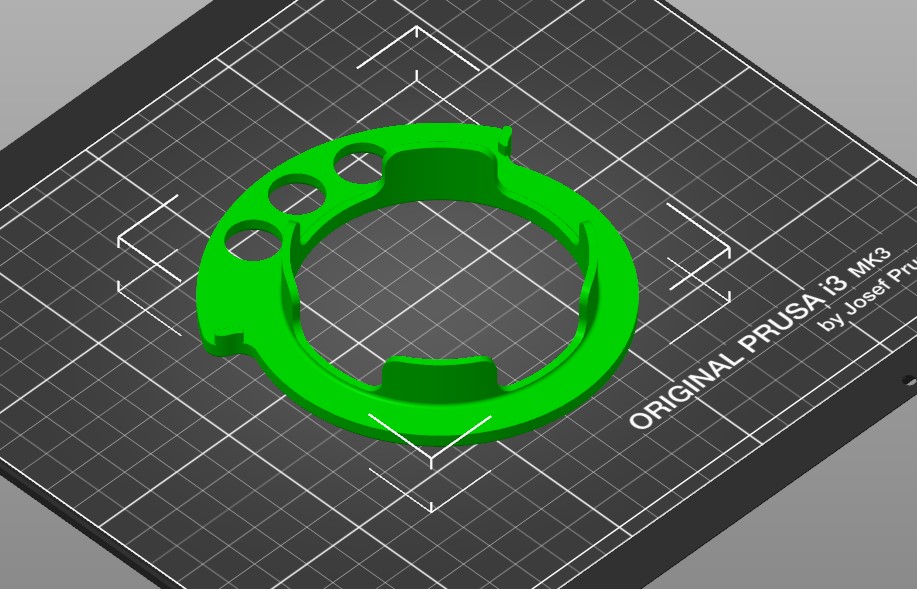
I changed bottom layer from monotonic to concentric then saved the project before I zipped it up. So, I saved a copy and changed it back to monotonic and it appears to be fine when I spin it. Maybe it was a printer flub. Either way. Here are both files. I'm still an amateur and learning so be constructive when you criticize my junk. LOL
Recliner Button Cover - Concentric Recliner Button Cover - Monotonic
Recliner Button Cover - Concentric
Electrical Engineer/Drafter
RE: How do I maintain infill angle for the entire 1st layer of print?
This issue has given me the notion to flip the part over after slicing and inspect the bottom layer. Something else I'll know to check before I send to the printer from now on.
Just to add - you can inspect any layer after slicing, by dragging the arrow heads in the vertical slider to the right of the sliced view.
Indeed. I've been learning how to insert color changes and stuff using the advanced tab and doing just that. I did not inspect the layers when I printed the first one but I will from here on out. As noted, the change was actually some fill missing on layer 1. Maybe the filament hung up, who knows. Brand new roll, not crossed over, etc.
I was just thinking it was a slicer issue, but maybe it wasn't after all.
Electrical Engineer/Drafter
RE:
Happy to hear it's working for you now. I don't see anything wrong with the model. Maybe as I suspected before, just some inadvertent subtle tilt when the model was loaded. Who knows? In any case, good to know it's not an issue anymore. Glitches in the Matrix do happen—sometimes 3d printing feels more like voodoo than engineering 🙂
The only comment about the model are the two small protrusions flanking the three holes. With reasonable force they may get sheared off. If possible—and given what I suspect about the function of the mode unlikely that's an option—a chamfer on the inside may provide additional stability.
Formerly known on this forum as @fuchsr -- https://foxrun3d.com/
RE: How do I maintain infill angle for the entire 1st layer of print?
The only comment about the model are the two small protrusions flanking the three holes. With reasonable force they may get sheared off. If possible—and given what I suspect about the function of the mode unlikely that's an option—a chamfer on the inside may provide additional stability.
The tabs are to keep the button guard from spinning. There shouldn't ever be any force applied to it. The first time we shear one, I'll increase the size and print more. These are for recliner buttons in our RV. You can't sit in the chairs without inadvertently bump the buttons. This provides some protection but still allows function. There was a model on thingiverse that I downloaded but I didn't' like it so I started fresh, took my own measurement, and made my own model. The hole centers weren't exactly on the buttons on the one on the website. Here is an image of the one I downloaded, I haven't made it home to take an image of this one I designed in use yet. I can update tomorrow. The tabs catch the sides of the bezel and keep the buttons centered by not allowing the cover to rotate in the cylinder.

Electrical Engineer/Drafter