E3d Cyclops with Prusaslicer & Marlin 2.0.x
Hello,
I found surprisingly little about the E3D Cyclops setup explaining how to set it up and get it working, and particularly things to looks out for. I found plenty of frustrated posts about blockages though.
Biggest issues I see is careful loading of the filament and limit the retraction length.
I run a custom Delta printer (320/320 bed), with a BondTech QR extruder and a second E3D Titan. The E3D Cyclops+ was a perfect fit since its small and light. I also did not want to mess with two nozzles and the oozing that the bowden tubes would likely cause. Additionally the size meant that minimal changes were needed to my effector, and all my delta calibration still held true.
Prusa has some help oin the matter but its a bit thin... https://help.prusa3d.com/en/article/wipe-tower_125010
Marlin
Changes in Marlin moving from single to dual:
Enable 2 Extruders
Tool Change Z Hop set to 0
(This can also be found in the LCD menu under tool change)
Z Hop needs to be set to 0 otherwise the hotend extruder extrudes some amount of filament above the wipe tower and not on it. Not sure when this would be used but for the Cyclops it causes a mess, took me ages to find out why Pursaslicer was doing this, funnily enough Cura does not do trigger this tool change behavior.
The Slicer
Some important points to a happy life with the Cyclops:
Blockages, from what I read this is the main reason people get frustrated and give up.
Load filament carefully:
heat the hotend to temperature
Gently push your filament through your coldend/bowden assembly into the hotend so that it just reaches the the melt zone do not try pushing it till it starts extruding! Pushing filament through a Cyclops with only one filament loaded will cause filament to flow through the the hotend, past the nozzle and then up the second empty heat break, the molten plastic will cool instantly and block the second heat break, which will then mean you have to disassemble the Cyclops and clear the blockage. Believe me, this gets really boring after a few times.
Once the first filament is in the melt zone, load the second filament, once it hits the melt zone the heat breaks are filled with filament so extrusion can begin without any plastic backing up in to the opposite heat break.
Once loaded its time for the Slicer, I have used both Cura and Prusaslicer, I prefer Slic3r at this time because it has some nice features. Both Slic3r and Cura are still a bit rough around the edges when dealing with dual+ extrusion slicing, mainly because its still early days and they are trying to serve multiple multi material solutions, single nozzle machines (Like the Cyclops), machines with more than 2 nozzles, and machines with tool changers. The end result is that the simplest is really the two extruder one nozzle solution, your fight with the slicer basically involved disabling all the other features.
Single most important rule, The filament retraction in the cyclops can only be ~2mm maximum, maybe a little more but it its a gamble. I try and keep between 0.8 and 1.2mm max.
The slicers have plenty of features which will try and trip you up, when setting up your profiles the main task is to disable all the additional settings which cause additional extrusion. Over retracting with one extruder and then extruding with the sencond will have your nozzel blocked on the 2/3rd layer every time! grrrr
The Cyclops requires 2 extruders, with a filament retraction of ~1mm. Thats basically it. All the other tool changing related features need to be disabled, stopped, suppressed set to 0 etc.
With just this you should be able to get pretty good prints out of your Cyclops, without blockages, only missing item is that your parts will show under extrusion at each filament swap (tool change) and show the colour transition. To deal with these the Purge/prime tower is used. This ensures that the void created by the ~1mm retraction is filled with the second filament so that no under extrusion occurs, additionally it purges/cleans out any old filament from the nozzle so that when the new colour is printed its not contaminated with the old colour.
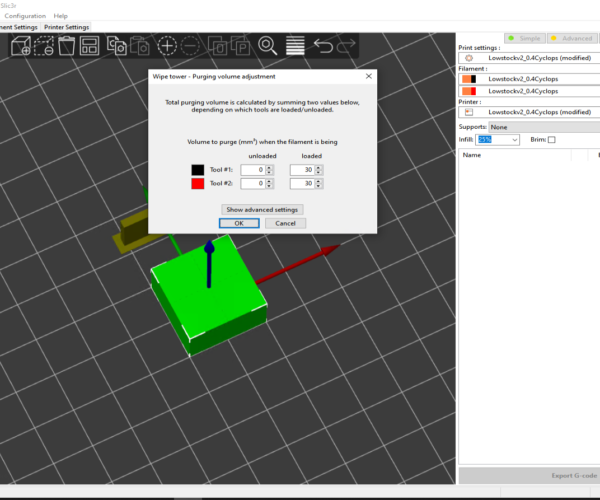
The important setting for the Cyclops is the amount of filament to purge on each tool change, obviously you want to keep the amount of material being purged at every nozzle priming to a minimum, anything between 25 to 35mm3 is needed depending on the material and the colour.
In Cura you just define the amount of filament you want to purge at each tool change. Remember to do this for both extruders.
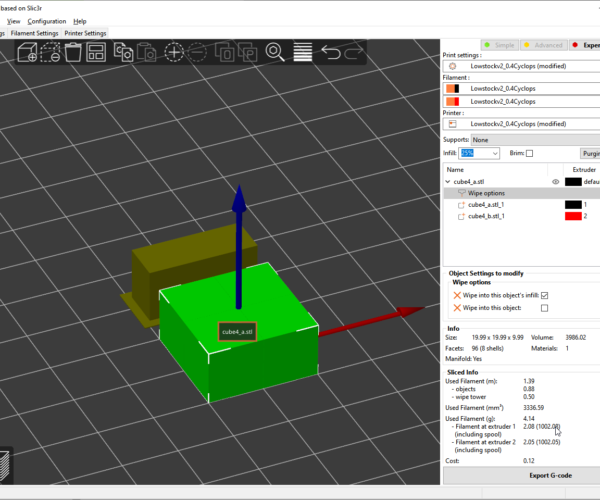
In Prusaslicer its a little more interesting, Prusaslicer gives the option to purge on each tool change (as Cura) but also purge into the objects being printed so that material is not wasted printing the purge tower but is, as much as possible, used for infill where the colour transition will not be seen. The purge tower for larger objects is practically empty/hollow when using this feature.
My Settings which may help as a starting point that may help others get started...
Marlin:
LCD Display, Configuration > Tool Change > Z Raise: 0
Prusaslicer:
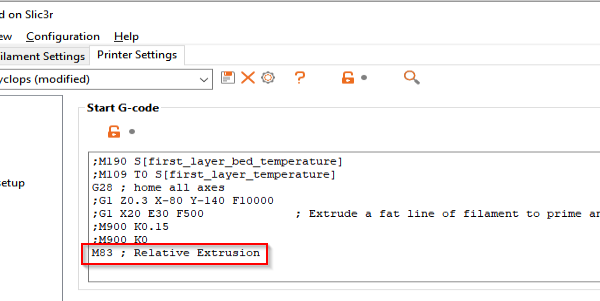
Make Sure to tell Marlin that Extruder steps are relative if you are using a purge tower (in this version of Prusaslicer anyway):
I also had to comment out other settings like pre-heating because these were causing issues with erratic movements, do not know why, could just be the nozzle preheating causing conflicts?
Tool Change parameters have influence on the speed at which the pruge/prime tower is printed.
Stay clear of any load and unload options they should all be off or set to 0.
We will not be doing any ramming.
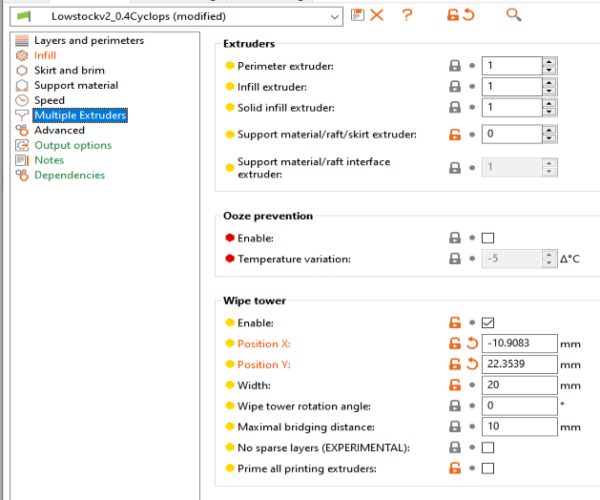
Enable the wipe tower option (remember to enable relative E-Steps for the extruder).
Set Purge Volumes (anything between 25 and 35mm^3)
Note this version? of Prusaslicer seems to mix up the extruder order, where in Marlin and through Pronterface it is logical, the order is correct in Prusaslicer they are reversed. T1 is Extruder 1 and T0 Is Extruder 2. Which is annoying, since it always picks the wrong extruder as the default.
Right click the object to be printed and select Wipe to options....
https://help.prusa3d.com/en/article/wipe-tower_125010#wipe-to-infill
and https://help.prusa3d.com/en/article/wipe-tower_125010#wipe-object


