Dimension Issue Printing in 2.3.2
Hello, I think this is a possible bug. If not, the result of the default slicing settings are causing a print to come out with significant size deviations, unless I'm mistaken.
I'm using Prusaslicer 2.3.2 with an MK3S.
I have 3 x small geometry objects, exported from Fusion 360. Each of these has a vertical cylinder of a specific diameter.
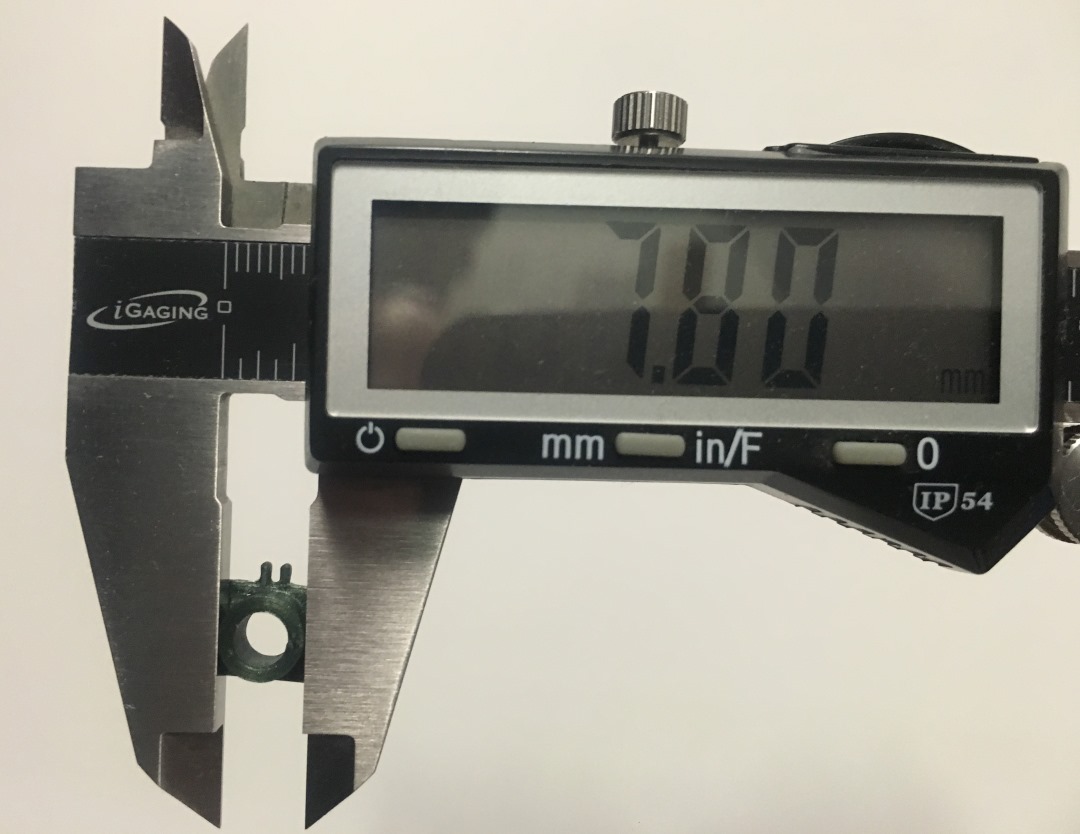
I printed all three, and two of the files have printed with the correct outer diameter, while the third has a very different outer diameter.
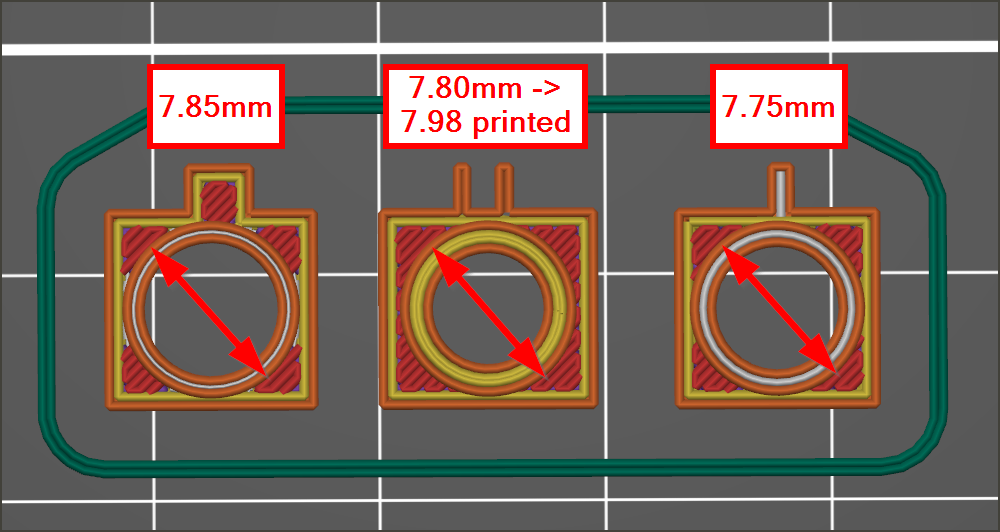
Target outer diameters are: 7.85, 7.80, and 7.75 mm. The 7.80 object is printed with a diameter of 7.98 mm. The rest of that object is printed true to size.
I have checked the dimensions of the geometry files in a different application, and the dimensions seem to be correct in the files.
I am running with the 0.20mm QUALITY preset and everything is unmodified. I have attached my project file and the geometry by itself.
Could someone help me take a look at this, and if it's a bug, advise me how to report it?
Thank you!
If you are using the default 0.4mm nozzle the default extrusion width is 0.45mm, an error of 0.18mm is only 40% of the width of a single extrusion...
You might get some improvement by selecting 'External perimeters first' in Print Settings > Layers and perimeters.
Cheerio,
Sutle Hint 😉
@brslicer
Try this and see if it helps.
Diameter Problem Project_Swiss.zip
if you have any questions just ask,
Swiss_Cheese
The Filament Whisperer
@brslicer again
here's another that you can play with and look around in, I think it's just more fun.
Diameter Problem Project_SwissV2.Zip
for sure it will give an idea of the possible ranges you can print with a 0.4 nozzle to maintain dimensional accuracy. they are actually greater then I expressed in this .3mf
Good Luck, have fun
Swiss_Cheese
The Filament Whisperer
Probably gap fill
I appreciate your help.
The other two items print within 0.01 mm measured with a caliper, so I'm hesitant to write this off as within the margin of error. (at the end of the day, perhaps the only way the printer can make walls this thin and accurate is to use gap fills, see below)
I should have checked the numbers on the wall thicknesses... I had actually eyeballed the inner diameters. Going by the model, the three cylinder wall thicknesses are: 2.35, 2.9, and 1.97. The 2.9 width wall is from the problem part. So maybe once the wall thickness gets to a certain point, the slicer does something that messes with accuracy.
Looking at the colors on the prusaslicer screenshot, the middle (problematic) wall's top layer has been designated as "perimeter" with the yellow color, while the other samples use "gap fill" on their tops. I'm going to bet that's the difference.
I'm checking out External Perimeters First to see what happens. Thank you for the advice. Yikes, I see settings like "detect thin walls" and also 2.3.3 has been released since my post....
RE: Thanks but...
@swiss_cheese
Hello Mr. Cheese, I appreciate you taking the time to generate and share a file, but would you mind explaining what you did so that we can skip the part where I go in, figure out what you did, and I come back here to confirm that I understand what you did?
Thank you!
Edit: I'm not from around these parts, sorry if subtle hints are normal.
Yeah so wow
@swiss_cheese
Ok Mr. Cheese (if that is your real name),
I see that you have done some stuff that is pretty advanced for me 🙂
You made modifications to each body, but did you decide to change the settings for each body for a reason particular to the body, or are you just applying 3 different setting alterations to demonstrate 3 different results?
I want to believe that this is a showcase of settings, but I think it is best to confirm.
The changes I see up front appear to only be applied to the "square" base layers, but I don't have a problem with the square base layers, are you trying to tell me that my wall thickness problem is related to the base layers?
You changed perimeters to 1, changed skirt height to 1mm and minimal filament extrusion length to 2mm. And elephant foot compensation from 0.2 to 0.05mm.
My best guess is that this fine tuning could result in some really nice output, I'll be back after printing. But I'd like to understand what you're trying to show me 😐
Thank you!
RE: Dimension Issue Printing in 2.3.2
@brslicer
it is a showcase of settings, designed to enlighten, the first .3mf was specific to the issue, the second was designed to show the possiblities.
If you have questions, I'm happy to answer
Regards
Swiss_Cheese
The Filament Whisperer
Good Grief
Ok I mean I can go learn how to turn rocks into silicon, but I'm ok with standing on the shoulders of giants... Learning from these would be a lot easier if I didn't have to theorize what you're trying to say and the reasoning behind your decisions. It is, for example, very hard to accurately confirm your purpose for having 3 settings for 3 bodies. If I assume the wrong reason, I could miss the whole point. This is why I ask for specificity. I've been learning how to learn my whole life and I know problems when I see them.
I'm prepared to explain them the first .3mf is the most impotent to you dimensional issue, so stick with that one for now
The Filament Whisperer
I'm eating my dinner as soon as I'm done ill expound on the first .3mf file
The Filament Whisperer
RE: Dimension Issue Printing in 2.3.2
ok for starters let's just ignore the second post, it was designed to show a level of control that you may not have known you have.
in the first .3mf I am showing you that the default settings are causing an issue for you, that you have already discovered. the bottom line there was you were trying to put to much plastic in one area, slicer tried it's best to cram the 0.45 perimeters into the space specified, but you needed to adjust it manually to make it fit. So I applied a modifier to that specific model to adjust the external perimeters and perimeters to 0.39, so now you have 2 perimeters with a perimeter width of 0.39 and it fits into the space specified, so it's not bulging the area making it bigger then you wanted.
simple enough right?
you have 3 ways in slicer to do this, one is to use height range modifiers, another is to use shape modifiers and yet another is to apply the modifier directly to the model as I have done in "Diameter Problem Project_Swiss.zip"
Hopefully you can gain an understanding of how this works from this very simple example, and then we can move on to the more complex example in "Diameter Problem Project_SwissV2.Zip" where I compound these modifiers for an example of even more control.
I'm sorry for the confusion, I have to make a guess about a users knowledge and understanding, and I've found it best to offer to much information as apposed to to little, so I tried to offer it in steps.
That said, I'm happy to educate the interested
Regards
Swiss_Cheese
The Filament Whisperer
BTW a 0.4 nozzle can reliably print perimeter widths of 0.35 - 0.8 you must of course be mindful of the layer height as you apply these varying widths this also comes with experience.
The Filament Whisperer
@brslicer
Was the explanation in conjunction with "Diameter Problem Project_Swiss.zip" adequate?
Regards
Swiss_Cheese
The Filament Whisperer
RE: Variations in thin wall construction cause external variations
[...] Looking at the colors on the prusaslicer screenshot, the middle (problematic) wall's top layer has been designated as "perimeter" with the yellow color, while the other samples use "gap fill" on their tops. I'm going to bet that's the difference.
I suspect you're right. Changes to the perimeter extrusions -- particularly any transition (e.g., from solid infill to sparse infill, from perimeters to gap fill) -- can cause minute variations. The way PrusaSlicer and most other slicers work is by approximating walls of varying thickness using fixed extrusion widths, sometimes overlapping them to a degree, then shoving in some gap fill for odd spaces. This can cause small, sub-mm surface variations if walls are printed with a different mix of techniques.
Three quick things I'd check:
- Have you calibrated your extrusion width? If your slicer settings don't closely match the real-world filament and printer settings, some deviation is inevitable (GIGO). Tune your extrusion width settings (filament diameter and extrusion multiplier) and you often reduce small amounts of over-extrusion that can cause problems in walls as the error accumulates. Get a 0.45mm single extrusion wall to print close to 0.45mm first, then try printing thicker walls with more extrusions. As a bonus, this also often helps with fine stringing.
- Have you tried the same prints with an increased number of perimeters? I notice your pics show 2 perimeters. This will sometimes "even out" the differences, or at least avoid the deviation with gap fill.
- If printing smaller parts, a smaller extrusion width can help. I like to use PrusaSlicer's "0" setting (1.125 X nozzle size) but sometimes going with different extrusion width helps.
If I'm understanding correctly, these are just pegs that you want to print reasonably close to the designed diameter, so you shouldn't have to spend time futzing with modifiers.
If you want to spend some time looking at deviations in walls due to this issue, just search for the (silly) term "buldge". As @Diem notes, these are sub-mm variations that really show up in some circumstances, less so in others.
You might want to follow the Cura team's Arachne slicer development. They are addressing this issue by adjusting extrusion widths automatically to provide consistent flow to address this issue. Early days yet, but it's an interesting alternative approach.
RE: Correction
@brslicer
After reading what Bob wrote, I realized that I used the term "modifier" to describe the settings change I made to the problematic model in "Diameter Problem Project_Swiss.zip" the correct way to describe this would be to say "I modified the properties of that model only" I did not apply a modifier to it. I changed the External perimeter & perimeter widths of that object only, to enable the correct amount of plastic to be applied to allow for the construction of the part at its proper dimensions.
once more, I did add modifiers to "Diameter Problem Project_SwissV2.Zip" to demonstrate a greater range of control should you or anyone reading this thread find it useful depending on your understanding of the software at whatever point you may be in your development at the time of reading.
if this doesn't interest you, or your feeling as though it is beyond your current understanding to use, that's OK.
If you are interested I would encourage you to look through "Diameter Problem Project_SwissV2.Zip" you may learn something new.
as for "Diameter Problem Project_Swiss.zip"
I was preparing this image for some tutorials I'm making, however it seems apropos that I should provide it here to help further understanding.

These are all the settings you can "modify" in the current version of slicer 2.3 of an object on the platter.
The term "modify" being relative to the over all platter settings that are applied to everything on the platter by default.
the settings in these menus override the settings applied to the overall platter.
@brslicer
adjusting the extrusion width of External perimeters and Perimeters was and is the answer to your issue.
I have extrusion multipliers adjusted for every filament I own (That's a lot ) and when printing your .3mf as you uploaded it, I to experienced the same problem, your issue is not rare at all, in fact it's a common problem that people don't seem to understand, some don't know they have the problem and still others call it (bulge), and the fix is learning to tune your prints for their specific features. for some reason this idea meets a lot of resistance, it would seem that more education is needed for the community as a whole.
I hope this helps someone,
Swiss_Cheese
The Filament Whisperer
Sorry for the radio silence
I apologize @Swiss_Cheese I only get a slice of time to work on this every once in a while (probably contributes to my bad attitude 🙁 )
I am going to try to process your help thus weekend, I am sorry for that.