Changing Z-axis position of added part
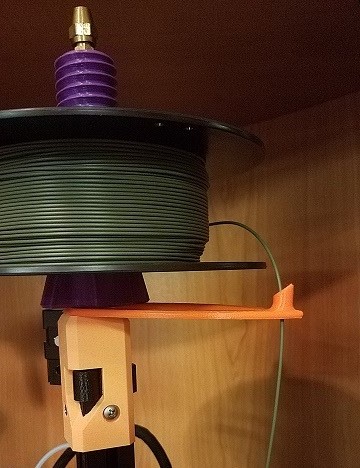
I'm sure what I am trying to do is, indeed, doable, but dang if I can figure it out. The illustration shows the top part of a spool holder that is used on the Mini Z-axis post. (The files are somewhere on this site, but I can't find the link at the moment; apologies to the person who posted it.) What I am trying to do is increase the vertical height of JUST the slanted-top open cylinder through which the filament passes on its way to the extruder. Because I am also using a large nut-and-bolt fixture that supports the spool (not sure where I found this) about an inch above the guide part plane. I want to get the entrance to this part above the bottom flange of the spool, and if it is longer, I can use a heat gun to soften and "bend" this tube a bit so there is minimum friction on the filament.
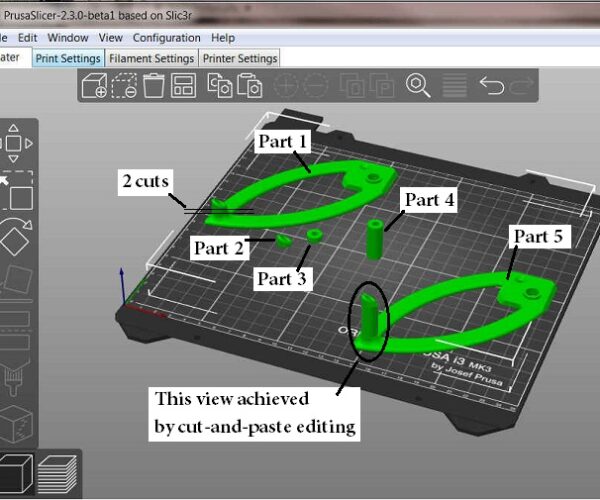
So, here is what I have been able to do so far: Loaded the part onto the build plate and labeled it Part 1. I made two "cuts", keeping all parts, giving me two short parts, Part 2 with the needed top geometry and Part 3 which is the same diameter with flat top and bottom. I then increased the vertical height of Part 3 to give Part 4. Now I want to "restack" Parts 2 and 4 into the position shown by Part 5. (That rendering was achieved by cut-and-pasting and some pixel editing.) I can reposition Parts 2 and 4 to be where they need to be in the X-Y plane, but all attempts to change their vertical (Z) positions have been fruitless. I can select them individually, but any value I enter in the Z position is ignored, and remains as if the part is dropped to the build plate. Is this just because I don't know how to use the program or is this a limitation? Is there an easier way?
Hear ye, Hear ye! Step right up folks and get your Government salvation here! Less than $.002 per word! Amazon.com/dp/B0B8XMMFP4
RE: Changing Z-axis position of added part
You can do it. Its not as straightforward as in other slicers though. I'll repost what I wrote in another thread on here ( https://forum.prusa3d.com/forum/prusaslicer/moving-models-in-the-z-direction/#post-309802) which if the search worked at all here you might have found.
"
There have been many many complaints over on github about slicer not allow the basic things of moving a part upwards. However the whole slicer workflow and logic is fundamentally different. However you can still do it, you just have to work within the limitations of that flow.
The primary rule is that some part of your Object HAS to touch the build plate (or a raft but technically that's still touching the plate via the raft). When you think about it this is logical as to print some part of your model does actually have to be on the bed.
However an Object can be made of multiple Parts. So the trick is to place AN object on the plate as usual. That can be anything, from a simple cube imported or the base layer of the thing you want to stack. Once that part is on the bed you right click the object and select Add Part. Then select the stl file of the thing you want to stack or move off the build plate. That second object can be freely positioned wherever you like. Even mid-air where it will fail to print without supports if you really want to make plastic spaghetti. That's because part of the Object is still touching the build plate so fulfills the primary rule. You can add as many parts to an existing object as you like.
To select a part you cant click it on the build plate as that selects the whole object but you can select it via the Object manipulation panel (the section on the right hand side). Select it there and then you can use move, scale, rotate etc on that part to position it.
The other thing you have to watch out for with the current version of slicer is it will complain if there are empty layers and not slice. So stacking objects on top of each other where they don't touch is currently not allowed. The new 2.3 versions currently in alpha have a checkbox to disable that warning. There's ways around that too though, you can add a part modifier that is basically a very tiny 0.5mm bit between the objects and that way the layer is not empty. That way its still easy to separate them.
We had a lot of this when printing PPE in the early days of the pandemic. People were trying to stack visor frames so all the workarounds became more widely known. I think it was that behind why the ignore empty layers option has been added in. "
So the answer is you have to exports your cut up parts and then import them back in using the right click add object option.
Now that's out of the way and you know the hacky way to do it, why oh why are you trying to use PS to do this simple task ? Its like trying to hammer in a nail using a knife. Yes it will eventually work but its far more effort than it warrants.
Lengthening that part would take approx 5 seconds in Blender once the part was loaded in. I'm sure any other reasonable CAD package would also have had no trouble either.
You went to all the trouble to create a very nice edited picture showing what you wanted when you could have just learned how to do the job properly lol. If you are going to continue using a 3d printer it really really does pay off to learn at least the basics of 'A' CAD package. I'm biased towards Blender as its free, open source, works on any platform and can do just about anything once you figure it out. There's also a huge number of youtube videos that explain how to do things if needed (and they are needed 🙂 )
RE: Changing Z-axis position of added part
Ok, I guess I didn't explain myself very well. I'm aware that there are other model manipulation programs that will allow me to modify the part in the way I want to. (BTW, thanks to @Alex for his original design here: https://www.prusaprinters.org/prints/18157). These have various learning curves and I am simply not going to take time to try to learn them all/or several. My manipulation needs are typically simple and I have thus far been able to do what I needed to do from within PrusaSlicer, including Z-axis positioning of added parts. In this case, it makes little sense to me why a "piece" of the original object, obtained by the vertical cutting process that I described, falls to the bed by default and cannot subsequently be repositioned in the Z-axis. I can scale it in all three axes but position it only in two?? Whereas, if I had externally modeled a simple open cylinder and imported it as an "Add part", it is fully positionable. But it will probably have some subtle geometry differences (including scaling difficulty) that will frustrate the look and fit between the original and the added part(s). Apparently, the "cut" parts are assigned some bed-hugging attribute that is absent from added parts. This limitation seems unnecessary to me, as does having to export it/them and bringing them right back in. What changed in that process? Guess I'll just head on over to github and find a "complaint" I can "+1". But thanks for the tutorial.
Hear ye, Hear ye! Step right up folks and get your Government salvation here! Less than $.002 per word! Amazon.com/dp/B0B8XMMFP4
RE: Changing Z-axis position of added part
The problem is when you cut an Object up using slicers tools it is NOT creating 2 parts of the same Object, it is creating 2 Objects. As they are now separate objects each must touch the bed.
When you add a Part to an object then it behaves as I described. There is as yet no option to use the cut function and still have them be Parts. You just have to look at the Object list on the right. The hierarchy is there in the tree list. That is why you have to export the cut Object so that it can be imported in as part of the same object.
What would be a useful addition is if it was possible to drag the parts and objects in the tree list around so that you could change the logical grouping in the software without have to export/import.
RE: Changing Z-axis position of added part
If you have just a bit of CAD expertise, cut the object in PrusaSlicer, then extrude the face, then place the enbigened part in place of the original. Before anybody jumps up and down on me, posting just how easy it is with <insert your favorite CAD package> some of us a severely CAD challenged and this way minimizes Mr Cockup.
RE: Changing Z-axis position of added part
@towlerg
If I correctly understand what you are saying, that is what I initially tried. I cut the object at the bottom of the ~45 degree sloped face, keeping both parts. Two problems were apparent: When I lengthened the topmost section, it also lengthened the sloped face by making the angle steeper, which is not what I wanted. This is why I did the double cut and lengthened only the center section. But still, since both pieces dropped to the bed after the cut, it was still not possible to "restack" them unless I could change the Z position.
Hear ye, Hear ye! Step right up folks and get your Government salvation here! Less than $.002 per word! Amazon.com/dp/B0B8XMMFP4
RE: Changing Z-axis position of added part
@neophyl
Agreed.
Hear ye, Hear ye! Step right up folks and get your Government salvation here! Less than $.002 per word! Amazon.com/dp/B0B8XMMFP4

