Changing print order within a layer, to avoid printing in the air
Here is the layer that is giving me troubles:
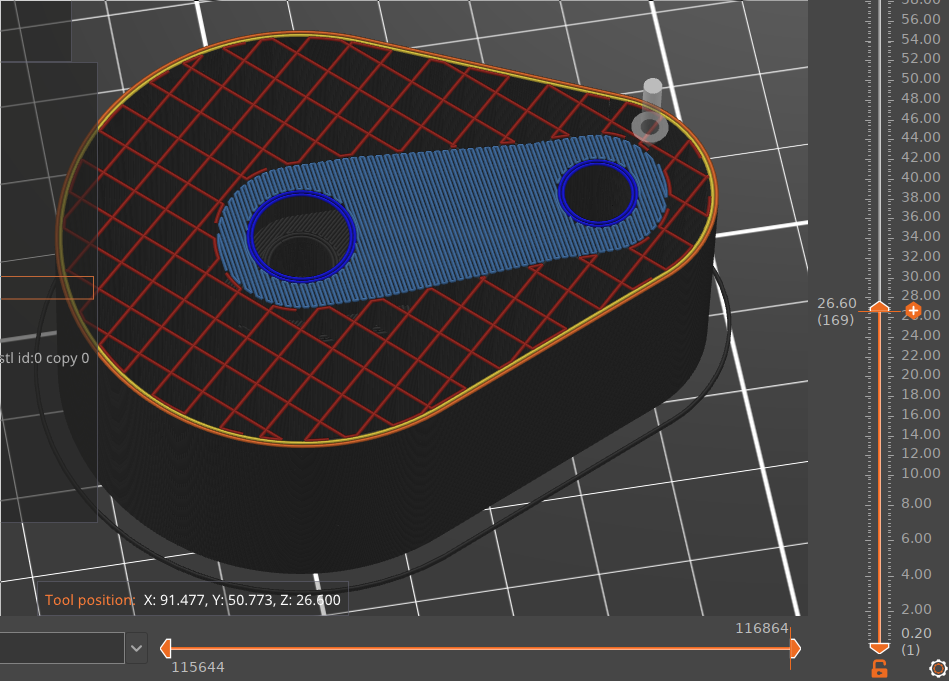
The bridge infill (light blue) has support from the previous layer, this is fine:
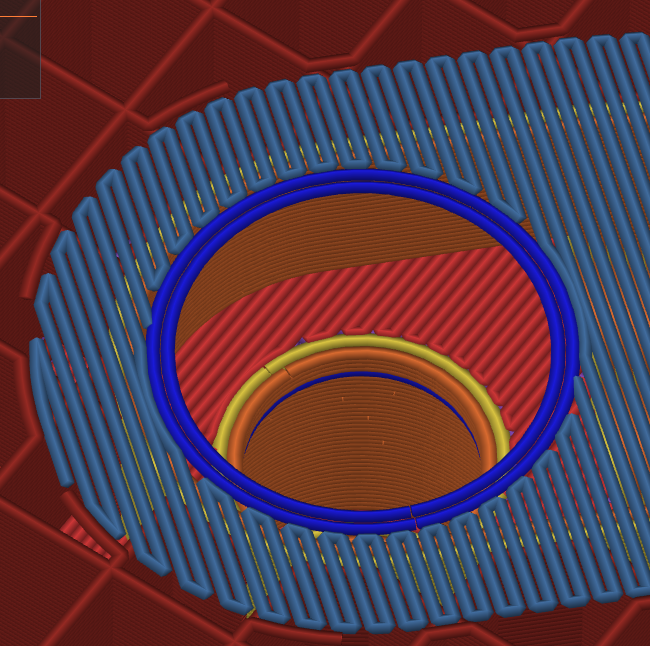
The problem is that the dark blue circles print first on that layer. They have no support, so it's not going to go well:

Supports are not an alternative, since this is an internal chamber, with no large enough opening for removing the support. Water soluble supports would be a solution, but I don't have an MMU.
If I could tell PrusaSlicer to print some of the bridges (light blue) first, at least the ones that wouldn't be dangling, that would be an improvement.
What can I do?
RE: Changing print order within a layer, to avoid printing in the air
Classic. Order is not going to make that print. Whatever you do there are unsupported ends to the filament which will sag.
The solution is a common one, a sacrificial layer. This can be done either in the slicer (although positioning is a bit tricky) or ideally in your CAD software.
The trick is to make there NOT be a hole for that layer. You need to know your print orientation and your desired layer thickness before you start. Then you create a 'patch' that is one layer thick and bigger than the hole and place it so its level with the bottom. With the slicer you right click and add part, then make the added part 1 layer high and the size you need. You can then position it where needed, the tricky bit.
If doing it in CAD for 0.2mm layers I like to use a 0.21 thick patch just to make sure the slicer will pick it up. When sliced that layer will be printed as whole and all of it will bridge. The rest of the hole has a surface to print on from then on.
Once printed you just poke the single layer out and can run a de-burring tool around the edge to make it smooth. 2 second job.
I use the technique all the time with holes for cap head bolts or recessed hex nuts, even where it would be possible to remove support as it obviates the need for support and you can just poke the layer out with the bolt. My bolt cut objects in Blender are built to do this automatically for me. Saves so much time.
For a visual representation a quick google search pops up https://blog.tommy.sh/posts/quick-tip-avoid-3d-printed-supports-with-sacrificial-bridge/
RE:
Yeah! So in essence: cover the hole with one layer so that the bridge goes over it, then drill/knock it out after the fact? Smart, I'll keep that technique in mind.
In this very case, it's not quite applicable, as the residue of the drill/knock would stay inside the chamber. I don't want that. Not accessible for deburring either. But for that specific part, I could modify the design and move the problem out of the way. Still glad I asked, and you could show me this!
RE: Changing print order within a layer, to avoid printing in the air
1 layer is really thin, you can just poke needle nose pliers through, grip and twist and that would rip most of it out and then you deburr the edge. Any bits that go inside you can just shake out as they will usually fit through the hole.
But yeah it’s a really handy technique to have in the ‘tool box’.