Change infill at different layers
Is there a way to have different infills at different ranges of layers, like 100% from Z = 0.00 to Z = 50.00 and 20% above that?
RE: Change infill at different layers
I have the same question. Even better is to add a modifier, cube, sphere etc, like we do for supports or block supports. But then set it so that any portion of the part that is within this modifier is set 50% infill (for example).
RE: Change infill at different layers
In the coming release (now in alpha) infill can be changed with modifiers (type and density).
Have a look at my models on Printables.com 😉
RE: Change infill at different layers
I am using PrusaSlicer
Hopefully it will be a lot easier than it was back in November. In November 2019 I was making a snowman head (100% print volume) with 2% infill as I wanted to put lights inside and did not want infill to block it and had a problem with the top and no/little internal support.
I spent hours trying various things.
Finally I figured it out. These are the steps I took:
- Set infill type and density for the object.
- Added a modifier ( slab in this case).
- Scaled and placed it where wanted.
- Highlighted the generic slab in the right hand panel
- clicked on the "Editing" icon.
- Clicked on infill in the dropdown list.
- Modified "Fill density" and Fill pattern.
Sliced and printed correctly. I found that if I changed the object's infill properties, I had to go back in and redo the generic box infill. (maybe it was just me).
Not sure what the version was at that time. I just update whenever it informs me a new version is available.
I tried it again just now and I can switch back and for th between infill density and pattern multiple times in an object.
Quality is the Journey, not the Destination. My limited prints->
RE: Change infill at different layers
This process is now documented in the PrusaSlicer documentation here: https://help.prusa3d.com/en/article/color-change_1687
RE: Change infill at different layers
I see the color change process documented. But changing infill is not documented there.
RE: Change infill at different layers
I hope this can be brought back to life. I am also trying to change the infill at different layers but it seems to me it can be done by the height range modifiers although I am struggling. I have given it a range from 11mm to 57.2mm and then given the infill a higher number as well but when I printed it printed the entire part with the % I gave it in the modifier infill instead of the individual infill number. I am attaching a snipit to see. I wanted them to to print at 30% until it got to range 11 thru 57.20 and then switch to 80%. What am I missing with this scenario?
RE: Change infill at different layers
@rufus
If you can post a Zipped up .3mf project file exported from PrusaSlicer, I'll take a look and see if I can help. The .3mf file should be setup as you would when trying to print the part and will allow us to see all the settings as they pertain to the model in your project.
Note: if you do not Zip the file the forum server will not allow it to be posted.
Regards
Swiss_Cheese
The Filament Whisperer
RE: Change infill at different layers
Thank you Swiss_Cheese. Hope this comes through correctly.
RE: Change infill at different layers
Your project file already has them sliced differently, its set up and its working. So what is the problem ?
For example Stop ValveAll.stl.1 has 30% triangles up until 11mm and then it changes to 60% triangles. However there on only a few obvious layers (layer 96 where it starts) of the higher density as the topfill layers start at 102, although you can still tell its higher for the cylindrical parts infill.
Its even more obvious on part 2 as that changes from grid to triangles.
Parts 3 and 4 are just set for different infill for their entirety without a height range modifier so you don't see a change but the infill is different between the 2.
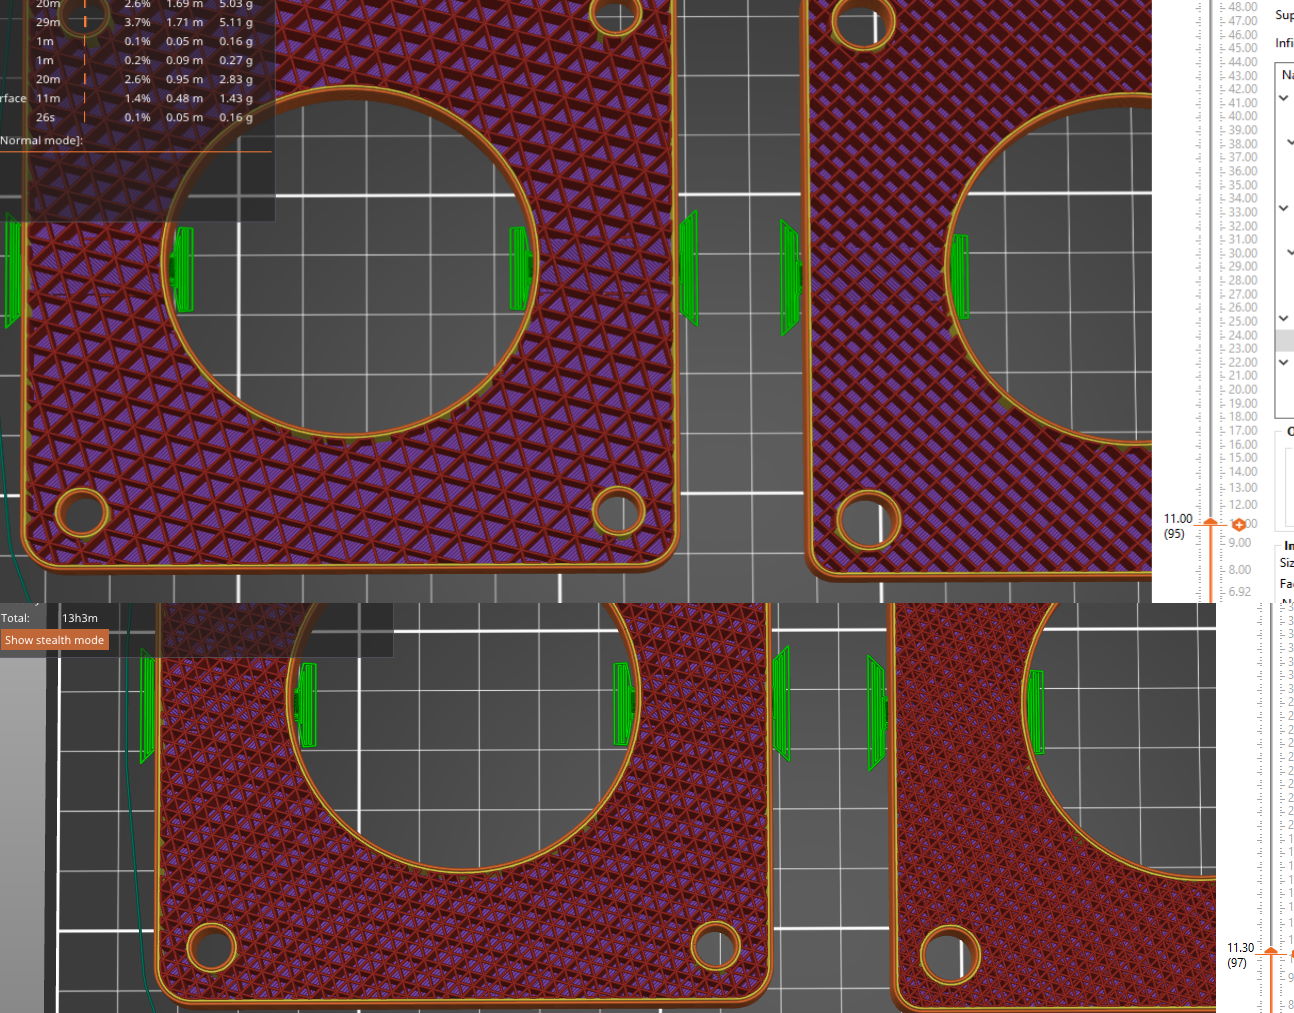
You can clearly see that your modifiers are working.
RE: Change infill at different layers
Thanks Neophyl, I intentionally made 2 different %'s on parts 1&2 to watch and see how it worked and its possible I was not seeing what I thought I was. I am now wondering if the grid change thru me off. I am going to change the grid setting to triangles and print this again. I just did not see the change as it was printing but I could very well be wrong. I am truly sorry If I missed this BUT if this is actually working then I know I did it correctly. I will get back with you soon. Thanks again!!
RE: Change infill at different layers
@rufus
I agree it looks as if you set things up properly, it should fine print as shown.
Let us know how things turn out.
Nice job
Swiss_Cheese
The Filament Whisperer
RE: Change infill at different layers
Stil in case, there will be some doubts, in link below is quite clear manual about quite usefull feature you want to use:
https://help.prusa3d.com/article/modifiers_1767#height-range-modifier