RE: Artifacts in Print? Looking for Guidance
Thanks for the reply. I see... Definitely is hard for me to judge by what height is correct just by looking at the cal The print was taken right from the SD card. I believe it was at 215 for the first layer and 210 for everything else. Sorry for the wait, I will get you the picture of the large, first layer calibration I did yesterday when I get home. Thanks.
RE:
@fuchsr thank you for the links. That print does look a lot easier to tell the results compared to the integrated z calibration. I'll print that out and provide some pictures later. Also, I'll look into the extrusion multiplier for the over-extrusion. I've done it for the ender 3 pro but never for a Prusa so thanks for that link. Will get back to you with the results.
RE: Artifacts in Print? Looking for Guidance
Hi, I've been a field tech for over 35 years and I'd like to give you a little advice for the future if you don't mind. When we tell someone how to work a problem and that person completely ignores everything we have requested, you tend to get the responses you received. You said you didn't have the time to print the original Prusa filament in a single layer square but you had the time to print a complete block. You wasted more time jumping all over the place making things worse than doing what they requested the first time. The 3D printer is a tool and like all tools they have to be setup correctly before they perform properly. If it never printed correctly from the start, using factory default settings, a good model and a known good filament, making adjustments will only make things worse and waste your time. Enough said on that.
I own three of these printers and have been running the default settings on every type of filament sold on the market just fine, with just a few adjustments every now and then. I have found the less you adjust the printer settings the better off you are. When I first built my first unit I had similar issues as you and found out later most of it was how I put the unit together. I didn't have enough tension on my filament at the extruder end by adjusting my spring tension. I didn't push hard enough on my penda sensor with the tie wrap under it, which effected my nozzle height. When you set the nozzle height by dragging it across the board keeping it as close as possible but not touching it, I was way off. I used a fueler gauge but it still didn't get it set right. So I used the shadow technique. Put the back off your printer against a wall and shut off all the lights in the room. You want it dark as possible. Take an office lamp that projects light in one direction or a bright flashlight and aim at the back wall but make sure the lamp is very close to the wall and reflecting light off the wall. Get in front of your printer and lower your print head to the board. When it gets close to the board you should see a shadow appear under your nozzle. You may have to adjust the lamp a little. Put your nozzle all the way to the left and lower it until all the light disappears under it. You should be just touching the board. Adjust the nozzle until you can just barely see any light under it. Move the extruder across the board slowly keeping the light source exactly the same until you reach the other side. I use this procedure to check surfaces I have milled and it works great. As for belt tension, to tight will cause issues. Just squeeze the belts, they should flex a good 1/4 inch. Now do your first calibration. If the filament line on the board is flat you are way to low, you want it a bit rounded on top. When it prints the square and it looks rough on the surface you are still to low. If the filament lines don't come together and create smooth rows you are to high.
I had adhesion issues when doing the test which forced me to lower the nozzle to get it to stick but caused issues when I printed models. This is something nobody checks and it fixed my adhesion issues. Lift your spring board off the printer and preheat your printer to the default PLA settings. Take a IR temp sensor or something that reads temperature correctly. I'm an electronics tech and there are no sensors that read temperatures perfectly every time. Most of the time I have to put them in ice to see what they read and the drift. My board was 8 degrees low and my nozzle was 5 degrees high , which means my filament was having a hard time sticking to the board during my calibration. I thought squeezing the filament to the board would help, which it did but it also caused my print problems. Now I make a profile from the default settings and adjust my board temp. If you are having issues with the bottom of your prints being warped it's possible you are running to high a temp on your board. It's worth checking. I would go back and do multiple calibration prints until it looks perfect every time. Over tightened belts cause lots of issues, just squeeze them, they should flex pretty easy.
If you are still having issue after resetting all that, try this site. https://all3dp.com/1/common-3d-printing-problems-troubleshooting-3d-printer-issues/
It goes over all the issues printers have. When testing always use factory settings, a good dry filament and a print that's good. Silk filaments are notorious for printing issues so I would stay away from them until you have everything ironed out with this printer. I purchased filament from Prusa only until I knew everything was working correctly. Even if you are a veteran at printing, every printer has its quirks and operate differently so it's good to get to know them before you venture off. I personally have beaten these printers to death running every type of filament and they just keep going. In fact the reason I'm here is because of a Silk filament issue I am having, which is to funny.
The nozzle is to low and hitting my filament. This could cause a build up of material behind your nozzle as it prints.
RE: Artifacts in Print? Looking for Guidance
Hello again,
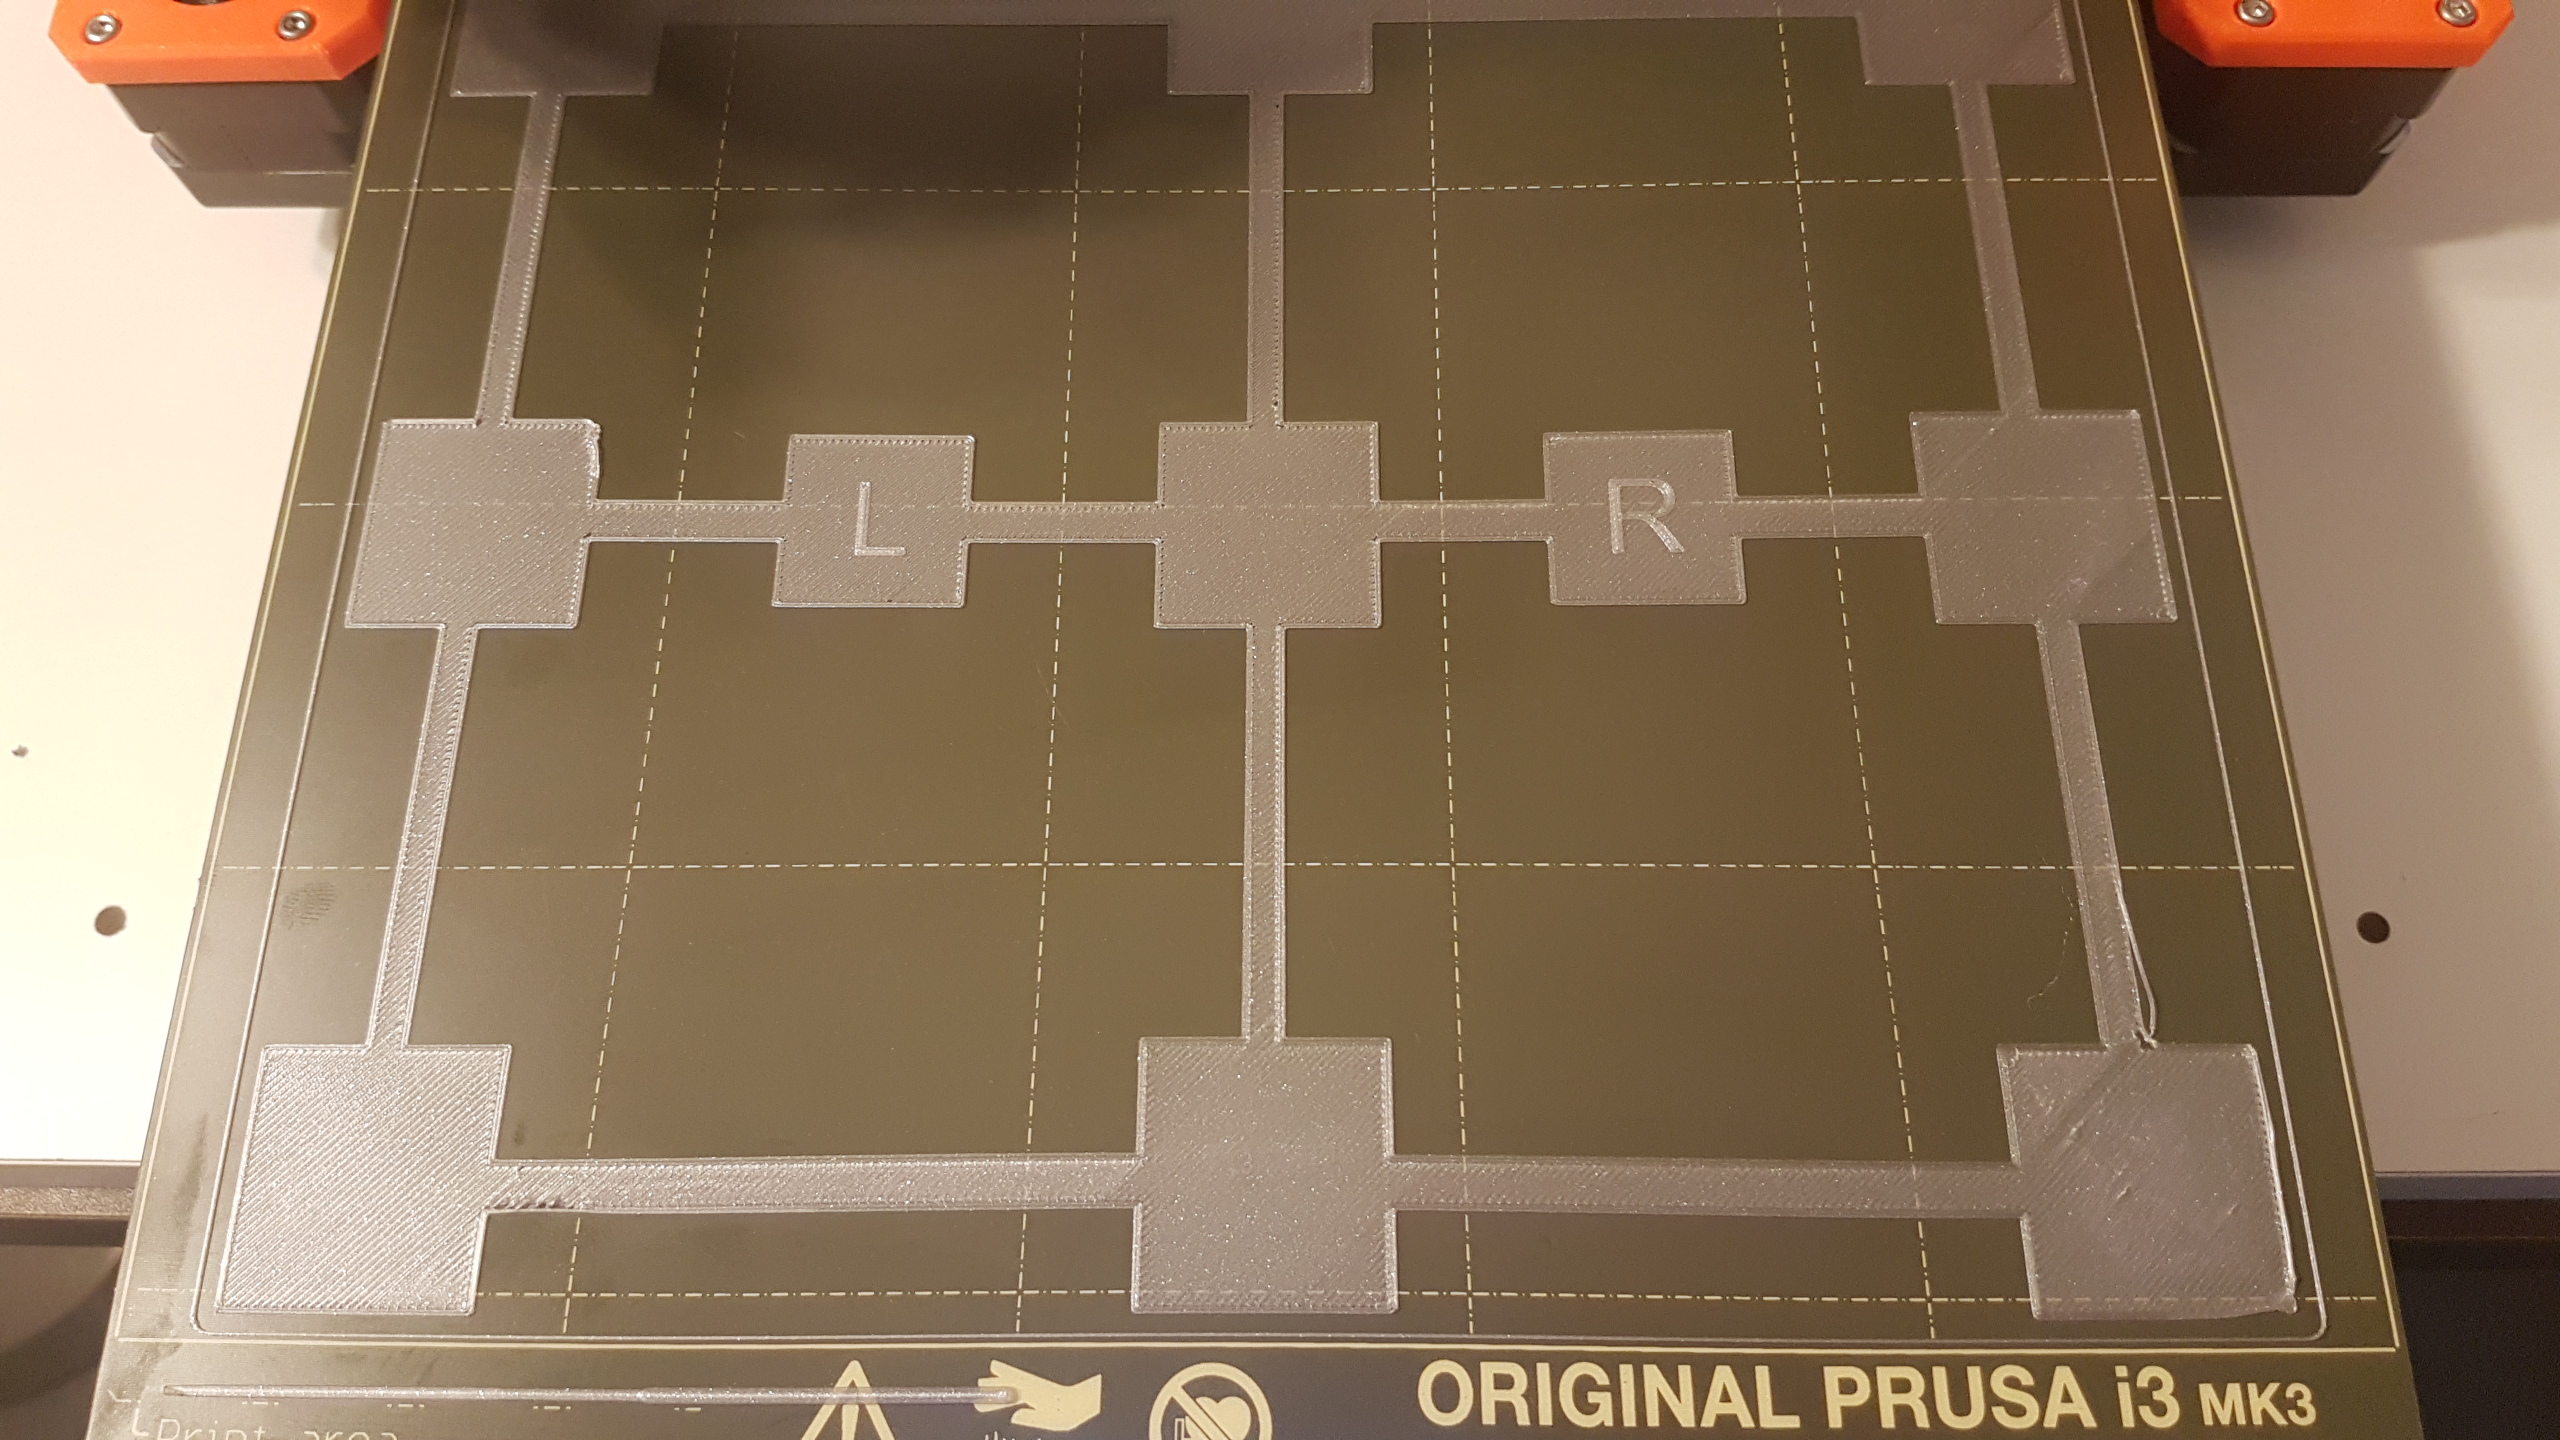
I printed the z height gcode file that you provided. Attached are the pictures. Please tell me your thoughts.
Just in my own head, I know that there shouldn't be any space between the lines or else its too high and on the other side if its really squished out and hard to extrude its too low. However, my knowledge kind of stops there because from the print it seems like there is a wide range of "optimal" z heights that are acceptable. What I don't really know is if I should stay on the lower side of the range (so the nozzle is lower to the bed) or high side (where the filament is squished more). I know the obvious answer would be to stay in the middle but I'd like your opinion on it please. Thank you.
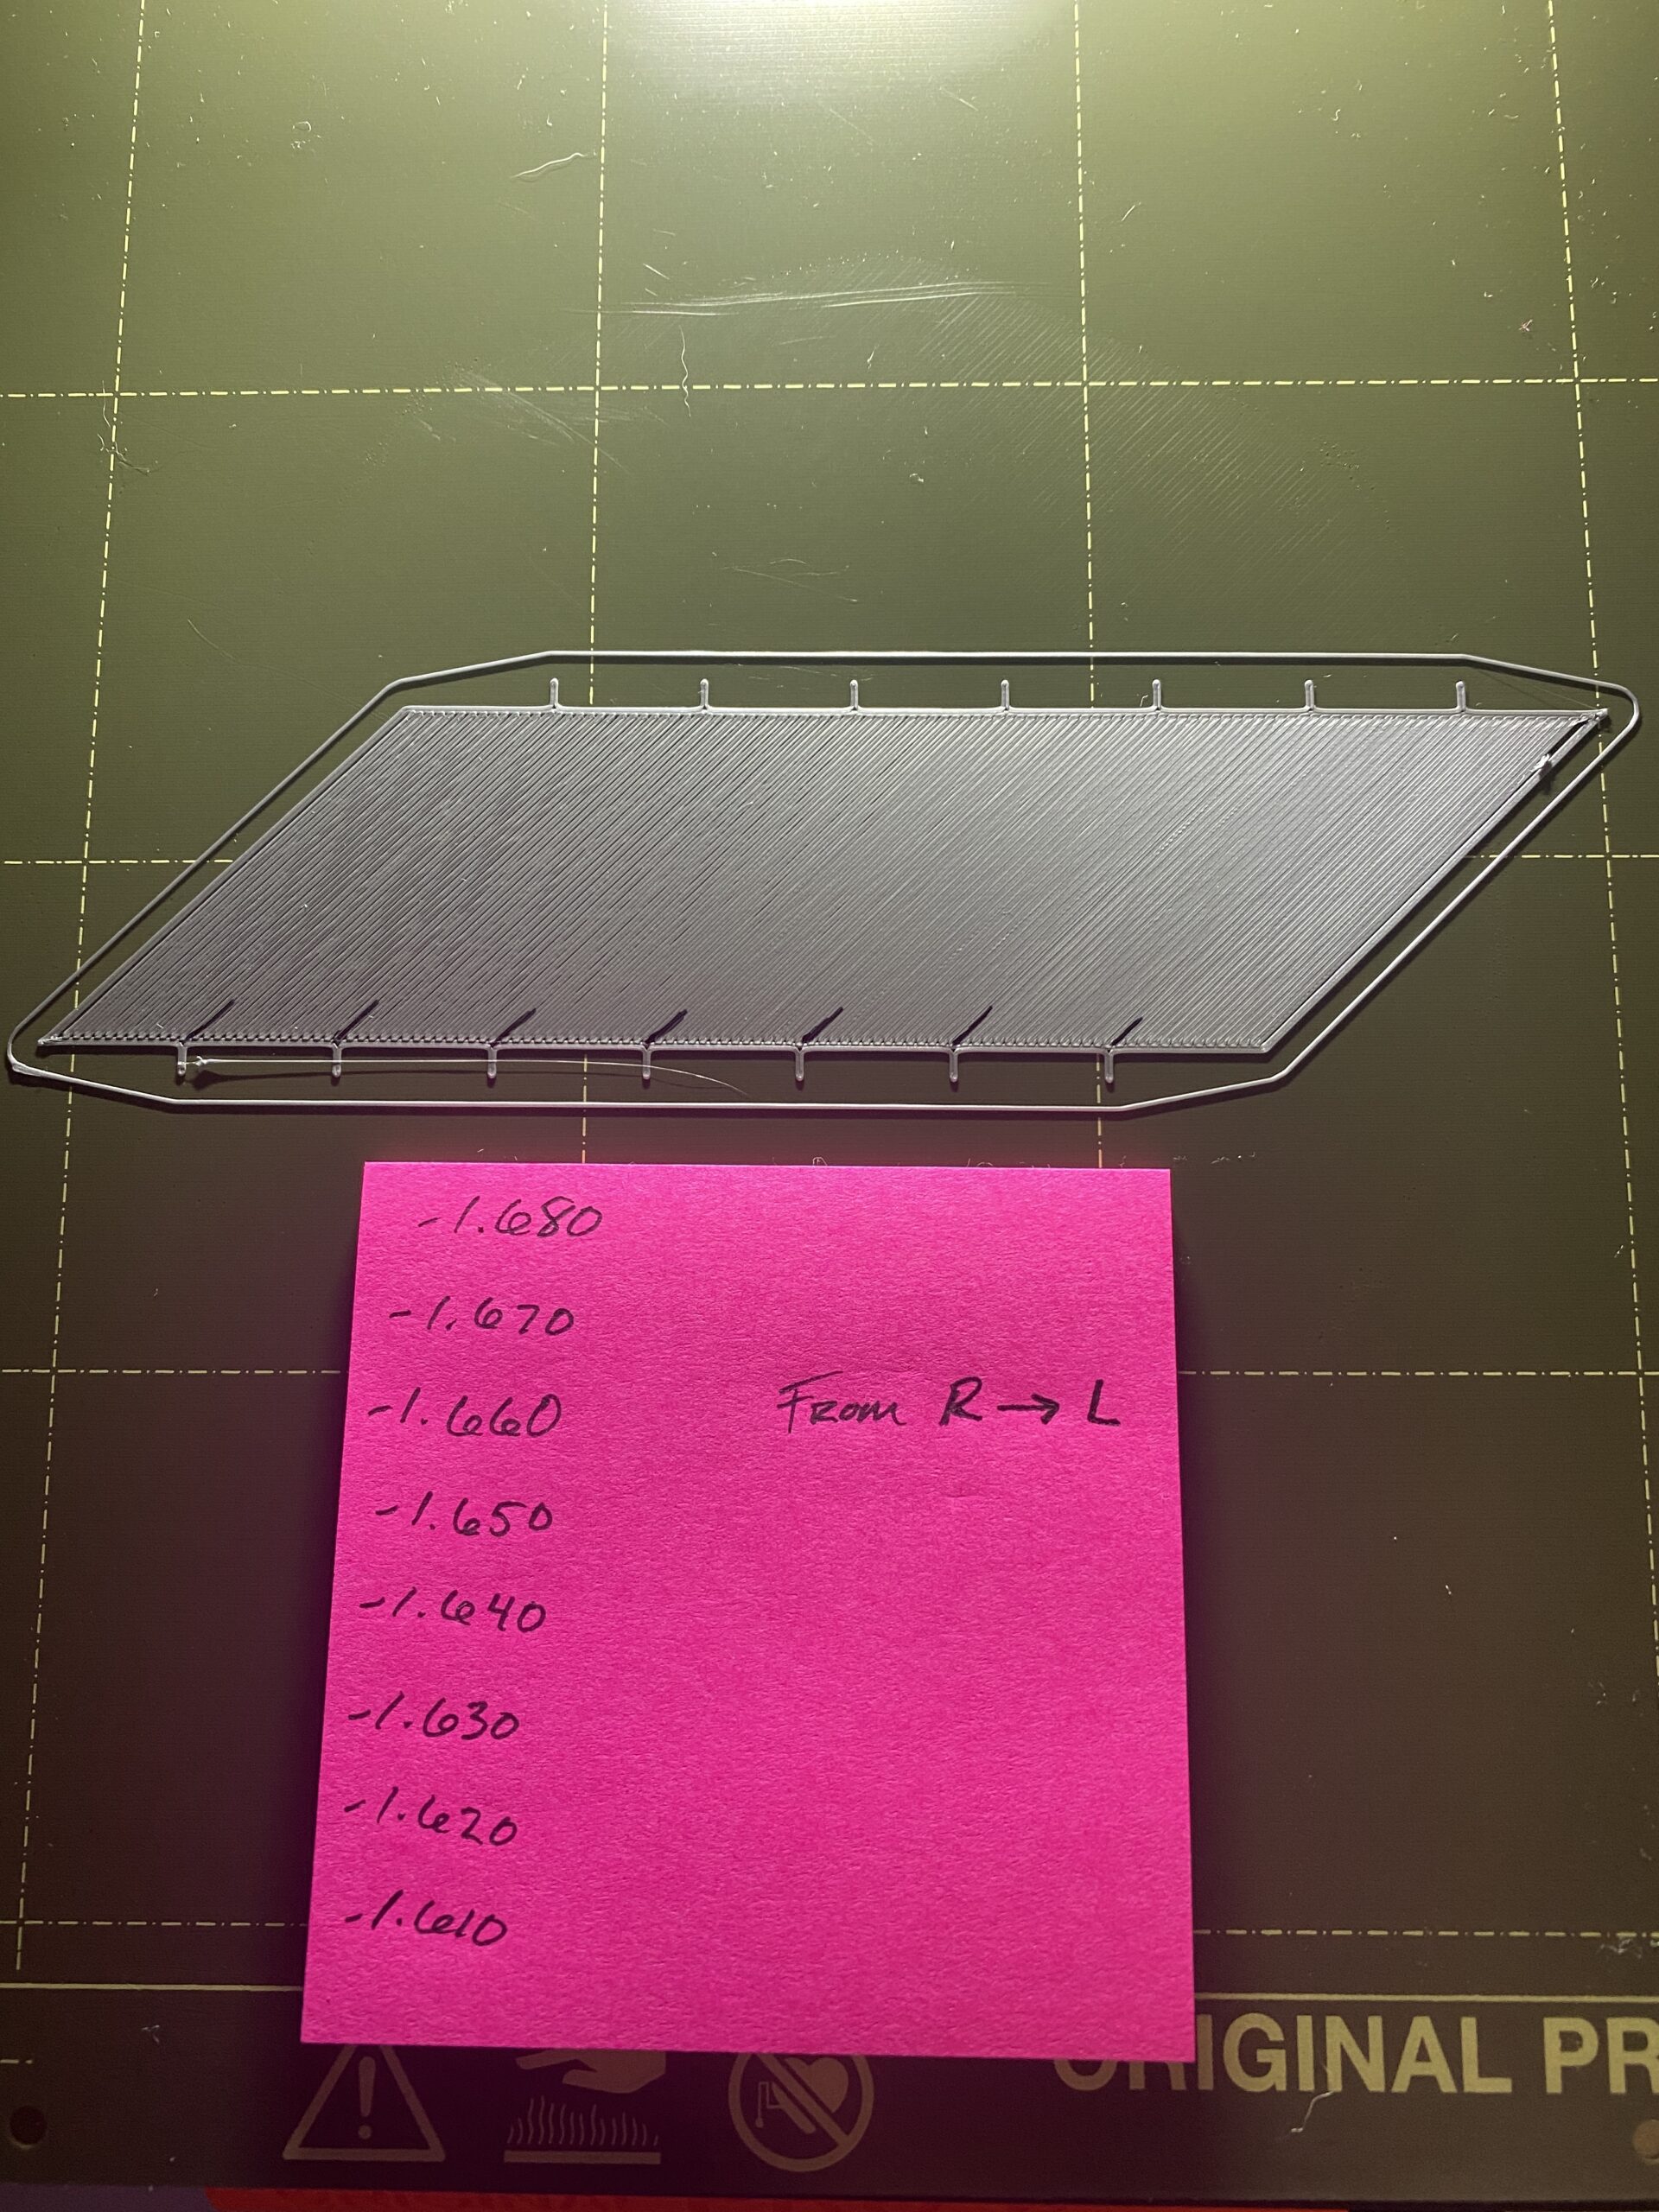
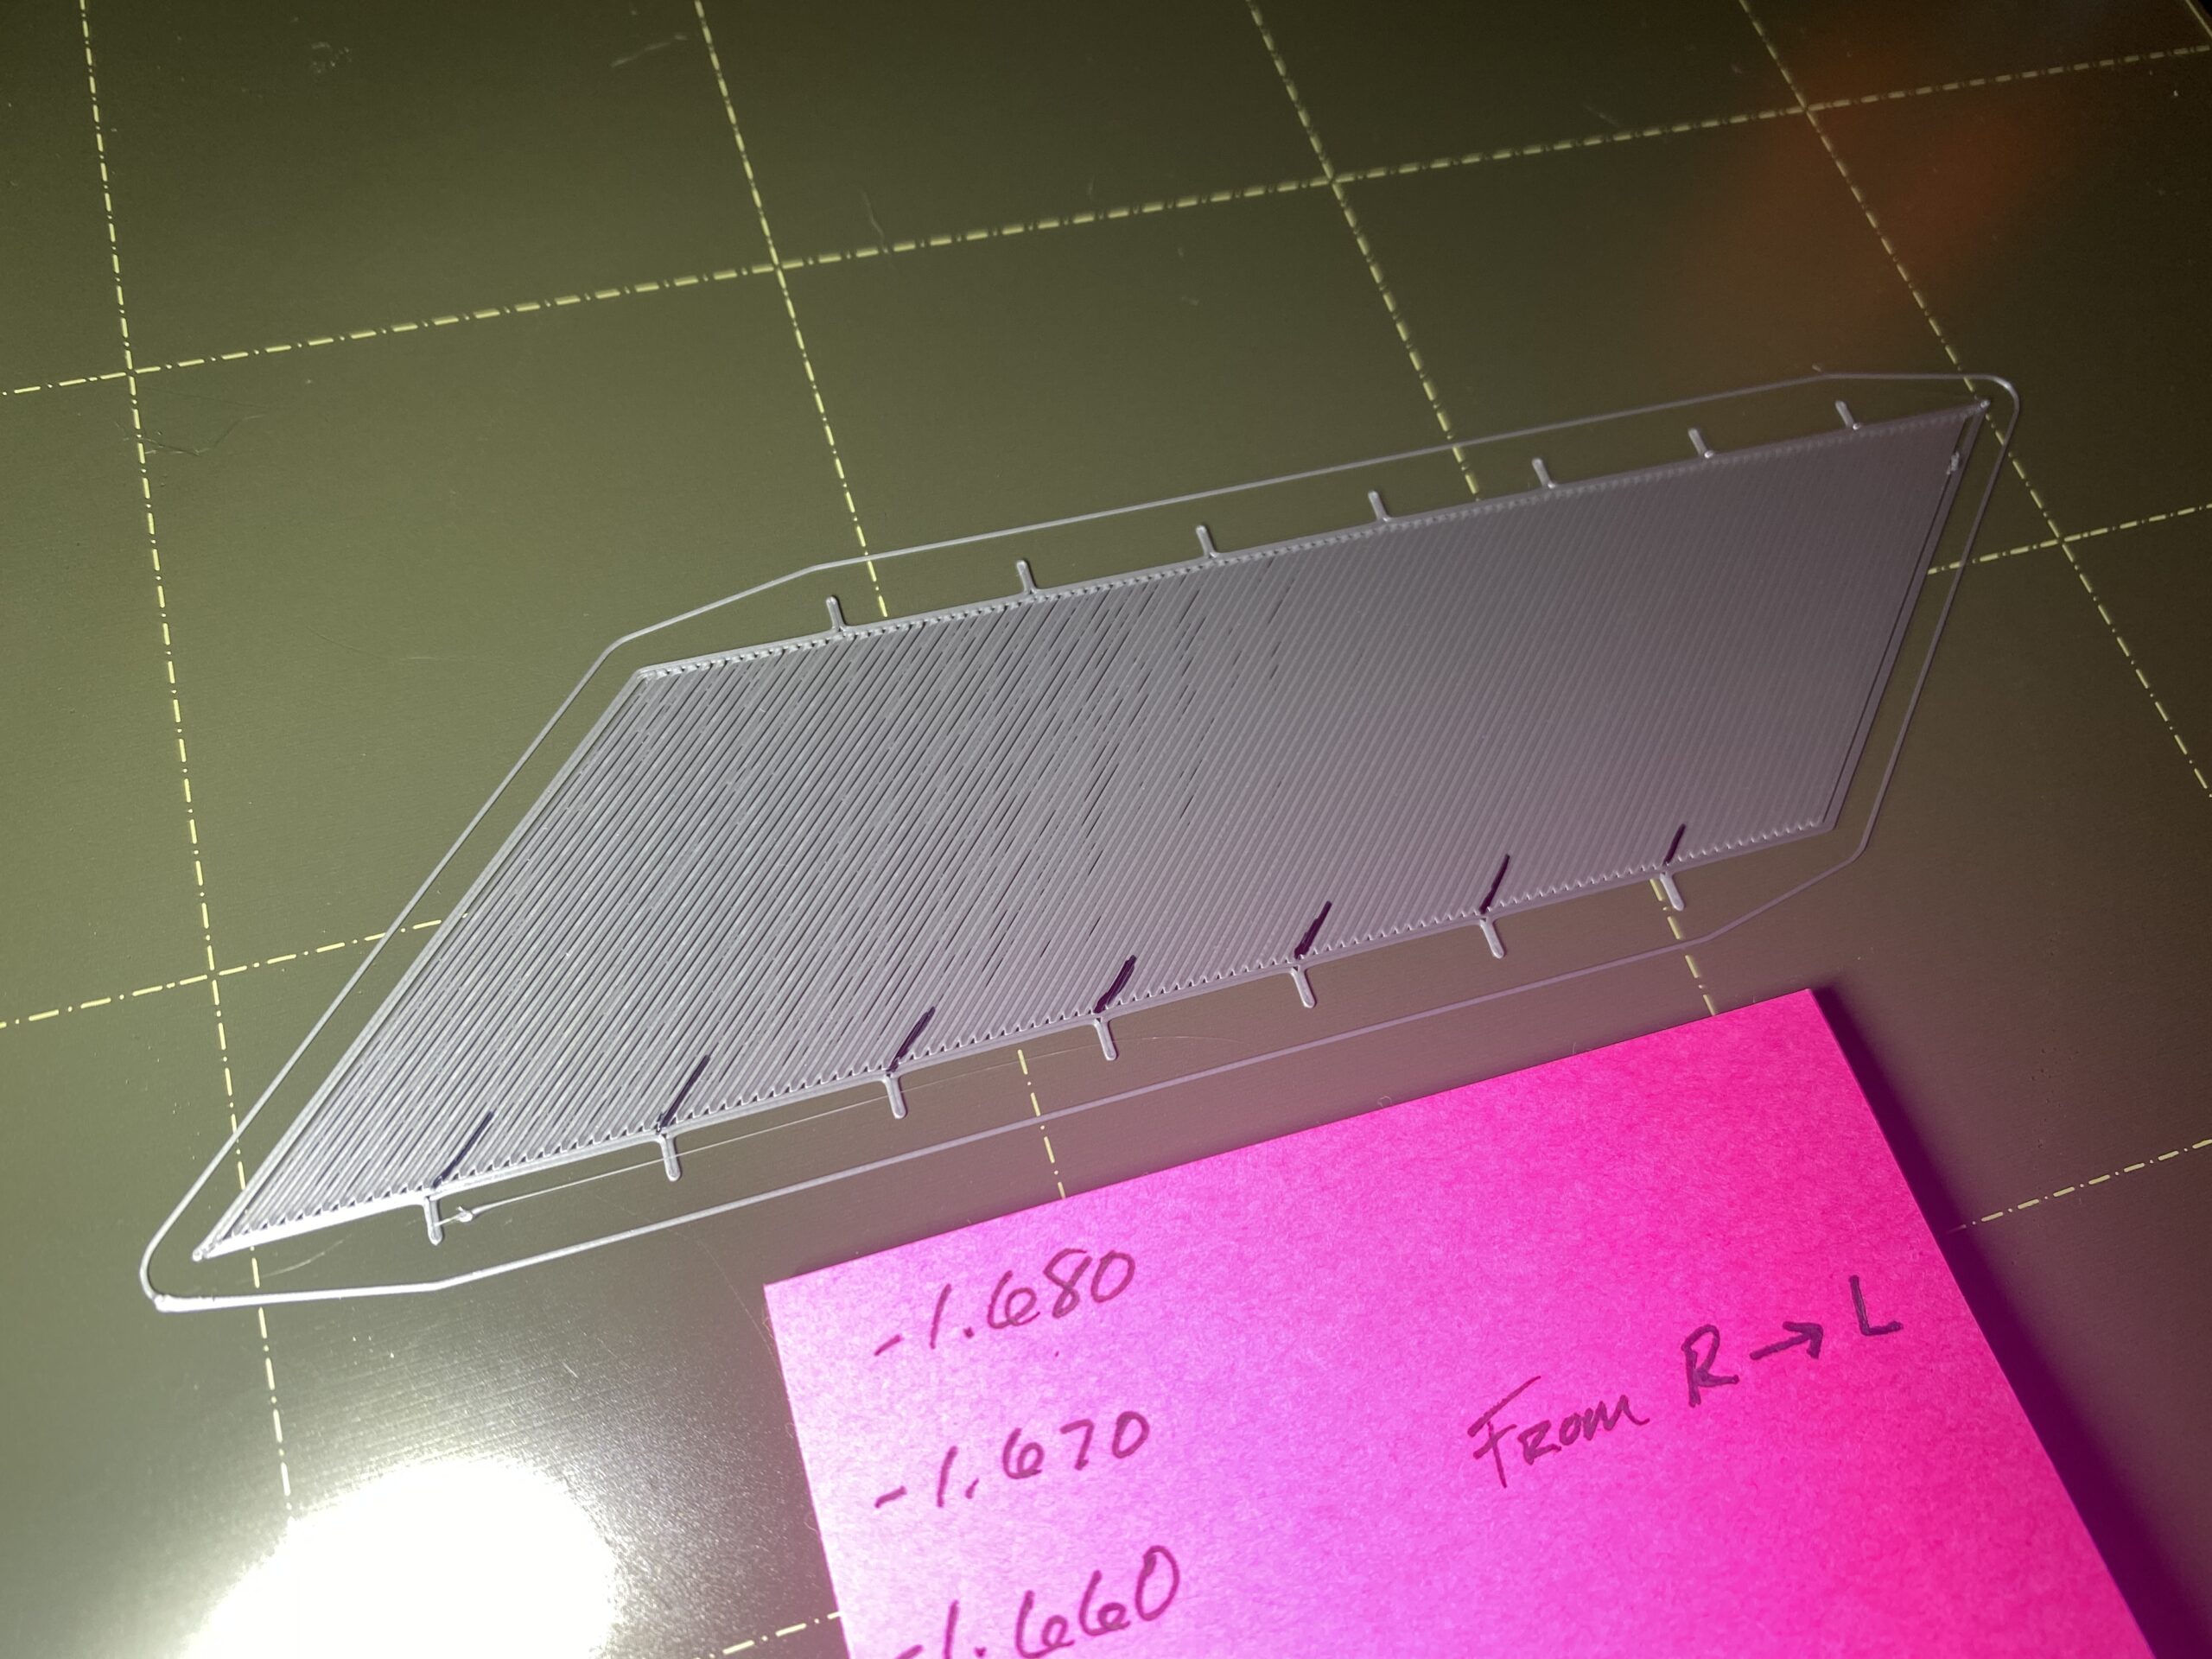
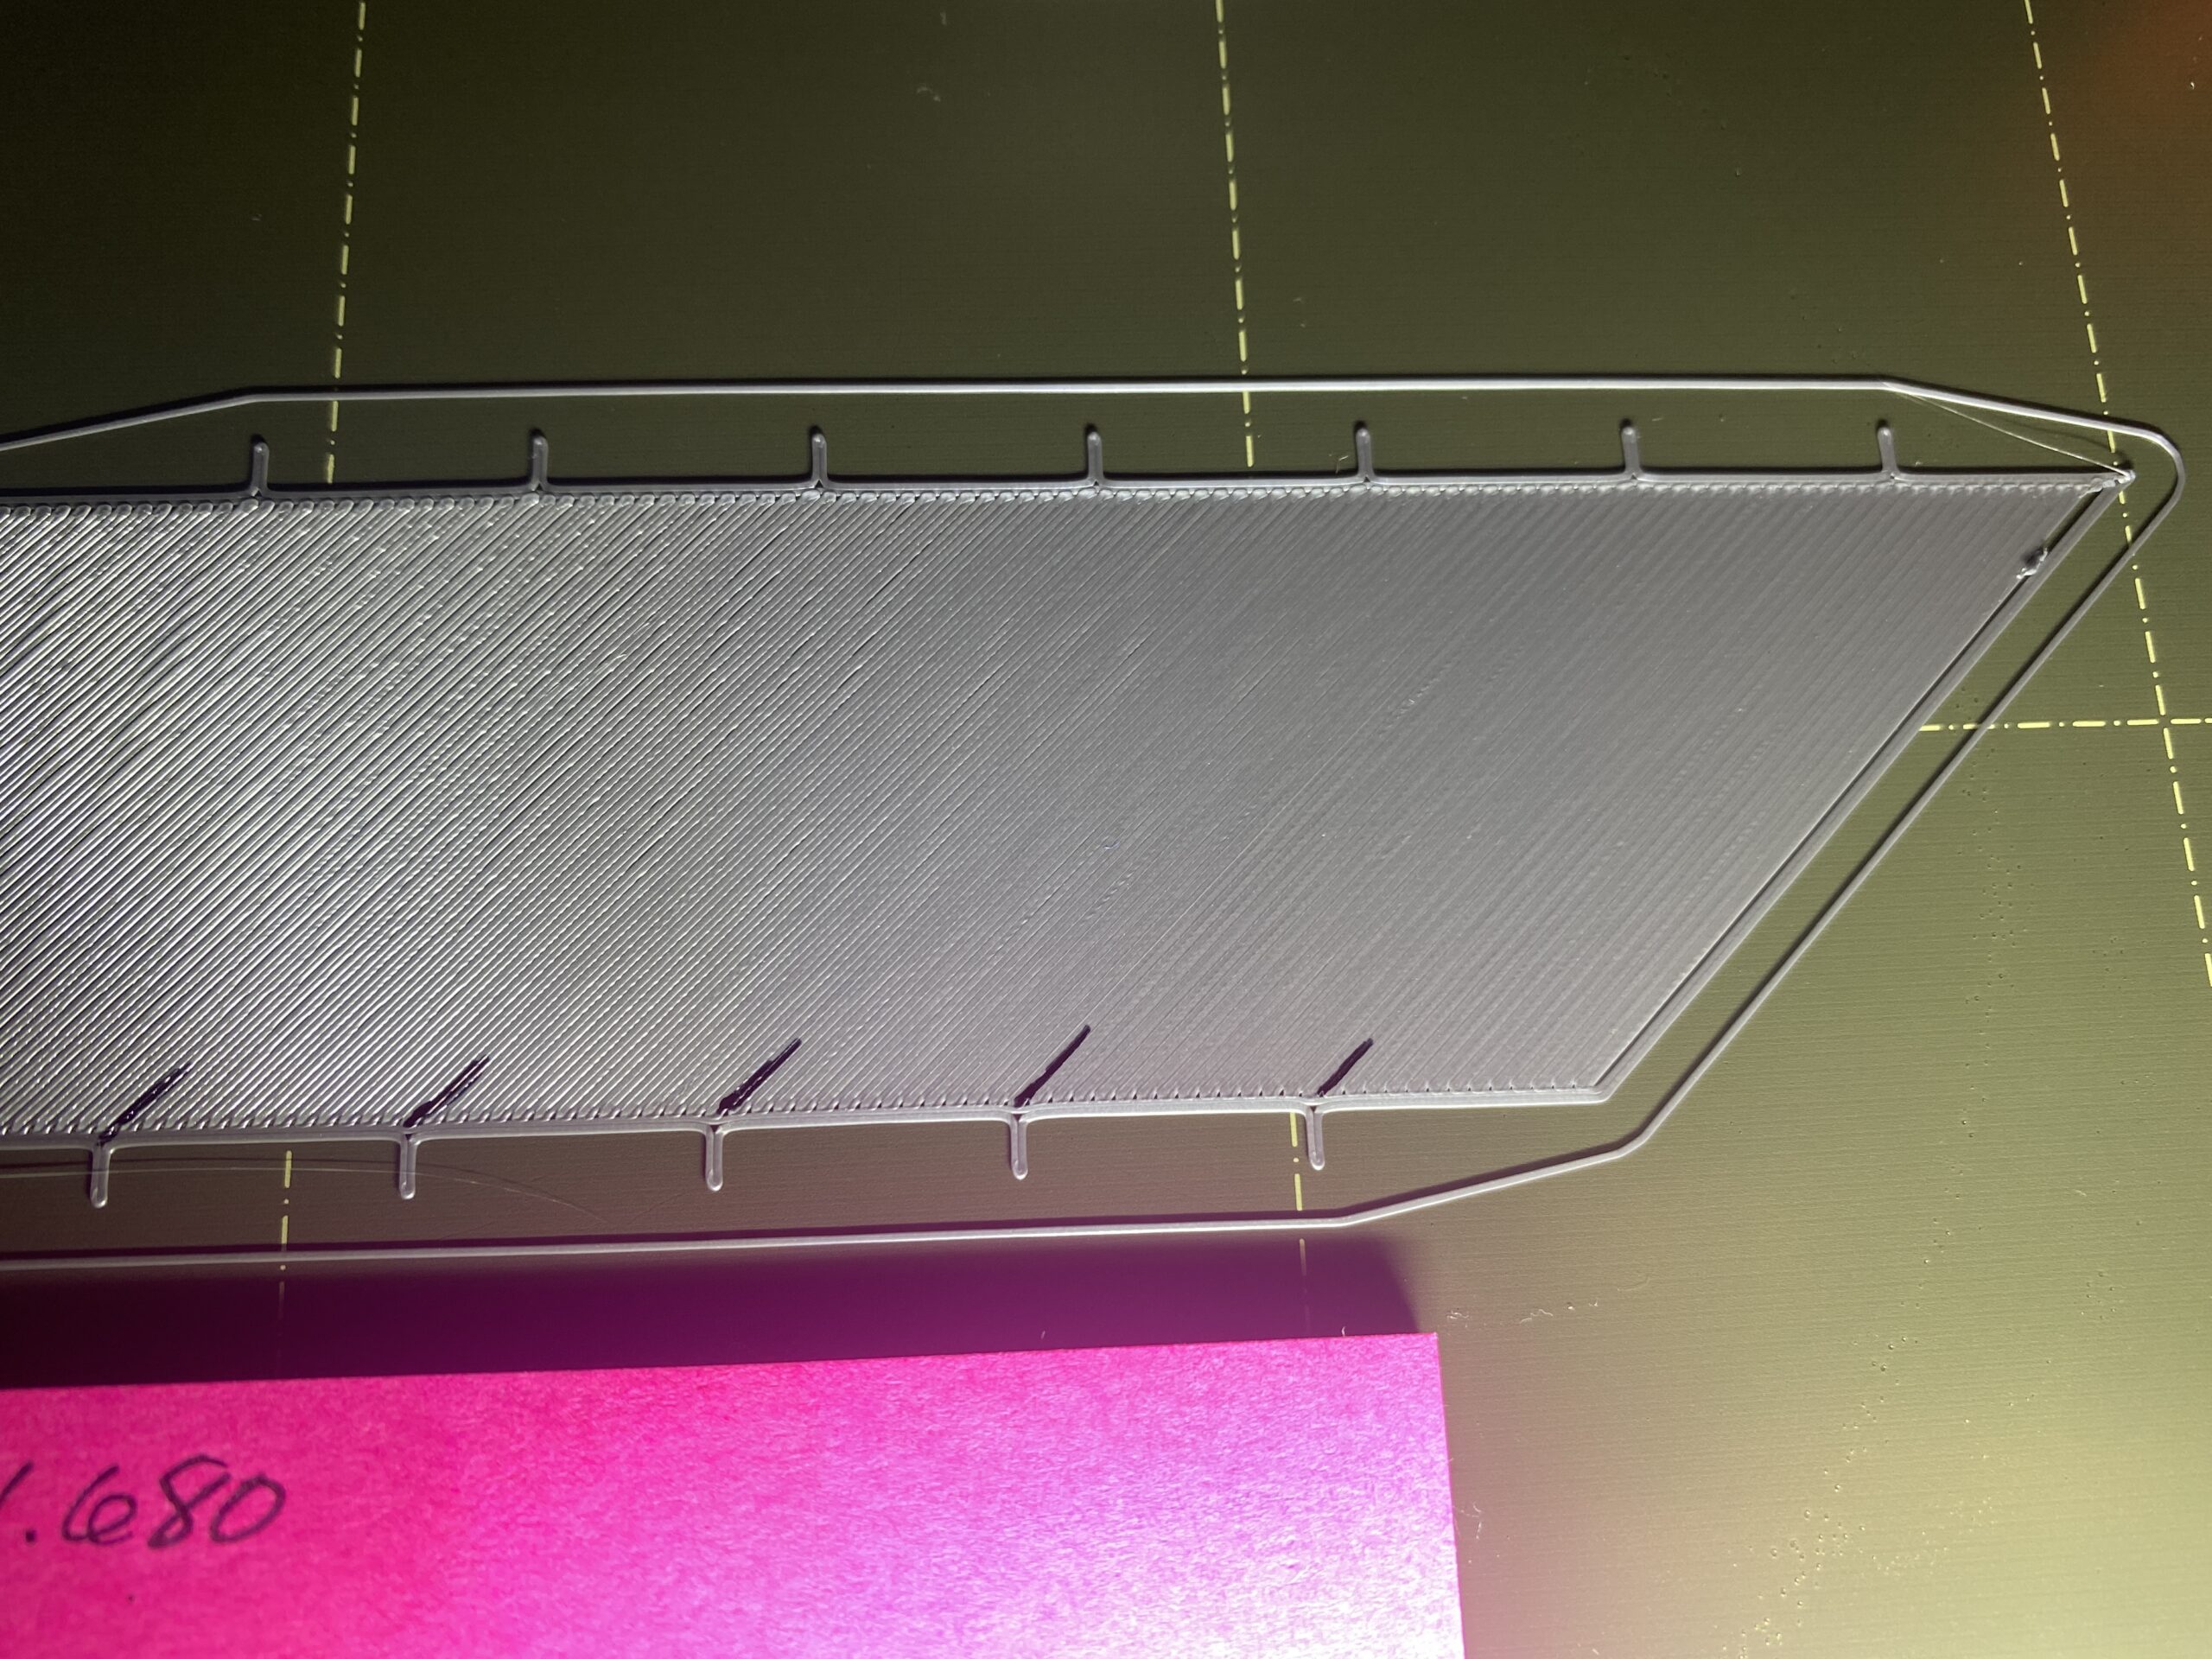
None of those are too low but for PLA I would tend to go for the second or third section. possibly split the difference.
Based on some of your earlier prints your belt tension might be suboptimal but first clean and lubricate your smooth rods in case it's just a little dry.
Cheerio,
RE: Artifacts in Print? Looking for Guidance
Always hard to tell from a photo but I was. similar to diem, thinking somewhere between 1st or 2nd segment.
Formerly known on this forum as @fuchsr -- https://foxrun3d.com/
RE: Artifacts in Print? Looking for Guidance
Lift the print and pull the test laterally and see if the infill pulls apart. If it does - definitely too low. Also, I look where the infill meets the perimeter and try to avoid any small holes in the acute angle intersection.
i3 Mk3 [aug 2018] upgrade>>> i3MK3/S+[Dec 2023]
RE: Artifacts in Print? Looking for Guidance
I really appreciate your insight.
As you said, silk PLA is a b*****. I've checked my bed and nozzle temp and the belts look good too. Not too tight but not super slacked. Iv'e never heard of the shadow technique, I'lll have to try that one out. Thanks.
I'm curious to know if under-extrusion (low flow rate) is getting in the way of a perfect first layer adhesion. From my test prints, it seems that the layers are perfect but the perimeters where the lines terminate show a small gap. I know that I can up the flow rate to 96 or 97 while its printing and it seems like it has improved (while keeping the z height the same), however, has anyone else had to alter the flow rate value for the stock filament and with stock PLA settings? I know flow parameters change for each filament and its not always the same. However, specifically for the included filament with stock settings, is this something others have encountered?
RE: Artifacts in Print? Looking for Guidance
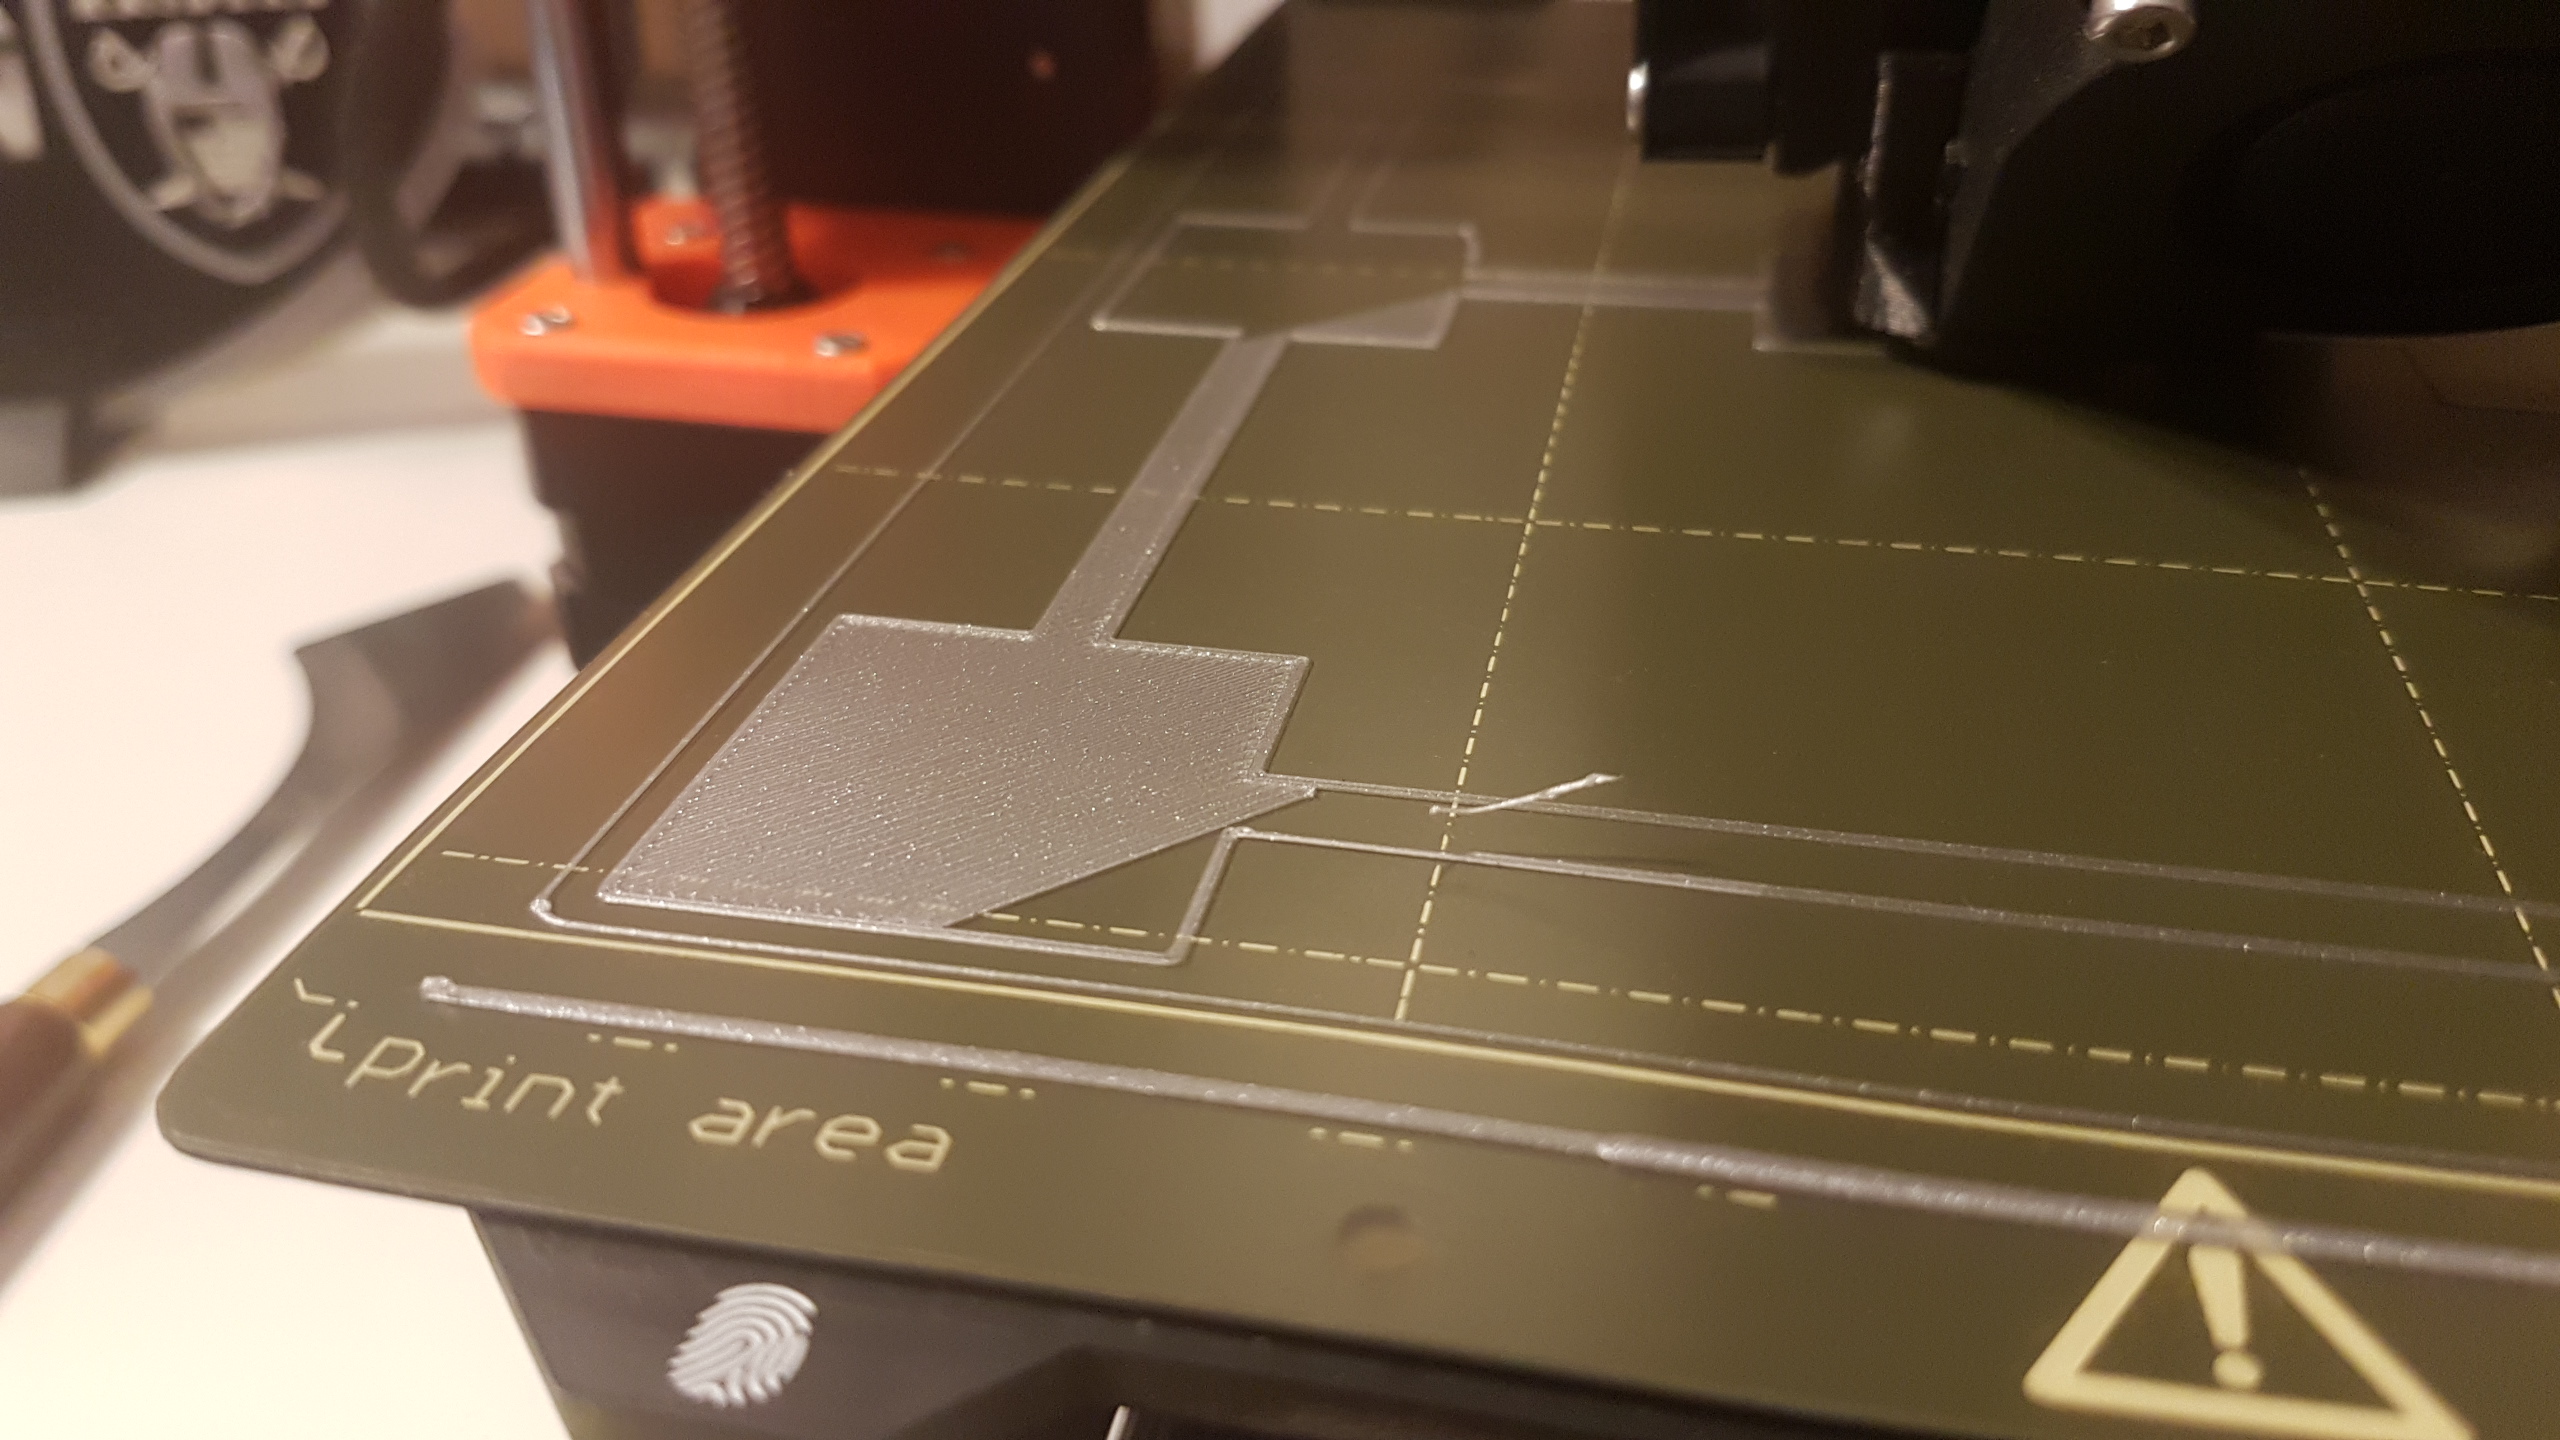
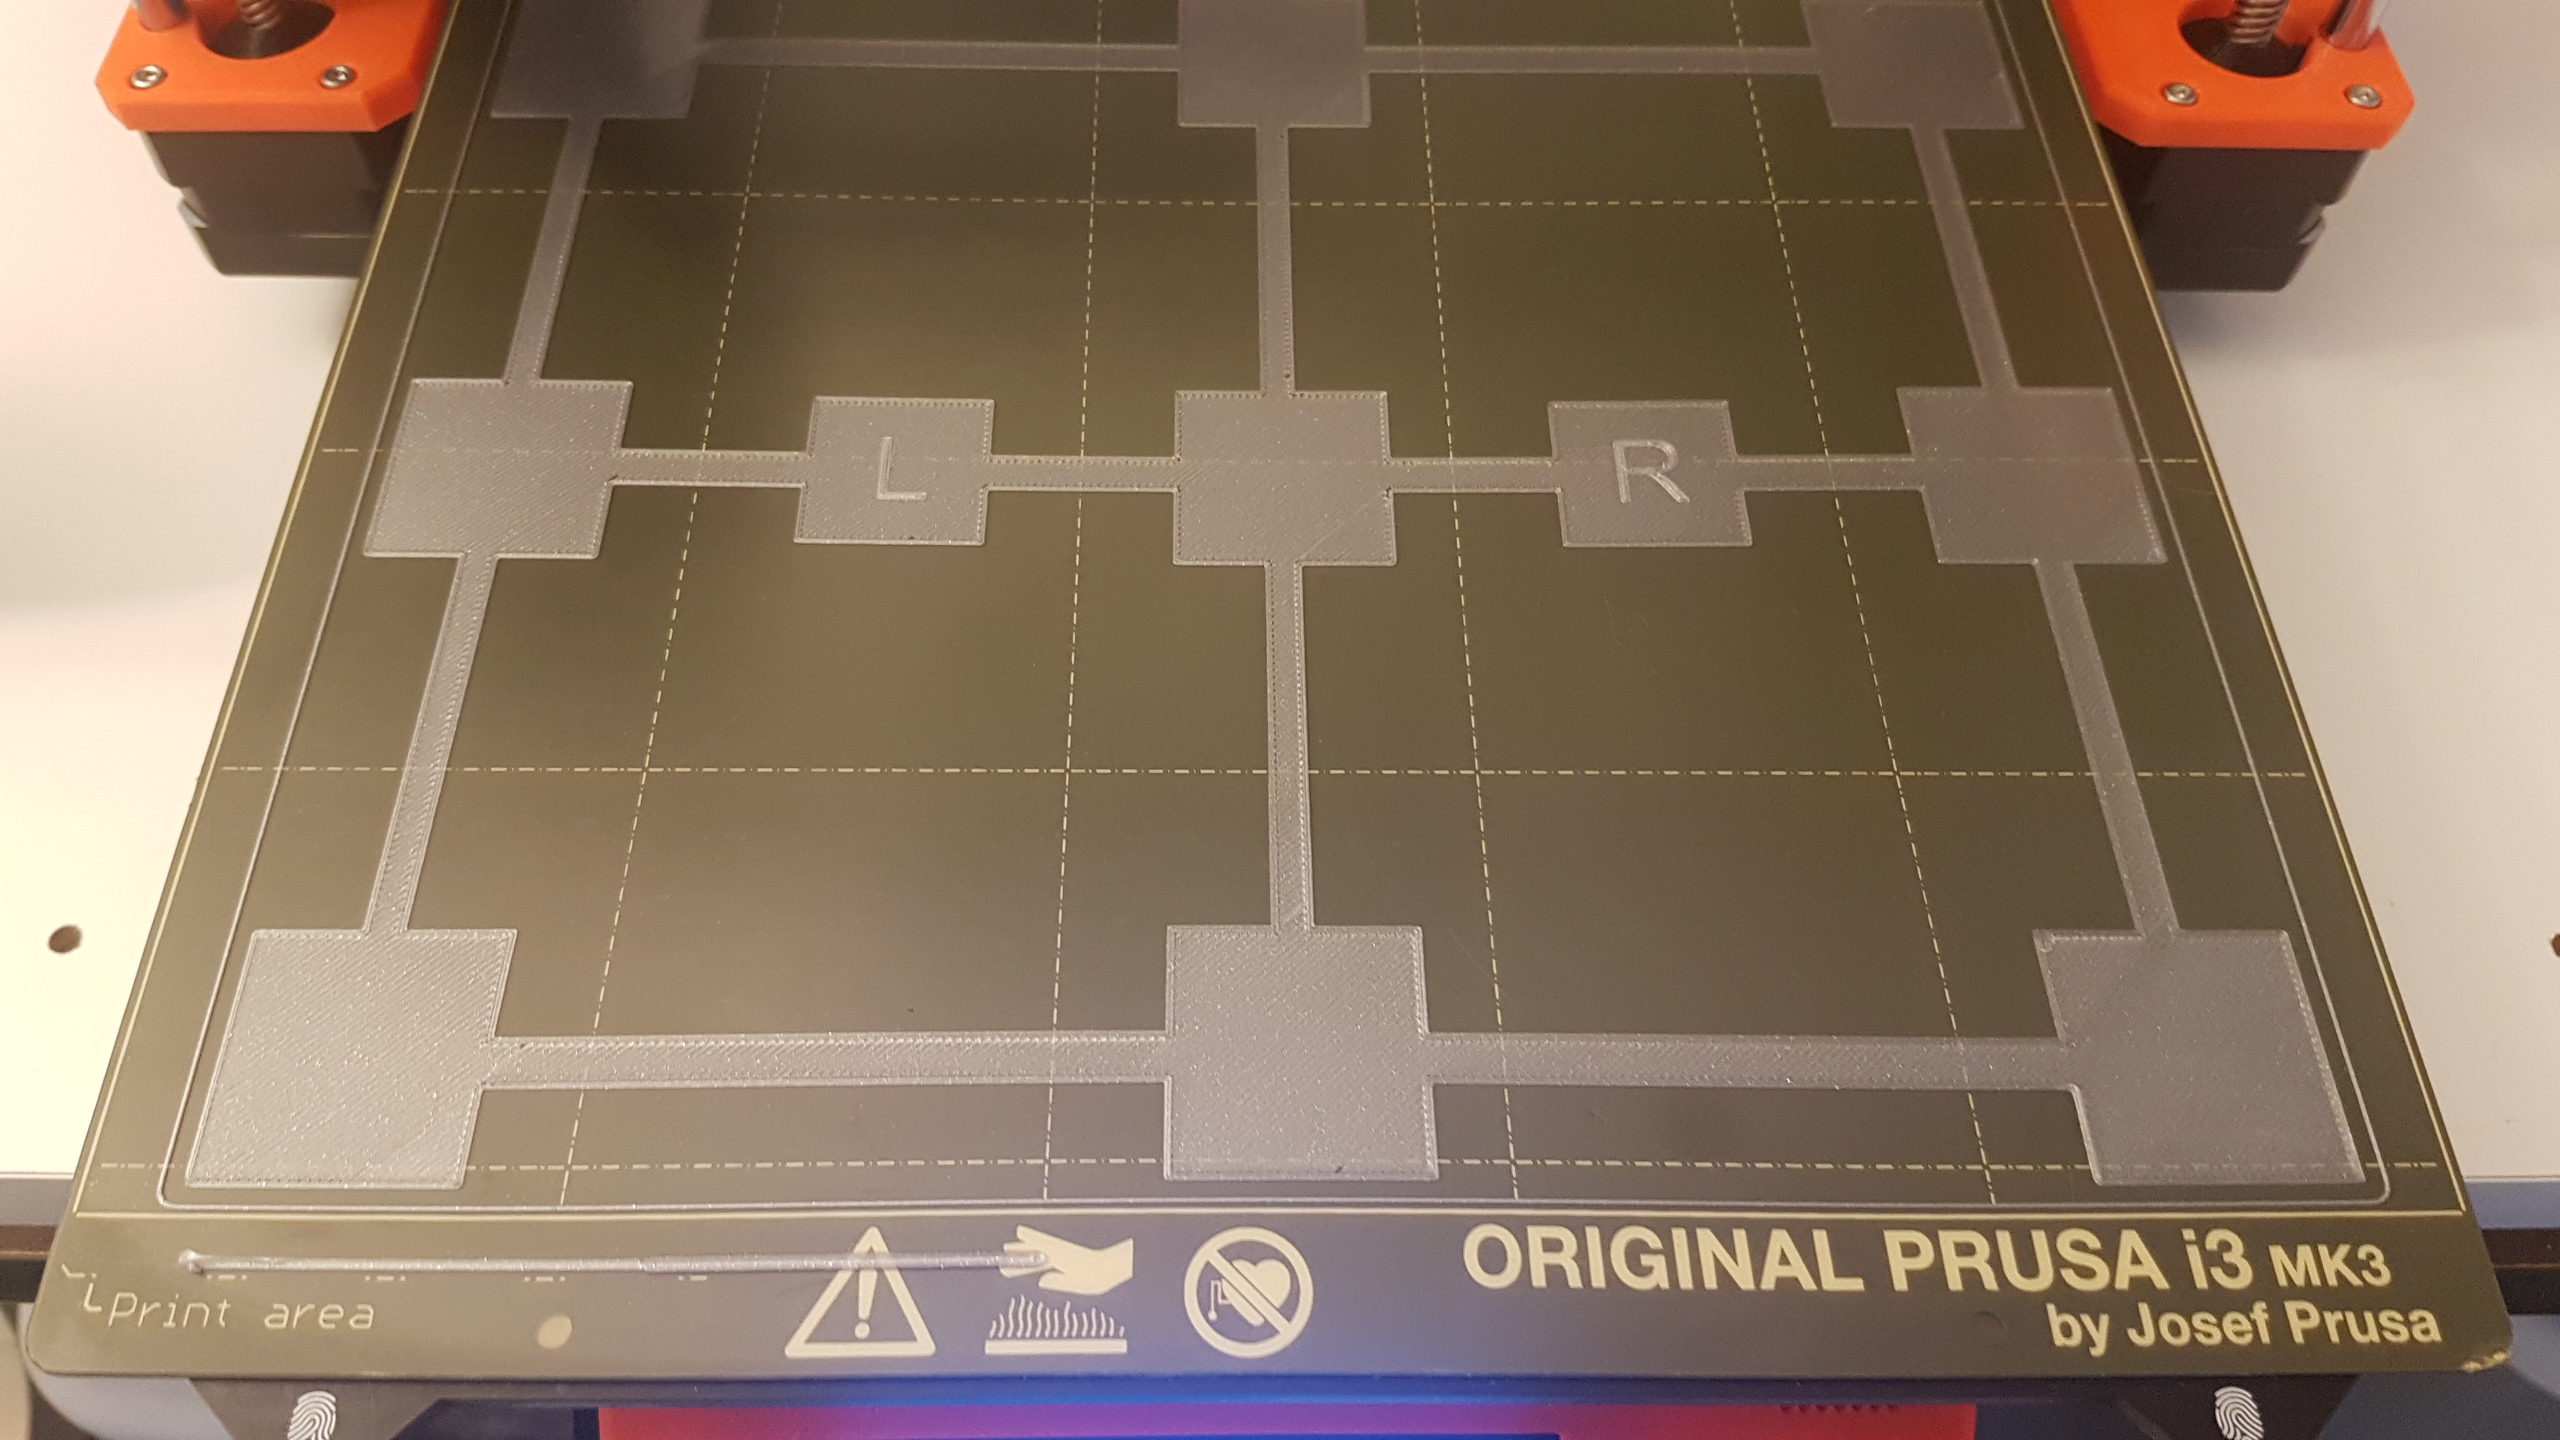
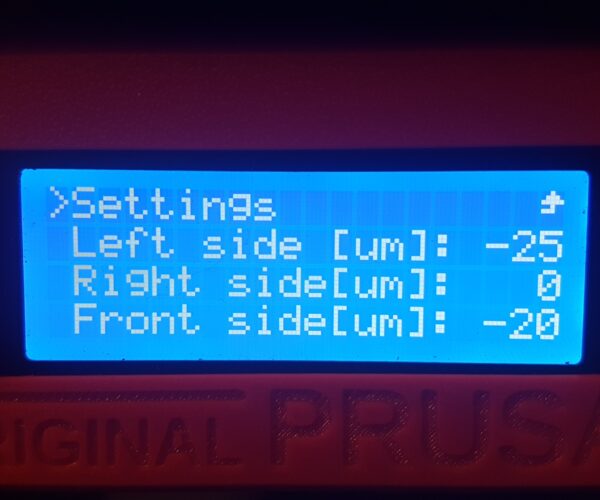
Hi, I'm no expert like these guys, they can run rings around me. This is just my opinion. I looked at your picture and your nozzle starts out too high and goes too low. If you look at my first picture and look at the boarder filament to the far left, not in the test print area just the border line that goes around the outside, see how round it looks. It looks as if I just laid the filament on the board. When you do your first layer Z Cal it needs to look like that. The next picture shows my nozzle to low. See how its tearing into the print or squishes the filament. Its to low. The third picture is after I did a complete factory reset, pushed the penda sensor down onto the tie wrap harder while holding the extruder down so it wouldn't rise up. I used the shadow trick I told you about and got my nozzle as close as possible to the board from left to right. Then doing the paper calibration and then the Z Cal, I was able to see an improvement. I saw 1.6 for your Z Cal. Mine is at 0.705. None of my printers are over 1.0. When I got my test print looking close in all four corners and center, picture 3, I did the last adjustment which is in the micro board adjustments. This tells the sensor to raise or lower the nozzle in the areas of the board that are to close or to far away from the print. That's why I use that test print for all four corners and center. The last picture shows my adjustments. It took a lot of prints playing with the final board adjustments but I got it tuned in perfect. Everything was factory default settings for all the testing. The only thing I adjusted was the first layer speed from 20 to 15 and my board temp from 60 to 68 because it was 8 degrees low. That 3rd Cal picture is almost perfect. I would take a metal ruler lay it on its side and lay it on your spring steel printing board. Put a bright flashlight behind it and shine the light on it from behind. Move it all over your board and see if you can see light under the rulers edge. This will tell you if you board is warped. 99 percent of my prints are factory settings. I rarely touch any of my settings. My first layer speed is always 15, board temp is 8 degrees higher. I only make adjustments when nothing else works. Like seam location, some prints it needs to be random and others it needs to be near. Detect Thin Walls is always on and Fill Gaps. Besides that not much gets changed. I always run printing temps on the high side because of better layer adhesion and board adhesion. Don't care about strings because a quick once over with a heat gun gets rid of those. Make sure the newest firmware in the printer is installed and your slicer software is up to date. Select the default Prusament filament settings for testing and don't touch anything else until you see a clean print. I almost tossed my first printer into the trash because it wouldn't print anything correctly but I went back to the beginning, right after I just got it put together, and started everything over again. I'm not sure if any of this will help but don't give up because once you tune these in they are awesome printers.

RE: Artifacts in Print? Looking for Guidance
it seems that the layers are perfect but the perimeters where the lines terminate show a small gap
Silk PLA: I totally love it 🙂 TTYT3D silk prints very well, far from being a b…. I just up the temperature by about 5 degrees. It does however— you're right— tend to leave some larger gaps than regular PLA. But usually gaps on the first layer get filled in from material on the second layer to the point that I don't have a problem with it.
There's also the Print settings→Advanced→Overlap→Infill/perimeters overlap setting you can adjust.
Formerly known on this forum as @fuchsr -- https://foxrun3d.com/
RE: Artifacts in Print? Looking for Guidance
Apologies for the late reply. Thank you very much to both of you for your insight and details. I did not know about the micro settings for left right and front. I'll have to look into that. I took your advice and started from the beginning and reset everything and am using the included filament. Seems to be working well expect for a little bit of stringing and my Z cal number being ~1.56. I read in the manual that it shouldn't be over 2 but I might push the penda sensor lower.
Silk PLA is great when it works, and not when is not. For me, on my other machines it always tends to get clogged in the nozzle and its always a struggle to figure out the correct printing temperature and fan speed. I do try to print test pieces and dial it in, but usually my results aren't consistent and at some point I just want to print the models I want. I'll look into the TTT3DD silk and that setting in the prusa slicer. Thanks for the recommendation.
RE: Artifacts in Print? Looking for Guidance
I read in the manual that it shouldn't be over 2 but I might push the penda sensor lower.
Common misconception. If you're getting close to -2 you need to push the PINDA higher.
May sound counter-intuitive to move the PINDA higher, but by doing so the nozzle can move closer to the print bed before the PINDA triggers. For an illustration of relationship of distance of PINDA to nozzle and sheet, see 
The Super PINDA should have about 1.5 mm distance between nozzle and sensor, so that you’re around -1 when your Live Z is correct. That gives you enough wiggle room up and down.
I put this little helper on Printables to help position the PINDA: https://www.printables.com/model/57192
Works better than zip ties or credit cards, which have less well-defined heights.
A good description of how the PINDA works and how it relates to Live Z can be found at https://www.reddit.com/r/prusa3d/comments/9kab1l/can_someone_explain_the_concept_of_the_pinda_to_me/
Formerly known on this forum as @fuchsr -- https://foxrun3d.com/