Adjustments for Silk Filaments
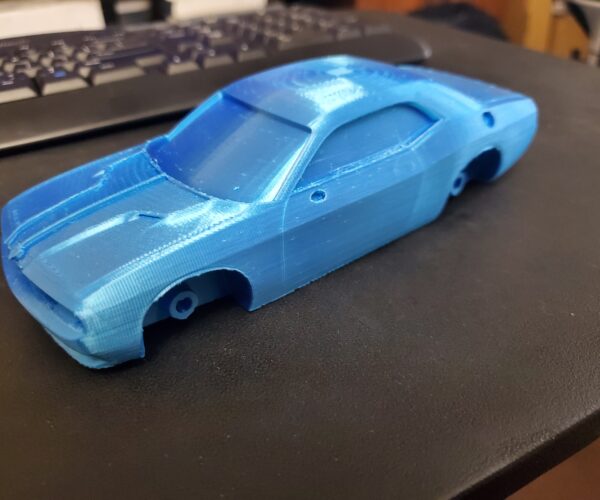
Hi, I'm sitting in Alaska talking to all of you today how awesome is that!!! I'm running the MK3S using Prusament default settings for PLA and printing @ 0.10 mm. This is my first Blender model, just a few tweaks needed but over all I'm pretty happy with it. I have had issues with this Silk Blue on other prints before. If you look close you will see little seam lines all over, if that's what you call them. For how small the model is, the level of detail and how good my adhesion layers are I don't have much to complain about. This thing was covered in supports and that even came off easy. My seam setting was set to Random and I'm wondering that's why they are all over the place. I hoping someone who knows the settings real good, could tell me which settings I could adjust to fill in those lines and get rid of them if possible. I'm going to print the next one with the seam setting set to nearest but I would like to fill those seams in a little more if possible. I don't care if the setting makes it a little more stringy, that's why god created heat guns. I really don't want to do a lot of adjustments if possible. I really believe in the KISS rule and because of that my printing over the years has been awesome, knock on wood. If anybody has any ideas on how to close that seem down a little more, please step forward and here's your blind fold.
Thanks
Bill
RE: Adjustments for Silk Filaments
As you surmised, it's probably the Z seam creating those blemishes. I usually go with Aligned and paint on the Z-seam. to make sure it's in an area least visible.
Formerly known on this forum as @fuchsr -- https://foxrun3d.com/
RE: Adjustments for Silk Filaments
I agree with Fuchsr, looks like the random seam choice. I normally set my seams to rear for most models and just orientate the model to get the seam placement in an area where it wont be generally seen. A straight line seam is also easier to post process normally but any sanding to remove a seam ruins the look of silk filaments anyway.
With that model the seam can be hidden on the lower half in the wheel wells but its going to be a problem on the upper body in general. Where the windows meet the body would be another good place to manually place the seam.
