OctoPrint bed visualizer gcode
I'm testing the OctoPrint Bed Visualizer plugin on my Core One. After some initial testing, I can run G28 to do homing, I can run M190 S50 in order to varm the bed to 50 degrees before testing testing, but nothing happens when I run the rest of the script, the printer LED just turns green and it aborts. Anyone have a complete setup they'd like to share? Here's my try:
G28
M190 S50
G80
@BEDLEVELVISUALIZER
G81
RE: OctoPrint bed visualizer gcode
I use this, copied from somewhere:
;
; MBL Prep
;
G0 X0 Y-4 Z15 F4800 ; move away from printbed
M140 S60 ; set bed temp
M104 S170 ; set extruder temp for bed leveling
M109 R170 ; wait for temp
M84 E ; turn off E motor
M302 S160 ; lower cold extrusion limit to 160C
G1 E-2 F2400 ; retraction
M84 E ; turn off E motor
G28 ; home all without mesh bed level
M106 S100
G0 Z40 F10000
M190 S60 ; wait for bed temp
M107
;
; MBL
;
M84 E ; turn off E motor
G29 P1 ; invalidate mbl & probe print area
G29 P3.2 ; interpolate mbl probes
G29 P3.13 ; extrapolate mbl outside probe area
;
; MBL Update Mesh
;
@ BEDLEVELVISUALIZER
G29 T ; print bed topography report
;
; Cleanup
;
M104 S0 ; turn off temperature
M140 S0 ; turn off heatbed
M107 ; turn off fan
G0 X0 Y-4 Z15 F4800 ; move away from printbed
RE: OctoPrint bed visualizer gcode
Thanks, that works! My plan was to print some of these and see if I can level it further. https://www.printables.com/model/1289015-prusa-core-one-bedlevel-correction-dust-cover/comments
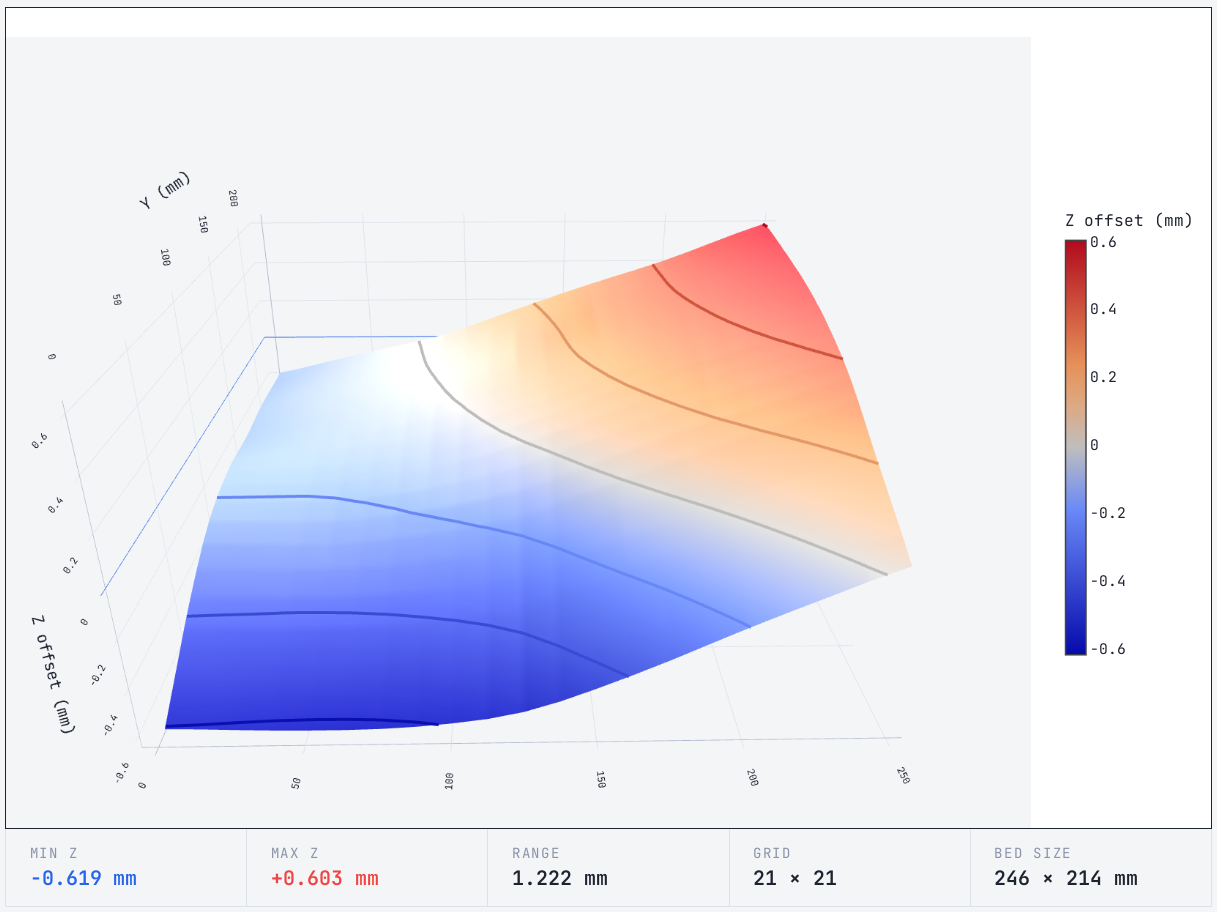
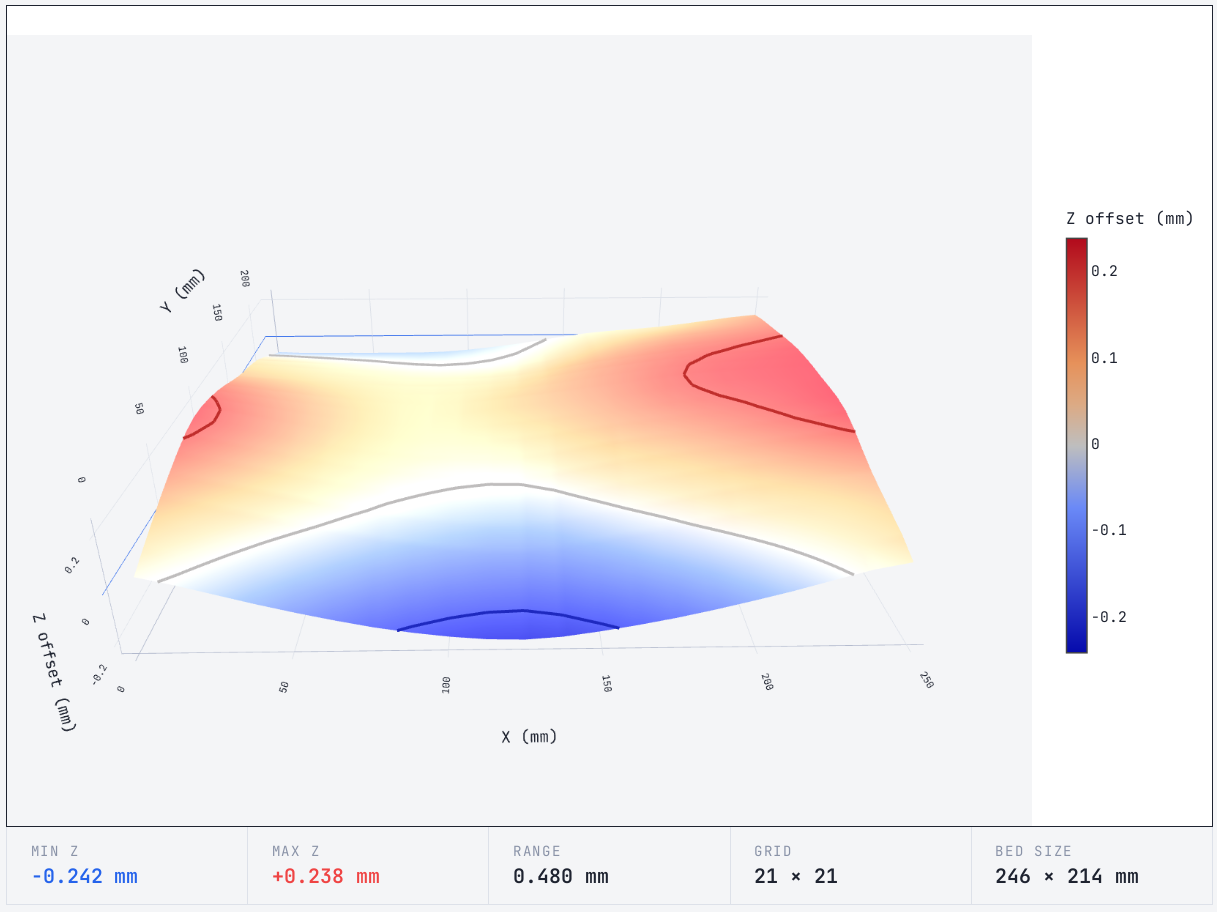
Here's the initial results:

RE: OctoPrint bed visualizer gcode
That's better! I put a 0.4mm shim on the left front rod.

RE:
The better solution is to use a 3mm bolt under each of the legs of the bed, there is a hole there for this purpose, but as far as i recall, this is not included in the build instructions.

RE: OctoPrint bed visualizer gcode
The better solution is to use a 3mm bolt under each of the legs of the bed, there is a hole there for this purpose, but as far as i recall, this is not included in the build instructions.
It was mentioned in a few posts in this forum, thanks for taking a photo of it. I'd suggest to place a nylock nut on the screw, so it won't turn by accident. Put the nut all the way to the screw head, level the bed and then tighten the nut onto the base floor to fixate the screw.
It's similar to the nylock-mod for other printers.
Btw: is there a way to get the values send to the PC or usb stick without Octoprint? I used a simple usb-cable with Pronterface for my mk3s.
RE: OctoPrint bed visualizer gcode
Thank you!!!
RE: OctoPrint bed visualizer gcode
thanks for the tip (screws as shims)
Does the G29 T or G29 T1 command write the results to a file on the usb drive ?
RE: OctoPrint bed visualizer gcode
Can someone who knows how to extract mesh info and do this, write here complete guide on what to do? So others like me can check their mesh, and help it make more flat?
RE: OctoPrint bed visualizer gcode
So I've created an easy standalone tool to get the mesh and visualize it (assuming you can run Linux):
https://github.com/wejn/prusa-mbl
As for guide, it is somewhat explained in the readme. But to add a few details:
- Get an USB-C cable, plug it to your Core One lower USB port (the one next to wifi antenna) on one end, and to your laptop/raspi on the other.
- Run the run_gcode.py to get mesh
- Run one of the visualizers to get the vizualization
Then maybe use the Prusa CORE ONE BedLevel Correction & Dust Cover and the procedure in description to get it better, and check again with the visualizer if you want.
RE: OctoPrint bed visualizer gcode
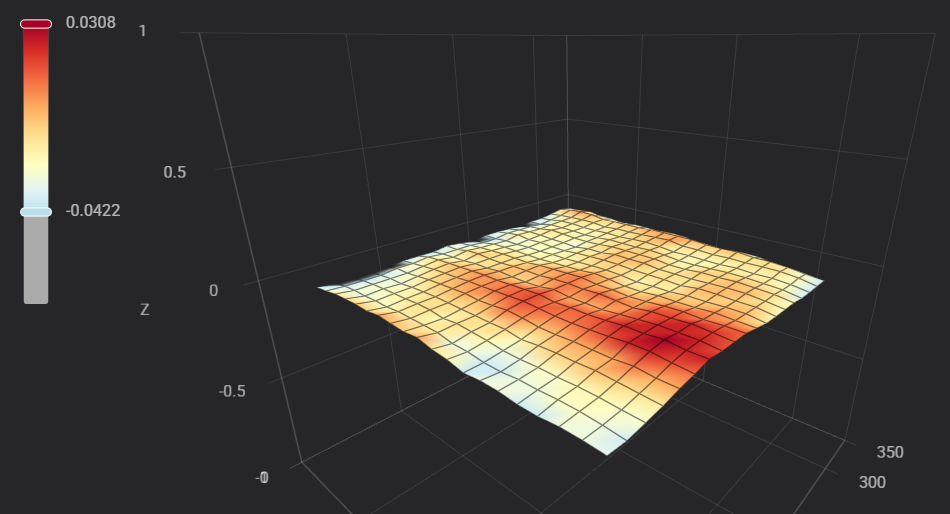
Btw, using that tool I went from:
to:
Still not ideal, but seems better 🙂
RE: OctoPrint bed visualizer gcode
Thats very similar to what I've implemented on my ESP monitor...I managed to get my deviation a bit lower 😅
The visualisation refreshes every time a new print is started (and probing takes place) , I like to keep my eye on things...what I find interesting is the difference you get from different plates. I still have to do a bit more tweaking, but I'll wait until the INDX kit arrives now, as the bed has to have some spacers fitted for that.

RE: OctoPrint bed visualizer gcode
For a look over the fence, this is how it looks on my 2nd printer build project (FOSS plus a €40 eddy current probe)
Video:
Result after 24 seconds:
All built-in Klipper / KlipperScreen, no customization other than installing the probe. Just push the button and wait 24 seconds.
RE: OctoPrint bed visualizer gcode
BTW regarding the screws, judge for yourself whether the bend force running into the end stop is acceptable. They are quite far in, it looks ugly during Z cal.
I always tune delta-Z manually (home, run up to Z=1, put a business card as feeler gauge below the nozzle and tweak the screws against the resistance of the motor - skipping steps - for an equally tight fit when moving the nozzle next to each spindle. Can't say whether it makes a measurable difference in print quality but it seems logical to minimize mechanical error (obviously, XY plane gets skewed against Z axis. Question is, does it matter).
RE: OctoPrint bed visualizer gcode
Thats very similar to what I've implemented on my ESP monitor...I managed to get my deviation a bit lower 😅
The visualisation refreshes every time a new print is started (and probing takes place) , I like to keep my eye on things...what I find interesting is the difference you get from different plates. I still have to do a bit more tweaking, but I'll wait until the INDX kit arrives now, as the bed has to have some spacers fitted for that.
Nice!
I actually thought about using esp32 but figured it’s probably plenty of work. Plus, probably needs one of the newer models that can do usb host, no?
But, per chance, is your solution opensource, so I could take a looksie?
RE: OctoPrint bed visualizer gcode
Hm, as a temporary solution I pretty much twisted the Z rods (clicking individual steps up or down as needed).
Later I’ll print the raised covers.
But I’m still weirded out why is the bed so twisted. Maybe I’ve done something wrong during assembly? IDK And also not sure how to fix, if even possible. Thin metal shims under bed?
BTW regarding the screws, judge for yourself whether the bend force running into the end stop is acceptable. They are quite far in, it looks ugly during Z cal.
I always tune delta-Z manually (home, run up to Z=1, put a business card as feeler gauge below the nozzle and tweak the screws against the resistance of the motor - skipping steps - for an equally tight fit when moving the nozzle next to each spindle. Can't say whether it makes a measurable difference in print quality but it seems logical to minimize mechanical error (obviously, XY plane gets skewed against Z axis. Question is, does it matter).
RE: OctoPrint bed visualizer gcode
Hm, as a temporary solution I pretty much twisted the Z rods (clicking individual steps up or down as needed).
Later I’ll print the raised covers.
But I’m still weirded out why is the bed so twisted. Maybe I’ve done something wrong during assembly? IDK And also not sure how to fix, if even possible. Thin metal shims under bed?
That "temporary" solution is almost a permanent one, at least until I move the Core One between rooms.
Usually the printer keeps calibration "in mechanical memory", actually one reason why the Z steppers are always never powered down by the firmware unless commanded.
Whether the tool is accurate is another question. There may be systematic error. 400 µm peak-to-peak would be visible with plain eye, I don't believe it. Have you checked with a simple ruler?
RE: OctoPrint bed visualizer gcode
Thats very similar to what I've implemented on my ESP monitor...I managed to get my deviation a bit lower 😅
The visualisation refreshes every time a new print is started (and probing takes place) , I like to keep my eye on things...what I find interesting is the difference you get from different plates. I still have to do a bit more tweaking, but I'll wait until the INDX kit arrives now, as the bed has to have some spacers fitted for that.Nice!
I actually thought about using esp32 but figured it’s probably plenty of work. Plus, probably needs one of the newer models that can do usb host, no?
But, per chance, is your solution opensource, so I could take a looksie?
Yeah if you look in the user mods thread i put a post in there. There’s a link to the GitHub but it’s very much a work in progress. Still plenty of bugs to iron out. Any questions just tag me in there. Only thing to remember is to put your Wi-Fi SSID/Password in the main.c file before compiling…I never got round to implementing credential details.
I use Esp32 S3 Supermini, around £$€4 from AliExpress, and yes you need USB host on the ESP.
RE: OctoPrint bed visualizer gcode
Hm, as a temporary solution I pretty much twisted the Z rods (clicking individual steps up or down as needed).
Later I’ll print the raised covers.
But I’m still weirded out why is the bed so twisted. Maybe I’ve done something wrong during assembly? IDK And also not sure how to fix, if even possible. Thin metal shims under bed?
BTW regarding the screws, judge for yourself whether the bend force running into the end stop is acceptable. They are quite far in, it looks ugly during Z cal.
I always tune delta-Z manually (home, run up to Z=1, put a business card as feeler gauge below the nozzle and tweak the screws against the resistance of the motor - skipping steps - for an equally tight fit when moving the nozzle next to each spindle. Can't say whether it makes a measurable difference in print quality but it seems logical to minimize mechanical error (obviously, XY plane gets skewed against Z axis. Question is, does it matter).
It sound like you’ve been cursed with the mismatched pitch on your z lead screws mate, shimming won’t fully solve the issue…the only thing that will fix it is finding the dodgy motor/s and replacing it.
Ive been there, and finally got it all matched and fixed, I had to replace 2 motors.
RE: OctoPrint bed visualizer gcode
Whether the tool is accurate is another question. There may be systematic error. 400 µm peak-to-peak would be visible with plain eye, I don't believe it. Have you checked with a simple ruler?
I just checked with a carpenter square (only thing I had available) and there's significant play that matches the contour of the bed reported by the "G29 T". I have no way of measuring the actual size now, but at least direction matches well, and it definitely is a fraction of a mm...