RE: Failed Y-calibration of a new CoreOne
@butters, I see that you have been active and posted in a couple of other threads in the meantime. It would be good if you kept the dialog going in this thread as well: Do you understand the belt routing change you need to make? Do you need additional help, or have you already done it (with which result)?
By the way, the incorrect routing through that right-hand idler block also explains why your belts were too loose after you had reattached them. By not going around the idler as it should, the belt is taking a shortcut which makes it a couple of cm too long. By routing it correctly, and then fastening it to the Nextruder back plate as shown here, you should be back in business.
RE: Failed Y-calibration of a new CoreOne
The belt is correct, it's possible the picture which I posted was not clear. When you look at this picture; https://help.prusa3d.com/guide/5-corexy-assembly_835522#845973 the Y-axis goes around the front pulley, then the teeth must go around the pulley in the linear assembly.
@butters, I see that you have been active and posted in a couple of other threads in the meantime. It would be good if you kept the dialog going in this thread as well: Do you understand the belt routing change you need to make? Do you need additional help, or have you already done it (with which result)?
By the way, the incorrect routing through that right-hand idler block also explains why your belts were too loose after you had reattached them. By not going around the idler as it should, the belt is taking a shortcut which makes it a couple of cm too long. By routing it correctly, and then fastening it to the Nextruder back plate as shown here, you should be back in business.
RE:
The belt is correct, it's possible the picture which I posted was not clear. When you look at this picture; https://help.prusa3d.com/guide/5-corexy-assembly_835522#845973 the Y-axis goes around the front pulley, then the teeth must go around the pulley in the linear assembly.
@butters, I see that you have been active and posted in a couple of other threads in the meantime. It would be good if you kept the dialog going in this thread as well: Do you understand the belt routing change you need to make? Do you need additional help, or have you already done it (with which result)?
By the way, the incorrect routing through that right-hand idler block also explains why your belts were too loose after you had reattached them. By not going around the idler as it should, the belt is taking a shortcut which makes it a couple of cm too long. By routing it correctly, and then fastening it to the Nextruder back plate as shown here, you should be back in business.
@butters, it's not correct you have the belt routed on the wrong side of the pulley.

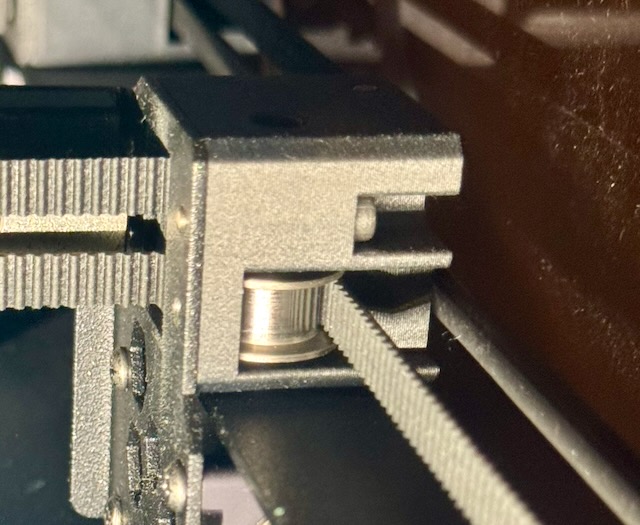
It should look like this photo. Pay close attention to the image in the circle:

RE: Failed Y-calibration of a new CoreOne
See how the belt is oriented on my printer? The teeth of the belt go around the pulley like this:
RE: Failed Y-calibration of a new CoreOne
That is the exact same as mine. There is no other way, that would make it work. You can't have the teeth from the belt the opposite direction.
See how the belt is oriented on my printer? The teeth of the belt go around the pulley like this:
RE: Failed Y-calibration of a new CoreOne
That is the exact same as mine. There is no other way, that would make it work. You can't have the teeth from the belt the opposite direction.
Could you take a photo from the same angle then to confirm? With the image you attached earlier it looks exactly like you don't have the belt around the pulley in the correct way.
RE: Failed Y-calibration of a new CoreOne
I tried to take an image from a similar angle. You can see the difference. The belt should be parallel to the other belt and the frame whereas yours goes off at a sharp angle

RE: Failed Y-calibration of a new CoreOne
From the top image you provided you can also see that the belt is not parallel to itself which is wrong

RE: Failed Y-calibration of a new CoreOne
That is the exact same as mine. There is no other way, that would make it work. You can't have the teeth from the belt the opposite direction.
You still have not understood where the problem is: Yes, the orientation of the belt (which side the teeth are on) is correct. But the position of the belt is incorrect.
Please push the print head in your printer to the center position (above the center of the heatbed). Look into the printer from the front, i.e. through the open door. Look at the idler block on the right end of the gantry. Compare what you see to the photo below.
In the photo below, the belt comes out on the right side of the pulley. In your printer, the belt comes out on the left side of the pulley. That's the problem.

RE: Failed Y-calibration of a new CoreOne
Didn't it make a horrible noise, while running the Y-calibration or moving the Nextruder manually?
The teeth are rubbing on the PC-CF part and might even show some damage or some debris might lay around in the corner and on the heatbed..
RE: Failed Y-calibration of a new CoreOne
@butters, a week has gone by -- did you get your belt routing and XY calibration fixed? I see you have been back on the forum in the meantime. It would be polite to give us an update, either confirming that this has been resolved or asking any follow-up questions you might have.
RE: Failed Y-calibration of a new CoreOne
I have completed and fixed the Y-axis calibration and it passes. Although, now the HOMING test is failing, I tried loosing and maximum tightening the tension but the calibration continues to fail.
RE: Failed Y-calibration of a new CoreOne
What does the CoreOne do to belts, I had one passed Y-axis test and HOMING test, then it's as if the belt comes loose and I can't even do print. I'm fighting with this quite alot; I'm now going on over a week. I'm taken apart the nextruder numerous times.