Filament Sensor Indicator
One thing I like about the Finda & Pinda is you can see it's state on the end via an LED they have there. I was troubleshooting some loading issues with my recently built MK3S/MMU2S and decided to add such an indicator to the new filament IR sensor.
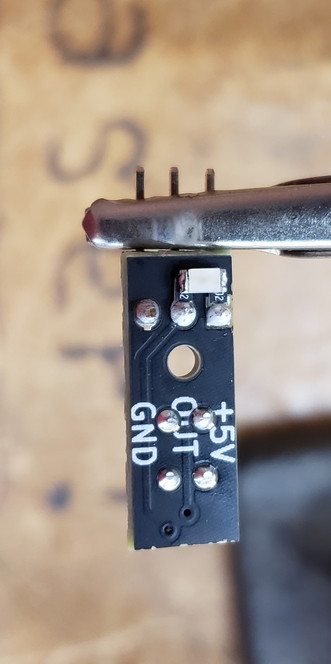
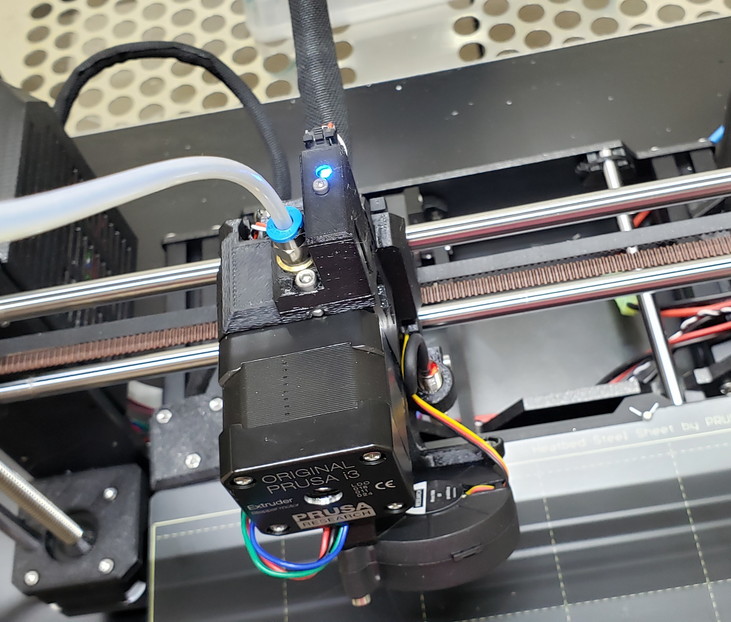
Easy mod - just connect an LED and current limiting resistor from the +5V to OUT and drill a hole in the cover. I chose to use two resistors (1K ea) instead of just one to offset the LED from the pins.


Turns out my sensor was always on (even with no filament in the extruder). I shaved two layers (0.4mm total) off the flag/beam_interrupter and now everything is working great.
-------------------------------------------
Edited by Joan Tabb, Moderator...
there is a detailed description in another thread please see below.
Filament sensor mod from Bunny and Bear: https://bunnyscience.dozuki.com/Guide/Bunny+and+Bear+(BNBSX)+MKS3+Geared+Extruder+Assembly/2?lang=en#s84
See step 33, It has the LED and SMD resistors listed.
Re: Filament Sensor Indicator
Nice idea. Where did you hide the resistors? 🙂
Often linked posts:
Going small with MMU2
Real Multi Material
My prints on Instagram
Re: Filament Sensor Indicator
They are there under the led (surface mount - you can just see the 02 of the 102 stamp).
Re: Filament Sensor Indicator
Ah! Really nice and simple solution.
Often linked posts:
Going small with MMU2
Real Multi Material
My prints on Instagram
Re: Filament Sensor Indicator
Or you could simply look at the sensor status page on the LCD. 😉
I too had to shave about 0.4mm off the sensor trigger arm. But the sensor holder can also move left/right a little on the top of the extruder body, so make sure it's aligned properly before making this type of adjustment.
Peter
Please note: I do not have any affiliation with Prusa Research. Any advices given are offered in good faith. It is your responsibility to ensure that by following my advice you do not suffer or cause injury, damage…
Re: Filament Sensor Indicator
Yeah, I noticed it would work if I pushed it to the side while tightening the screw but it took a fair amount of pressure so I was worried it might creep back with use. You are right to be careful - it doesn't take much. I ended up taking too much off the first try and had to reprint the part.
Although you can check the status from the LCD, you don't always go there first when debugging a fail. I like having the indicator right there at the sensor so I immediately know what the problem is if the sensor is not behaving correctly.
Understand that. I just displayed the sensor screen for a complete print after I made the adjustment. I did note that the FINDA didn't update during a tool change, but after getting it set up, it's been fine since.
Actually, if for some reason it didn't work, it would be quite obvious. The MMU would just keep feeding filament into the extruder 🙁
Peter
Please note: I do not have any affiliation with Prusa Research. Any advices given are offered in good faith. It is your responsibility to ensure that by following my advice you do not suffer or cause injury, damage…
Re: Filament Sensor Indicator
What size Led are you using?
Re: Filament Sensor Indicator
Did you also drill in a hole to see the light, or is it already there?
Where did you get the parts you used? Links to them?
Re: Filament Sensor Indicator
Love the clean look of your solution. How hard was it to hand solder SMD parts onto that board? My projects usually use through-hole parts so I'm concerned that I'll mess it up.
I've been watching the extruder idler screw head on the left side of the extruder. When the filament reaches the Bondtech gears, the idler door moves outward, the IR sensor triggers and the idler screw head moves into the body and compresses the spring. Not good from a distance or bad angle, but works for close-up troubleshooting.
RE: Filament Sensor Indicator

This is a great idea! I made the same modification. It isn't always possible to navigate to the sensor info page during an error condition so having this visible indicator is a fabulous improvement. This would have saved me hours of troubleshooting an IR sensor assembly that passed manual calibration but cut in and out during printing.
RE: Filament Sensor Indicator
This is really simple and neat solution, hope that prusa do something similar on future IR sensor board revision. It costs few cents and helps a lot with troubleshooting.
RE: Filament Sensor Indicator
I love this mod. Yes, old post but worth keeping alive. I've added viewports to my BNBSX extruder project to support this mod.
BTW, for those older, through hole hobbyists who rarely do surface mount... The biggest challenge is keeping the little SMD pieces in position during soldering. A zero cost, simple trick is to wrap a rubber band tightly around the handles of a needle nose, preferably one that has rubberize handles. Clamp a sewing needle at the needle nose tip at right angles. Put the dull end of the needle upon the SMD component. Gravity and the "tripod" holds the SMD still during soldering.
RE: Filament Sensor Indicator
Or you could simply look at the sensor status page on the LCD. 😉
Many times it will not let you change the screens, such as when it claims you are out of filament when you can see you are not. You cannot change to the status page while that notice is up.
That is something that needs to be changed.
RE: Filament Sensor Indicator
This is a great modification. I have been having tons of problems getting my MMU2S working and have been suspecting filament sensor issues. This mod allows me to see the sensor status and clearly it is not the problem. This let me rule the filament sensor out.
RE: Filament Sensor Indicator
Once could look for the status buried in the LCD menu system, but the indicator LED has ZERO lag during sensor lever tuning. It's also always immediately visible independent of confused firmware or error status.
Also did my spare sensor unit... this time in blue.

You can also see the wishbone shaped, BNBSX internal MMU2S filament sensor lever in the print job.
RE: Filament Sensor Indicator
Even more cool thing about this LED mod is you can bench test the sensor system WITHOUT the printer.
Here I have the sensor board hooked up to just a 5v power supply while testing internal MMU2S lever sensor system. Extruder isn't even mounted in a printer during bench test.
I can manually turn the shaft to move filament in/out of Bondtech. The LED makes tuning the idler door's sensor adjuster screw so easy.
Try that with just the LCD panel display! I would say the LED mod is essential for efficient hardware testing.
RE: Filament Sensor Indicator
I'm having a nightmare with the extruder not "releasing" the filament during a filament change. I don't know why. I hope the LED indicator might help debug these situations because the software menu can't be accessed once the system is in panic mode. So the Sensor menu is bloody useless.
RE: Filament Sensor Indicator
Sorry, I apparently did not subscribe to my own thread and didn't realize there was activity. Glad the mod is helping folks - it certainly helped me. As far as soldering the SM devices goes, yes it can be quite frustrating (the parts are so light they get stuck to the soldering iron). In my case I was able to hold it down with one hand while I soldered to the board (didn't need to add solder for the first connection). A trick that might help some is to simply glue the parts to the board prior to soldering. Just the tiniest sliver of Silicone is all it takes. Don't use super glue or similar as it tends to wick out and may interfere with soldering.
RE: Filament Sensor Indicator
Tick-tock
It'd be awesome if you could provide some part numbers or something.
I'm not familiar with smds and I ordered some 1k's and there about 1/3 the size of yours! Significantly smaller than the diameter of 1.75mm filament. Maybe 1mm absolute max .
Cheers
Kieran
