RE: Filament Sensor Indicator
I do it differently
I use a 5volt, 5mm LED 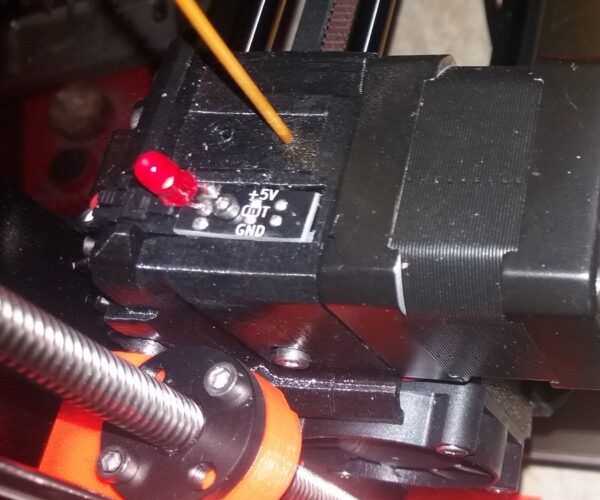
regards Joan
I try to make safe suggestions,You should understand the context and ensure you are happy that they are safe before attempting to apply my suggestions, what you do, is YOUR responsibility.Location Halifax UK
RE: Filament Sensor Indicator
Nice! Easy to see from any angle. Although a red LED is fine with the old sensor like yours (black PCB) I wanted to caution people against that color for the new Rev 0.4 sensor with the red PCB (Thanks 3d-gussner for bringing this to our attention). Blue or green is safer. The red LEDs have a lower turn-on voltage and can leak non-negligible current when the Rev0.4 sensors is in the off (no filament) state - impacting the expected output voltage from the 10K:56K resistor divider. It isn't clear there really is an issue but blue LEDs will have almost no off current so you won't have to worry about it impacting behavior.
RE: Filament Sensor Indicator
Is there an easy trick to soldering something so darn small? My eyes are not nearly as good as they used to be, and I was never that good at soldering to start with.
RE: Filament Sensor Indicator
@cybrsage
I've taken to wearing both my bifocals and computer glasses to see such details better. I also have a "helping hand" with a magnifying glass to help as well...
I believe it was somewhere in this thread (but I haven't gone back to look) to rubber band a needle nose closed on an actual needle. Then you place the SMD where you want it and lower the needle point onto the center of the SMD to hold it in place while you solder it. Then repeat for the other too.
It still took me a few tries to get it right though, but I finally got it.
RE: Filament Sensor Indicator
I figured it out - my tip was way too large and my new soldering iron's temp settings are off (runs too hot). Of course, I destroyed the LED I was installing, but the kit came with 310 of them so...another try!
A rubber band is a GREAT idea, I will use that to help out next try. I am using the same LEDs as Joan. 🙂
RE: Filament Sensor Indicator
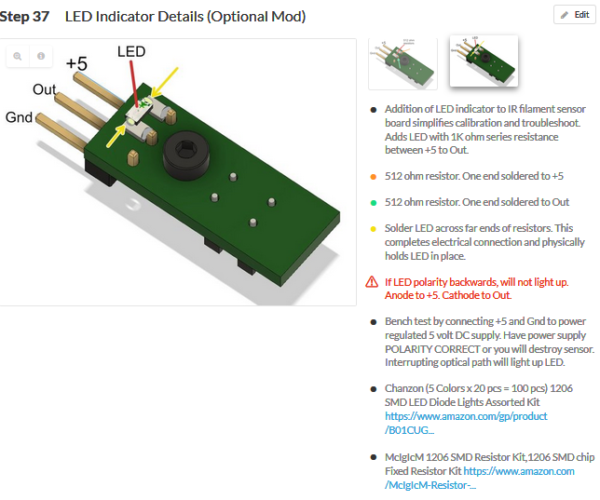
My v4 Sensor comes tomorrow and I have all the kit to do this mod. I see the Bear guide uses 2 x 510 while another uses 22k ( https://www.prusaprinters.org/prints/2139-mk3smmu2s-filament-indicator-cover )
I have pretty much every resistor combo as I bought the pack, any suggestions on resistance to not mess with V4 detection?
Thanks!
dsd
To follow up, I used a 330 resistor on my clone and a 510 on the genuine v4. No issues with it reporting as a v4 and I prefer the 510.
RE: Filament Sensor Indicator
This looks like a fun mod. I have a boat load of 1206 leds because I changed my steering wheel control color in the car from ugly green to white.
I just wanted to make sure though that people are NOT experiencing issues by soldering on an LED. I got my mk3s in August but it isn't a +. Just the mk3s with the red ir board.
I would change the led to green or blue. Maybe even orange since I have that color as well. So increasing the resistance ONLY affects the led and not the sensor. I am having zero issues with the printer and I love it, I am just hesitant on changing or modifying too much because I don't want there to be problems or feeding issues...etc.
Thanks much,
-Nigel
RE: Filament Sensor Indicator
@newshockerguy
I've had the LED on mine for quite some time now and it has never been an issue. I ended up using 1k resistors on both legs as that is what I had on hand.
Personally I went with a red LED so it matched the PINDA, FINDA, and platform heater LEDs. Just personal taste though.
RE: Filament Sensor Indicator
@newshockerguy
Zero issues since July 2019 and it is indispensable IMO. Alerts me to marginal behavior long before it actually impacts the print. Printer software is pretty robust and can handle some intermittent false triggering (manifests as flickering on the LED) so if you adjust the sensor when you see that, you can avoid failed prints.
RE: Filament Sensor Indicator
..and do check out the instructions from B&B. I was lazy when I first posted and left out details. They picked up the ball and made a much nicer write-up in step 37 of their guide:
RE: Filament Sensor Indicator
Awesome thank you! I already printed out the top part so I am just waiting on my resistors to come next week. So by going to 1k on each leg I am simply reducing the brightness of the LED, correct? I don't need a beacon of light so it doesn't have to be some crazy bright indicator. I have red, here but I thought earlier in the thread it was indicated not to use a red led because you might get feedback somewhere or something along the lines of that since it didn't take as much voltage to turn it on compared to other colors?
This should be a nice little mod. I wonder why Prusa doesn't do this on the board for the mk3s already? Seems like a simple thing to do and if nothing else just another layer of indication if there is a problem with the printer...etc.
Thanks,
-Nigel
RE: Filament Sensor Indicator
So by going to 1k on each leg I am simply reducing the brightness of the LED, correct? I don't need a beacon of light so it doesn't have to be some crazy bright indicator.
This was my thought, but it is still pretty bright. So if it is dimmer, I'd hate to see it with a lower value😲
I have red, here but I thought earlier in the thread it was indicated not to use a red led because you might get feedback somewhere or something along the lines of that since it didn't take as much voltage to turn it on compared to other colors?
I have not run into any issues using the red LED.
RE: Filament Sensor Indicator
FWIW you don't need to use 2 resistors and if possible use a 5V LED (it has the current limiting resistor built in) for a neater install.
RE: Filament Sensor Indicator
Awesome thank you! I already printed out the top part so I am just waiting on my resistors to come next week. So by going to 1k on each leg I am simply reducing the brightness of the LED, correct? I don't need a beacon of light so it doesn't have to be some crazy bright indicator. I have red, here but I thought earlier in the thread it was indicated not to use a red led because you might get feedback somewhere or something along the lines of that since it didn't take as much voltage to turn it on compared to other colors?
This should be a nice little mod. I wonder why Prusa doesn't do this on the board for the mk3s already? Seems like a simple thing to do and if nothing else just another layer of indication if there is a problem with the printer...etc.
Thanks,
-Nigel
The resistor does, in fact, reduce the brightness as you surmise. You can safely increase the value to make it dimmer but run the risk of interfering with the sensor if you decrease it. I used blue and the 1K per leg (2K total) works perfectly. You may need to increase the resistance if you use a red LED with a R4 board. Even at 10K per leg I was able to see the light from the blue LED but it was pretty dim.
RE: Filament Sensor Indicator
Awesome, thank you all for the information. I found 5v 3mm/5mm leds but that doesn't look as clean to me since you can no longer use the top cap that is on the extruder housing. I wouldn't want just an led sticking up and not being covered. I couldn't find 5v smd leds really. But my resistors come on Tuesday so I should be able to get this done shortly. I would like to do red honestly just to match the pinda but any color is fine. Whatever color would give me the least amount of trouble. I have an orange one that would work as well, might look cool.
-Nigel
RE: Filament Sensor Indicator
I have installed the following filament LED components:
https://at.farnell.com/kingbright/kp-3216zgc/led-smd-1206-echtgr-n/dp/2217977 (1 piece)
https://www.q-ickey.de/products/Samsung-Electro-Mechanics-America,Inc/RC3216F5110CS (2 pieces)
... with redesigned and reprinted the sensor cover.
Statt zu klagen, dass wir nicht alles haben, was wir wollen, sollten wir lieber dankbar sein, dass wir nicht alles bekommen, was wir verdienen.
RE: Filament Sensor Indicator
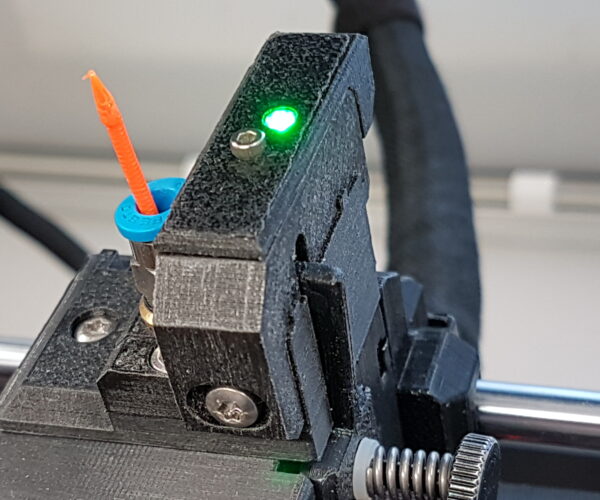
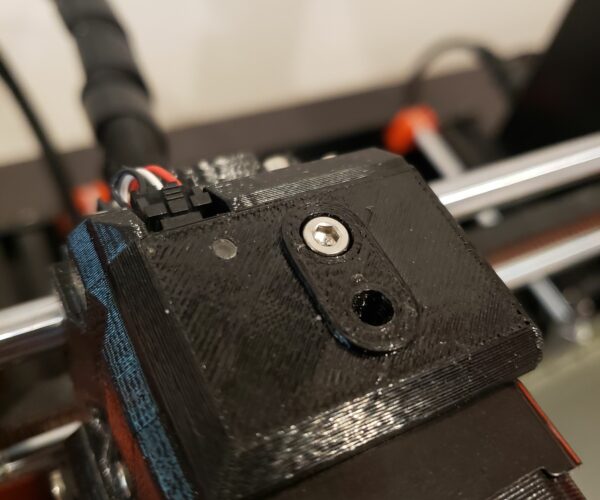
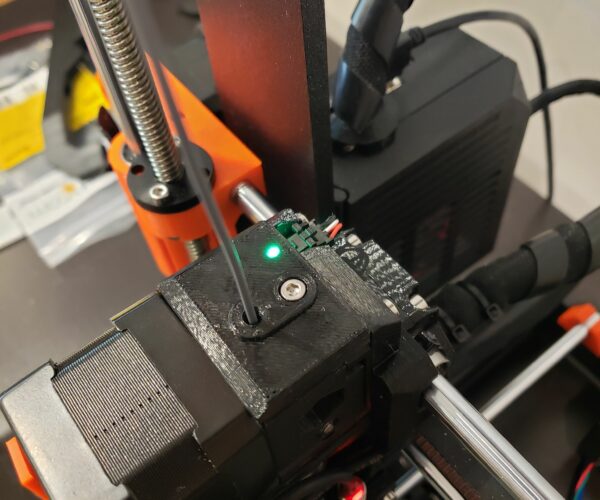
I forgot to post!. I ended up using a green smd led, and two 1k ohm resistors. I printed out a new top plate (actually two versions) but was not happy with them. So I figured do the least evasive. Which was use the stock piece and drill a small hole. I then used a piece of clear filament that I had and made it pliable so that the hole was covered and that the led was slightly difused. I think it turned out great!. I can see the green led at any point in the room. I probably could have gone higher in value resistors but this is fine. It's not in a bedroom and it's not directly blinding me in any way.
Hardest part was figuring out what color to use..lol I thought orange would be nice but didn't want it to be too close to red and possibly interfer with anything. White would have also been cool as well, but green for now. If I get tired of it I will just desolder and put a new led on there, which would take 30 seconds to do.
Attached pictures! Glad I found this thread, I would have never thought to do this otherwise!
Thanks,
-Nigel
RE: Filament Sensor Indicator
@newshockerguy
Nice idea with sticking the bit of filament in to diffuse the light.
RE: Filament Sensor Indicator
This might be a great suggestion to submit to Prusa for the next upgrade.
--------------------
Chuck H
3D Printer Review Blog
RE: Filament Sensor Indicator
Just wanted to add an other option I just used myself. I was going to try the smd LED but thought of something I could try without ordering parts.
I had a some LEDs and resistor from an other project. The green LED with a 1k resistor worked fine on a separate psu so I used that.
And instead of soldering it to the sensor, I thought it would be easier to do at the end of the cable in the Einsy housing.
A lot more room there and the cable is easy to fix/replace if you mess up.
I put the LED next to the USB connector on the Einsy housing. And printed a little cap to diffuse the light (black and vanilla white Prusament)
