Infill Settings
I'm using PrusaSlicer 2.2.0 win64 on a new PC. I printed out a bracket which I've printed before on my old PC using PrusaSlicer 1.35.5.16.
This time, two of the 2mm diameter vertical supports (2cm tall) on the bracket snapped in half. I notice they were quite hollow inside. The supports on the bracket printed on the old PC are sturdy and do not break. I'm using the same PLA both times.
I am wondering if there is a default setting that's different in 2.2.0 which is causing the 2mm supports to be hollow (or infilled) making them weak.
I see 2.2.0 has an option for Fill Pattern which was not present in 1.35.5.16. This is set to default 'Gyroid'. Would this cause a 2mm diameter pillar to have a lot of hollowness inside? Is there a way of only printing infill when a vertical pillar is more than say 3mm in diameter?
Any help or advice gratefully received.
RE: Infill Settings
A photo of the problem will help. "SUPPORT" is a term for plastic generated to underpin printable areas that have no structure under them. INFILL is what is printed inside a part to add rigidity and compression strength to the perimeter shell. It is hard to tell what you are describing - thus a request for a photo.
RE: Infill Settings
@tim-m30
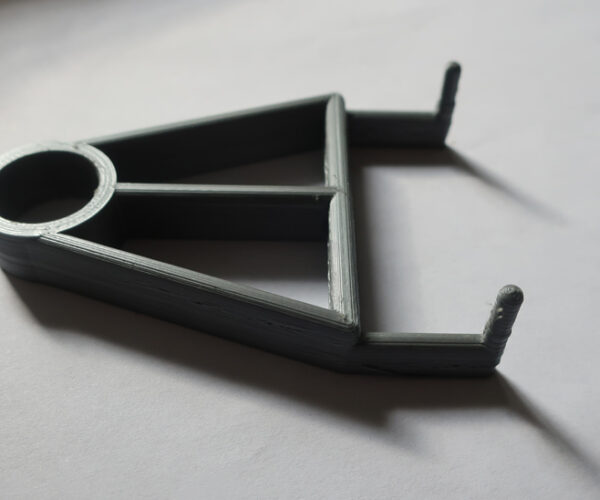
Tim - thanks. I've uploaded a photo. Apologies for using incorrect terminology. The bracket is for fitting to a music stand and is for hanging a ukulele. The 'supports' to which I refer are the two upright posts at the right of the picture. They stop the instrument sliding off. They are 2mm diameter and 1cm tall. The bracket depicted works just fine. On the secondbracket, using the updated software, those posts snap off at the lightest touch. The other thing I noticed in the Print Settings, Infill settings - on the old software the defaults were 20%, Cuboid, Rectilinear; with the newer software it's 15%, Gyroid, Rectilinear. I don't really know what these mean, but 20% to 15% is hardly a big difference.
Any help gratefully received.
RE: Infill Settings
Not being able to see what is broken, I'll guess you mean those two pins sticking up from the part, right side. I can't speak to what settings were used on your prior prints, but GRID was the common infill before Prusa switched to GYROID default for many quality settings. And yes, gyroid can be weaker than grid in cases like those pins.
Plus, minor changes like where the print sits on the bed will affect the infill quality on small areas, inspecting the slice in detail can help understand if there is actual infill being placed where needed (infill is mapped from an ill-defined start point, and not always where you want it).
Another possible change would be number of perimeters. You can increase the perimeters to 3 or even 4 and make parts much stronger.
RE: Infill Settings
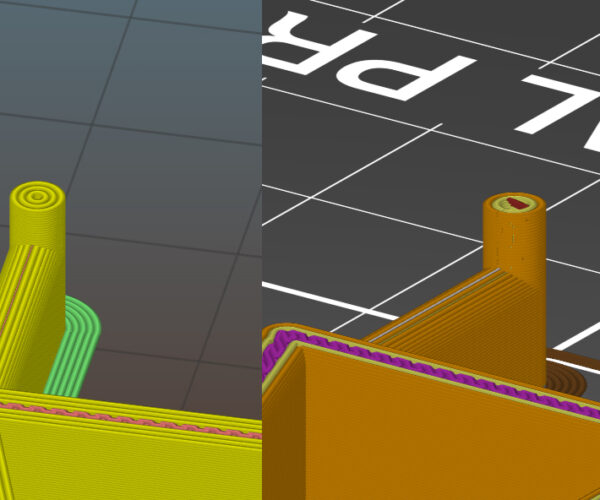
These screen shots show the pillar in question, with the layers reduced to show the inside of the pillar.
On the left is the slice generated by 1.35.5.16, showing a solid pillar. On the right is that generated by 2.2.0 showing a hollow pillar with some infill. Both version were set to 20% Cubic infill, yet both have produced different results.
It's as though there is another parameter somewhere which says 'only infill if width of wall is more than x mm'.
RE: Infill Settings
... Found it! It wasn't an Infill setting per se, but in the Print Settings > Layers and Perimeters > Vertical Shells > Perimeters, the old software had a value of 3 whereas in the new software this value was defaulted to 2. Setting this to 3 produces a solid pillar.

