Getting PVA support interface to stick to PLA
After playing with my MMU2S (and MK3S+) for a couple months, I just tried my first practical MMU2S print: a print with soluble supports. (That's the main reason I got the MMU2S.) I'm trying to print a little ~3x5 cm storage box insert with small feet on the corners. Except for the feet, the rest of the bottom is flat and needs support. I'm printing with the "0.2mm SOLUBLE INTERFACE" settings, so there's supposed to be a big raft of PVA interface layers sitting on top of a few PLA support layers, everywhere except for the feet.
Unfortunately, the PVA support interface didn't stick to the underlying PLA. At first it seemed to be working. On the first interface layer, the first ~50cm of PVA stuck to the PLA scaffolding just fine. (And it also stuck just fine to the PLA layers in the wipe tower during the filament change.) But after a while the PVA stopped sticking and I ended up with a big ball of PVA string getting dragged around my print by the nozzle. I aborted the print at that point.
Some details:
- The PLA is Prusament (Azure Blue). printed with the "Prusament PLA @ MMU2" profile
- The PVA is MatterHackers Pro PVA. I'm printing it with a profile I copied from the built-in "PrimaSelect PVA+" one, with the temperature raised to 210° C. (Their documentation says the range is 200°-220°.)
- The printer is a fairly new MMU3S+. I'm fairly new to 3d printing, so I don't have tons of experience tinkering with the settings and debugging prints yet. But I'm an engineer and am usually good at figuring things out, so I've had fairly good results so far. Until now.
Has anyone made this combination work before? What settings did you use for the MatterHackers Pro PVA? If not, what would you suggest I try first? Maybe raise the temperature on the PVA to try to get it to stick better, or turn off the fan for bridging with it? I also wonder if I might have better luck printing the PVA on top of a solid layer of PLA, but I couldn't find a setting for that. Any suggestions!
Thanks!
Best Answer by Robin:
I get good results (PrimaSelect PVA+) with 207° and a speed of 10mm/s (yes, that's very slow, but ist makes the PVA layers stick to each other, the bed (80°, smooth sheet) and PLA support).
It's a couple of years since I've done this but as I recall raising the temperature and slightly slowing the print fixed it.
There's a sort of sweet spot for each filament pair, what I could never find was one that worked with three filaments, eg PLA + PETG + PVA...
You might do better with BVOH but it's not cheap.
Cheerio,
RE: my 50 cents
I get good results (PrimaSelect PVA+) with 207° and a speed of 10mm/s (yes, that's very slow, but ist makes the PVA layers stick to each other, the bed (80°, smooth sheet) and PLA support).
If at first you don't succeed, skydiving is not for you.
Find out why this is pinned in the general section!
RE: my 50 cents
[I thought I posted this yesterday, but apparently not....]
Thanks for the tips. I'll give them a try today. I'll try the higher temp and slower print speed that you both suggested. Another thing I want to try is to make the PLA support that's underneath the PVA interface much more dense. Playing with the settings in PrusaSlicer, it looks like a honeycomb support pattern with fairly close spacing may provide enough material for the PVA to stick. But I may have to abandon the "soluble interface" approach and just print full soluble supports so the PVA has the whole bed to stick to.
Robin: Did you use PVA glue stick on the bed like some people seem to suggest for PVA support material? Or just print the PVA straight onto the smooth PEI sheet?
That all assumes I get my printer working again by tomorrow. Today's project has been rebuilding my MMU idler. While messing with this PVA issue last night I heard some loud crunching noises coming from the MMU. When I opened it up, I found the idler was cracked. Fortunately I got it to limp along just far enough to print a new idler overnight. I cranked up the perimeter count and infill percentage on the new one, so hopefully this one will last more than a month.
New PrusaSlicer alpha
I forgot to add: Tbere's a new alpha build of PrusaSlicer 2.4 out, and it apparently has many improvements to supports, including a better way of doing a soluble interface on top of non-soluble supports. Basically, it splits the interface in half; the bottom half is non-soluble and the top half is soluble, which gives the soluble half something solid to sit on.
(One of the developers responded to another thread that I resurrected, which is how I know this. I'm going to give the alpha a try later today.)
…why do I need to choose a title?…
adhesion of PVA+ to the bed on the smooth sheet is better with glue stick.
The alpha 3 works nicely and stable for me. I didn’t realise there was so much changed regarding the supports, I just got carried away painting colors on every model I saved for later MMU editing in Meshmixer for quite some time - it‘s awesome!
If at first you don't succeed, skydiving is not for you.
Find out why this is pinned in the general section!
Thanks
Thanks for the info that alpha3 is working well for you. I was a bit worried about trying an "alpha", but i installed it last night — after getting my MMU going again — and it seems to work just fine. I haven't had a chance to play with soluble supports again yet, but hopefully tonight.
Aside / Pro Tip: Avoid sticking things in your eye. 🙄 I managed to give myself a corneal abrasion over the weekend. Hurts a lot, makes you look like you're crying all the time 😭, and really hurts if you look at a computer screen or TV for very long. Fortunately it's doing a lot better today so I may be able to work on the computer again.
Where to set the speed?
I get good results (PrimaSelect PVA+) with 207° and a speed of 10mm/s (yes, that's very slow, but ist makes the PVA layers stick to each other, the bed (80°, smooth sheet) and PLA support).
I am sure I am just clueless, but I cannot find where to set the speed to 10mm/sec for the PVA extruder in PrusaSlicer. Can someone describe where that setting is located?
I am about to try printing with soluble supports the first time and I also purchased the MatterHackers Pro PVA so this thread is very relevant for me.
Max volumetric flow?
If you want to set the speed in the filament profile (which you probably do, so you only have to do it once), there's no way to do it directly. (I've seen people requesting that as a slicer feature so they can print Polyalchemy Elixir slowly, but it keeps getting rejected.) Instead you have to do some math to figure out the corresponding "max volumetric flow" in cubic mm / sec, and set that on the "Advanced" tab of the Filament Settings. I think the formula for volumetric flow is
flow (mm/s) * extrusion width (mm) * layer height (mm)
But I'm a n00b at this, so take that with a grain of salt. I learned it from this web site, which you should probably read. (Any errors are mine.) https://projects.ttlexceeded.com/3dprinting_prusaslicer_max_volumetric_speed.html
You'd think there should be a way to do it by adding a modifier to your print and modifying something under Support or Speed. But I can't find a modifier for "Support Speed". Even if it worked, that would require you to do it for every part needing support, rather than just once for the filament profile, so it may not be a great approach anyway.
adjust speed
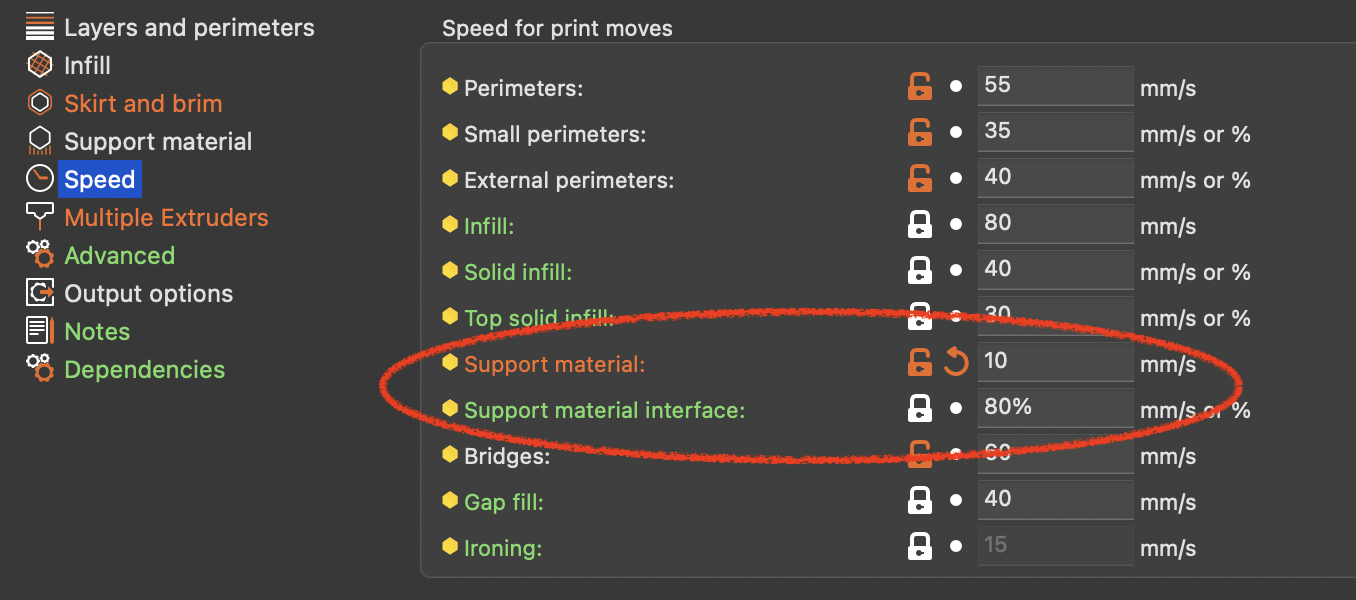
You can adjust the speed for support and interface layers separately:
If at first you don't succeed, skydiving is not for you.
Find out why this is pinned in the general section!
RE: adjust speed
You can adjust the speed for support and interface layers separately:
Awesome, exactly what I was looking for but could not see even though it was right in front of my face. 🙂
Thanks!
Right approach for changing settings?
Interesting. The reason that I answered the way I did is because I've been trying to do all my print settings changes as modifiers in the right-hand panel rather than by creating modified copies of the built-in print profiles, which is what I think your screenshot shows. My reasoning is that if I change the profiles, I'll have to save each modified profile under a new name, and I'll eventually end up with tons of them. But if I managed to get the settings I want (e.g. max print speed for a filament) into the filament profile or into the object settings modifiers in the 3MF file, then I won't end up with a proliferation of different print profiles.
My engineer brain decided the latter approach (filament profile changes, modifiers) was more elegant, especially after I started to accumulate a bunch of different print profiles that were really just settings overrides for various filaments (e.g. print speeds for Elixir and PVA filaments at different layer heights) or were even specific to an individual print. But there could be a reason why this is dumb and it's better to just modify and save the print profile. I'm very new at this, so I have no clue. What do experienced PrusaSlicers do here?
…true
You are right, with time you get quite a few sets of settings. I regularly delete the unused or obsolete ones and try to give the new ones meaningful names. For special cases I don‘t save the settings but the whole project. If I have a similar object to print, I load the old project, dump the object in it and load the new one….
The transfer feature also helps keeping this things cleaned up. Using that you don’t need every possible combination of properties. Just transfer the settings you need, use and don’t save.
If at first you don't succeed, skydiving is not for you.
Find out why this is pinned in the general section!
Keep the PLA dry before and during printing
When I use BVOH as a soluble support, if I dry the filament before the print, and then do a 36 hour print or so it works fine. But, if I continue on with another print right afterwards the BVOH starts loading incorrectly and other strings of filament start clogging the superFINDA. It's possible that the PVA is similar in that it needs to be dried far more frequently than you expect. On long prints (greater than 48 hours) I leave the BVOH in the filament dryer with the dryer running during the entire print to avoid the aforementioned mistakes. The guy who mentioned the max volumetric speed is right also. If the machine is making motions faster than the PVA is coming out than it doesn't have time to stick to the surface because it is being stretched too much by the fast motion.
Printing from dry box
I'm doing something sort of similar. I'm making single-spool dry boxes for all of my moisture-sensitive filaments. They're made from 21-cup / 4.5 liter Rubbermaid storage containers with some silica beads in the bottom. I put a tube fitting (a "festo" fitting?) on the front of each one so I can run a PTFE tube straight from the dry box to the back of the MMU. I also printed an MMU mod that adds 5 festo fittings to the back of the MMU, so it's easy to swap out between different dry boxes. There's a spool rewinder in each dry box so I can dispense with the filament buffer.
So far, it all seems to be working well, but I haven't done a huge amount of testing yet. Most of the parts and ideas came from Thingiverse and PrusaPrinters. When I'm happy with it I'll post my collection of parts back to PrusaPrinters so anyone else who wants to do this won't have to do as much experimenting as I did with all the variations out there.
On the max volumetric speed front, I really wish PrusaSlicer allowed "max speed" overrides in the filament profiles. That would handle the cases like Polyalchemy Elixir where a filament manufacturer recommends a maximum linear speed regardless of the layer height or extrusion width. But the devs seemed pretty adamant about not adding this when it came up in past threads I've been able to find. I don't know enough about all this yet to know if there's something I'm missing. 🤷♀️
Max Volumetric Speed
There actually are two settings for max volumetric speed. In Prusa Slicer under the tab "Print Settings"/ Speed, at the bottom under autospeed is the overall max volumetric speed (which is typically 15 mm^3/s for PLA- I set mine to 10 mm^3/s because I'm willing to print a little slower to acheive a higher quality print ). In Prusa Slicer under the tab "Filament Settings" /Advanced (and after selecting your filament) there is toward the top "print speed override- max volumetric speed". Even if you set this max volumetric speed for the specific filament greater than the max volumetric speed under the "Print Settings" tab, the max volumetric speed under the "Print Settings " tab is the overall main determinant. However, Verbatim recommends printing BVOH at 30 mm/s. With a .4 mm nozzle (a .45mm width of deposit) and a .15mm layer height the max volumetric speed is then := (.45mm)*(.15mm)*(30mm/s)=2.03mm^3/s which is far lower than the main max volumetric speed. BVOH is a type of PVA so the settings are probably similar for your material. I would consult the manufacturer on recommended print speed and set the max volumetric speed under the specific filament.
Now the dry box is a great idea, but you still have to dry the filament before you put it in! I'm just letting you know that I dry the filament before and during the print and its kept in the sealed filament dryer all the time. If I don't dry the filament before I print I can expect all kinds of filament strings clogging the super FINDA and slipping filament on loading and unloading due to soft filament or misshapen ends of the filament on retraction from the extruder even though it is kept in a dry box also. That stuff is so willing to turn to goo.
Dry box vs. Dryer
Hey, dry boxes work well for me and my PVA+, I use this: https://www.prusaprinters.org/prints/63978-ikea-foodbox-drybox-remix in combination with a modified Prusa buffer… does the job.
I believe Ryan is talking about something else, like: https://www.aliexpress.com/item/1005001351142828.html
If at first you don't succeed, skydiving is not for you.
Find out why this is pinned in the general section!
Dry boxes
I just use my oven as my filament dryer. 😁 It's a Miele, so it has very good temperature control.
My dry boxes look a lot like yours, but single-width because I had easier access to the Rubbermaid containers. I may steal your
Posted too soon
... I may steal your downward-pointing outlet design for the boxes I have on upper shelves.
The big difference is that I have an "Integrated Auto Rewinder" in each dry box so that I don't have to use a buffer. I was afraid the rewinder would add too much tension to the filament, but so far it's been okay. Too soon to be sure, though.