Re: SUCCESS! How I resolved my MMU2 issues (MK2S -> MK2.5 -> MMU2 upgrade path)
Just ordered the heatbreak too, I had 1 nice print, but subsequent prints all failed at some point because the filament could not be retracted or pushed back into the extruder due to (I guess) the wide tip.
Hope this helps, so far the MK2.5 -> MMU2 upgrade is one big frustrating journey.
Also disappointed that the filament sensor is not enabled, big pile of wasted filament already after a small week of trying. Had to cut off 50cm pieces each time because the MMU2 idler grinded the filament when it could not push/pull to/from the extruder..
Re: SUCCESS! How I resolved my MMU2 issues (MK2S -> MK2.5 -> MMU2 upgrade path)
[...] although you do have one already from the MMU1 extruder.
Peter
Given the order in which I upgraded my printer, I've simply installed the wrong hot-end then. I've currently got the MK2S hotend working with the MMU2 (hence some of my issues).
The modified versions are here too.
Thank you Peter.s50!
Just ordered the heatbreak too, I had 1 nice print, but subsequent prints all failed at some point because the filament could not be retracted or pushed back into the extruder due to (I guess) the wide tip.
I'm really interested to see if this solves your issues too. I'm banking on it solving mine... Please report back your success or failures!
Hope this helps, so far the MK2.5 -> MMU2 upgrade is one big frustrating journey.
Also disappointed that the filament sensor is not enabled, big pile of wasted filament already after a small week of trying. Had to cut off 50cm pieces each time because the MMU2 idler grinded the filament when it could not push/pull to/from the extruder..
I've experienced the same thing. Quite surprised that the extruder filament sensor is disabled. The MMU2 pulley gears are forcing too much filament into the extruder (regardless of calibration) and grinding out chunks that cause jams later... link to my posting about that separate issue. This is all very frustrating as I thought a lot of this was beta tested already.
Re: SUCCESS! How I resolved my MMU2 issues (MK2S -> MK2.5 -> MMU2 upgrade path)
Just ordered the heatbreak too, I had 1 nice print, but subsequent prints all failed at some point because the filament could not be retracted or pushed back into the extruder due to (I guess) the wide tip.
I'm really interested to see if this solves your issues too. I'm banking on it solving mine... Please report back your success or failures!
Will do! When I didn’t reply in 1 week from now please remind me.
link to my posting about that separate issue.
What a great find about the misalignment, excellent pictures! Will check mine too, I’m having issues with homing the selector, only fw 1.0.2 is somewhat working now.
Re: SUCCESS! How I resolved my MMU2 issues (MK2S -> MK2.5 -> MMU2 upgrade path)
It's so great to hear that others are having success switching to the MK3 heatbreak as well. It's been a while since I originally posted this topic. I can confirm my MMU2 is still working great for me! I have found a few filament brands that require just a small bump in cooling moves, or one notch up in ramming. Those are trivia and somewhat expected changes compared to before I installed the MK3 heatbreak.
Also, in case anyone is curious, I actually bought my MK3 heatbreak from Printed Solid: https://www.printedsolid.com/products/e3d-mk3-heatbreak
Re: SUCCESS! How I resolved my MMU2 issues (MK2S -> MK2.5 -> MMU2 upgrade path)
Just ordered the heatbreak too, I had 1 nice print, but subsequent prints all failed at some point because the filament could not be retracted or pushed back into the extruder due to (I guess) the wide tip.
Hope this helps, so far the MK2.5 -> MMU2 upgrade is one big frustrating journey.
Also disappointed that the filament sensor is not enabled, big pile of wasted filament already after a small week of trying. Had to cut off 50cm pieces each time because the MMU2 idler grinded the filament when it could not push/pull to/from the extruder..
If you've installed the MK3 heatbreak, by advice is to not give up! Go back to stock settings in Slic3r, with the exception of changing the "Loading Speed at Start" to 19, and the "Loading Speed" to 22. Then try again. I haven't had a single fat tip since I swapped the heatbreak, and really only need to make small tweaks to eliminate the fine hair that can develop at the tip. The shape has been perfect otherwise, every time.
Thanks Eric for sharing your experiences! Have good hope now to get it right.
Also due to the fantastic Prusa announcement about MMU2S which we can order for free soon, finally a reliable filament sensor at the end of the extruder!
Re: SUCCESS! How I resolved my MMU2 issues (MK2S -> MK2.5 -> MMU2 upgrade path)
It's so great to hear that others are having success switching to the MK3 heatbreak as well.
I agree! I'm hoping it helps for me too. I've recently swapped to the correct hot-end (MK3 version for my printer that's gone from MK2/S --> MK2/S MMU1 --> MK2.5 --> MK2.5 MMU2) and have only done single-color prints - but I immediately noticed that the tips weren't fat and appeared to just by the width of the filament (like others are describing). I'm very excited to try the multi-color benchy again and see if my issues are gone.
Also due to the fantastic Prusa announcement about MMU2S which we can order for free soon, finally a reliable filament sensor at the end of the extruder!
I'm really hopeful that this works as expected. It's unfortunate that the laser based sensor was a total bust - but I like that Prusa won't give up and is really trying to find a good solution.
Re: SUCCESS! How I resolved my MMU2 issues (MK2S -> MK2.5 -> MMU2 upgrade path)
Argh.. Got the replacement heat break today, but the old one broke from the heater block when I tried to disassemble it. Also the nozzle refuses to get removed and is welded onto the heater block too.
While I ordered a spare nozzle, I don't have a spare heater block.. So now have to source a new heater block to get my printer functional again 😥
Yikes, that sucks! I went through the normal process you'd follow for removing the nozzle first. You have to heat the nozzle up in order to be able to easily unscrew it. Neither the heatbreak nor the nozzle would budge until I did this.
I then let everything cool down before removing the hot end and then removing the heatbreak. With the nozzle already out, the heatbreak was actually really easy to remove.
I know this doesn't help you specifically, since your past that option. But maybe it will help others?
Re: SUCCESS! How I resolved my MMU2 issues (MK2S -> MK2.5 -> MMU2 upgrade path)
Yes, should have read the manual.. 😉
I started to disassemble and had the heater cartridge already out.
Re: SUCCESS! How I resolved my MMU2 issues (MK2S -> MK2.5 -> MMU2 upgrade path)
Oh no! What a shame! I'm sorry to hear that. It's surprising that the filament gets everywhere inside the threads and acts like glue!
Good luck with the repair... 😥
I've just installed the MK3 version of the hot end and am trying the Benchy print again. It's already skipped a layer and I seem to be having the same issues already 🙁
So, the key thing that the MK3 heatbreak did for me was to prevent the possibility of tips that were too thick. The smaller diameter of the MK3 heatbreak is what accommodates this. Despite tweaking every possible setting in Slic3r, the tips of my filament were just too large before. This would cause an unload jam.
After the MK3 heatbreak was installed, I no longer get the unload jams. But, I did still have to make some minor tweaks to the ramming settings for certain brands of filament. This was just to fine tune the stringing that would occur at the tip.
Can you describe how your prints are failing? Is it on load? On unload? Have you gone back to stock MMU2 Slic3r profiles after the new heatbreak? Have you calibrated your bowden tube lengths for each filament position? Have you ensured a low-friction path from the spool to the MMU2 for each filament?
Re: SUCCESS! How I resolved my MMU2 issues (MK2S -> MK2.5 -> MMU2 upgrade path)
The smaller diameter of the MK3 heatbreak is what accommodates this.
The later Mk2, MMU1 and Mk3 printers have the same heat break which has a partly larger bore than the earlier Mk2 printers. The bore from the top is 2.1mm and from the bottom 2mm as opposed to 2mm in both directions in the original E3D heat breaks.
Peter
Please note: I do not have any affiliation with Prusa Research. Any advices given are offered in good faith. It is your responsibility to ensure that by following my advice you do not suffer or cause injury, damage…
Re: SUCCESS! How I resolved my MMU2 issues (MK2S -> MK2.5 -> MMU2 upgrade path)
The smaller diameter of the MK3 heatbreak is what accommodates this.
The later Mk2, MMU1 and Mk3 printers have the same heat sink which has a partly larger bore than the earlier Mk2 printers. The bore from the top is 2.1mm and from the bottom 2mm as opposed to 2mm in both directions in the original E3D heat breaks.
Peter
Are you referring to the heatsink, or the heatbreak? I'm confused because you used both terms.
My MK2S had a visibly larger bore than the MK3 one I purchased.
Left: MK3 heatbreak with a 2.2mm hole. || Right: MK2S heatbreak with a ~2.6mm hole. It was hard to measure with calipers, but you can clearly see that the MK2S heatbreak is a larger diameter.
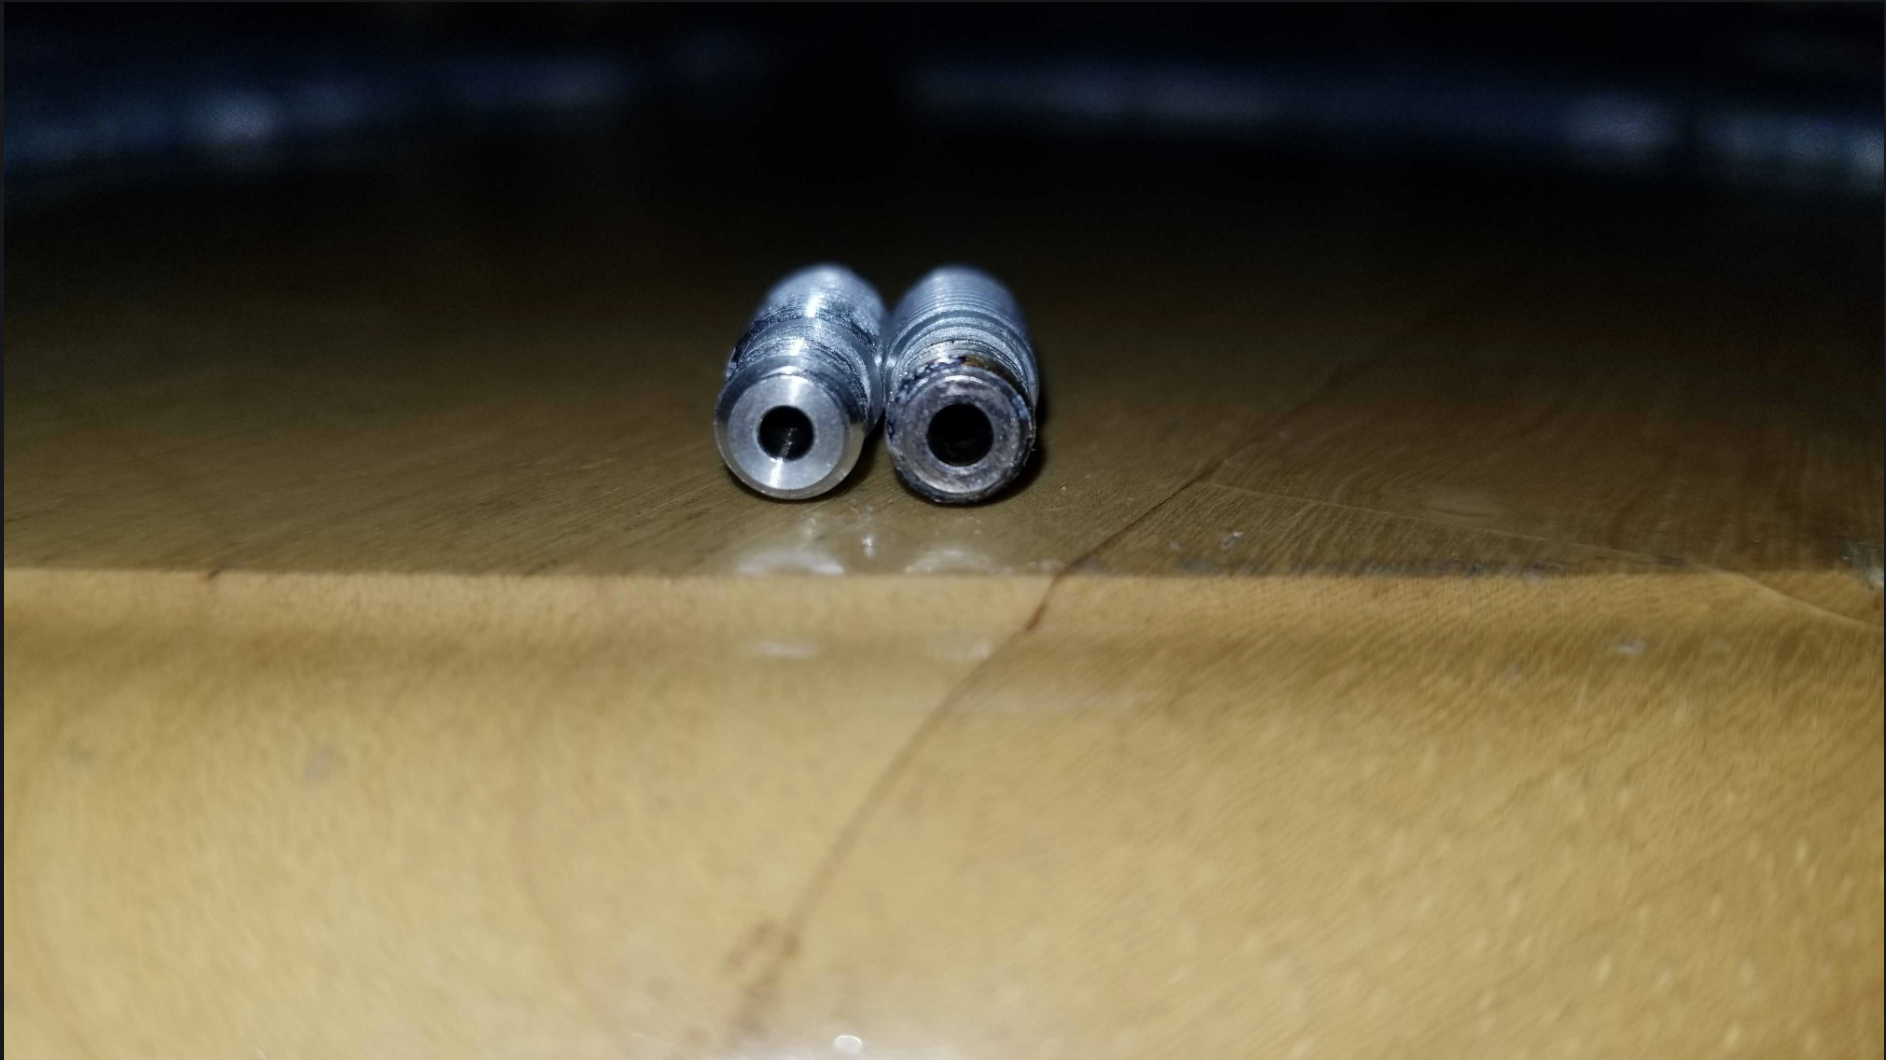
One thing I hadn't considered was whether the bore diameter will increase due to additives in filaments (glow in the dark, carbon fiber, etc). I know nozzles do. Do the heatbreaks though?
Re: SUCCESS! How I resolved my MMU2 issues (MK2S -> MK2.5 -> MMU2 upgrade path)
Are you referring to the heatsink, or the heatbreak? I'm confused because you used both terms.
Sorry, heat sink - now corrected.
Peter
Please note: I do not have any affiliation with Prusa Research. Any advices given are offered in good faith. It is your responsibility to ensure that by following my advice you do not suffer or cause injury, damage…
Re: SUCCESS! How I resolved my MMU2 issues (MK2S -> MK2.5 -> MMU2 upgrade path)
If you look at E3D technical drawing: https://e3d-online.dozuki.com/Document/46/.pdf you will note that the hole is 2mm in diameter.
Because this hole is drilled from both ends, there is the possibility that where they meet (just above the 2.95mm undercut) there is slight eccentricity, causing a step at that point. The step caused load fails with MMU1.
PR staff went to E3D and worked out that if the top hole were 2.1mm, there would not be any burring and the consistent step with an angle allowed proper loading.
Peter
Yep, I see what you're saying. I remember reading that PR had to work with E3D on this. Makes sense.
I think we are still concluding that acquiring an MK3 heatbreak helps though, correct?
Re: SUCCESS! How I resolved my MMU2 issues (MK2S -> MK2.5 -> MMU2 upgrade path)
I think we are still concluding that acquiring an MK3 heatbreak helps though, correct?
Basically, yes.
Although I had just as good results with the stock heat break after burnishing the inside with the flutes of a 1.8mm drill bit. This was during the MMU1 beta-testing, on 2 printers, before the modification was implemented. It really is simply down to luck with regards to the concentricity of the two holes 🙁
Peter
Please note: I do not have any affiliation with Prusa Research. Any advices given are offered in good faith. It is your responsibility to ensure that by following my advice you do not suffer or cause injury, damage…
Re: SUCCESS! How I resolved my MMU2 issues (MK2S -> MK2.5 -> MMU2 upgrade path)
@eric.s20: finally got my printer back up and running. Ordered replacement heater block (at a local shop), got the wrong one, exchanged for the correct one.
After some recalibration things are looking very well now!
I'm back to the default Prusament PLA MMU profile, I only lowered the temp to 200 (I don't use Prusament, but some other brand). Above 200 degrees I get stringing.
I'm testing with 2 colors, one in F1 the other in F5 so after each cycle I can easily inspect the tips. No more fat ends so far, though only 30mins into a 2 hour test print. Will report back later after some more testing.
That's great! FYI, when I was first trying out the MK3 heatbreak I had four different rolls of Prusament and one eSun loaded up. For the Prusament, the only changes I made were to the loading/unloading speed (which I change for all filaments now). "Loading Speed at Start = 19", "Loading Speed = 21".
I use a first layer temperature of 215. And then 210 after that. Almost everything is the stock Slic3r settings for Prusament filament.