Pre-Update question
Hi,
I finally get around to update my MK3 to MMU2S. I have both Prusa kits (MMU2 and MMU2->MMU2S) with printed parts ready.
My question is:
- what extra parts should be printed before disassembling the printer? I have printed the new PCB housing. Anything else?
- What other modifications would be useful to do while the printer is disassembled?
- I have a set of spring washers for the heatbed lying around. Is this still a useful mod after the number of bed calibration points has been increased to 7x7?
- Filament buffer: I am using a IKEA furniture with a depth of 60cm as printer housing and my spools are on a second cabinet on top of the printer. According to the manual, the MMU2S would not fit into my cabinet anymore, let alone the filament spools...
Is it possible to mount the filament buffer vertically to maintain that setup? What parts would have to be printed in order to do that.
Thanks for the help and information
Kind regards
Berthold
--
MK3
RE: Pre-Update question
I'm on my phone so don't have links handy, but
- You might consider a couple of auto rewind spools in the event the buffer doesn't work well for you.
- I did the nyloc bed upgrade replaced the X and Z bearings with Drylin bushings and cleaned and properly lubricated the Y bearings (Drylins were a disaster on the Y axis). I also replaced the Y belt tensioner with a better one.
- The real question is how out of level is your bed. Mine had a 2mm shift from one corner to the opposite. I went with the nyloc modification rather than the springs though since the springs will fail sooner or later.
- If it is the Lack table you are using, go check Prusa'a blog. They just released info and parts to make it work for the MMU. They even did it so you can reuse most (all?) parts from the plain Lack enclosure.
Not asked for, but here are two other suggestions:
- After assembling the extrduer, stop and reconnect it. Then get the printer working and happy again as a MK3S. Specifically make sure you can get through an entire print with the IR sensor turn on and no false run out events. Making sure the IR sensor is working well will save you lots of headaches with the MMU.
- Make sure filament flows from your spool to the MMU as smoothly as possible. Friction/drag is your enemy as it will lead to tool change failures.
RE: Pre-Update question
Look at Replacement IR sensor holder and selector for i3 mk3s mmu2s. It makes both MK3S+MMU2S sensors more reliable which is essential for successful multimaterial prints.
RE: Pre-Update question
I'm on my phone so don't have links handy, but
- You might consider a couple of auto rewind spools in the event the buffer doesn't work well for you.
- I did the nyloc bed upgrade replaced the X and Z bearings with Drylin bushings and cleaned and properly lubricated the Y bearings (Drylins were a disaster on the Y axis). I also replaced the Y belt tensioner with a better one.
- The real question is how out of level is your bed. Mine had a 2mm shift from one corner to the opposite. I went with the nyloc modification rather than the springs though since the springs will fail sooner or later.
- If it is the Lack table you are using, go check Prusa'a blog. They just released info and parts to make it work for the MMU. They even did it so you can reuse most (all?) parts from the plain Lack enclosure.
Not asked for, but here are two other suggestions:
- After assembling the extrduer, stop and reconnect it. Then get the printer working and happy again as a MK3S. Specifically make sure you can get through an entire print with the IR sensor turn on and no false run out events. Making sure the IR sensor is working well will save you lots of headaches with the MMU.
- Make sure filament flows from your spool to the MMU as smoothly as possible. Friction/drag is your enemy as it will lead to tool change failures.
Perfect! Thank you!
I am printing now this spool holder: Auto-Rewind Spool Holder (for MMU)
Another thing that pops up recently on this forum is replacing the smooth idlers with teethed ones. Is it really worth the trouble? I find it counterintuitive to add another index to the drive belts and all I can imagine is that you end up with uneven tension on both belt parts.
--
MK3
RE: Pre-Update question
Look at Replacement IR sensor holder and selector for i3 mk3s mmu2s. It makes both MK3S+MMU2S sensors more reliable which is essential for successful multimaterial prints.
Thanks! I downloaded the parts and will print this prior to disassembly.
Now, concerning the R4 extruder and all those melting problems, I am wondering whether it might be wise to adopt another extruder design to avoid those issues. I also understand that this issue should be addressed by Prusa in the next few weeks. So, maybe it might be a good idea to wait it out for the moment and see what new design they come up with.
For the moment I am happy with how my MK3 works and have no immediate pressing need for MM prints . What do you suggest?
Another question is Y-Belt tensioning. I recall seeing on the old forum a post from Prusa about what to update along the MK3S mode and there was something about a new Y-belt tensioner. I cannot find this post anymore on the new forum though....
--
MK3
RE: Pre-Update question
When I found my extruder melting I didn't have a new extruder on hand so had to reassemble and then print. I did print a whole new (Butterworth) extruder as I intended to go back to the MK3, but then got the MMU working so I've been loath to screw with it. I've put another 500ish hours on it since then and so far there is no impact. I figure I'll just let it go as is until it droops enough to be a problem, then I'll swap.
If you don't mind waiting, go ahead and wait. Remember, however, you'll want to give it some time for others to use to see if they indeed fixed it. Also remember that while that thread is new, this issue was brought up months ago shortly after the 3S became available yet they are only now fixing it.
In other words, I personally wouldn't let it hold me up. I'd install the factory kit (so there isn't any question about a different extruder while troubleshooting the MMU), get the MMU working, and then consider changing the extruder later.
As far as the Y tensioner, there is nothing for it in the S upgrade.
RE: Pre-Update question
FWIW I am just about finished running off a set of Skelestruder parts. No MMU, but am interested to see what it can do for my top print speed in addition to fixing reliability issues with the old laser sensor. (Butterworth design w/bearing still gave me false runouts)
All in about $40 or so for hardware, less if you don't bother with the pancake stepper.
RE: Pre-Update question
I also faced some melting of extruder cover (look at first picture). As quick and easy solution I have printed upgrade extruder cover R4.
It has more material on critical place and is still OK after some over night prints.
 dav
dav  dav
dav  dav
dav
RE: Pre-Update question
Hi again,
After months of delays and other work, I finally get around to perform the upgrade of my printer.
However, as I will be printing a lot of single material prints to support local aid organisations with parts, I will skip the MMU2S part for now and only upgrade my Mk3 to Mk3s. I have the MMU2 and MMU2S upgrade kits at home.
- First question: I assume all parts for the Mk3S are included in those kits, right?
- Eventually, I will add the MMU2S later on. Is there anything I should do already to make my life easier afterwards?
- There is always some confusion about what are the latest parts available... For the extruder, is it R5, or is there something more actual?
Any other tips or hints are very much appreciated, as I have to make the conversion quickly to not halt the printing for too long.
Thanks!
Berthold
--
MK3
RE: Pre-Update question
@berthold-h2
To make life easier, I would just do the whole upgrade now.
If you do the upgrade to the standard MK3S extruder now and later to the MMU2S , you will end up taking the extruder apart to change out the parts that are needed for the MMU2 chimney style idler / sensor holder.
The kit has the parts you need but you will need to print the R5 parts (extruder body and cover). If you don't do the MMU2 upgrade then you need the standard extruder-idler, the adapter and lever.
RE: Pre-Update question
@berthold-h2
To make life easier, I would just do the whole upgrade now.
Thank you for the reply!
The main reason for not doing the whole upgrade now is that I am reading a lot about productivity issues with MMU2S and I don't want to waste time fiddling around with something I don't really need now. I will be printing parts needed for health services and mainly need a working system...
How serious are the flaws of the MMU2S generally speaking?
Thanks again
Berthold
--
MK3
RE: Pre-Update question
@berthold-h2
If you have time critical print jobs, I wouldn't mess with any upgrades. There is always the danger of breaking a wire or part that you don't have. That could mean waiting days or weeks to get printing again.
There is a learning curve with the MMU2.
- On the assembly side, you need to be careful to get the parts correctly aligned and make sure to eliminate any excess friction in the filament path.
- The other issue is getting good filament profiles that result in no stringing and a well formed tip.
- I also de-greased the bearings in the spool holder and oiled them with light weight oil with PTFE. Old Fidget spinner trick.
- Also attention to detail. For example if you insert the short PTFE tubes in the wrong way, you will get lots of jams.
I am at the point where I am getting several thousand tool changes between jams and it has been a long time since I have had a print that completely failed.
This is all with stock parts. The key to getting the MMU2 to work is patience and time.
This is my latest print. I did both of them at the same time as a stress test.
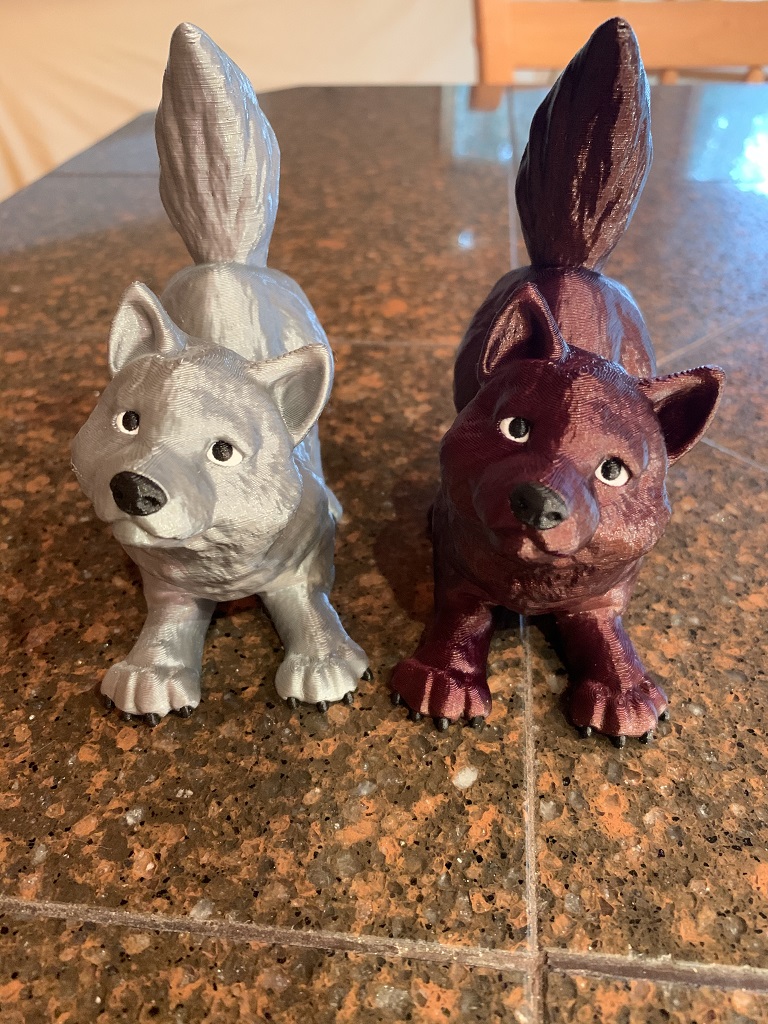
Wolfie! Multimaterial Wolf cub model by Loubie3D
RE: Pre-Update question
@bruce-p4
OK. That is good to know and gives me some incentive to go for it at a later date. For the MK3S upgrade, after almost 1,5 years of printing with my original MK3, I would have to do some maintanance. The spiral wrap is byting into my wires and I have to change it for the soft fabric version. For PETG, things are fine, but some other materials would benefit from better cooling and the newer extruder design.The belts could be a bit tighter etc.
In short, I think the maintanance run could be used to update to a smoother running MK3S but rather not to a MMU2S that would draw attention away from productivity for the moment. In any case, I just printed a spare set of X-axis parts and have a spare extruder part as well. I got some spare thermal probes as well. So hopefully everything goes smoothely.
Thanks again for the advice
Berthold
--
MK3
RE: Pre-Update question
@berthold-h2
You may want to print the new electronics box (R3) with cable clamps if you don't have it.
Makes securing the cables a lot easier than the original design.