Matterhacker Build settings
I'm starting a thread to capture my experience dialing in my MMU2. My focus is on dialing in my Matterhackers Build PLA, primarily because I bought a bunch of colors and I'm a bit invested. It's Matterhackers $20/kg version. All the rolls are fresh, newly bought, stored sealed with desiccant.
I started out with White/Brown with the pre-sliced GCode. Too hot, lots of stringing, jams, skipped layers.
I tried cooling it down to 205, 195, 190. At 190, I had bad layer adhesion and couldn't do much. At 195 I still had issues with strings (failed unload, failed load, and [the worst] successful loads where a string catches below the Bondtech and a layer gets skipped). I was trying the Ram/unload settings from the Inland PLA thread (80 mm/s unload, 4s ram)
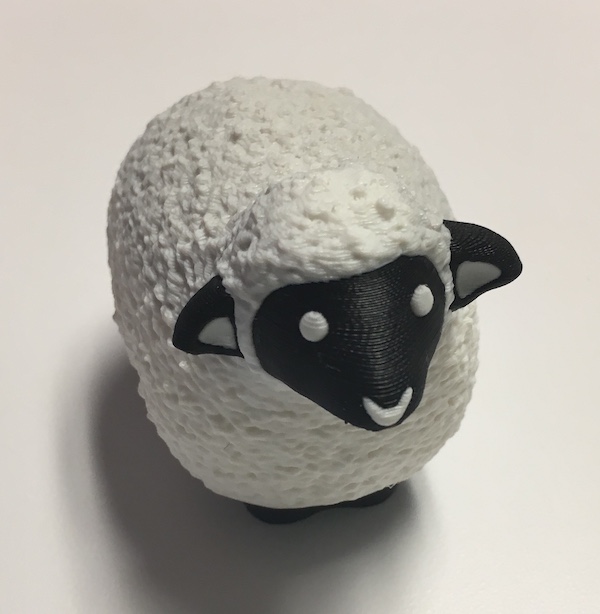
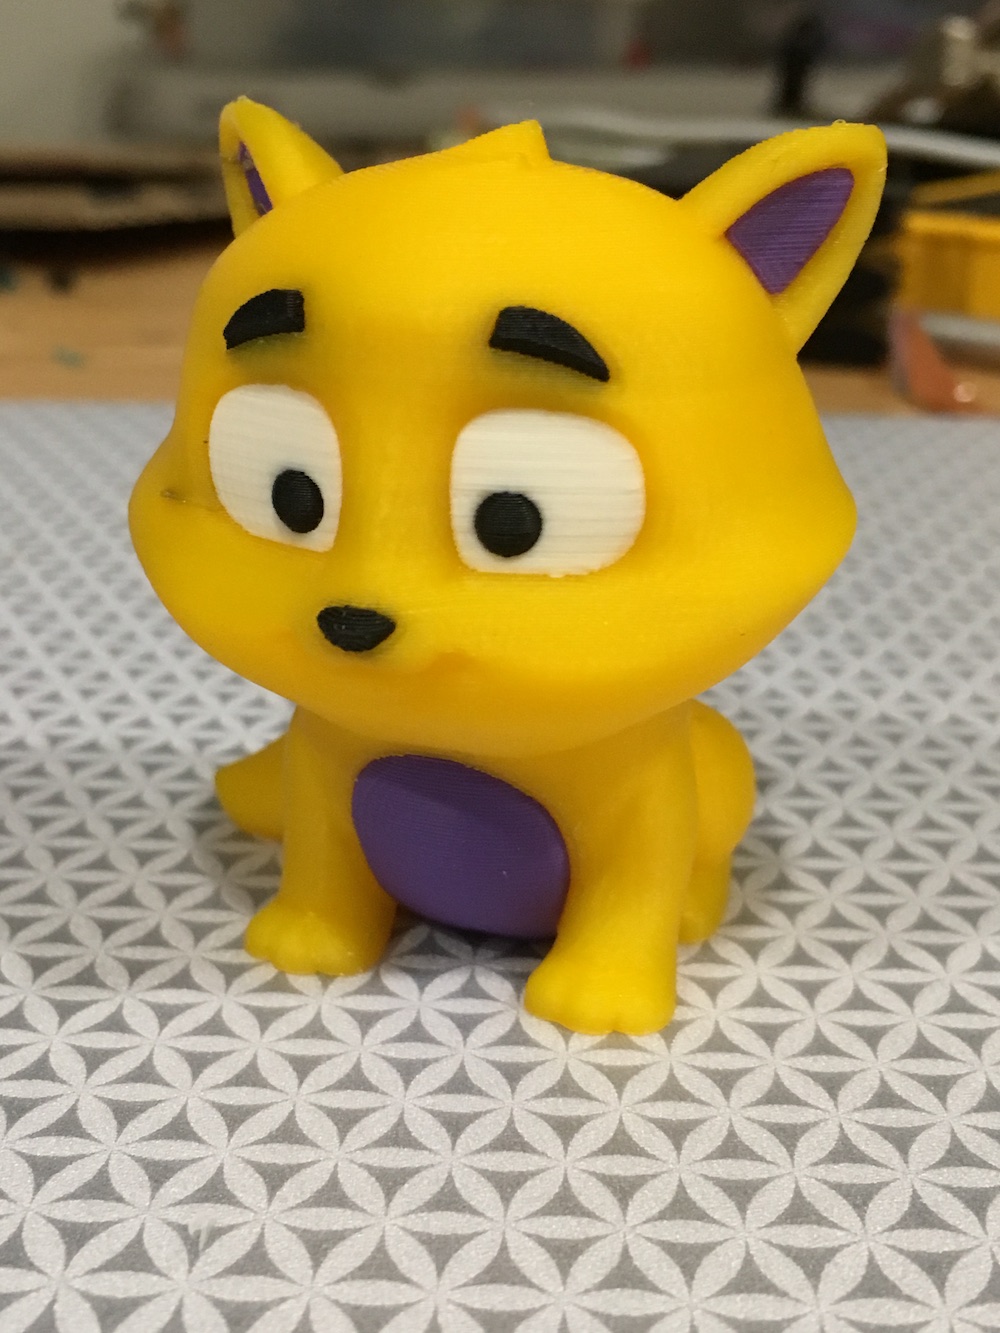
I managed one good 50% sheep so far, because the skipped layer was brown just at the base of the face and not visible.
Today I switched to two rolls of filamentum PLA I had never opened. Ran a two filament test structure at 215, got some stringing and a jam. The box says 190-210C, so I switched to 205 first layer, 200 for the rest, generic PLA Ram/unload settings. Ran my two filament test structure, perfect. The tips are clean, no stringing. Not a single unload/load/skip fail.
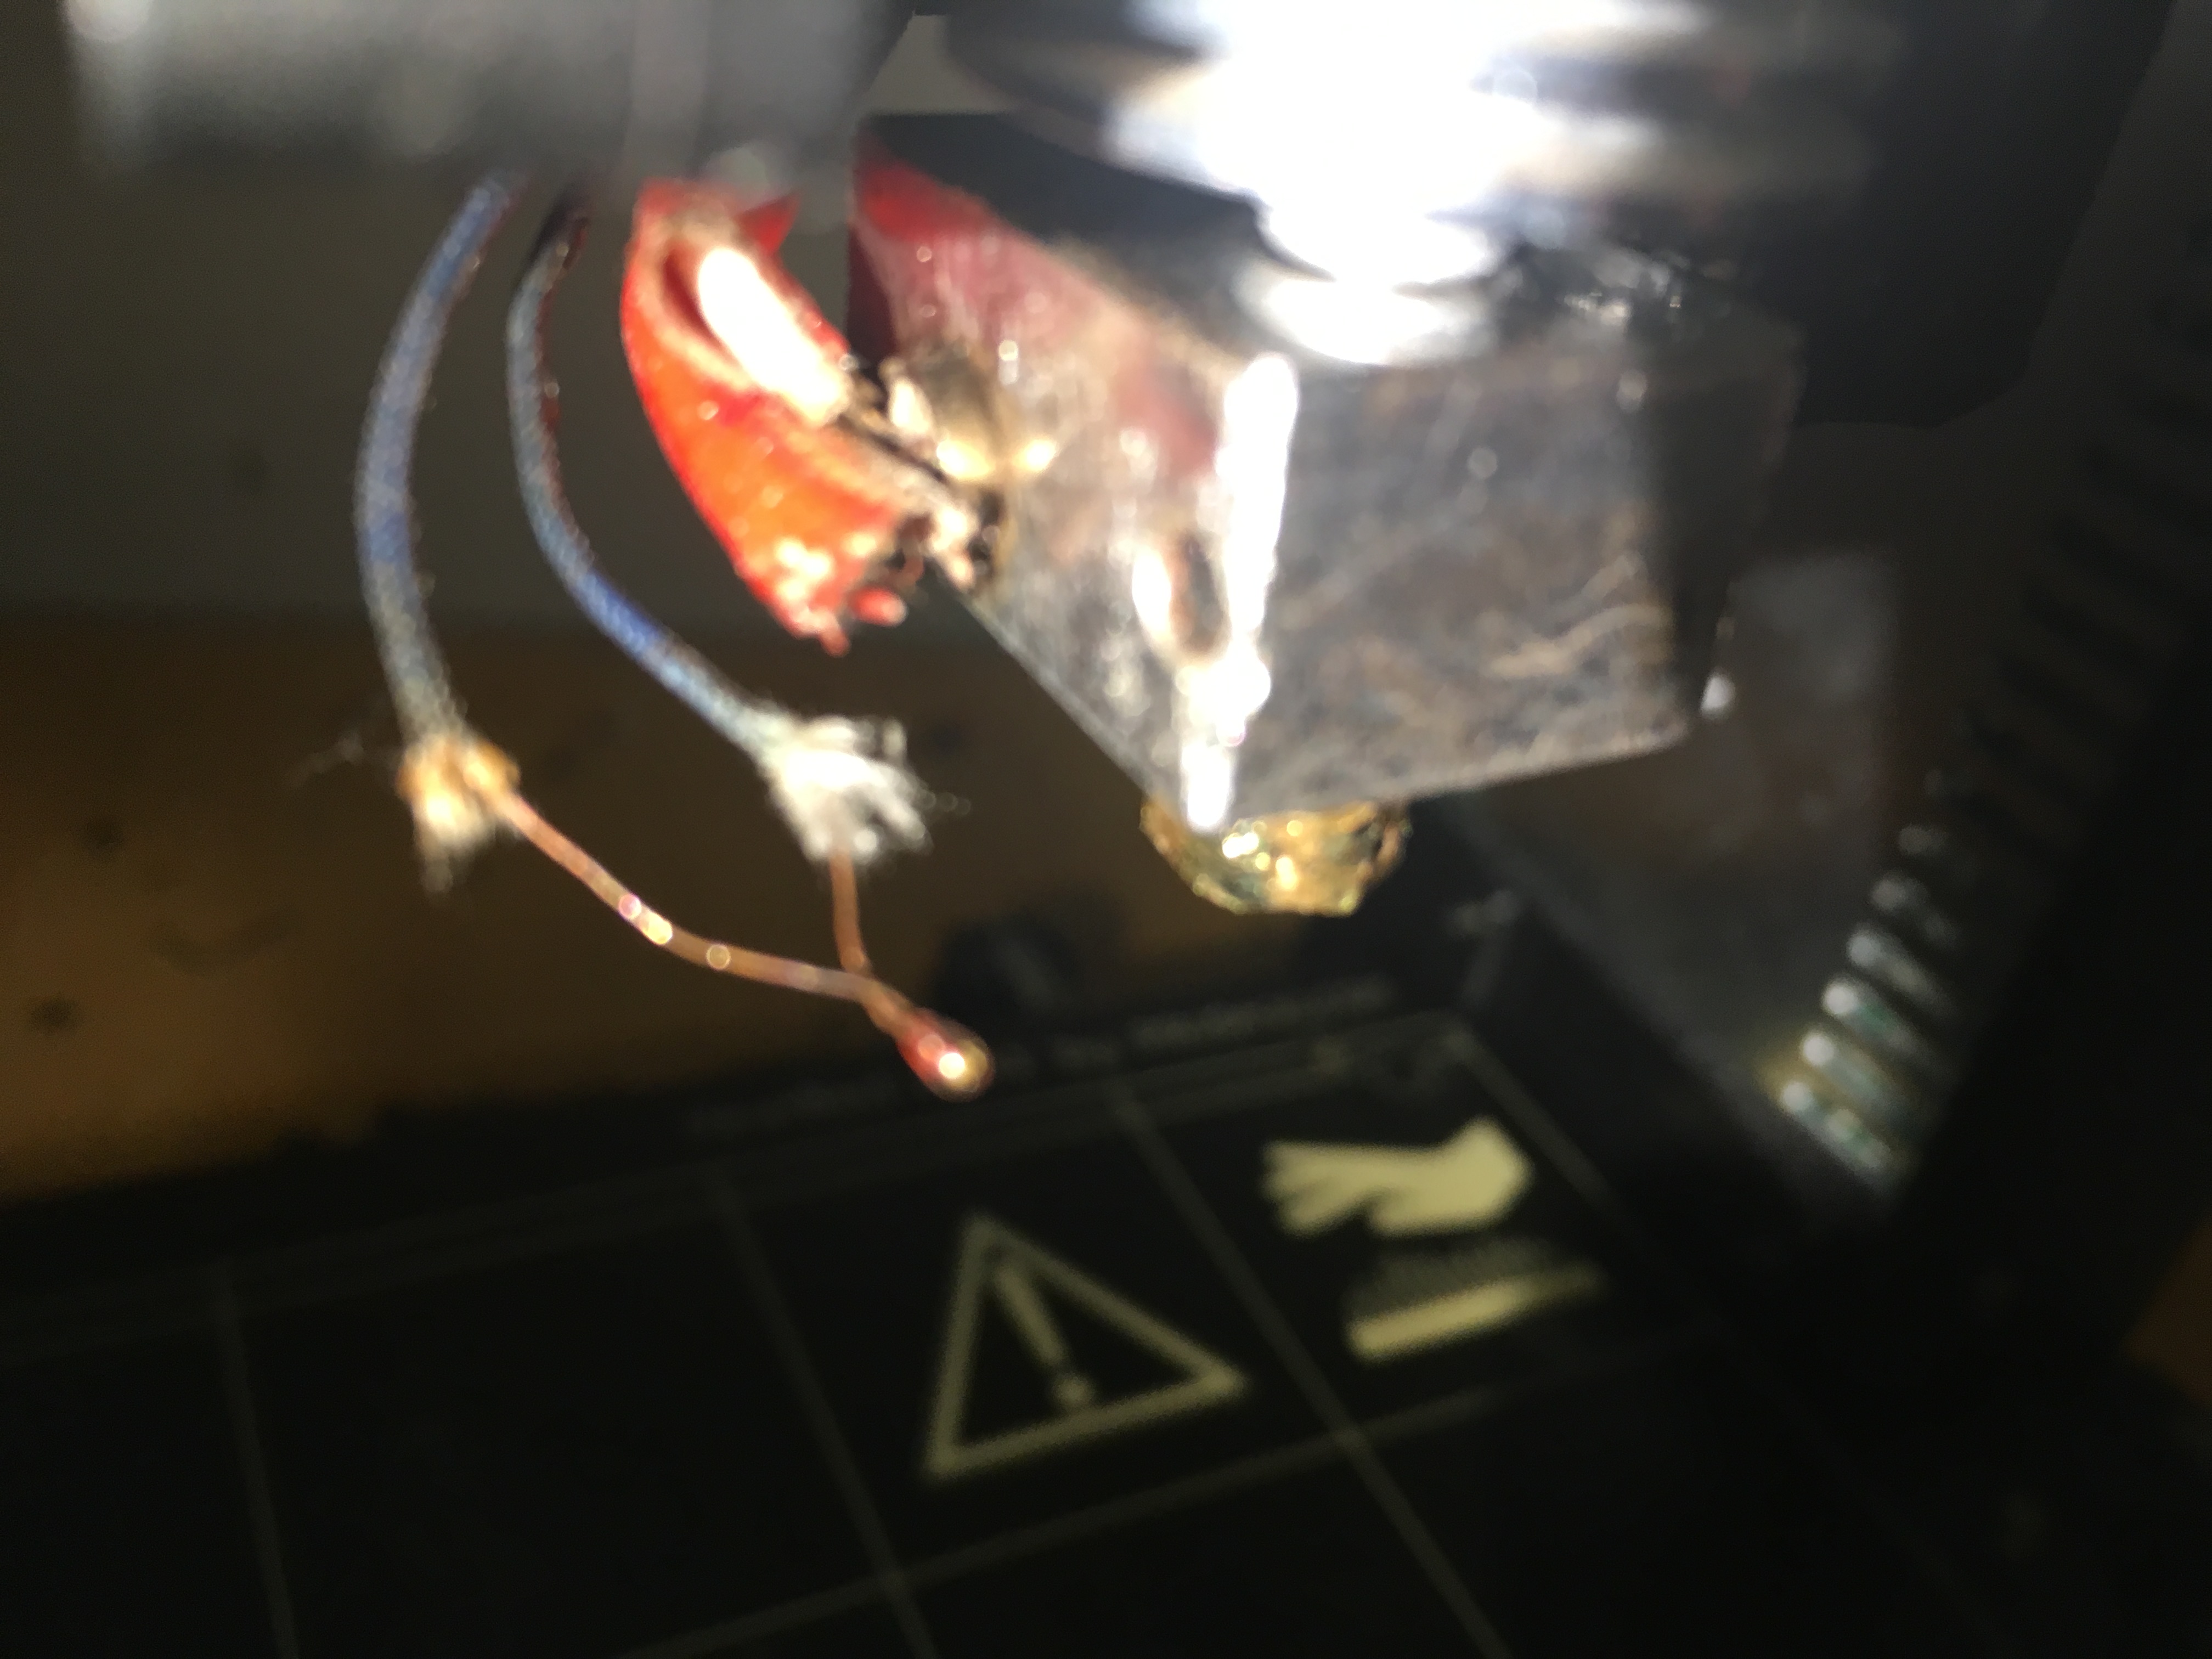
Switched to my brown/white again, test structure jammed in the extruder 4mm up. Picture of the filament tip:

I'm printing a sheep with the filamentum. Not going to be very pretty (sparkly dark grey and sparkly dark brown), but I think it'll at least convince me that with some filament/settings I can be successful. Once that works, I'll start working on MH Build again.
Re: Matterhacker Build settings
Not much progress. I’ve loaded up five filaments now in hopes that the original white/brown were the issue, and I started to print my 5 column test structure. At 200 and 195, with stock filament exchange settings and a bit more aggressive (3.5 ram!p, 2 cooling moves). No good. Every 10 or so filament jams at the extruder. I’m not getting load/unload fails, at least.
The extruder layer skips seem to come either from a single filament string (1” long or so) on the tip that catches and prevents the bondtech from grabbing, or in one case from a blob of fine little threads that had wrapped around the tip.
I’m having trouble staying motivated, as I don’t really have a good idea what to try. I’ve gone through he troubleshooting guide thoroughly.
If I look at my current problems, I see two paths:
1) avoid stringing. Lower temps, try random ram/exchange settings and hope I get lucky.
2) change geometry to better tolerate strings. Replace the tube below the bondtech with a funnel so the string is fed in rather than catching.
Just because, I’m going to change to a brand new 0.4 nozzle to remove that from the equation.
Re: Matterhacker Build settings
All right, enough whining.
I switched nozzles and I'm hopeful that will help. Walking through the procedure, I realized I'm using the original 0.4mm nozzle I built the mk3 with 9 months ago. I mostly print PETG. The nozzle works fine, but who knows what 250C gunk is built up in there affecting the shape of my unloaded tip.
I'm doing another 5 filament test with the new nozzle. This time, I am being very methodical. I'm watching every exchange, and taking a picture of the tip of the filament after every unload. No issues so far, 3 layers/15 exchanges in.
Not quite true: one unload on blue had an unreasonably long tip:

That strikes me as something that would have likely jammed next load. I snipped it off so I could keep going (giving up the opportunity to see if it would have loaded!). All other tips have seemed fine, and no load/unload/extruder jams yet.
Fingers crossed. I need a win here!
Re: Matterhacker Build settings
Progress. I've got a new technique, and some new info.
Technique (credit for the basic idea to to khalil.n):
- Load up 5 filaments you are trying to dial in
- Pick a slicer setting (temperature, ramming, load/unload)
- print my 5 filament test structure
-> 5 1x1 cm towers in 5 filamants, link below.
- When the selector gets to filament #4, check filament #1 and #2 tips (take a photo!)
- when the selector finishes #5 and heads back to #1, check filament #3, #4, #5 tip (photo!)
The way to check the filament: When the selector is safely out of the way of the filaments you are interested in, and likely to stay there for 30 seconds, grab the filaments to be checked above the brake push it into the PTFE tube a few cm until it pops out. Do this for all filaments of interest. Take a picture if there is anything interesting. Then pull all the filaments back until the tip just disappears into the MMU2 (so it won't jam the selector). Sounds complicated, but it's actually quite easy and there is plenty of time.
Very quickly, you will get a feel for how each filament is behaving. This was my breakthrough (at least as far as motivation)
When I did this, I found that my blue and brown filaments where consistently the ones most likely to have long strings (this was with my 195C, somewhat aggressive unload settings). The other filaments tended to have very well formed tips. The big thing for me was that multiple filaments from the same vendor/same type may require different settings.
Or, it is just random luck that blue/brown had
Don't know if it will be consistent through the spool, but it may be that I have to simply avoid certain colors until I figure things out. Working on a sheep with "good" filament now.
Test structure:
https://www.thingiverse.com/thing:3120233

technique examples:


Re: Matterhacker Build settings
Technique (credit for the basic idea to to khalil.n):
- Load up 5 filaments you are trying to dial in
- Pick a slicer setting (temperature, ramming, load/unload)
- print my 5 filament test structure
-> 5 1x1 cm towers in 5 filamants, link below.
- When the selector gets to filament #4, check filament #1 and #2 tips (take a photo!)
- when the selector finishes #5 and heads back to #1, check filament #3, #4, #5 tip (photo!)
You like that huh. 
It wasnt a technique I had seen being mentioned by any1 else. Being able to check the tips while another filament is printing really speeds up tip evaluation. I havent been able to achieve much better tips however. I think its going to take some slic3r and firmware tweaks to really move us farther.
Prusa MK3 > MK4s
Prusa MK2.5 kit > MK3 > MK3s > MK4s
Prusa SL1 3D printer + Curing and Washing Machine (day1 order)
Taz6 - taken apart for space
CR10s4 - upgrading
Delta 3ku - dont use
Re: Matterhacker Build settings
You like that huh.
It wasnt a technique I had seen being mentioned by any1 else. Being able to check the tips while another filament is printing really speeds up tip evaluation. I havent been able to achieve much better tips however. I think its going to take some slic3r and firmware tweaks to really move us farther.
Yup, brilliant. Not quite up there with this *very cool* filament control (cool mod!, but it has accelerated my tip examination amazingly.
Just made it through 7.4 mm (37 layers, 2 exchanges per layer) before my red jammed in the extruder. New record! Almost finished one test structure! Sigh.
Re: Matterhacker Build settings
I think its going to take some firmware tweaks to really move us farther.
Yes, experimenting right now with some firmware tweaks. Turned off interpolation and enabled 1/1 stepping. Good result so far 🙂
That is in addition to the MMU firmware change I made a while ago.
Peter
Please note: I do not have any affiliation with Prusa Research. Any advices given are offered in good faith. It is your responsibility to ensure that by following my advice you do not suffer or cause injury, damage…
Re: Matterhacker Build settings
Success!
Two brand new spools of Inland PLA from Amazon. Not a single load/unload fail. One skipped white layer way down under the belly, but still amazing for the first print with new filament, no dialing-in yet.
Settings:
- 205 first layer, 200C other layers
- Generic PLA settings for all load/unload/RAM
- post-processed to drop to 195 just during RAM
Nothing magic about these settings, I just happened to have a full size sheep sliced with those settings from my Matterhackers Build work.
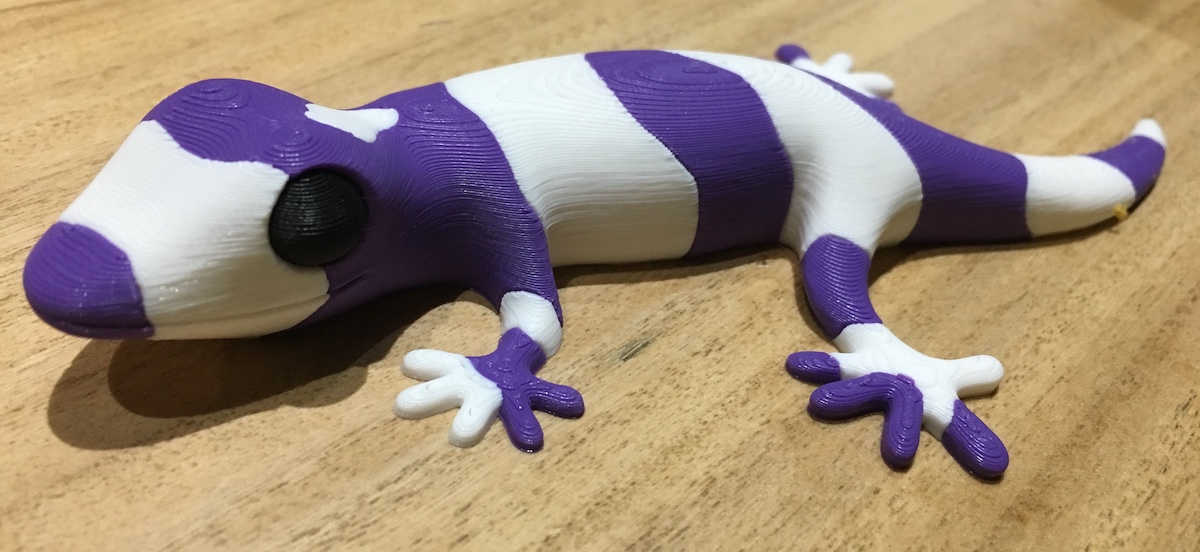
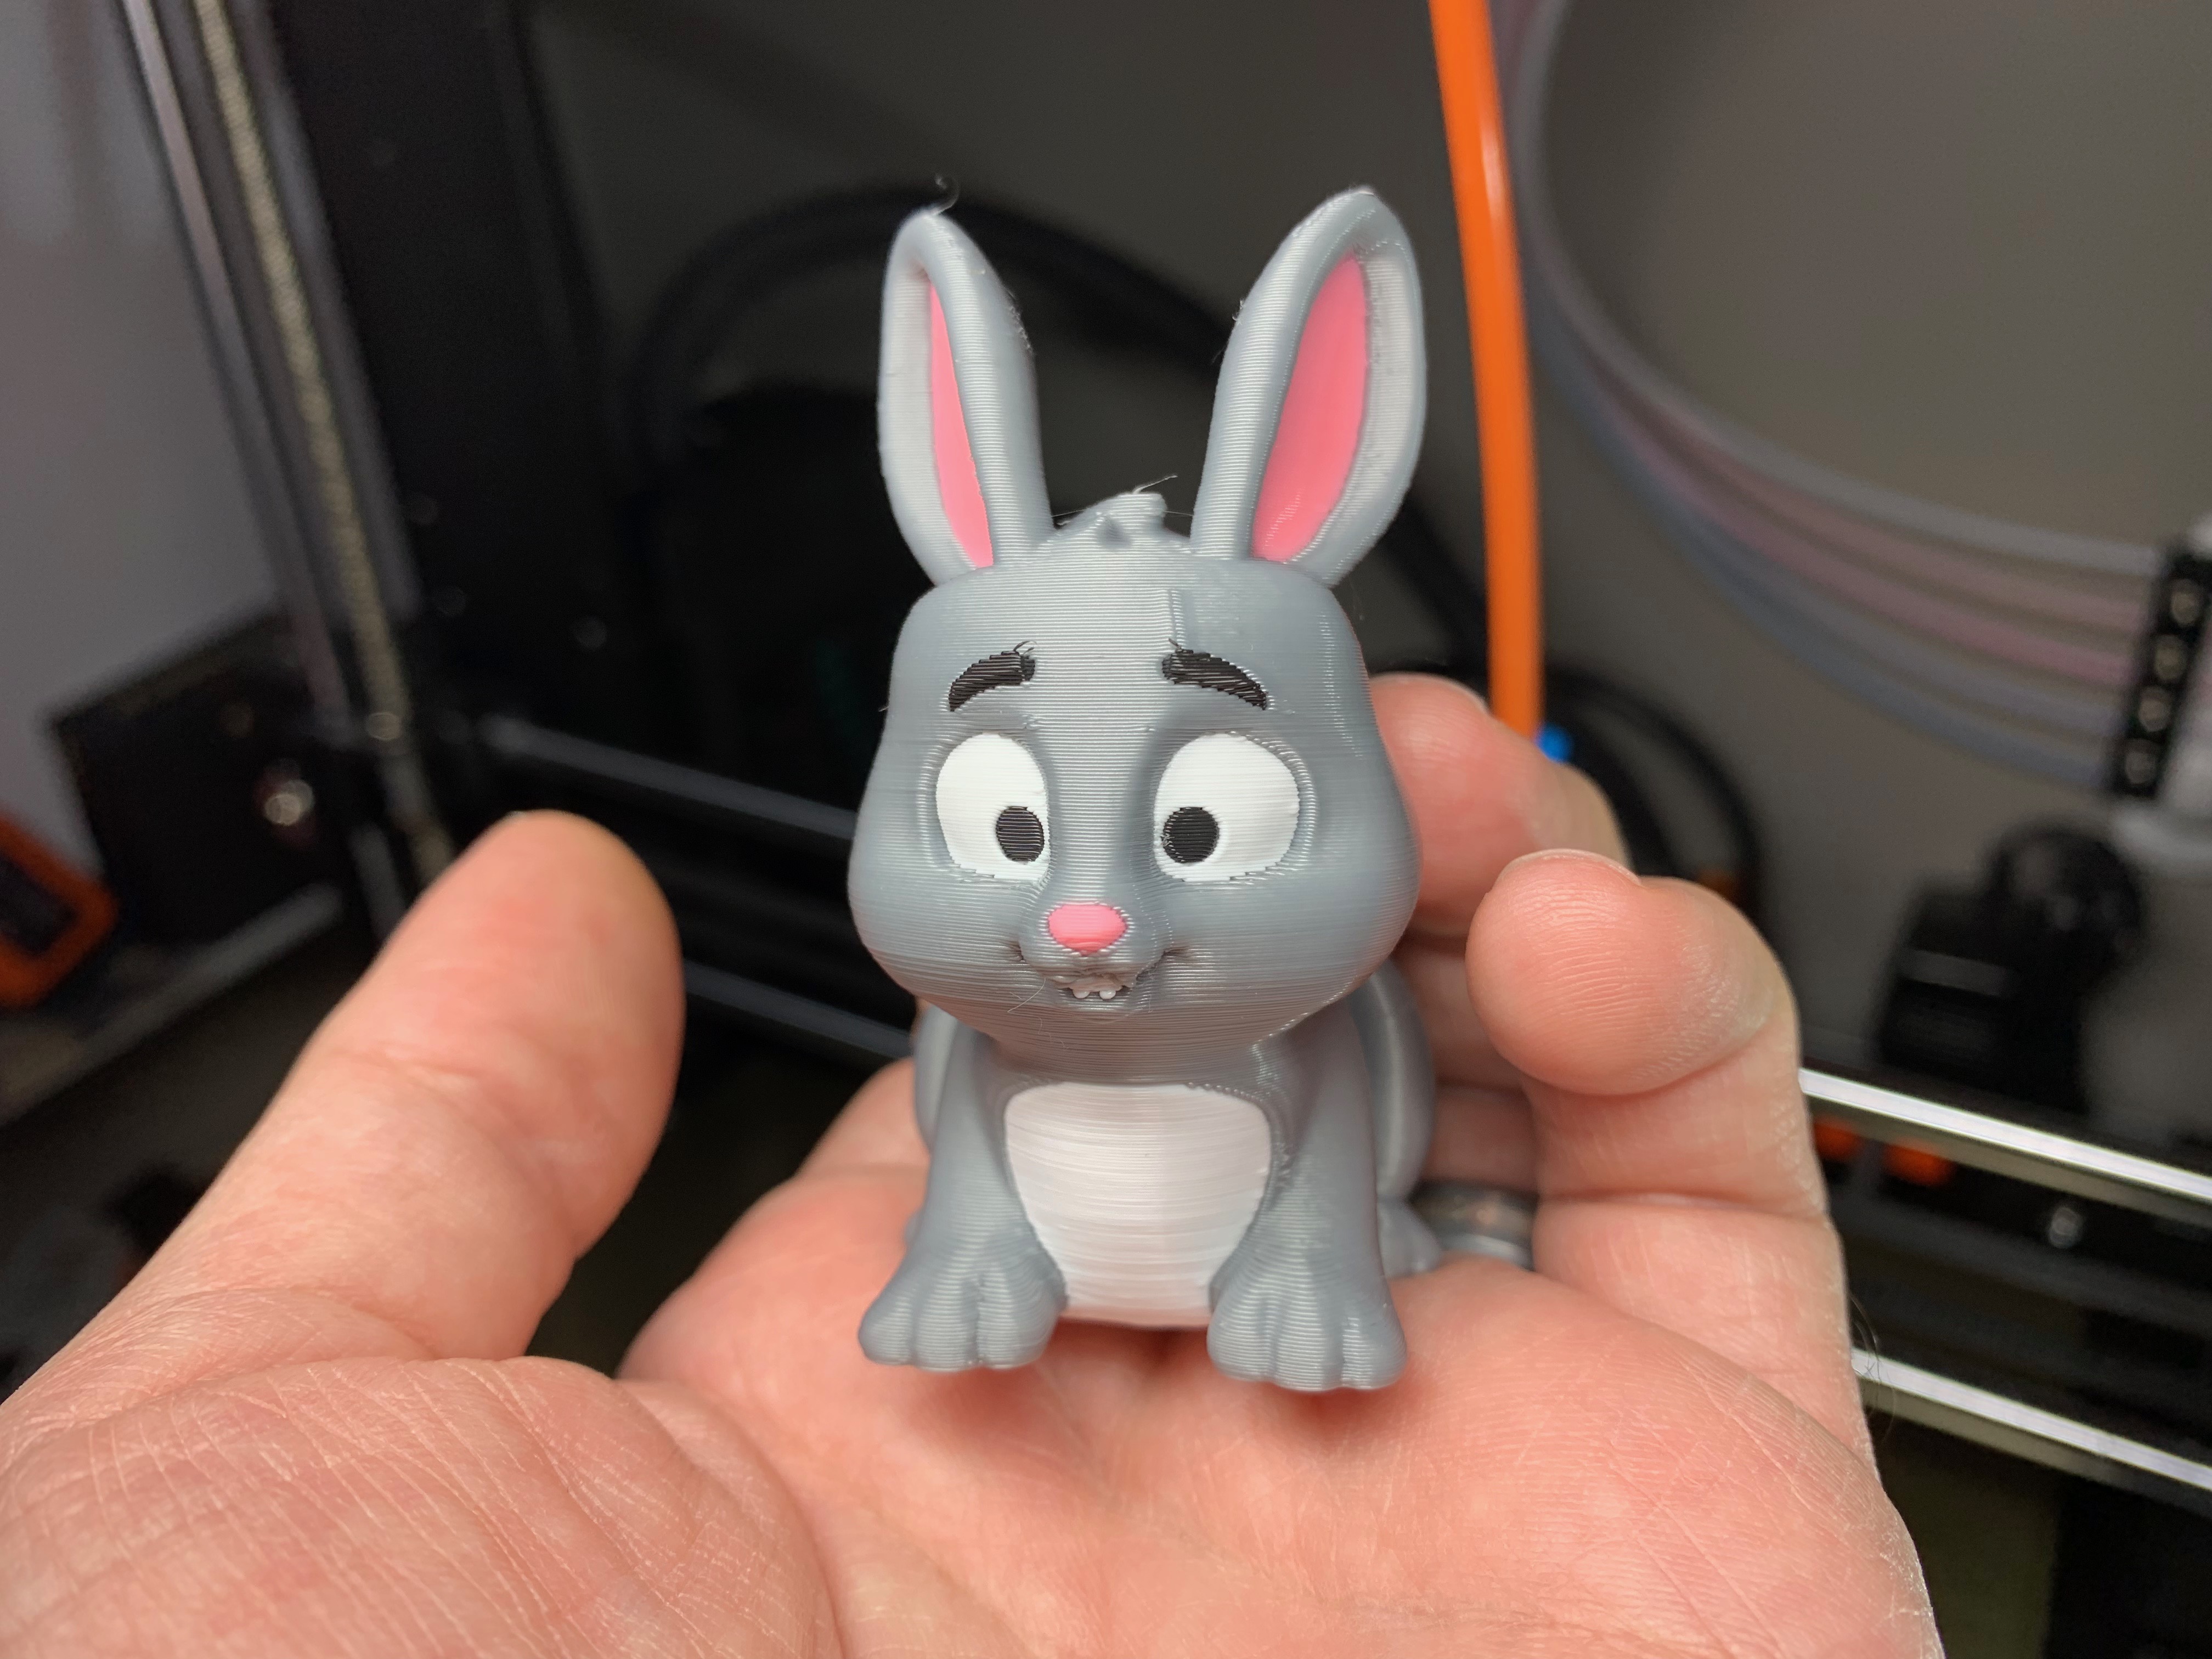
I'm starting to become convinced that my Matterhackers Build is brittle crap. I've got a bunch of spools of inland on order now (arriving today! Amazon same day is amazing). Hoping to print a lizard tonight.
Re: Matterhacker Build settings
Decided to expand my palette to purple (Inland PLA) and red (Inland PLA+). Started with these settings:
- 205 first layer, 200C other layers
- Generic PLA settings for all load/unload/RAM
- post-processed to drop to 195 just during RAM (stabilize at 195).
This did not go well:
The problems all seemed to come from red strings, really long, sometimes the full length of the orange PTFE! Pretty impressive, actually. The red was PLA+, with a lower recommended print temp. Purple PLA seemed to be fine. So I tried purple/white/black, all Inland PLA. I also switched settings a bit:
- 205 first layer, 200C other layers
- Generic PLA load/unload except 4 second ram, and 140 mm/s starting unload speed.
- post-processed with the new "no wait" that basically cuts power completely to the nozzle and then rams
[#> cool_ram.py -nw -i input.gcode ## defaults to 180C floor]
Gorgeous. Not a single load/unload/skipped layer. Filament tips looked great.
Trying it again with red PLA+ back in the mix with the same settings. Halfway through, no issues. The red tips look like this:
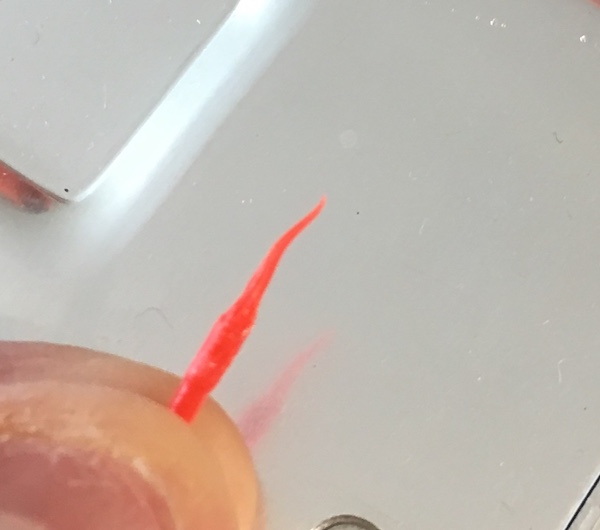
Not perfect, but relatively short, relatively stiff, and 'centered'. Basically the tip looks like it is of an acceptable shape to pull cleanly back during unload, and make it through all the danger zones on reload. At least so far (halfway through the print, no jams or skips)
Re: Matterhacker Build settings
- 205 first layer, 200C other layers
- Generic PLA load/unload except 4 second ram, and 140 mm/s starting unload speed.
- post-processed with the new "no wait" that basically cuts power completely to the nozzle and then rams
Sorry for my ignorance, but what do you mean by "Post-Processed"? Does this mean you have edited the G-code after slicing?
Yes. I've got a script that takes Prusa Slic3r output and modifies it to drop the temperature during ram.
See this thread: ram cooling script
Re: Matterhacker Build settings
Yes. I've got a script that takes Prusa Slic3r output and modifies it to drop the temperature during ram.
See this thread: ram cooling script
Thanks, while I was waiting to see what you said, I tweaked my Hatchbox PLA settings. I was almost there with my setup, but kept getting really tiny strings that would eventually bind things up. Funny thing was that I wouldn't always get them. Just when I thought I had things setup well, and not getting any strings, one would show up! And that usually happened about 2 hours into a print, and then I would have to fix it. The only thing I hadn't tried was increasing the Ramming Settings to 4 seconds, I had left it at 2.5. When I upped it to 4 seconds I got some decent tips, and after 30 minutes of printing your test tower I had consistent tips (shown in photo).
Another thing I changed before reading your post was the Cooling Tube Position, and the Cooling Tube Length settings in the Printer Settings/Single Extruder MM Setup. It was set at 30mm for Tube Position, and 10mm for Tube Length. If I understand that correctly the Tube Position is half way from the tip of the hot end to the middle of the cooling tube? I measure my MK3 and the middle of the cooling section (ribbed part of the VG extruder) was 40mm! And the length of the cooling section is 30mm! After I changed the values to match what was on my machine I started to see way better tips. I'm assuming that the RAM sequence is greatly affected by these values, and would subsequently effect the tips of the filament.
I can't wait for some more updates from Prusa with regards to firmware, and a guid as to getting better tips. I'm not knocking Prusa, but I would have thought that a lot of this would have been fixed during beta testing. But then again, maybe they are working on it, but wanted to get the MMU's out to those of us where were waiting. Guess it's a double edged sword, delay release in order to fix everything found in beta testing, and have people upset because of the delay. Or release the MMU, and have everyone upset because it's not plug-n-play. 😯
Any how, while I've been writing this message I've been testing 5 more different brands of PLA, and I'm happy to say that so far all the tips look like the ones in the photo. A couple of my Hatchbox PLA tips were a little on the thick side (but no string), so I might have to mess with temperatures a little. I found that lower temperatures with the Hatchbox make thicker tips, so I think I can smooth them out a little with about 5 to 10 degree increase.
Thanks again, because of your post I've not got tips that I feel confident in using. 😀
Re: Matterhacker Build settings
Thanks to you Paul I'm printing again! I can finally do other things instead of printing test prints all day! 😀
I'm currently 10hrs into a 36hr print!
Here are my settings, and not only do they work with the Matterhacker Build PLA, but it also works for my eSun, Hatchbox, and Makergeek PLAs.
Filament Settings:
Extruder First Layer: 215
Other Layers: 210
Loading speed at the start: 19
Loading speed: 22
Unloading speed at the start: 140
Speed of the first cooling move: 2.2
Speed of the last cooling move: 3.4
Ramming/total ramming time: 4 sec
Printer Settings (Single extruder MM setup):
Cooling tube position: 40mm
Cooling tube length: 30mm
All other settings are the Slic3r PE default.
Re: Matterhacker Build settings
You are on the right track. I'll have to look into the cooling tube settings, as well as the "synchronize the MMU2 speed with the Bondtech speed" that I've seen referenced but haven't dug into.
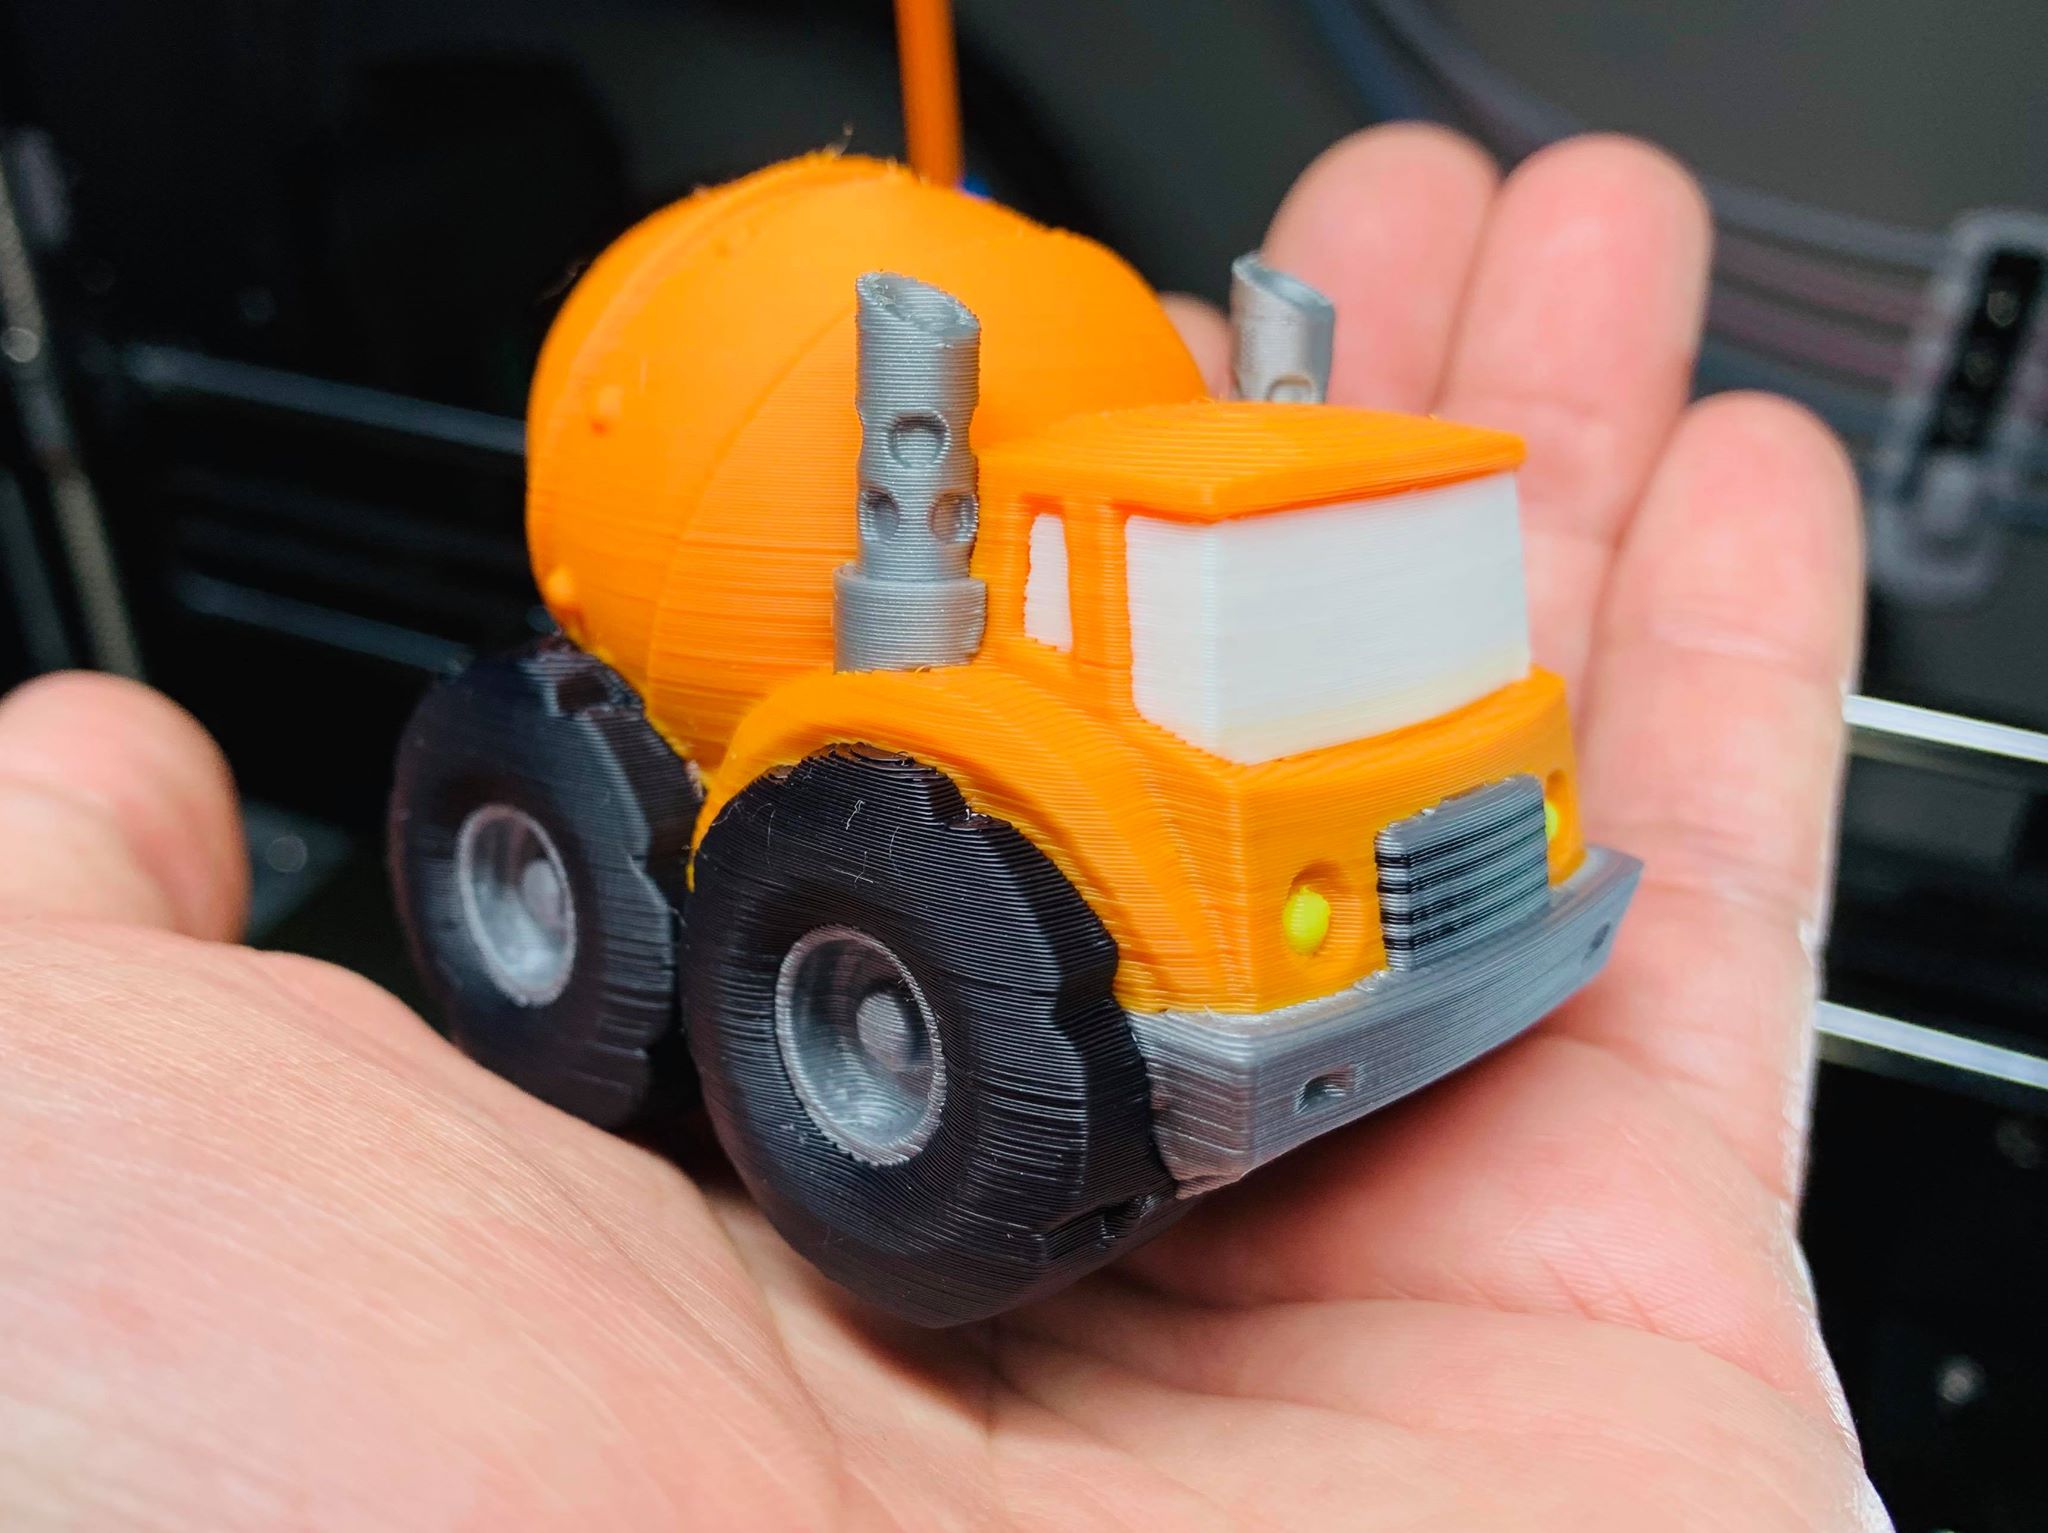
Nice tip. I had my most successful print: 4 color, 12 hour, 0.15mm. No jams, no layer skips.
I did get a few issues (mostly bits of filament ending up where they shouldn't be), but that is more normal mk3/filament issues, not MMU2 issue.
Re: Matterhacker Build settings
Awesome print Paul!
My wife just saw the owl print I was doing. I told her that I was thinking about stopping the print because I had chosen "wipe to infill" and the darker colors were showing through the skin. Here is the conversation that transpired.
She said "Don't stop it I LOVE IT! I think it gives the Owls character, and makes it look like they have feathers."
I said "But I was hoping to print something for the Halloween party this weekend, and I'm not going to have enough time to do that if I have to wait another 25hrs for this print to finish, and not turn out the way I had hoped with regards to the infill showing through."
Her response "You need to get another printer."
I almost fell off my chair! That was a very unexpected response from my wife who never supports me spending money on my hobbies! 😮
Re: Matterhacker Build settings
I just wanted to say thank you Wayne.
Your settings are the ONLY ones that have allowed me to print without jams from start to finish using my eSun or Solutech PLAs.
I could get prints that were nearly flawless with great tips until a single long stringy tip would cause a skipped layer and wreck the whole print.
I ended up integrating your settings into Chris' profile. I did have to lower the temps to 205/200. But it allowed me to get my first print without a single jam. I'd already been messing with the Cooling tube position variable, but I hadn't changed the length before. My plan is tweak the unload speed down until I get reliable results. I'm see slight grinding on certain colors with the super fast unload. I've dropped it to 135 mm/s for my currently running print, we'll see how it goes.
Thanks again!
Re: Matterhacker Build settings
I just wanted to say thank you Wayne.
That's awsome!
I thought I had mentioned it in this thread but it looks like I didn't. I also found another problem with my printer that was contributing to bad tips. I was using a ruby tipped nozzle, and I found out that the top of the ruby is flat. This video will explain, , once I swapped back to the stock brass nozzle, 90% of my problems went away. With there being a flat surface that the filament has to go through inside the nozzle, there is no way I was going to be able to pull a good tip off it. Since replacing the tip, I've gone back to the stock cooling tube settings, 30mm for "Cooling Tube Position" and 10mm for Cooling tube length.
My filament settings are almost stock, except for 19mm/s for "Loading speed at the start", 21mm/s for "Loading Speed", 120mm/s for "Unloading speed at the start", and 3 for "Number of cooling moves". I'm also running about 210 degrees for nozzle temp. I've been using mainly Hatchbox, and eSun PLA, and that's only because the prints required the colors that I had in those brands. But tweeking in those filament values have been so much more easier now that I swapped out the ruby nozzle. My tips have been perfect with a "Ramming Setting" of 2.5. When I noticed stringing I would just adjust the "Unload Speed at Start", or number of cooling moves. Changing those two values would give a noticeable difference in string, but tips have always been constant with regards to shape. When I had the ruby nozzle on, my tips would be to big and would get jammed, I don't think I've had a jamm at all this past week. My two big problems have been the filament being pulled to far back, because of a string that was to long, or filament getting kinked when feeding. I think I've had one or two skipped layers ruining a print this past week, but it wasn't caused by a jam.
As far as the filament kinking problem I'm having. I'm not using stock filament holders, I have my filament above my printer, using the split PTFE tube setup. Some of my spools are coming to the end of the spool, and the filament likes to loop upon itself after ejecting. Then what will happen sometimes is that on the next feed sequence it pulls tight and kinks. I've had filament break, or the extruder just skips because it can't pull the filament. I stabled the PTFE tube that goes to the filament to the wall to see if that makes a difference. If it does (and it seems to be doing the trick), I'll print something up that looks nicer than just staples. I guess you could say I'm beta testing. :geek:
Re: Matterhacker Build settings
Thanks for the follow-up. I think you did mention the Olsson somewhere else I read.
I too have a Olsson in there, and I know it's been the root of most of my problems because of it's flat melt chamber bottom. I'm too stubborn to give up on it though. I want to have my cake and eat it too! I also figure if I can get this setup to work, it should be nearly bulletproof for almost any other better configuration. I know so many people have been having similar issues without success it seems like a more robust profile that is aggressive enough to work on difficult setups is necessary.
That said, I've been able to reduce the unload speed to 135 and I've adjusted the cooling tube length to 25 in an effort to reduce some minor grinding and to get the filament farther away from the hot end whole cooling. I have one of the higher flow Sunon cooling fans coming soon, which should further help this problem. Since most of the issues seems rooted in heat soak up into the heatbreak, which messes with cooling and tip formation as the longer prints are going.
My tips are pretty hideous at times... but they don't string and they at working and working consistently. I think the test for finding the right unload speed is as long as you can hear the pulling a vacuum (whump) sound on unload, it's fast enough. I'm going to continue to keep dropping the speed until I encounter issues.
As far as filament feeding setup... I've gone through my own personal battle over desk space and feeding. After a LOT of adjustments this is what I've ened up with. I'm using a RepBox from RepKord and 4mm x 3mm PTFE to feed into and out of the slack wallet someone posted. So far it's been quite realible. I tried to use 4mm x 2mm PTFE from the bottom of the wallet into the MMU2, but it was a bit too much friction and would cause some issues on initial filament feeds.
Re: Matterhacker Build settings
That's a pretty sweet setup! I like the filament box, thought about getting one myself. Where did you get the acrylic sheets for the filament wallet?
My setup is sort of temporary, I'm seriously thinking about enclosing the top of my printer desk. I made the Prusa Lack enclosure but now the printer doesn't fit with the MMU on top of it. So haven't decided if I want to modify that, or just build a new DIY enclosure on top of the desk my printer is currently sitting on. It might be easier to do that then modify my Lack enclosure. If I add enclosure to the desk, then I'll have to re-engineer a filament setup.
With regards to the ruby nozzle, I figured that I really don't print corse filament, so I'll just use it whenever I do need it. And when I'm printing course material I'll most likely not be using the MMU. Most of the course filaments are expensive, and I wouldn't want to waste it in a purge block. I do like the idea of having one tip installed that works with everything, so I thought I would try a hardened nozzle, and that worked well with the MMU, but for some reason it makes the filament string like crazy! I spent the last two days working with retraction settings and no matter what I did I would get little fuzz balls all over my prints. So, as a test I put the brass nozzle back on and like magic, no fuzz or strings! And in all actuality it only takes a couple of minutes to swap out nozzles, and I've written down my Z height settings for each nozzle, so it's just a quick swap, set Z height, and start printing. I'm really happy with the MMU now that I've figured out the nozzle, and setting issues. I did a 17+hr print yesterday and it printed with no manual intervention! Only issue I had with the print that kinda made me mad was that I didn't have Purge settings right, and I had blue, and yellow streaks in the skin colored face of the print! So I really upped the purge values on any color that goes to white and skin colored filament. I'm currently printing an army of snowmen ornaments for Christmas, and all colors are nice and clean. 😀
Re: Matterhacker Build settings
I really do need to test my Matterhackers filament, considering that's the whole point of this thread! LOL
I've just been so excited about being able to print with multiple colors, and I keep finding things I want to print, and the stuff I've chosen to print all use colors that I only have in Hatchbox and eSun filaments. So once I'm done printing these snowmen I'll do some sample prints using the Matterhackers filaments. 😀